

PZ-1 Manual
Page 3
...flaps, so keep them unfolded for quick reference. The names of Pentax autofocus SLR photography! It's all a photographer could wish for difficulties resulting from the use . PENTA) ------ your Pentax camera. MI N Commercially available lenses and accessories produced by other manufacturers ...exposures of up to our precise specifications and therefore, may cause difficulties with - This camera is an autofocus 35mm SLR camera featuring 18 different Pentax exclusive functions, a power zoom mechanism, and one-touch switching between three programmable modes. Highlights of...
...flaps, so keep them unfolded for quick reference. The names of Pentax autofocus SLR photography! It's all a photographer could wish for difficulties resulting from the use . PENTA) ------ your Pentax camera. MI N Commercially available lenses and accessories produced by other manufacturers ...exposures of up to our precise specifications and therefore, may cause difficulties with - This camera is an autofocus 35mm SLR camera featuring 18 different Pentax exclusive functions, a power zoom mechanism, and one-touch switching between three programmable modes. Highlights of...
PZ-1 Manual
Page 7
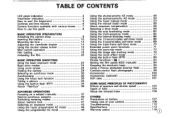
...speed (ISO) manually 94 Basic drive modes 24 Stopping the electronic beep 95 Using zoom lenses 26 Using a Pentax dedicated external flash 96 Holding the camera 29 Contrast-control flash photography 99 Selecting an autofocus mode 30 Accessories 100 Autofocusing 30 Accessories (optional) 100 ...Hard-to-autofocus subjects 40 OTHERS Switching metering modes 41 Precautions on battery 107 About memory lock 41 Taking care of your camera 108 Selecting an exposure mode 42 Troubleshooting 110 Using the hyper programmed AE mode Using the programmed AE mode 44 Specifications ...
...speed (ISO) manually 94 Basic drive modes 24 Stopping the electronic beep 95 Using zoom lenses 26 Using a Pentax dedicated external flash 96 Holding the camera 29 Contrast-control flash photography 99 Selecting an autofocus mode 30 Accessories 100 Autofocusing 30 Accessories (optional) 100 ...Hard-to-autofocus subjects 40 OTHERS Switching metering modes 41 Precautions on battery 107 About memory lock 41 Taking care of your camera 108 Selecting an exposure mode 42 Troubleshooting 110 Using the hyper programmed AE mode Using the programmed AE mode 44 Specifications ...

PZ-1 Manual
Page 9
...; B000 Tv Value (Shutter Speed) 3 2 Av Value (Aperture Value) Overexposure indication Underexposure indication Exposure Compensation O Metering Mode Exposure-Value Memory Lock MULTI(8)-SEGMENT METERING This camera incorporates a high-precision eight-segment TTL metering system. Even the beginner can achieve excellent results with ease. With conventional averaged metering systems, underexposure of the...
...; B000 Tv Value (Shutter Speed) 3 2 Av Value (Aperture Value) Overexposure indication Underexposure indication Exposure Compensation O Metering Mode Exposure-Value Memory Lock MULTI(8)-SEGMENT METERING This camera incorporates a high-precision eight-segment TTL metering system. Even the beginner can achieve excellent results with ease. With conventional averaged metering systems, underexposure of the...

PZ-1 Manual
Page 10
...Selecting the basic exposure mode 105 A n 11 8 564 CO -- ■ -0 CI Hold the aperture-A-lock button in a battery (2CR5) according to the markings ( + , - ) on the camera base. (See page 10.) Remember to re-latch the cover to the [A position. (See page 23.) 11n .s Slide the power-zoom ring forward until you...switch is at [P]. (See page 27.) Set the main switch to the right, until it clicks and [POWER ZOOM] can be seen on the camera body and the lens mount aligned. Positioning the aperture ring 4. Mounting the lens ca il. Open the battery chamber cover and put in and turn...
...Selecting the basic exposure mode 105 A n 11 8 564 CO -- ■ -0 CI Hold the aperture-A-lock button in a battery (2CR5) according to the markings ( + , - ) on the camera base. (See page 10.) Remember to re-latch the cover to the [A position. (See page 23.) 11n .s Slide the power-zoom ring forward until you...switch is at [P]. (See page 27.) Set the main switch to the right, until it clicks and [POWER ZOOM] can be seen on the camera body and the lens mount aligned. Positioning the aperture ring 4. Mounting the lens ca il. Open the battery chamber cover and put in and turn...

PZ-1 Manual
Page 11
O Selecting the autofocus mode 01100 .0 .10,10 a popooOtiocso 0666 6 afioo 0 Open the back cover of the camera, drop in a roll of film, align the end of the film leader with the power zoom ring .1,40,LE Set the focus mode switch to ...
O Selecting the autofocus mode 01100 .0 .10,10 a popooOtiocso 0666 6 afioo 0 Open the back cover of the camera, drop in a roll of film, align the end of the film leader with the power zoom ring .1,40,LE Set the focus mode switch to ...
PZ-1 Manual
Page 12
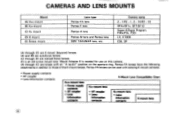
...lens • LensInformation contacts K-mount lens Pentax-FA lenses can be used with an "A (auto)" position on the aperture ring. Pentax-FA lenses have the following attachments in addition to those of the K-mount lenses. Camera name Z - 1/PZ -1, Z - 10/PZ -10 SFXN/SF1N, SF7/SF10 Super...information contacts Kar-mount lens • AF coupler • Lens- CAMERAS AND LENS MOUNTS Mount (A) KAF2-mount (B) KAF-mount IC) KA mount (D) K-mount (E) Screw mount Lens type Pentax-FA lens Pentax-F lens Pentax-A lens Pentax-M lens and Pentax lens SMC TAKUMAR lens, etc. Mount Adapter K is an old screw...
...lens • LensInformation contacts K-mount lens Pentax-FA lenses can be used with an "A (auto)" position on the aperture ring. Pentax-FA lenses have the following attachments in addition to those of the K-mount lenses. Camera name Z - 1/PZ -1, Z - 10/PZ -10 SFXN/SF1N, SF7/SF10 Super...information contacts Kar-mount lens • AF coupler • Lens- CAMERAS AND LENS MOUNTS Mount (A) KAF2-mount (B) KAF-mount IC) KA mount (D) K-mount (E) Screw mount Lens type Pentax-FA lens Pentax-F lens Pentax-A lens Pentax-M lens and Pentax lens SMC TAKUMAR lens, etc. Mount Adapter K is an old screw...
PZ-1 Manual
Page 13
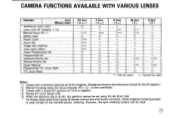
...adapter.) *2. Lenses with a maximum aperture of the multi(81-pattern metering. O When the aperture ring is at [A], the aperture cannot be used . CAMERA FUNCTIONS AVAILABLE WITH VARIOUS LENSES Function . Lenses with AF Adapter 1.7x) Manual focus (FI) *2 (Matte field) Power zoom Zoom clip Image size ... Flash TTL Auto Flash FA lens (KAF2) O - Manual focusing using the Av direct dial. * For lenses made earlier than Pentax-M (lenses without lens information contacts), center weighted metering system is used instead of f/2.8 or brighter. (Details are found in the viewfinder...
...adapter.) *2. Lenses with a maximum aperture of the multi(81-pattern metering. O When the aperture ring is at [A], the aperture cannot be used . CAMERA FUNCTIONS AVAILABLE WITH VARIOUS LENSES Function . Lenses with AF Adapter 1.7x) Manual focus (FI) *2 (Matte field) Power zoom Zoom clip Image size ... Flash TTL Auto Flash FA lens (KAF2) O - Manual focusing using the Av direct dial. * For lenses made earlier than Pentax-M (lenses without lens information contacts), center weighted metering system is used instead of f/2.8 or brighter. (Details are found in the viewfinder...

PZ-1 Manual
Page 14
HOW TO USE THIS GUIDE This guide is divided into the following sections. • Be sure to begin taking pictures with this camera - ADVANCED OPERATIONS IV. details can be found in the following sections to help you want to read sections I . BASIC OPERATION (...PREPARATION) II. BASIC OPERATION (SHOOTING) III. These sections introduce only the basic functions of your camera. SOME BASIC PRINCIPLES OF PHOTOGRAPHY V. OTHERS • If you make best use of this new camera as soon as possible, read "BATTERY PRECAUTIONS" (page 107), "TAKING CARE OF YOUR...
HOW TO USE THIS GUIDE This guide is divided into the following sections. • Be sure to begin taking pictures with this camera - ADVANCED OPERATIONS IV. details can be found in the following sections to help you want to read sections I . BASIC OPERATION (...PREPARATION) II. BASIC OPERATION (SHOOTING) III. These sections introduce only the basic functions of your camera. SOME BASIC PRINCIPLES OF PHOTOGRAPHY V. OTHERS • If you make best use of this new camera as soon as possible, read "BATTERY PRECAUTIONS" (page 107), "TAKING CARE OF YOUR...

PZ-1 Manual
Page 15
INOIllikIVAild) NOI.I.V83d0 3IS (1) ATTACHING THE CAMERA STRAP 0 O I. O BASIC OPERATION (PREPARATION) Attach the enclosed camera strap as shown in this illustration. * To stop the camera from swinging excessively while walking, adjust the strap so the camera hangs.
INOIllikIVAild) NOI.I.V83d0 3IS (1) ATTACHING THE CAMERA STRAP 0 O I. O BASIC OPERATION (PREPARATION) Attach the enclosed camera strap as shown in this illustration. * To stop the camera from swinging excessively while walking, adjust the strap so the camera hangs.

PZ-1 Manual
Page 16
To close the battery cover, apply pressure while moving the release lever back to use the specified lithium battery (2CR5). 2. Insert the battery electrode-end first. Make sure that the battery polarity matches the markings 1+, -1 on the camera base. 3. (2) INSERTING THE BATTERY II 1 co cn 0 2 3 O' 0 Open the battery cover by sliding the release lever in the direction of the arrow. • This camera will not operate without a battery. Be sure to its original position. 10
To close the battery cover, apply pressure while moving the release lever back to use the specified lithium battery (2CR5). 2. Insert the battery electrode-end first. Make sure that the battery polarity matches the markings 1+, -1 on the camera base. 3. (2) INSERTING THE BATTERY II 1 co cn 0 2 3 O' 0 Open the battery cover by sliding the release lever in the direction of the arrow. • This camera will not operate without a battery. Be sure to its original position. 10

PZ-1 Manual
Page 17
..., but the shutter will not operate. Be sure to I • 1 or I a 1 starts blinking, the shutter cannot be displayed if the battery polarity is replaced, all camera settings except the exposure count, m 1 settings, and film speed (ISO) are reset. Set the main switch to insert the battery properly. * Low Battery Warning Towards...
..., but the shutter will not operate. Be sure to I • 1 or I a 1 starts blinking, the shutter cannot be displayed if the battery polarity is replaced, all camera settings except the exposure count, m 1 settings, and film speed (ISO) are reset. Set the main switch to insert the battery properly. * Low Battery Warning Towards...

PZ-1 Manual
Page 18
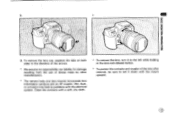
... 0 -4 0 z Ales' 14 0 (3) MOUNTING THE LENS 2 7_7 0 ( 1. Align the red index marks on the camera and lens mount, attach the lens to the right until you are mounting it fully to the camera body, and turn it , ensure that the main switch is at the factory. Remove the cap from the... body mount 0 and the rear lens cap e as shown in the illustration. • The body mount cap protects the camera against scratches and dust at 1 0 1. 2. For storage after purchase, an optional accessory called the "Body Mount Cap K" is available. • To prevent...
... 0 -4 0 z Ales' 14 0 (3) MOUNTING THE LENS 2 7_7 0 ( 1. Align the red index marks on the camera and lens mount, attach the lens to the right until you are mounting it fully to the camera body, and turn it , ensure that the main switch is at the factory. Remove the cap from the... body mount 0 and the rear lens cap e as shown in the illustration. • The body mount cap protects the camera against scratches and dust at 1 0 1. 2. For storage after purchase, an optional accessory called the "Body Mount Cap K" is available. • To prevent...
PZ-1 Manual
Page 19
..., squeeze the tabs on both sides in the lens-lock-release button. * To protect the contacts and coupler of lenses made by other manufacturers. * The camera body and lens mounts incorporate lens information contacts and an AF coupler. Dirt, dust, or corrosion may lead to the left while holding in the...
..., squeeze the tabs on both sides in the lens-lock-release button. * To protect the contacts and coupler of lenses made by other manufacturers. * The camera body and lens mounts incorporate lens information contacts and an AF coupler. Dirt, dust, or corrosion may lead to the left while holding in the...

PZ-1 Manual
Page 20
... the viewfinder. * To attach the Eyecup Fo, slide it upward before adjusting the diopter. • The adjustment range is + 1. 5D to - 2.5D (diopters). 2. Aim the camera at a bright object. After adjustment, reattach the Eyecup by sliding it down the grooves on both sides of the viewfinder. 14 (4) ADJUSTING THE VIEWFINDER DIOPTER 1 2 0 O 0 1.
... the viewfinder. * To attach the Eyecup Fo, slide it upward before adjusting the diopter. • The adjustment range is + 1. 5D to - 2.5D (diopters). 2. Aim the camera at a bright object. After adjustment, reattach the Eyecup by sliding it down the grooves on both sides of the viewfinder. 14 (4) ADJUSTING THE VIEWFINDER DIOPTER 1 2 0 O 0 1.

PZ-1 Manual
Page 21
...Green position (for easy picture taking a picture, hold your breath and gently press the shutter release button down to prevent camera shake. * Before loading a roll of this camera available). Pushing it halfway down (second position) releases the shutter to learn where the first position is. * When the... down (first position) (second position) 15 Pressed halfway Pressed fully Not pressed down down . * The exposure meter stays on for when the camera is not in either Programmed AE or Aperture-Priority AE mode). 0 : OFF position (for about five seconds after the button is held at ...
...Green position (for easy picture taking a picture, hold your breath and gently press the shutter release button down to prevent camera shake. * Before loading a roll of this camera available). Pushing it halfway down (second position) releases the shutter to learn where the first position is. * When the... down (first position) (second position) 15 Pressed halfway Pressed fully Not pressed down down . * The exposure meter stays on for when the camera is not in either Programmed AE or Aperture-Priority AE mode). 0 : OFF position (for about five seconds after the button is held at ...

PZ-1 Manual
Page 22
Ib 4 2. Hold the film cartridge with the protruding end down and slide the top end in first. • Before loading the camera with the shutter curtain while loading film can set a DX-coded film speed within the range ISO 25 to direct sunlight during loading. • If a ... the film speed (ISO) as shown in the direction of the arrow. 3. Take care not to become familiar with its operation. 1. This camera can damage it. To open the camera back and remove the protective card as described on page 94. When DX-coded film is used, the correct film speed is...
Ib 4 2. Hold the film cartridge with the protruding end down and slide the top end in first. • Before loading the camera with the shutter curtain while loading film can set a DX-coded film speed within the range ISO 25 to direct sunlight during loading. • If a ... the film speed (ISO) as shown in the direction of the arrow. 3. Take care not to become familiar with its operation. 1. This camera can damage it. To open the camera back and remove the protective card as described on page 94. When DX-coded film is used, the correct film speed is...

PZ-1 Manual
Page 26
...remove the film. * It takes about 10 seconds to rewind a 24-exposure roll of the roll is reached, the camera automatically rewinds the film. • When automatic rewinding is not specified with a Pentax function [ m ], rewind the film as explained in "Rewinding a Film in descending order. • When the film..." on the LCD panel. • As the film rewinds, the exposure numbers are not using the camera, be sure to set the main switch to O 1. * Before opening the back cover. • Using a Pentax function, you can leave the rewound film leader outside the film cartridge. (See page 89.)
...remove the film. * It takes about 10 seconds to rewind a 24-exposure roll of the roll is reached, the camera automatically rewinds the film. • When automatic rewinding is not specified with a Pentax function [ m ], rewind the film as explained in "Rewinding a Film in descending order. • When the film..." on the LCD panel. • As the film rewinds, the exposure numbers are not using the camera, be sure to set the main switch to O 1. * Before opening the back cover. • Using a Pentax function, you can leave the rewound film leader outside the film cartridge. (See page 89.)

PZ-1 Manual
Page 28
For the uses of other exposure modes, see the respective explanations on page 42. ' In the Programmed AE mode, the camera automatically selects the combination of automatic exposure modes. BASIC OPERATION (SHOOTING) (1) USING THE BASIC EXPOSURE MODE This camera offers an advanced range of aperture and shutter speed, allowing you to take pictures simply by turning the main switch to the green position I a I. II. For easy picture-taking, select the basic Programmed AE mode by pressing the shutter release button. #
For the uses of other exposure modes, see the respective explanations on page 42. ' In the Programmed AE mode, the camera automatically selects the combination of automatic exposure modes. BASIC OPERATION (SHOOTING) (1) USING THE BASIC EXPOSURE MODE This camera offers an advanced range of aperture and shutter speed, allowing you to take pictures simply by turning the main switch to the green position I a I. II. For easy picture-taking, select the basic Programmed AE mode by pressing the shutter release button. #

PZ-1 Manual
Page 32
... you to make the subject appear larger (telephoto) or smaller (wide angle) in the zoom scale window, the wider the angle. o ` Using a Pentax-FA zoom lens with this camera means only the manual zoom function can be used. 0 0 z • • * • I a. Turn the zoom ring to the desired position and press the...
... you to make the subject appear larger (telephoto) or smaller (wide angle) in the zoom scale window, the wider the angle. o ` Using a Pentax-FA zoom lens with this camera means only the manual zoom function can be used. 0 0 z • • * • I a. Turn the zoom ring to the desired position and press the...

PZ-1 Manual
Page 34
In the manual zoom mode, these lenses act like conventional Pentax-F lenses. 1. Turning the power zoom ring to the right makes the subject appear larger (telephoto) and turning it to the left makes the subject appear smaller (wide angle). Pull the power zoom ring toward the camera body until [POWER ZOOM] is changed. Select the desired focal length manually. 1 pa' use-as 0 2 1 co nM re 3s 051 FellIMM-106 , (SNII0OHS) NOI1VS3d0 3IS Using the Manual Zoom Function Pentax-FA zoom lenses can be zoomed as manually if the power zoom ring position is hidden. 2.
In the manual zoom mode, these lenses act like conventional Pentax-F lenses. 1. Turning the power zoom ring to the right makes the subject appear larger (telephoto) and turning it to the left makes the subject appear smaller (wide angle). Pull the power zoom ring toward the camera body until [POWER ZOOM] is changed. Select the desired focal length manually. 1 pa' use-as 0 2 1 co nM re 3s 051 FellIMM-106 , (SNII0OHS) NOI1VS3d0 3IS Using the Manual Zoom Function Pentax-FA zoom lenses can be zoomed as manually if the power zoom ring position is hidden. 2.

