
MZ-S Manual
Page 2
... sure to get the strap caught around their neck. (S) Do not look directly at the sun through the camera, as viewing the sun for buying the Pentax MZ-S camera. WARNING • The electronic circuits inside the camera contain high voltage working parts. Make sure that , if not followed, could result in minor or medium injury...
... sure to get the strap caught around their neck. (S) Do not look directly at the sun through the camera, as viewing the sun for buying the Pentax MZ-S camera. WARNING • The electronic circuits inside the camera contain high voltage working parts. Make sure that , if not followed, could result in minor or medium injury...
MZ-S Manual
Page 3
... repaired. Do not mix battery brands, type or an old battery with a dry soft cloth. • Do not drop the camera or allow it to a Pentax service center for battery leakage, traces of dirt or grease, or corrosion due to prevent the growth of this does not affect the ...picture taken. Store it with good dry air circulation to salinity or gas. Repairs of fungus. PRECAUTIONS FOR YOUR CAMERA Your Pentax camera is not weather, water, or liquid resistant. Handle it in an area where chemicals are not covered under the terms of electrical contact. ...
... repaired. Do not mix battery brands, type or an old battery with a dry soft cloth. • Do not drop the camera or allow it to a Pentax service center for battery leakage, traces of dirt or grease, or corrosion due to prevent the growth of this does not affect the ...picture taken. Store it with good dry air circulation to salinity or gas. Repairs of fungus. PRECAUTIONS FOR YOUR CAMERA Your Pentax camera is not weather, water, or liquid resistant. Handle it in an area where chemicals are not covered under the terms of electrical contact. ...

MZ-S Manual
Page 4
... 14 REWINDING THE FILM 34 16 SETTING THE FILM SPEED(ISO) MANUALLY 36 17 IMPRINTING EXPOSURE DATA 37 18 REPLACING THE BATTERIES 40 REPLACING THE CAMERA'S BATTERIES 40 REPLACING THE DATA BACK'S BATTERY 42 ADJUSTING THE DATA BACK 44 0 CONTENTS FOR SAFE USE OF YOUR... CAMERA PRECAUTIONS FORE YOUR CAMERA PRECAUTIONS FOR BATTERY USAGE NAMES OF WORKING PARTS USING THIS OPERATING MANUAL SET UP THINGS TO DO BEFORE TAKING PICTURES STEP 1 Attaching the Strap STEP 2 ...
... 14 REWINDING THE FILM 34 16 SETTING THE FILM SPEED(ISO) MANUALLY 36 17 IMPRINTING EXPOSURE DATA 37 18 REPLACING THE BATTERIES 40 REPLACING THE CAMERA'S BATTERIES 40 REPLACING THE DATA BACK'S BATTERY 42 ADJUSTING THE DATA BACK 44 0 CONTENTS FOR SAFE USE OF YOUR... CAMERA PRECAUTIONS FORE YOUR CAMERA PRECAUTIONS FOR BATTERY USAGE NAMES OF WORKING PARTS USING THIS OPERATING MANUAL SET UP THINGS TO DO BEFORE TAKING PICTURES STEP 1 Attaching the Strap STEP 2 ...
MZ-S Manual
Page 5
STEP UP ADVANCED OPERATIONS CAMERA OPERATIONS 48 CONSECUTIVE-FRAME DRIVE 48 MULTIPLE EXPOSURES ON A SINGLE FRAME 49 SELF-TIMER MODE 51 AUTO BRACKETING 53 SETTING THE EXPOSURE MODE 56 ABOUT ... THE BUILT-IN FLASH AND EXTERNAL FLASH 97 USING CONTRAST-CONTROL-SYNC FLASH MODE 99 USING SLOW-SPEED SYNC 101 WHEN USING FLASH 103 APPENDIX PENTAX FUNCTIONS 106 SETTING PENTAX FUNCTIONS 108 SETTING A PENTAX FUNCTION 110 ACCESSPORIES (OPTIONAL) 123 TROUBLE SHOOTING 128 SPECIFICATIONS TABLE 132 WARRANYTY POLICY 136
STEP UP ADVANCED OPERATIONS CAMERA OPERATIONS 48 CONSECUTIVE-FRAME DRIVE 48 MULTIPLE EXPOSURES ON A SINGLE FRAME 49 SELF-TIMER MODE 51 AUTO BRACKETING 53 SETTING THE EXPOSURE MODE 56 ABOUT ... THE BUILT-IN FLASH AND EXTERNAL FLASH 97 USING CONTRAST-CONTROL-SYNC FLASH MODE 99 USING SLOW-SPEED SYNC 101 WHEN USING FLASH 103 APPENDIX PENTAX FUNCTIONS 106 SETTING PENTAX FUNCTIONS 108 SETTING A PENTAX FUNCTION 110 ACCESSPORIES (OPTIONAL) 123 TROUBLE SHOOTING 128 SPECIFICATIONS TABLE 132 WARRANYTY POLICY 136
MZ-S Manual
Page 7
...of the following sections. ♦Things to Check This section is before you use the built-in flash. ♦Advanced Operations The camera's features are explained in detail. • Picture-taking Techniques: Consecutive-frame mode, multi- USING THIS OPERATING MANUAL This operating manual ... flash exposure settings, and effective flash range. • Using a Pentax-Dedicated External Flash: Explains the opera- tion for dedicated external flash units and high-speed sync and wireless mode features with the camera set to single-frame mode, programmed AE mode, multi-segment metering ...
...of the following sections. ♦Things to Check This section is before you use the built-in flash. ♦Advanced Operations The camera's features are explained in detail. • Picture-taking Techniques: Consecutive-frame mode, multi- USING THIS OPERATING MANUAL This operating manual ... flash exposure settings, and effective flash range. • Using a Pentax-Dedicated External Flash: Explains the opera- tion for dedicated external flash units and high-speed sync and wireless mode features with the camera set to single-frame mode, programmed AE mode, multi-segment metering ...

MZ-S Manual
Page 8
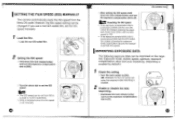
... turn the cover clockwise to close. 11O2f About the Batteries • Be sure to use the optional Battery Grip BG-10. • When taking the camera to do before using in cold environments, take a spare set of the strap through the strap lug from underneath, then pass the strap through the... clasp from the camera body. 2 Follow the same procedure to attach the other end of the strap to alter the date or time. BEFORE TAKING PICTURES Things to unfamiliar...
... turn the cover clockwise to close. 11O2f About the Batteries • Be sure to use the optional Battery Grip BG-10. • When taking the camera to do before using in cold environments, take a spare set of the strap through the strap lug from underneath, then pass the strap through the... clasp from the camera body. 2 Follow the same procedure to attach the other end of the strap to alter the date or time. BEFORE TAKING PICTURES Things to unfamiliar...

MZ-S Manual
Page 9
... lenses made by other manufacturers. • Use a soft, dry cloth to turn on the lens mount index lamp on the lens and camera while attaching the lens to the camera, then turn the lens clockwise until it is locked in place. Ti Handling the Lens • To detach the lens, hold down... the lens unlock button and turn the lens counterclockwise. • After attaching the lens, try and turn on the camera's main switch and press the lens unlock button to keep the electrical contacts on the contacts can cause problems with the electrical system. Dirt or...
... lenses made by other manufacturers. • Use a soft, dry cloth to turn on the lens mount index lamp on the lens and camera while attaching the lens to the camera, then turn the lens clockwise until it is locked in place. Ti Handling the Lens • To detach the lens, hold down... the lens unlock button and turn the lens counterclockwise. • After attaching the lens, try and turn on the camera's main switch and press the lens unlock button to keep the electrical contacts on the contacts can cause problems with the electrical system. Dirt or...

MZ-S Manual
Page 10
O0 O1SONI Step 4 mprinting the date or time Imprint the date or time within the picture. 1 On the camera's back cover, press the DATE button to +1.5m-1 (per meter). 0 If this part of the first frame will change in the following sequence: The sample .... scene. BEFORE TAKING PICTURES' Step 5 Adjusting the viewfinder's diopter Adjust the viewfinder's diopter to suit your eye's vision. 1 Look through the viewfinder and point the camera to distinguish.
O0 O1SONI Step 4 mprinting the date or time Imprint the date or time within the picture. 1 On the camera's back cover, press the DATE button to +1.5m-1 (per meter). 0 If this part of the first frame will change in the following sequence: The sample .... scene. BEFORE TAKING PICTURES' Step 5 Adjusting the viewfinder's diopter Adjust the viewfinder's diopter to suit your eye's vision. 1 Look through the viewfinder and point the camera to distinguish.

MZ-S Manual
Page 11
...curtains - Keep them gently with its operations. 3 As shown in the illustration. If you use a non-DX coded film, you first operate the camera with no film loaded to become familiar with a soft, dry cloth. • If there is automatically set the film *Important* speed manually. (u.,ji...film speed. Do not touch them gently with ISO ratings from scratch- 11= Remove the protective cover • Before loading film for the camera. Wipe them with the protective card. BEFORE TAKING PICTURES (:) We suggest that you can set spool. for the first time after purchase,...
...curtains - Keep them gently with its operations. 3 As shown in the illustration. If you use a non-DX coded film, you first operate the camera with no film loaded to become familiar with a soft, dry cloth. • If there is automatically set the film *Important* speed manually. (u.,ji...film speed. Do not touch them gently with ISO ratings from scratch- 11= Remove the protective cover • Before loading film for the camera. Wipe them with the protective card. BEFORE TAKING PICTURES (:) We suggest that you can set spool. for the first time after purchase,...

MZ-S Manual
Page 12
... 33 UNLOADING FILM 34 REWINDING THE FILM 34 SETTING THE FILM SPEED(ISO) MANUALLY 36 IMPRINTING EXPOSURE DATA 37 REPLACING THE BATTERIES 40 REPLACING THE CAMERA'S BATTERIES 40 REPLACING THE DATA BACK'S BATTERY 42 ADJUSTING THE DATA BACK 44 0
... 33 UNLOADING FILM 34 REWINDING THE FILM 34 SETTING THE FILM SPEED(ISO) MANUALLY 36 IMPRINTING EXPOSURE DATA 37 REPLACING THE BATTERIES 40 REPLACING THE CAMERA'S BATTERIES 40 REPLACING THE DATA BACK'S BATTERY 42 ADJUSTING THE DATA BACK 44 0
MZ-S Manual
Page 13
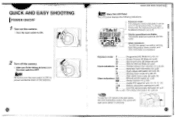
... OISV9 tacp.56 -- Be sure to turn the main switch to OFF. p.36 Pentax function im -p.106 Audible PCV signal G- QUICK AND EASY SHOOTING I POWER ON/OFF 1 Turn on the camera. 1 Turn the main switch to ON. 2 Turn off the camera. 1 After you finish taking pictures, turn the main switch to OFF to...
... OISV9 tacp.56 -- Be sure to turn the main switch to OFF. p.36 Pentax function im -p.106 Audible PCV signal G- QUICK AND EASY SHOOTING I POWER ON/OFF 1 Turn on the camera. 1 Turn the main switch to ON. 2 Turn off the camera. 1 After you finish taking pictures, turn the main switch to OFF to...

MZ-S Manual
Page 14
...to the [A] position while holding down position at the center. 1.` IN\ \ 1', SNOlltni3dO 019V9 When the focus point mode is set to [A], the camera selects one of the Six Focus Points (1 )Set the focus point mode switch to indicate that the Programmed AE Mode is set. Cl 3 Set ...the multi(6)-segment metering mode. 1 Set the metering mode switch to [ ]. I QUICK AND EASY SHOOTING For quick and easy shooting, set your camera for singleframe shooting, Programmed AE, multi-segment metering, automatic focus point mode, and autofocus. .NOTE To load the batteries and film or to attach the...
...to the [A] position while holding down position at the center. 1.` IN\ \ 1', SNOlltni3dO 019V9 When the focus point mode is set to [A], the camera selects one of the Six Focus Points (1 )Set the focus point mode switch to indicate that the Programmed AE Mode is set. Cl 3 Set ...the multi(6)-segment metering mode. 1 Set the metering mode switch to [ ]. I QUICK AND EASY SHOOTING For quick and easy shooting, set your camera for singleframe shooting, Programmed AE, multi-segment metering, automatic focus point mode, and autofocus. .NOTE To load the batteries and film or to attach the...

MZ-S Manual
Page 15
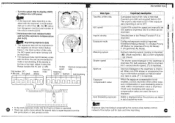
... focus. Convenient especially in a situation where it is recommended to Do." Focus indicator Focus point IIIEM Holding the camera • Hold the camera firmly, with your body or the camera on a solid object - A tripod should be taken unless focus is the inverse of the six focus points to... focusing methods You can also manually select one of the focus points. The focus will remain locked as long the shutter release button is held camera is achieved. tg4- to focus. When the single AF mode [AF.S] has been set, press the shutter release button halfway down position....
... focus. Convenient especially in a situation where it is recommended to Do." Focus indicator Focus point IIIEM Holding the camera • Hold the camera firmly, with your body or the camera on a solid object - A tripod should be taken unless focus is the inverse of the six focus points to... focusing methods You can also manually select one of the focus points. The focus will remain locked as long the shutter release button is held camera is achieved. tg4- to focus. When the single AF mode [AF.S] has been set, press the shutter release button halfway down position....

MZ-S Manual
Page 16
..., turn the zoom ring to the right. • Using the manual zoom function with a Power Zoom lens attached Pull the power zoom ring toward the camera body until the words [POWER ZOOM] appear beneath the power zoom ring. ??Turning the power zoom ring to the right brings the subject closer (telephoto...
..., turn the zoom ring to the right. • Using the manual zoom function with a Power Zoom lens attached Pull the power zoom ring toward the camera body until the words [POWER ZOOM] appear beneath the power zoom ring. ??Turning the power zoom ring to the right brings the subject closer (telephoto...

MZ-S Manual
Page 17
... the select dial (ZiBe The flash mode is on the LCD panel and in flash is charged and ready to fire, [$] is recommended to prevent camera shake. To set the built-in flash's flash mode or when using the built-in flash, do if an indication other than ] is displayed Hold... down , if [$] blinks in flash 1 2Make sure the camera is indicated on page 91. LI uu(n)uu • • b I USING THE BUILT- nn uju 90 F9.5 C BUILT-IN FLASH - IN FLASH You can only...
... the select dial (ZiBe The flash mode is on the LCD panel and in flash is charged and ready to fire, [$] is recommended to prevent camera shake. To set the built-in flash's flash mode or when using the built-in flash, do if an indication other than ] is displayed Hold... down , if [$] blinks in flash 1 2Make sure the camera is indicated on page 91. LI uu(n)uu • • b I USING THE BUILT- nn uju 90 F9.5 C BUILT-IN FLASH - IN FLASH You can only...

MZ-S Manual
Page 19
... cartridge. When you take important pictures, rewind the film when the film reaches the number of the film rewind, you wish to shade the camera. • Never open the back cover until the whole film roll is being rewound. During rewinding, [ __._O ] blinks on the ...opening the back cover, check that [0] Is blinking. ( SNOI1VH3d0 DISVEI I REWINDING THE FILM • Always unload film in mid-roll is reloaded into the camera, picture-taking can also leave the film leader outside the cartridge. (0 - When the film is fully rewound, [G ] blinks and the exposure counter disappears from...
... cartridge. When you take important pictures, rewind the film when the film reaches the number of the film rewind, you wish to shade the camera. • Never open the back cover until the whole film roll is being rewound. During rewinding, [ __._O ] blinks on the ...opening the back cover, check that [0] Is blinking. ( SNOI1VH3d0 DISVEI I REWINDING THE FILM • Always unload film in mid-roll is reloaded into the camera, picture-taking can also leave the film leader outside the cartridge. (0 - When the film is fully rewound, [G ] blinks and the exposure counter disappears from...
MZ-S Manual
Page 20
... set the ISO speed. *on the LCD panel indicates that exposure data imprinting is set manually 0 I UNLOADING FILM I I SETTING THE FILM SPEED (ISO) MANUALLY The camera automatically reads the film speed from ISO 6 to 6400 in 1/3-EV increments. • [ISO] is positioned at [ISO] with the DX-coded film loaded, pressing...
... set the ISO speed. *on the LCD panel indicates that exposure data imprinting is set manually 0 I UNLOADING FILM I I SETTING THE FILM SPEED (ISO) MANUALLY The camera automatically reads the film speed from ISO 6 to 6400 in 1/3-EV increments. • [ISO] is positioned at [ISO] with the DX-coded film loaded, pressing...
MZ-S Manual
Page 21
...is imprinted. For 1-second shutter speed, [1"] is too low or too high, adjust it = Exposure data imprinting is powered by the camera body battery (CR-2) instead of film rolls is imprinted. When either compensation value is imprinted. Exposure mode Configured exposure mode is imprinted. ...imprinted: M (Metered Manual Mode)/ Tv (Shutter-Priority AE Mode)/ Av (Aperture-Prioriy AE Mode)/ P (Programmed AE Mode). it using the Pentax function No.15. (itk- of film rolls Cumulative count of the button cell for date and time imprinting. tax Imprinting exposure data • The...
...is imprinted. For 1-second shutter speed, [1"] is too low or too high, adjust it = Exposure data imprinting is powered by the camera body battery (CR-2) instead of film rolls is imprinted. When either compensation value is imprinted. Exposure mode Configured exposure mode is imprinted. ...imprinted: M (Metered Manual Mode)/ Tv (Shutter-Priority AE Mode)/ Av (Aperture-Prioriy AE Mode)/ P (Programmed AE Mode). it using the Pentax function No.15. (itk- of film rolls Cumulative count of the button cell for date and time imprinting. tax Imprinting exposure data • The...
MZ-S Manual
Page 22
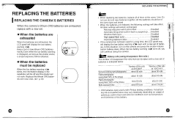
...rolls about 8 rolls about 2 hours • CR2 batteries were used for a long time, the LCD panel may vary drastically depending on the camera and press the shutter release button halfway down. Actual battery life and performance may still display the low battery warning 4=a even with a new set...long as temperature and freshness of the battery. 0 SNOLLVInd0 OISVa Do not use old arid new batteries together. Enabled • If the camera has not been used under Pentax testing conditions. ies. When the low battery warning 4=s turns off and the shutter will take effect.
...rolls about 8 rolls about 2 hours • CR2 batteries were used for a long time, the LCD panel may vary drastically depending on the camera and press the shutter release button halfway down. Actual battery life and performance may still display the low battery warning 4=a even with a new set...long as temperature and freshness of the battery. 0 SNOLLVInd0 OISVa Do not use old arid new batteries together. Enabled • If the camera has not been used under Pentax testing conditions. ies. When the low battery warning 4=s turns off and the shutter will take effect.

MZ-S Manual
Page 25
STEP UP DVANCED OPERATIONS CAMERA OPERATION 48 CONSECUTIVE-FRAME DRIVE 48 MULTIPLE EXPOSURES ON A SINGLE FRAME 49 SELF-TIMER MODE 51 AUTO BRACKETING 53 SETTING THE EXPOSURE MODE 56 ABOUT ...
STEP UP DVANCED OPERATIONS CAMERA OPERATION 48 CONSECUTIVE-FRAME DRIVE 48 MULTIPLE EXPOSURES ON A SINGLE FRAME 49 SELF-TIMER MODE 51 AUTO BRACKETING 53 SETTING THE EXPOSURE MODE 56 ABOUT ...

