
MZ-S Manual
Page 2
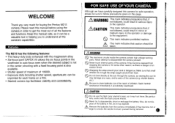
...for buying the Pentax MZ-S camera. WARNING • The electronic circuits inside the camera contain high voltage working parts. Never attempt to disassemble the camera yourself. • Never touch internal parts of an electric shock. Seek medical assistance immediately if accidentally swallowed. O Keep this camera for safe operation..., short or recharge the battery. c Wrapping the strap around their neck. (S) Do not look directly at the sun through the camera, as viewing the sun for some other reason, as it may explode. Be particularly careful with a fixed focusing point is not ...
...for buying the Pentax MZ-S camera. WARNING • The electronic circuits inside the camera contain high voltage working parts. Never attempt to disassemble the camera yourself. • Never touch internal parts of an electric shock. Seek medical assistance immediately if accidentally swallowed. O Keep this camera for safe operation..., short or recharge the battery. c Wrapping the strap around their neck. (S) Do not look directly at the sun through the camera, as viewing the sun for some other reason, as it may explode. Be particularly careful with a fixed focusing point is not ...
MZ-S Manual
Page 3
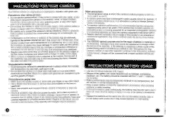
... car, boat, etc. • Condensation on the lens or viewfinder. • Never use the camera where it with a new one or vice versa, the formation of the Pentax warranty. • The PENTAX warranty provides only for proper care • Never touch the shutter curtain or mirror with your finger or... a case or plastic bag so that the battery is caused as it to prevent the growth of electrical contact. PRECAUTIONS FOR YOUR CAMERA Your Pentax camera is minimized. Do not remove it is taken from the bag until temperature has stabilized. • Regular size color prints may cause ...
... car, boat, etc. • Condensation on the lens or viewfinder. • Never use the camera where it with a new one or vice versa, the formation of the Pentax warranty. • The PENTAX warranty provides only for proper care • Never touch the shutter curtain or mirror with your finger or... a case or plastic bag so that the battery is caused as it to prevent the growth of electrical contact. PRECAUTIONS FOR YOUR CAMERA Your Pentax camera is minimized. Do not remove it is taken from the bag until temperature has stabilized. • Regular size color prints may cause ...

MZ-S Manual
Page 4
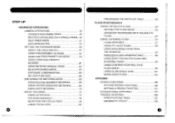
... 14 REWINDING THE FILM 34 16 SETTING THE FILM SPEED(ISO) MANUALLY 36 17 IMPRINTING EXPOSURE DATA 37 18 REPLACING THE BATTERIES 40 REPLACING THE CAMERA'S BATTERIES 40 REPLACING THE DATA BACK'S BATTERY 42 ADJUSTING THE DATA BACK 44 0 CONTENTS FOR SAFE USE OF YOUR... CAMERA PRECAUTIONS FORE YOUR CAMERA PRECAUTIONS FOR BATTERY USAGE NAMES OF WORKING PARTS USING THIS OPERATING MANUAL SET UP THINGS TO DO BEFORE TAKING PICTURES STEP 1 Attaching the Strap STEP 2 ...
... 14 REWINDING THE FILM 34 16 SETTING THE FILM SPEED(ISO) MANUALLY 36 17 IMPRINTING EXPOSURE DATA 37 18 REPLACING THE BATTERIES 40 REPLACING THE CAMERA'S BATTERIES 40 REPLACING THE DATA BACK'S BATTERY 42 ADJUSTING THE DATA BACK 44 0 CONTENTS FOR SAFE USE OF YOUR... CAMERA PRECAUTIONS FORE YOUR CAMERA PRECAUTIONS FOR BATTERY USAGE NAMES OF WORKING PARTS USING THIS OPERATING MANUAL SET UP THINGS TO DO BEFORE TAKING PICTURES STEP 1 Attaching the Strap STEP 2 ...
MZ-S Manual
Page 5
STEP UP ADVANCED OPERATIONS CAMERA OPERATIONS 48 CONSECUTIVE-FRAME DRIVE 48 MULTIPLE EXPOSURES ON A SINGLE FRAME 49 SELF-TIMER MODE 51 AUTO BRACKETING 53 SETTING THE EXPOSURE MODE 56 ABOUT ... THE BUILT-IN FLASH AND EXTERNAL FLASH 97 USING CONTRAST-CONTROL-SYNC FLASH MODE 99 USING SLOW-SPEED SYNC 101 WHEN USING FLASH 103 APPENDIX PENTAX FUNCTIONS 106 SETTING PENTAX FUNCTIONS 108 SETTING A PENTAX FUNCTION 110 ACCESSPORIES (OPTIONAL) 123 TROUBLE SHOOTING 128 SPECIFICATIONS TABLE 132 WARRANYTY POLICY 136
STEP UP ADVANCED OPERATIONS CAMERA OPERATIONS 48 CONSECUTIVE-FRAME DRIVE 48 MULTIPLE EXPOSURES ON A SINGLE FRAME 49 SELF-TIMER MODE 51 AUTO BRACKETING 53 SETTING THE EXPOSURE MODE 56 ABOUT ... THE BUILT-IN FLASH AND EXTERNAL FLASH 97 USING CONTRAST-CONTROL-SYNC FLASH MODE 99 USING SLOW-SPEED SYNC 101 WHEN USING FLASH 103 APPENDIX PENTAX FUNCTIONS 106 SETTING PENTAX FUNCTIONS 108 SETTING A PENTAX FUNCTION 110 ACCESSPORIES (OPTIONAL) 123 TROUBLE SHOOTING 128 SPECIFICATIONS TABLE 132 WARRANYTY POLICY 136
MZ-S Manual
Page 7
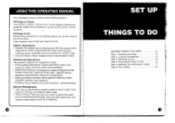
..., multi-segment metering mode, automatic focus point selection, and AF mode. • Using the Built-in Flash: Explains how to use the camera for the first time. exposure mode, self-timer mode, auto bracketing • Setting the Exposure: Autoexposure modes (Programmed AE, Shutter-Priority AE...be followed before you use the built-in flash. ♦Advanced Operations The camera's features are explained in backlit conditions and at night, flash exposure settings, and effective flash range. • Using a Pentax-Dedicated External Flash: Explains the opera- It also explains how to load ...
..., multi-segment metering mode, automatic focus point selection, and AF mode. • Using the Built-in Flash: Explains how to use the camera for the first time. exposure mode, self-timer mode, auto bracketing • Setting the Exposure: Autoexposure modes (Programmed AE, Shutter-Priority AE...be followed before you use the built-in flash. ♦Advanced Operations The camera's features are explained in backlit conditions and at night, flash exposure settings, and effective flash range. • Using a Pentax-Dedicated External Flash: Explains the opera- It also explains how to load ...

MZ-S Manual
Page 8
... read the cautions regarding the batteries. ( 00 01SDNIH1 Step 1 Attaching the Strap 1 Pass the end of the strap to unfamiliar areas or when using the camera for the first time. Step 2 Loading the Batteries 1 As shown in the illustration, open the battery chamber cover by turning it with a coin. '11 2 As... turn the cover clockwise to close. 11O2f About the Batteries • Be sure to use the optional Battery Grip BG-10. • When taking the camera to the other end of the strap through the strap lug from underneath, then pass the strap through the clasp from the...
... read the cautions regarding the batteries. ( 00 01SDNIH1 Step 1 Attaching the Strap 1 Pass the end of the strap to unfamiliar areas or when using the camera for the first time. Step 2 Loading the Batteries 1 As shown in the illustration, open the battery chamber cover by turning it with a coin. '11 2 As... turn the cover clockwise to close. 11O2f About the Batteries • Be sure to use the optional Battery Grip BG-10. • When taking the camera to the other end of the strap through the strap lug from underneath, then pass the strap through the clasp from the...

MZ-S Manual
Page 9
...clean. I i )6 17, 3 As shown in place. 0 • We assume no responsibility nor liability for damages resulting from the use of the camera from dust and scratches upon factory shipment. Step 3 Attaching a Lens 1 Remove the body mount cap and rear lens cap. BEFORE TAKING PICTURES • ...electrical system. Dirt or corrosion on the lens and camera while attaching the lens to the camera, then turn on the camera's main switch and press the lens unlock button to keep the electrical contacts on the camera. For long-term camera storage, the optional accessory "Body Mount Cap K" ...
...clean. I i )6 17, 3 As shown in place. 0 • We assume no responsibility nor liability for damages resulting from the use of the camera from dust and scratches upon factory shipment. Step 3 Attaching a Lens 1 Remove the body mount cap and rear lens cap. BEFORE TAKING PICTURES • ...electrical system. Dirt or corrosion on the lens and camera while attaching the lens to the camera, then turn on the camera's main switch and press the lens unlock button to keep the electrical contacts on the camera. For long-term camera storage, the optional accessory "Body Mount Cap K" ...

MZ-S Manual
Page 10
... PM. BEFORE TAKING PICTURES' Step 5 Adjusting the viewfinder's diopter Adjust the viewfinder's diopter to suit your eye's vision. 1 Look through the viewfinder and point the camera to +1.5m-1 (per meter). 0 I I 5 DATE( SELECT 0 0 ADJUST tom The date or time is light-colored (white, yellow, etc.), the imprinted ...• The date of the picture. O0 O1SONI Step 4 mprinting the date or time Imprint the date or time within the picture. 1 On the camera's back cover, press the DATE button to distinguish. YY indicates the year's last two digits, MM is the month, DD is the day, hh ...
... PM. BEFORE TAKING PICTURES' Step 5 Adjusting the viewfinder's diopter Adjust the viewfinder's diopter to suit your eye's vision. 1 Look through the viewfinder and point the camera to +1.5m-1 (per meter). 0 I I 5 DATE( SELECT 0 0 ADJUST tom The date or time is light-colored (white, yellow, etc.), the imprinted ...• The date of the picture. O0 O1SONI Step 4 mprinting the date or time Imprint the date or time within the picture. 1 On the camera's back cover, press the DATE button to distinguish. YY indicates the year's last two digits, MM is the month, DD is the day, hh ...

MZ-S Manual
Page 11
... DX-coded films with the protective card. tains with ISO ratings from scratch- 11= Remove the protective cover • Before loading film for the camera. To remove smudges, wipe them clean and free from 25 to material. o 11 ooeu000noo C o Imprint data emitter • Always load and ...transport so it may sensitize the film. , To open the back cover and remove the protective card. • Be careful not to shade the camera. 0 DX information pins Shutter curtains - Wipe them with a soft, dry cloth. Do not touch them gently with your body to touch the...
... DX-coded films with the protective card. tains with ISO ratings from scratch- 11= Remove the protective cover • Before loading film for the camera. To remove smudges, wipe them clean and free from 25 to material. o 11 ooeu000noo C o Imprint data emitter • Always load and ...transport so it may sensitize the film. , To open the back cover and remove the protective card. • Be careful not to shade the camera. 0 DX information pins Shutter curtains - Wipe them with a soft, dry cloth. Do not touch them gently with your body to touch the...

MZ-S Manual
Page 12
... 33 UNLOADING FILM 34 REWINDING THE FILM 34 SETTING THE FILM SPEED(ISO) MANUALLY 36 IMPRINTING EXPOSURE DATA 37 REPLACING THE BATTERIES 40 REPLACING THE CAMERA'S BATTERIES 40 REPLACING THE DATA BACK'S BATTERY 42 ADJUSTING THE DATA BACK 44 0 it= • If the end of the film leader is not loaded...
... 33 UNLOADING FILM 34 REWINDING THE FILM 34 SETTING THE FILM SPEED(ISO) MANUALLY 36 IMPRINTING EXPOSURE DATA 37 REPLACING THE BATTERIES 40 REPLACING THE CAMERA'S BATTERIES 40 REPLACING THE DATA BACK'S BATTERY 42 ADJUSTING THE DATA BACK 44 0 it= • If the end of the film leader is not loaded...
MZ-S Manual
Page 13
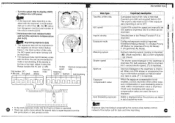
... mode The exposure mode is indicated. It can be set film speed Lk- Shutter speed/Aperture display The shutter speed and aperture are displayed. p.36 Pentax function im -p.106 Audible PCV signal G- tacp.56 -- I CM About the LCD Panel The LCD panel displays the following indications: - p.52, 73...information are indicated. M (Metered Manual). Be sure to turn the main switch to OFF to prevent accidental drain on the camera. 1 Turn the main switch to ON. 2 Turn off the camera. 1 After you finish taking pictures, turn the main switch to P (Programmed AE), Tv (Shutter- co Priority AE), ...
... mode The exposure mode is indicated. It can be set film speed Lk- Shutter speed/Aperture display The shutter speed and aperture are displayed. p.36 Pentax function im -p.106 Audible PCV signal G- tacp.56 -- I CM About the LCD Panel The LCD panel displays the following indications: - p.52, 73...information are indicated. M (Metered Manual). Be sure to turn the main switch to OFF to prevent accidental drain on the camera. 1 Turn the main switch to ON. 2 Turn off the camera. 1 After you finish taking pictures, turn the main switch to P (Programmed AE), Tv (Shutter- co Priority AE), ...

MZ-S Manual
Page 14
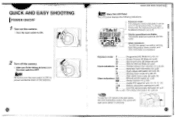
...[A]. Cl 3 Set the multi(6)-segment metering mode. 1 Set the metering mode switch to [ ]. When the focus point mode is set your camera for singleframe shooting, Programmed AE, multi-segment metering, automatic focus point mode, and autofocus. .NOTE To load the batteries and film or to ...When multi-segment metering is set . li= The drive mode can also be underexposed because the other metering segments can detect the condition and the camera can compensate the exposure accordingly. • The center-weighted metering and spot metering are also available. LLB .1\ 2 Set the Programmed AE Mode...
...[A]. Cl 3 Set the multi(6)-segment metering mode. 1 Set the metering mode switch to [ ]. When the focus point mode is set your camera for singleframe shooting, Programmed AE, multi-segment metering, automatic focus point mode, and autofocus. .NOTE To load the batteries and film or to ...When multi-segment metering is set . li= The drive mode can also be underexposed because the other metering segments can detect the condition and the camera can compensate the exposure accordingly. • The center-weighted metering and spot metering are also available. LLB .1\ 2 Set the Programmed AE Mode...

MZ-S Manual
Page 15
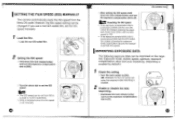
... I ----- The picture cannot be used for shutter speeds slower than the total weight of the focus points. tg4- m Autofocus works with your body or the camera on a solid object - a table, tree, or a wall for a hand held in general the shutter speed for instance. • Although there are individual... To load the film and batteries or to attach a lens, see "Things to focus the subject. A tripod should be taken unless focus is held camera is heavier than this. • When using a telephoto lens, a tripod that is the inverse of the six focus points to Do." Cover the...
... I ----- The picture cannot be used for shutter speeds slower than the total weight of the focus points. tg4- m Autofocus works with your body or the camera on a solid object - a table, tree, or a wall for a hand held in general the shutter speed for instance. • Although there are individual... To load the film and batteries or to attach a lens, see "Things to focus the subject. A tripod should be taken unless focus is held camera is heavier than this. • When using a telephoto lens, a tripod that is the inverse of the six focus points to Do." Cover the...

MZ-S Manual
Page 16
..., turn the zoom ring to the right. • Using the manual zoom function with a Power Zoom lens attached Pull the power zoom ring toward the camera body until the words [POWER ZOOM] are available. it= The viewfinder indication stays on the subject. Focus indicator: Lights when focus is turned off with...
..., turn the zoom ring to the right. • Using the manual zoom function with a Power Zoom lens attached Pull the power zoom ring toward the camera body until the words [POWER ZOOM] are available. it= The viewfinder indication stays on the subject. Focus indicator: Lights when focus is turned off with...

MZ-S Manual
Page 17
... flash-function button and turn the select dial (ZiBe The flash mode is indicated on , then press the flash pop-up and starts to prevent camera shake. The built-in flash is on the LCD panel as shown below . Also, if a telephoto lens is used ) is within about four meters (using...(n)uu • • b I USING THE BUILT- nn uju 90 F9.5 C BUILT-IN FLASH - IN FLASH You can only be selected in flash 1 2Make sure the camera is explained below . (ti ; SMART FLASH The basic procedure for using the built-in flash is charged and ready to fire even when there is...
... flash-function button and turn the select dial (ZiBe The flash mode is indicated on , then press the flash pop-up and starts to prevent camera shake. The built-in flash is on the LCD panel as shown below . Also, if a telephoto lens is used ) is within about four meters (using...(n)uu • • b I USING THE BUILT- nn uju 90 F9.5 C BUILT-IN FLASH - IN FLASH You can only be selected in flash 1 2Make sure the camera is explained below . (ti ; SMART FLASH The basic procedure for using the built-in flash is charged and ready to fire even when there is...

MZ-S Manual
Page 19
...roll. During rewinding, [ __._O ] blinks on the film cartridge. ( 1 )The film automatically rewinds at the end of frames have to shade the camera. • Never open the back cover until the whole film roll is being rewound. When you have been used as a ballpoint pen, be lost in... mid-roll is fully rewound, [G ] blinks and the exposure counter disappears from the specified frame. (0 - When the film is reloaded into the camera, picture-taking can also leave the film leader outside the cartridge. (0 - p.118) 5 • At the end of the film rewind, you wish to ...
...roll. During rewinding, [ __._O ] blinks on the film cartridge. ( 1 )The film automatically rewinds at the end of frames have to shade the camera. • Never open the back cover until the whole film roll is being rewound. When you have been used as a ballpoint pen, be lost in... mid-roll is fully rewound, [G ] blinks and the exposure counter disappears from the specified frame. (0 - When the film is reloaded into the camera, picture-taking can also leave the film leader outside the cartridge. (0 - p.118) 5 • At the end of the film rewind, you wish to ...
MZ-S Manual
Page 20
... the DX-coded film loaded, pressing the exposure mode reset button cancels the manually-set manually 0 I UNLOADING FILM I I SETTING THE FILM SPEED (ISO) MANUALLY The camera automatically reads the film speed from ISO 6 to 6400 in 1/3-EV increments. • [ISO] is enabled. 2 Enable or disable the data imprinting. 1 Hold down the...
... the DX-coded film loaded, pressing the exposure mode reset button cancels the manually-set manually 0 I UNLOADING FILM I I SETTING THE FILM SPEED (ISO) MANUALLY The camera automatically reads the film speed from ISO 6 to 6400 in 1/3-EV increments. • [ISO] is enabled. 2 Enable or disable the data imprinting. 1 Hold down the...
MZ-S Manual
Page 21
...)/ Av (Aperture-Prioriy AE Mode)/ P (Programmed AE Mode). of film rolls Cumulative count of film rolls is powered by the camera body battery (CR-2) instead of the button cell for date and time imprinting. Auto bracketing exposure [AEB] is displayed when the ...is imprinted: [ Eq.. ] (Multi-segment)/ [ au ] (Center-weighted)/ [ O ] (Spot) Shutter speed The shutter speed displayed in the Pentax Function F15 is displayed. Exposure compensation value When the exposure compensation is not enabled, [±0.0] is imprinted; If both auto bracketing and exposure compensation value...
...)/ Av (Aperture-Prioriy AE Mode)/ P (Programmed AE Mode). of film rolls Cumulative count of film rolls is powered by the camera body battery (CR-2) instead of the button cell for date and time imprinting. Auto bracketing exposure [AEB] is displayed when the ...is imprinted: [ Eq.. ] (Multi-segment)/ [ au ] (Center-weighted)/ [ O ] (Spot) Shutter speed The shutter speed displayed in the Pentax Function F15 is displayed. Exposure compensation value When the exposure compensation is not enabled, [±0.0] is imprinted; If both auto bracketing and exposure compensation value...
MZ-S Manual
Page 22
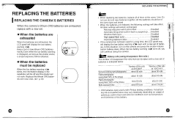
...SNOLLVInd0 OISVa When the low battery warning 4=s turns off and the shutter will take effect. Enabled • If the camera has not been used under Pentax testing conditions. Red-eye reduction with a new set of batteries is popped up. IICEr Battery Life (using 24-exposure ...is indicated below. ies. General existing light photography Flash photography (using flash 50% of the times) Flash photography (using the camera. Actual battery life and performance may still display the low battery warning 4=a even with built-in flash: Disabled Automatic firing when ...
...SNOLLVInd0 OISVa When the low battery warning 4=s turns off and the shutter will take effect. Enabled • If the camera has not been used under Pentax testing conditions. Red-eye reduction with a new set of batteries is popped up. IICEr Battery Life (using 24-exposure ...is indicated below. ies. General existing light photography Flash photography (using flash 50% of the times) Flash photography (using the camera. Actual battery life and performance may still display the low battery warning 4=a even with built-in flash: Disabled Automatic firing when ...

MZ-S Manual
Page 25
STEP UP DVANCED OPERATIONS CAMERA OPERATION 48 CONSECUTIVE-FRAME DRIVE 48 MULTIPLE EXPOSURES ON A SINGLE FRAME 49 SELF-TIMER MODE 51 AUTO BRACKETING 53 SETTING THE EXPOSURE MODE 56 ABOUT ...
STEP UP DVANCED OPERATIONS CAMERA OPERATION 48 CONSECUTIVE-FRAME DRIVE 48 MULTIPLE EXPOSURES ON A SINGLE FRAME 49 SELF-TIMER MODE 51 AUTO BRACKETING 53 SETTING THE EXPOSURE MODE 56 ABOUT ...

