
MX Manual
Page 7
MX camera body accepts Winder MX for up to 2 frames-per second (single-frame and consecutive exposure operation possible), for data recording on battery failure. Two 1.5V Alkaline (LR44) or Silver-oxide (G13) batteries; Open-aperture, center-weighted Through-The-Lens meter, with SPD cells for fast light response, with Bulk Film Magazine MX..., Dial Data MX for automatic, speedy film wind and shutter cocking. Standard back with memo holder, interchangeable with tri-colored LED...
MX camera body accepts Winder MX for up to 2 frames-per second (single-frame and consecutive exposure operation possible), for data recording on battery failure. Two 1.5V Alkaline (LR44) or Silver-oxide (G13) batteries; Open-aperture, center-weighted Through-The-Lens meter, with SPD cells for fast light response, with Bulk Film Magazine MX..., Dial Data MX for automatic, speedy film wind and shutter cocking. Standard back with memo holder, interchangeable with tri-colored LED...
MX Manual
Page 8
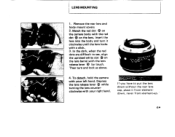
... by touch. Depress the lens release lever C) while turning the lens counterclockwise with a click. 3. Insert the lens into the body and turn and lock as above. Remove the rear lens and body mount covers 2. If you have to see, align the upraised white dot Q on the lens. Match the red dot 0 ...on the camera body with the red dot 0 on the lens barrel with your right hand. Then turn it front-elementdown, ...
... by touch. Depress the lens release lever C) while turning the lens counterclockwise with a click. 3. Insert the lens into the body and turn and lock as above. Remove the rear lens and body mount covers 2. If you have to see, align the upraised white dot Q on the lens. Match the red dot 0 ...on the camera body with the red dot 0 on the lens barrel with your right hand. Then turn it front-elementdown, ...

MX Manual
Page 17
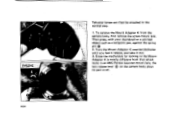
the hand that releases the shutter - Hold the camera firmly with your left hand, and draw your body. Vertical position C. HOLDING THE CAMERA As a general rule, your camera with the right hand - this may cause camera movement. Vertical position B. Hold your camera tightly ... right arm and draw your left hand, which does not release the shutter. Often, blurred pictures are due to your right arm close to your body. If you hold your camera can be held more firmly in the left arm to your...
the hand that releases the shutter - Hold the camera firmly with your left hand, and draw your body. Vertical position C. HOLDING THE CAMERA As a general rule, your camera with the right hand - this may cause camera movement. Vertical position B. Hold your camera tightly ... right arm and draw your left hand, which does not release the shutter. Often, blurred pictures are due to your right arm close to your body. If you hold your camera can be held more firmly in the left arm to your...
MX Manual
Page 20
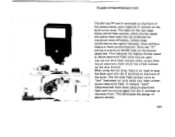
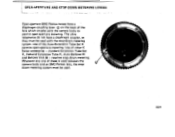
... electronic flash units may be used. mount electronic flash. The hot shoe flash contact turns to plug the flash cord into the X terminal on the body front. Note the "X" setting is no need to "hot" (switched on) only when you insert a shoe! It remains "cold" (disconnected) even ...using the hot shoe, there is 'exactly at which has a flash contact on the shoe bracket. FLASH SYNCHRONIZATION 0 P EUI&X 11100 BO SINAI The MX has FP and X terminals on the front of the camera body, and a separate X contact on the built-in flash synchronization. This eliminates the danger of -I the...
... electronic flash units may be used. mount electronic flash. The hot shoe flash contact turns to plug the flash cord into the X terminal on the body front. Note the "X" setting is no need to "hot" (switched on) only when you insert a shoe! It remains "cold" (disconnected) even ...using the hot shoe, there is 'exactly at which has a flash contact on the shoe bracket. FLASH SYNCHRONIZATION 0 P EUI&X 11100 BO SINAI The MX has FP and X terminals on the front of the camera body, and a separate X contact on the built-in flash synchronization. This eliminates the danger of -I the...
MX Manual
Page 32
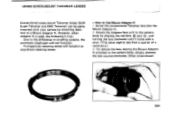
...-down metering lenses. a How to Use Mount Adaptor K Screw the conventional Takumar lens into the Mount Adaptor K. 2 Attach the Adaptor/lens unit to the camera body by attaching them first to a Mount Adaptor K. Other screw-mount 30• Full-aperture metering lenses will not function. . However, when Adaptor K is used, the... until it locks with a click. (This takes slightly less than a quarter of a revolution.) 3 To remove the lens, leaving the Mount Adaptor K attached to the camera body, simply unscrew the lens counterclockwise.
...-down metering lenses. a How to Use Mount Adaptor K Screw the conventional Takumar lens into the Mount Adaptor K. 2 Attach the Adaptor/lens unit to the camera body by attaching them first to a Mount Adaptor K. Other screw-mount 30• Full-aperture metering lenses will not function. . However, when Adaptor K is used, the... until it locks with a click. (This takes slightly less than a quarter of a revolution.) 3 To remove the lens, leaving the Mount Adaptor K attached to the camera body, simply unscrew the lens counterclockwise.
MX Manual
Page 33
molimimerrr-**MOMINIES.rt ... $ Takumar lenses can then be attached in an SMC Pentax bayonet-mount lens, the lens release lever C) on the camera body plays no part at all. •31 Turn the Mount Adaptor K counterclockwise until you feel it release, and take it out. 3. To remove the Mount... Adaptor K from that which locks in the normal way. 1. Since the mechanism for locking in the Mount Adaptor K is totally different from the camera body, first remove the screw-mount lens. Then press, with your thumbnail or a pointed object such as a ballpoint pen, against the spring pin 2. e DL...
molimimerrr-**MOMINIES.rt ... $ Takumar lenses can then be attached in an SMC Pentax bayonet-mount lens, the lens release lever C) on the camera body plays no part at all. •31 Turn the Mount Adaptor K counterclockwise until you feel it release, and take it out. 3. To remove the Mount... Adaptor K from that which locks in the normal way. 1. Since the mechanism for locking in the Mount Adaptor K is totally different from the camera body, first remove the screw-mount lens. Then press, with your thumbnail or a pointed object such as a ballpoint pen, against the spring pin 2. e DL...
MX Manual
Page 34
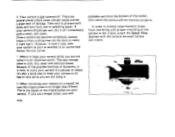
.... standard Extension Tube Set K, Helicoid Extension Tube K, Auto-Bellows M • and Bellows Unit III - st down metering system must be used between the camera body and an SMC Pentax lens, the stop -down metering. The ultra telephotos do not have a diaphragm coupling lever 0 on the back of other K Series accessories - OPEN-APERTURE...
.... standard Extension Tube Set K, Helicoid Extension Tube K, Auto-Bellows M • and Bellows Unit III - st down metering system must be used between the camera body and an SMC Pentax lens, the stop -down metering. The ultra telephotos do not have a diaphragm coupling lever 0 on the back of other K Series accessories - OPEN-APERTURE...
MX Manual
Page 37
... while you are not using it right again. The best storage place is not waterproof. 4. It's also a good idea to protect both body and lens from interfering with a clean, soft cloth. In order to prevent large diameter lenses from rain or splashing water. probably puncture the bottom... of the camera to an authorized Pentax Service Center. When mounting your camera. However, in its bag or case while you will not function properly. Your camera is cool, dry...
... while you are not using it right again. The best storage place is not waterproof. 4. It's also a good idea to protect both body and lens from interfering with a clean, soft cloth. In order to prevent large diameter lenses from rain or splashing water. probably puncture the bottom... of the camera to an authorized Pentax Service Center. When mounting your camera. However, in its bag or case while you will not function properly. Your camera is cool, dry...
