
MV Manual
Page 3
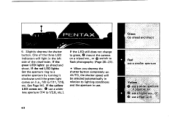
CONTENTS Description of Parts 2 Specifications 4 Lens mounting 6 Inserting batteries 7 Basic operating instructions 8 Film loading and winding 10 Setting ASA film speed 11 Aperture setting 13 Shooting on AUTO 14 The "100X" ...
CONTENTS Description of Parts 2 Specifications 4 Lens mounting 6 Inserting batteries 7 Basic operating instructions 8 Film loading and winding 10 Setting ASA film speed 11 Aperture setting 13 Shooting on AUTO 14 The "100X" ...
MV Manual
Page 4
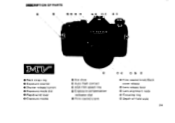
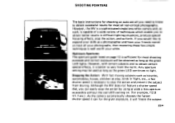
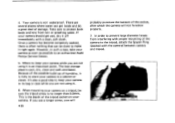
DESCRIPTION OF PARTS 00 0 (3 00 OC 2 0 Neck strap ring O Exposure counter 0 Shutter release button 0 Exposure mode dial 0 Rapid-wind lever 0 Exposure modes O Hot shoe 0 Auto flash contact O ASA film speed ring Exposure-compensationindicator dial 0 Film rewind crank 0 Film rewind knob/Back cover release CD Lens release lever O Lens alignment node 0 Focusing ring O Depth-of-field scale 2•
DESCRIPTION OF PARTS 00 0 (3 00 OC 2 0 Neck strap ring O Exposure counter 0 Shutter release button 0 Exposure mode dial 0 Rapid-wind lever 0 Exposure modes O Hot shoe 0 Auto flash contact O ASA film speed ring Exposure-compensationindicator dial 0 Film rewind crank 0 Film rewind knob/Back cover release CD Lens release lever O Lens alignment node 0 Focusing ring O Depth-of-field scale 2•
MV Manual
Page 6
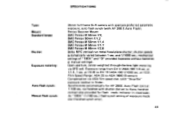
mechanical settings of exposure mode dial (hotshoe synch only). 4• Open aperture, center-weighted through-the-lens light metering via ASA film speed dial. Film Speed Range: ASA 25 to Auto; At "100X" (1/100 sec.) flash-synch setting of...Stop/Go" exposure readout in viewfinder. hotshoe contact also provided for AF 200S Auto Flash Unit at 1/100 sec. Pentax Bayonet Mount SMC Pentax-M 50mm f/2, SMC Pentax 50mm f/1.2 SMC Pentax-M 50mm f/1.4 SMC Pentax-M 50mm f/1.7 SMC Pentax-M 40mm f/2.8 Seiko MFC vertical-run metal focal-plane shutter; and 1/1000 sec.; Exposure range from EV 3 (...
mechanical settings of exposure mode dial (hotshoe synch only). 4• Open aperture, center-weighted through-the-lens light metering via ASA film speed dial. Film Speed Range: ASA 25 to Auto; At "100X" (1/100 sec.) flash-synch setting of...Stop/Go" exposure readout in viewfinder. hotshoe contact also provided for AF 200S Auto Flash Unit at 1/100 sec. Pentax Bayonet Mount SMC Pentax-M 50mm f/2, SMC Pentax 50mm f/1.2 SMC Pentax-M 50mm f/1.4 SMC Pentax-M 50mm f/1.7 SMC Pentax-M 40mm f/2.8 Seiko MFC vertical-run metal focal-plane shutter; and 1/1000 sec.; Exposure range from EV 3 (...

MV Manual
Page 7
Three LED Stop/Go indicator system. plastic tipped for speed film rewind. Rapid rewind crank for winding comfort, 135° advance with 50mm lens; -1.0 diopter eyepiece. Standard camera back with split-image/ microprism focusing screen; Green: Adequate exposure for handheld shooting (1/1000 - 1/30 sec.) Yellow: Slow Exposure Warning (below 1/...
Three LED Stop/Go indicator system. plastic tipped for speed film rewind. Rapid rewind crank for winding comfort, 135° advance with 50mm lens; -1.0 diopter eyepiece. Standard camera back with split-image/ microprism focusing screen; Green: Adequate exposure for handheld shooting (1/1000 - 1/30 sec.) Yellow: Slow Exposure Warning (below 1/...
MV Manual
Page 8
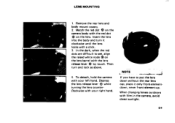
... If you have to see, align the raised white node 0 on the lens barrel with the red dot C) on the camera body with the lens e release lever by touch. To detach, hold the camera with a click. 3. Insert the lens into the body and turn and lock as above. 4. Then turn it... dark, when the red dots are difficult to put the lens down without the rear lens cap, place it clockwise until the lens locks with your right hand. Match the red dot on the lens. Depress e the lens release lever while turning the lens counterClockwise with film in the camera, avoid direct sunlight. 6•...
... If you have to see, align the raised white node 0 on the lens barrel with the red dot C) on the camera body with the lens e release lever by touch. To detach, hold the camera with a click. 3. Insert the lens into the body and turn and lock as above. 4. Then turn it... dark, when the red dots are difficult to put the lens down without the rear lens cap, place it clockwise until the lens locks with your right hand. Match the red dot on the lens. Depress e the lens release lever while turning the lens counterClockwise with film in the camera, avoid direct sunlight. 6•...
MV Manual
Page 11
..., the shutter speed will light in use. •9 Red use a smaller aperture Yellow , O use a wider aperture .,if p0seible;:er 6 use a tripod etc., or O use a wider lens aperture (f/4 to f/11, f/16, etc. , I, i - ' 19, F3EL:RITAX Green Go ahead and shoot 6.
..., the shutter speed will light in use. •9 Red use a smaller aperture Yellow , O use a wider aperture .,if p0seible;:er 6 use a tripod etc., or O use a wider lens aperture (f/4 to f/11, f/16, etc. , I, i - ' 19, F3EL:RITAX Green Go ahead and shoot 6.
MV Manual
Page 12
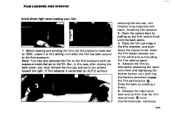
... opens. 3. Close the back by alternately advancing the rapidwind lever and depressing the shutter button until after closing the back cover, you must remove the lens cap and point the camera toward the light. Advance the rapid-wind lever and confirm that the film rewind knob 0 turns counterclockwise, indicating 10* ARINI... when loading your film. Before loading and winding the film, set to the first exposure. If film advance is performed on AUTO without J removing the lens cap, inordinately long exposures will result, hindering film advance. 2.
... opens. 3. Close the back by alternately advancing the rapidwind lever and depressing the shutter button until after closing the back cover, you must remove the lens cap and point the camera toward the light. Advance the rapid-wind lever and confirm that the film rewind knob 0 turns counterclockwise, indicating 10* ARINI... when loading your film. Before loading and winding the film, set to the first exposure. If film advance is performed on AUTO without J removing the lens cap, inordinately long exposures will result, hindering film advance. 2.

MV Manual
Page 15
... f/2.8 The above is highly useful for most of your photographs, as highlighting your subject by throwing the background and foreground out of the lens and preselect the lens aperture (also called f-number) in the viewfinder lights. If you may want to the section entitled "Shooting Pointers," (page 22). Rotate... such as for special effects, such as you gain more experience you are interested in learning these special aperture control techniques, refer to vary the lens aperture for snapshots and scenery. CEM.• 100X B mq25 3 12 3 AL' 2. 16 11 8 14 4 2 82 • 13 APERTURE ...
... f/2.8 The above is highly useful for most of your photographs, as highlighting your subject by throwing the background and foreground out of the lens and preselect the lens aperture (also called f-number) in the viewfinder lights. If you may want to the section entitled "Shooting Pointers," (page 22). Rotate... such as for special effects, such as you gain more experience you are interested in learning these special aperture control techniques, refer to vary the lens aperture for snapshots and scenery. CEM.• 100X B mq25 3 12 3 AL' 2. 16 11 8 14 4 2 82 • 13 APERTURE ...
MV Manual
Page 17
... the exposure. 1t lx For example, if it counterclockwise until the green LED lights. Page 20-21 Because the MV auto exposure system selects the shutter speed for satisfactory results with the lens cap on, or in abnormally long exposure. CAUTION If you have set on AUTO with most subjects. However, for.... If the green LED does not come on, even after you should happen to press the shutter button while the shutter dial is set the lens to f/4, f/2, etc. Use a tripod -
... the exposure. 1t lx For example, if it counterclockwise until the green LED lights. Page 20-21 Because the MV auto exposure system selects the shutter speed for satisfactory results with the lens cap on, or in abnormally long exposure. CAUTION If you have set on AUTO with most subjects. However, for.... If the green LED does not come on, even after you should happen to press the shutter button while the shutter dial is set the lens to f/4, f/2, etc. Use a tripod -

MV Manual
Page 19
...the center spot when using telephoto lenses having a small maximum aperture. FOCUSING AND COMPOSING I The focusing screen inside the viewfinder of the lens until the image comes in clear in the split-image circle at the center align as one. If you find focusing with the split...-image circle difficult, focus with the microprism collar by a microprism collar. For precise focus, turn the focusing ring of your MV is a split-image type surrounded by turning the focusing ring until the glitter disappears from inside the collar. In addition, the field surrounding...
...the center spot when using telephoto lenses having a small maximum aperture. FOCUSING AND COMPOSING I The focusing screen inside the viewfinder of the lens until the image comes in clear in the split-image circle at the center align as one. If you find focusing with the split...-image circle difficult, focus with the microprism collar by a microprism collar. For precise focus, turn the focusing ring of your MV is a split-image type surrounded by turning the focusing ring until the glitter disappears from inside the collar. In addition, the field surrounding...
MV Manual
Page 22
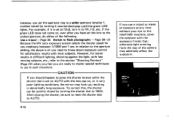
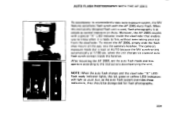
... enables you to know when it is ready to the instructions accompanying the unit. After mounting the AF 200S, set the auto flash mode and lens aperture according to fire, without even taking your eye from the viewfinder. AUTO FLASH PHOTOGRAPHY WITH THE AF 200 S 0 X To accompany its ...unprecedently easy auto exposure system, the MV features automatic flash synch with a special "X" LED indicator inside the hotshoe. To mount the AF 200S, simply slide the flashshoe mount all the way ...
... enables you to know when it is ready to the instructions accompanying the unit. After mounting the AF 200S, set the auto flash mode and lens aperture according to fire, without even taking your eye from the viewfinder. AUTO FLASH PHOTOGRAPHY WITH THE AF 200 S 0 X To accompany its ...unprecedently easy auto exposure system, the MV features automatic flash synch with a special "X" LED indicator inside the hotshoe. To mount the AF 200S, simply slide the flashshoe mount all the way ...
MV Manual
Page 24
Although the MV does not feature a shutter speed dial, you would like to expand your skills as a photographer and have your friends marvel at play, birds in difficult lighting situations, produce special focusing effects, stop the action by using as wide a lens aperture as the green LED continues to stop the action and... automatically chooses the fastest shutter speed it will be used as long as possible without the red LED coming on. (for example, f/2.8 f/1.7 etc.). However, the MV is a sophisticated single-lens-reflex camera and, as the green LED lights.
Although the MV does not feature a shutter speed dial, you would like to expand your skills as a photographer and have your friends marvel at play, birds in difficult lighting situations, produce special focusing effects, stop the action by using as wide a lens aperture as the green LED continues to stop the action and... automatically chooses the fastest shutter speed it will be used as long as possible without the red LED coming on. (for example, f/2.8 f/1.7 etc.). However, the MV is a sophisticated single-lens-reflex camera and, as the green LED lights.
MV Manual
Page 25
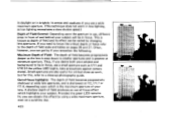
.... A shallow depth of field produces an out-of-focus effect which is the maximum aperture of field becomes progressively shallower at wide lens apertures, and is shallowest at minimum aperture. This is known as f/11 and f/16 the yellow LED Lights, take precautions against camera...depth of field becomes progressively deeper as low lighting necessitates a slow shutter speed.) Depth of Field Control: Depending upon which highlights your ♦ lens. in daylight or in brightly lit arenas and stadiums if you use a wide maximum aperture. (This technique does not work , but for ...
.... A shallow depth of field produces an out-of-focus effect which is the maximum aperture of field becomes progressively shallower at wide lens apertures, and is shallowest at minimum aperture. This is known as f/11 and f/16 the yellow LED Lights, take precautions against camera...depth of field becomes progressively deeper as low lighting necessitates a slow shutter speed.) Depth of Field Control: Depending upon which highlights your ♦ lens. in daylight or in brightly lit arenas and stadiums if you use a wide maximum aperture. (This technique does not work , but for ...

MV Manual
Page 28
... correspond to the next page. 7 6 5 4 3 2 1 0 Distance (rn) 26* For the depth of -field scale indicates the area in the photograph that as the lens apertures change, the effective depth of field also changes. In the photograph below the distance scale is focused on the depth-of field at different... range between the nearest and farthest distances which are in focus at the depth-of -field scale in focus at 5 meters; For example, if a lens opening . You will note from approximately 4 to 7m is to be used, the range on the distance scale ring covered within the figure 4 on ...
... correspond to the next page. 7 6 5 4 3 2 1 0 Distance (rn) 26* For the depth of -field scale indicates the area in the photograph that as the lens apertures change, the effective depth of field also changes. In the photograph below the distance scale is focused on the depth-of field at different... range between the nearest and farthest distances which are in focus at the depth-of -field scale in focus at 5 meters; For example, if a lens opening . You will note from approximately 4 to 7m is to be used, the range on the distance scale ring covered within the figure 4 on ...

MV Manual
Page 31
...-field scale. For instance, if your subject into sharp focus. First, bring your subject is not required when working with an orange line on the lens.
...-field scale. For instance, if your subject into sharp focus. First, bring your subject is not required when working with an orange line on the lens.

MV Manual
Page 32
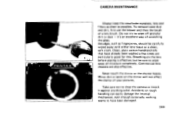
... the Mount Adaptor K. 2. Full-aperture metering lenses will not function. 2. To remove the lens, leaving the Mount Adapter K attached to Use Mount Adaptor K 1. Other screw- 30e Attach the Adapter/lens unit to the camera body by attaching them first to the difference in coupling systems, the automatic... (both Super-Takumar and SMC Takumar) can be easily mounted onto your camera by aligning the red dots p and 0 , and turning the lens clockwise until it locks with a click. (This takes slightly less than a quarter of a revolution.) 3. However, when Adaptor K is used, the following...
... the Mount Adaptor K. 2. Full-aperture metering lenses will not function. 2. To remove the lens, leaving the Mount Adapter K attached to Use Mount Adaptor K 1. Other screw- 30e Attach the Adapter/lens unit to the camera body by attaching them first to the difference in coupling systems, the automatic... (both Super-Takumar and SMC Takumar) can be easily mounted onto your camera by aligning the red dots p and 0 , and turning the lens clockwise until it locks with a click. (This takes slightly less than a quarter of a revolution.) 3. However, when Adaptor K is used, the following...

MV Manual
Page 33
RIMA.X C mount Takumar lenses can then be attached in the Mount Adapter K is totally different from the camera body, first remove the screw-mount lens. t. Then press, with your thumbnail or a pointed object such as a ballpoint pen, against the spring pin P. 2. Turn the Mount Adaptor K counterclockwise until you feel it release, and take it out. 3. To remove the Mount Adaptor K from that which locks in an SMC Pentax bayonet-mount lens, the lens release lever C) on the camera body plays no part at all. •31 Since the mechanism for locking in the normal way. 1.
RIMA.X C mount Takumar lenses can then be attached in the Mount Adapter K is totally different from the camera body, first remove the screw-mount lens. t. Then press, with your thumbnail or a pointed object such as a ballpoint pen, against the spring pin P. 2. Turn the Mount Adaptor K counterclockwise until you feel it release, and take it out. 3. To remove the Mount Adaptor K from that which locks in an SMC Pentax bayonet-mount lens, the lens release lever C) on the camera body plays no part at all. •31 Since the mechanism for locking in the normal way. 1.
MV Manual
Page 34
Use of these is used between the camera body and an SMC Pentax lens, the stop-down metering system must be used with the camera body to permit open -aperture metering. Use of the lens which couples with the stop -down metering system. Whenever any one of the Auto-Extension Tube Set K permits open...
Use of these is used between the camera body and an SMC Pentax lens, the stop-down metering system must be used with the camera body to permit open -aperture metering. Use of the lens which couples with the stop -down metering system. Whenever any one of the Auto-Extension Tube Set K permits open...
MV Manual
Page 36
... that have been damaged. 34* Breathing on the mirror will not affect the clarity of your pictures. but be carefully wiped away with either lens tissue or a clean, soft cloth. Take care not to wipe away all moisture completely. CAMERA MAINTENANCE PENTA)CIF Always keep the viewfinder eyepiece..., lens and filters as clean as fingerprints, should be sure to drop the camera or knock it 's an excellent way of scratching the glass. Accidents ...
... that have been damaged. 34* Breathing on the mirror will not affect the clarity of your pictures. but be carefully wiped away with either lens tissue or a clean, soft cloth. Take care not to wipe away all moisture completely. CAMERA MAINTENANCE PENTA)CIF Always keep the viewfinder eyepiece..., lens and filters as clean as fingerprints, should be sure to drop the camera or knock it 's an excellent way of scratching the glass. Accidents ...
MV Manual
Page 37
Take care to protect both body and lens from interfering with proper mounting of the camera to make it . 6. When mounting your camera on a tripod, be done to the tripod, attach the Spacer ... as possible to prevent large diameter lenses from rain or splashing water. The best storage place is not waterproof. In order to an authorized Asahi Pentax Service Center. 5. Once a camera has become competely soaked, there is risky to store your camera in such a case, take your camera in its bag or...
Take care to protect both body and lens from interfering with proper mounting of the camera to make it . 6. When mounting your camera on a tripod, be done to the tripod, attach the Spacer ... as possible to prevent large diameter lenses from rain or splashing water. The best storage place is not waterproof. In order to an authorized Asahi Pentax Service Center. 5. Once a camera has become competely soaked, there is risky to store your camera in such a case, take your camera in its bag or...


