

Operation Manual
Page 16
Align the red dots on the camera and lens mount, attach the lens to the camera body, and turn it fully to the right until you hear a click. BASIC OPERATION (PREPARATION) ATTACHING THE LENS O I 0 ti 1. Remove the body mount cap while depressing the lens unlock button. 2.
Align the red dots on the camera and lens mount, attach the lens to the camera body, and turn it fully to the right until you hear a click. BASIC OPERATION (PREPARATION) ATTACHING THE LENS O I 0 ti 1. Remove the body mount cap while depressing the lens unlock button. 2.

Operation Manual
Page 17
... cap, squeeze the tabs on both sides in the direction of the arrow. • With a non-autofocus lens attached, all available functions in this camera operate except autofocus operation. • We assume no responsibility nor liability for damages resulting from the use of the lens against damage after removal, be... the left while depressing the lens unlock button. • To protect the contacts and AF coupler of lenses made by other manufacturers. • The camera body and lens mount incorporate lens information contacts and an AF coupler. (NOLLVElVd3kid) NOID/1:13dO OISVEI 3 0 3.
... cap, squeeze the tabs on both sides in the direction of the arrow. • With a non-autofocus lens attached, all available functions in this camera operate except autofocus operation. • We assume no responsibility nor liability for damages resulting from the use of the lens against damage after removal, be... the left while depressing the lens unlock button. • To protect the contacts and AF coupler of lenses made by other manufacturers. • The camera body and lens mount incorporate lens information contacts and an AF coupler. (NOLLVElVd3kid) NOID/1:13dO OISVEI 3 0 3.

Operation Manual
Page 18
the locking mechanism will release and the film holder is heard. Attaching 2. Depress both sides of the red line; Raise the film holder knob and turn the film holder knob to the end of the film holder until the red dot markings align and a click is now detached from the camera body. Align the red dots on the film holder knob and film holder, then insert the film holder into the camera chamber. Continue to turn until you hear a click. MED ATTACHING/DETACHING FILM HOLDER 645 2 BASIC OPERATION (PREPARATION) Detaching 1.
the locking mechanism will release and the film holder is heard. Attaching 2. Depress both sides of the red line; Raise the film holder knob and turn the film holder knob to the end of the film holder until the red dot markings align and a click is now detached from the camera body. Align the red dots on the film holder knob and film holder, then insert the film holder into the camera chamber. Continue to turn until you hear a click. MED ATTACHING/DETACHING FILM HOLDER 645 2 BASIC OPERATION (PREPARATION) Detaching 1.
Operation Manual
Page 19
After attaching the film holder to the camera, fold the film holder knob into the camera body, be sure that the film holder is required when attaching the 220 film holder. BASIC OPERATION (PREPARATION) 3.Turn the film holder knob 90° to avoid any serious damage. • The same precaution is inserted the right way up in order to the right. 15 3 • When inserting the film holder into its original position.
After attaching the film holder to the camera, fold the film holder knob into the camera body, be sure that the film holder is required when attaching the 220 film holder. BASIC OPERATION (PREPARATION) 3.Turn the film holder knob 90° to avoid any serious damage. • The same precaution is inserted the right way up in order to the right. 15 3 • When inserting the film holder into its original position.
Operation Manual
Page 22
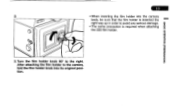
... spool until arrow marking on the LCD panel. &If the [ E ] appears, indicating that the film is not properly loaded. Set the main switch to the camera body. 7 8 J 0 0 O • • 545N,__ OFF .1.4.0(1., 1 BINH011 eta 7. Wind the leader paper to the first frame. [ i ] is displayed on the leader paper aligns with the holder...
... spool until arrow marking on the LCD panel. &If the [ E ] appears, indicating that the film is not properly loaded. Set the main switch to the camera body. 7 8 J 0 0 O • • 545N,__ OFF .1.4.0(1., 1 BINH011 eta 7. Wind the leader paper to the first frame. [ i ] is displayed on the leader paper aligns with the holder...

Operation Manual
Page 23
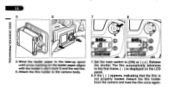
... m pictures are taken with its operations. • The film counter indication advances one each time the shutter is in the shade or by using your body to become familiar with the 220 roll film. 33 0 z m -0 0 If the dot marks align with the start mark on the film holder, the first 3 frames... will not be exposed. • If the leader paper is wound far beyond the start mark S or the red line, you first operate the camera with no film loaded to shade the film holder. • We suggest that you may lose the last frame(s) on the roll. • The film...
... m pictures are taken with its operations. • The film counter indication advances one each time the shutter is in the shade or by using your body to become familiar with the 220 roll film. 33 0 z m -0 0 If the dot marks align with the start mark on the film holder, the first 3 frames... will not be exposed. • If the leader paper is wound far beyond the start mark S or the red line, you first operate the camera with no film loaded to shade the film holder. • We suggest that you may lose the last frame(s) on the roll. • The film...
Operation Manual
Page 25
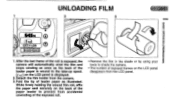
... the LCD panel disappears from accidental unwinding of the exposed roll. • Remove the film in the shade or by using your body to shade the camera. • The number of leader paper as the back of the leader paper is wound to the take-up spool. [End]... to prevent from the LCD panel. While firmly holding the wound film roll, affix the paper seal securely on the LCD panel is exposed, the camera will automatically wind the film and stops winding as soon as illustrated. (NOLLVEntd3Eld) NOID183d0 0ISVEI 1 /v J • 0 545N 0 7t. 0FFiip ON 111111111111 1111111111 UNLOADING ...
... the LCD panel disappears from accidental unwinding of the exposed roll. • Remove the film in the shade or by using your body to shade the camera. • The number of leader paper as the back of the leader paper is wound to the take-up spool. [End]... to prevent from the LCD panel. While firmly holding the wound film roll, affix the paper seal securely on the LCD panel is exposed, the camera will automatically wind the film and stops winding as soon as illustrated. (NOLLVEntd3Eld) NOID183d0 0ISVEI 1 /v J • 0 545N 0 7t. 0FFiip ON 111111111111 1111111111 UNLOADING ...
Operation Manual
Page 35
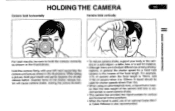
...individual differences among photographers, in the illustrations. A tripod should be sure to avoid camera shake. • This camera has provided two tripod sockets for vertical and horizontal format positions. • When the tripod is used, use of an optional Cable SW... F or Cable Release is also recommended. While taking a picture, hold the camera correctly as shown in general the shutter speed for a hand held camera is the inverse of the focal length. Hold the camera firmly, with your body or the camera...
...individual differences among photographers, in the illustrations. A tripod should be sure to avoid camera shake. • This camera has provided two tripod sockets for vertical and horizontal format positions. • When the tripod is used, use of an optional Cable SW... F or Cable Release is also recommended. While taking a picture, hold the camera correctly as shown in general the shutter speed for a hand held camera is the inverse of the focal length. Hold the camera firmly, with your body or the camera...

Operation Manual
Page 81
.../consecutive mode, Approx.2.0 frames/sec.(consecutive mode) Exposure Meter: TTL dual six-segment metering, Metering range from EV2 to EV21 at ISO100 with Pentax dedicated auto flashes, X-sync speed at 1/60 sec., Slow shutter speed synchronization possible in Metered Manual Mode, X-sync. contact with couples with ... AA-size 1.5V batteries (Alkaline or Lithium battery), an optional Remote battery pack 645 is attachable with X-sync. Supplied Accessories: Body mount cap 645, Rear body cap 645, Release socket cap F, Strap D, Large eye cap 645, and Hot shoe cover Fc. socket is locked;
.../consecutive mode, Approx.2.0 frames/sec.(consecutive mode) Exposure Meter: TTL dual six-segment metering, Metering range from EV2 to EV21 at ISO100 with Pentax dedicated auto flashes, X-sync speed at 1/60 sec., Slow shutter speed synchronization possible in Metered Manual Mode, X-sync. contact with couples with ... AA-size 1.5V batteries (Alkaline or Lithium battery), an optional Remote battery pack 645 is attachable with X-sync. Supplied Accessories: Body mount cap 645, Rear body cap 645, Release socket cap F, Strap D, Large eye cap 645, and Hot shoe cover Fc. socket is locked;
