
Operation Manual
Page 3
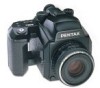
... with or actual damage to the Fantastic World of Pentax Autofocus Multi-Mode Medium Format Photography The Pentax 645N, our latest development in the viewfinder. or FA lens attached, the 645N imprints relevant information (frame number, shutter speed, aperture...film wind, an external LCD information panel and clearly visible LCD information in the area of the medium format SLR, promises a superior 6 x 4.5cm result with AF Spot and AF Wide selection, and the 6-segment multi-pattern metering allows precise exposure control under widely varying conditions. Welcome to your Pentax camera...
... with or actual damage to the Fantastic World of Pentax Autofocus Multi-Mode Medium Format Photography The Pentax 645N, our latest development in the viewfinder. or FA lens attached, the 645N imprints relevant information (frame number, shutter speed, aperture...film wind, an external LCD information panel and clearly visible LCD information in the area of the medium format SLR, promises a superior 6 x 4.5cm result with AF Spot and AF Wide selection, and the 6-segment multi-pattern metering allows precise exposure control under widely varying conditions. Welcome to your Pentax camera...

Operation Manual
Page 5
... dirt or grease, or corrosion due to a subfreezing one or vice versa, the formation of icelets may come in an area where chemicals are not covered under the terms of safety at a Pentax service center. If you cannot correct the problems, have your picture with a margin ...cushion to protect the camera when carrying it may often be assessed. lated on the interior or exterior of the camera may be extremely harmful to the camera mechanism as paint thinner, alcohol or benzene to prevent the growth of the film frame. PRECAUTIONS FOR YOUR CAMERA Your Pentax camera is not weather, ...
... dirt or grease, or corrosion due to a subfreezing one or vice versa, the formation of icelets may come in an area where chemicals are not covered under the terms of safety at a Pentax service center. If you cannot correct the problems, have your picture with a margin ...cushion to protect the camera when carrying it may often be assessed. lated on the interior or exterior of the camera may be extremely harmful to the camera mechanism as paint thinner, alcohol or benzene to prevent the growth of the film frame. PRECAUTIONS FOR YOUR CAMERA Your Pentax camera is not weather, ...

Operation Manual
Page 7
LCD PANEL INDICATION Dewl °mcaoiAmoso 1rr-w-e1ri-1--&0 VIEWFINDER INDICATION "minmim" • COG' F a8* 88 : Frame Counter (p.22) 8888: Film Speed Information (p.20) ISO :.Film Status Information (p.20) : Battery Exhaustion Warning (p.11) O : Imprinting Exposure Data Information (p.60) LCD (Liquid-Crystal Display) When the LCD is exposed to high temperatures over ...
LCD PANEL INDICATION Dewl °mcaoiAmoso 1rr-w-e1ri-1--&0 VIEWFINDER INDICATION "minmim" • COG' F a8* 88 : Frame Counter (p.22) 8888: Film Speed Information (p.20) ISO :.Film Status Information (p.20) : Battery Exhaustion Warning (p.11) O : Imprinting Exposure Data Information (p.60) LCD (Liquid-Crystal Display) When the LCD is exposed to high temperatures over ...

Operation Manual
Page 8
... working parts Safe use of your camera Precautions for your camera Precautions for battery usage LCD panel indication Viewfinder indication Flaps Inside cover 1 2 3 3 I. BASIC OPERATION (PREPARATION) 7 - 24 Attaching the camera strap 7 Loading the batteries 8 ...Turning on the power 10 • When the batteries are exhausted 11 Attaching the lens 12 Attaching/Detaching the film holder 120 and 22014 Depressing the shutter release button 16 Film loading 17 Setting the film speed (ISO) 20 Unloading the film 21 Unloading the film...
... working parts Safe use of your camera Precautions for your camera Precautions for battery usage LCD panel indication Viewfinder indication Flaps Inside cover 1 2 3 3 I. BASIC OPERATION (PREPARATION) 7 - 24 Attaching the camera strap 7 Loading the batteries 8 ...Turning on the power 10 • When the batteries are exhausted 11 Attaching the lens 12 Attaching/Detaching the film holder 120 and 22014 Depressing the shutter release button 16 Film loading 17 Setting the film speed (ISO) 20 Unloading the film 21 Unloading the film...

Operation Manual
Page 9
... in the Servo position.53 Using the Spot AF Mode 54 Focus Lock Function 55 Manual focusing 56 Imprinting the exposure data on the film 60 Using a Pentax Dedicated External Flash 62 Daylight-sync shooting 66 Slow-speed-sync shooting 67 About the preview lever 68 Accessories (Optional) 69 • Interchangeable focusing...
... in the Servo position.53 Using the Spot AF Mode 54 Focus Lock Function 55 Manual focusing 56 Imprinting the exposure data on the film 60 Using a Pentax Dedicated External Flash 62 Daylight-sync shooting 66 Slow-speed-sync shooting 67 About the preview lever 68 Accessories (Optional) 69 • Interchangeable focusing...

Operation Manual
Page 13
... about 6 hours about 10 hours • The batteries were used under Pentax testing conditions. Always use six 1.5V AA size batteries. • The ISO film speed and number of exposed frames are unchanged even if the batteries are recommended when the camera is cn C) used under the extremely low temperatures. • Replace all...
... about 6 hours about 10 hours • The batteries were used under Pentax testing conditions. Always use six 1.5V AA size batteries. • The ISO film speed and number of exposed frames are unchanged even if the batteries are recommended when the camera is cn C) used under the extremely low temperatures. • Replace all...

Operation Manual
Page 18
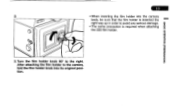
Raise the film holder knob and turn the film holder knob to turn until you hear a click. Continue to the end of the film holder until the red dot markings align and a click is now detached from the camera body. the locking mechanism will release and the film holder is heard. Depress both sides of the red line; Attaching 2. Align the red dots on the film holder knob and film holder, then insert the film holder into the camera chamber. MED ATTACHING/DETACHING FILM HOLDER 645 2 BASIC OPERATION (PREPARATION) Detaching 1.
Raise the film holder knob and turn the film holder knob to turn until you hear a click. Continue to the end of the film holder until the red dot markings align and a click is now detached from the camera body. the locking mechanism will release and the film holder is heard. Depress both sides of the red line; Attaching 2. Align the red dots on the film holder knob and film holder, then insert the film holder into the camera chamber. MED ATTACHING/DETACHING FILM HOLDER 645 2 BASIC OPERATION (PREPARATION) Detaching 1.
Operation Manual
Page 19
BASIC OPERATION (PREPARATION) 3.Turn the film holder knob 90° to avoid any serious damage. • The same precaution is required when attaching the 220 film holder. After attaching the film holder to the camera, fold the film holder knob into the camera body, be sure that the film holder is inserted the right way up in order to the right. 15 3 • When inserting the film holder into its original position.
BASIC OPERATION (PREPARATION) 3.Turn the film holder knob 90° to avoid any serious damage. • The same precaution is required when attaching the 220 film holder. After attaching the film holder to the camera, fold the film holder knob into the camera body, be sure that the film holder is inserted the right way up in order to the right. 15 3 • When inserting the film holder into its original position.

Operation Manual
Page 20
... picture, depress the shutter release button gently to prevent camera shake. • To prevent camera shake, depress the shutter release button gently. • Before loading a roll of film, slowly depress the shutter release button to set the proper film speed. Depressing it fully (second position) releases the... button is . • The LCD indication stays on for setting the film speed. LOADING FILM Spool retainer (p.17) Film wind gear (p.17) 0 00 0 0 Pressure plate Start mark (p.18) After loading the film, be sure to learn where the first position is released from the halfway...
... picture, depress the shutter release button gently to prevent camera shake. • To prevent camera shake, depress the shutter release button gently. • Before loading a roll of film, slowly depress the shutter release button to set the proper film speed. Depressing it fully (second position) releases the... button is . • The LCD indication stays on for setting the film speed. LOADING FILM Spool retainer (p.17) Film wind gear (p.17) 0 00 0 0 Pressure plate Start mark (p.18) After loading the film, be sure to learn where the first position is released from the halfway...

Operation Manual
Page 21
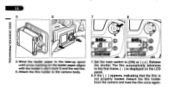
Slowly rotate the film winding gear in the direction of the leader into the take-up spool's slit. 4. Tear off the tape and install the spool to the spool retainer as illustrated. 2. 1 2 3 4 BASIC OPERATION (PREPARATION) 0 0 0 0 0 0 0 0 0 0 1.Install the emptied spool to the film holder so that the black inner side of the leading must face outwards. 3. Insert the tip of the arrow while lightly holding the leader paper.
Slowly rotate the film winding gear in the direction of the leader into the take-up spool's slit. 4. Tear off the tape and install the spool to the spool retainer as illustrated. 2. 1 2 3 4 BASIC OPERATION (PREPARATION) 0 0 0 0 0 0 0 0 0 0 1.Install the emptied spool to the film holder so that the black inner side of the leading must face outwards. 3. Insert the tip of the arrow while lightly holding the leader paper.
Operation Manual
Page 22
... on the LCD panel. &If the [ E ] appears, indicating that the film is not properly loaded. Release the shutter. Detach the film holder from the camera and load the film once again. Wind the leader paper to [ON] or [ •)))]. The film automatically advances to the camera body. 7 8 J 0 0 O • • 545N,__ OFF .1.4.0(1., 1 BINH011 eta 7. 18 a 5 6 0 m33...
... on the LCD panel. &If the [ E ] appears, indicating that the film is not properly loaded. Release the shutter. Detach the film holder from the camera and load the film once again. Wind the leader paper to [ON] or [ •)))]. The film automatically advances to the camera body. 7 8 J 0 0 O • • 545N,__ OFF .1.4.0(1., 1 BINH011 eta 7. 18 a 5 6 0 m33...

Operation Manual
Page 23
... one each time the shutter is in the shade or by using your body to shade the film holder. • We suggest that you may lose the last frame(s) on the roll. • The film holder cannot be exposed. • If the leader paper is wound far beyond the start mark S or... the red line, you first operate the camera with no film loaded to become familiar with the 220 roll film. 33 0 z m -0 0
... one each time the shutter is in the shade or by using your body to shade the film holder. • We suggest that you may lose the last frame(s) on the roll. • The film holder cannot be exposed. • If the leader paper is wound far beyond the start mark S or... the red line, you first operate the camera with no film loaded to become familiar with the 220 roll film. 33 0 z m -0 0

Operation Manual
Page 24
...the auto bracketing selector to [ ISO ]. • The film speed setting range is lifted. 2. To change the film speed to 6400 in 2/3 1 lea, 111111111111111111111111 :1/3 2/3 T nnn 1. To change the film speed to a smaller number (lower film speed), depress the [ V ] button repeatedly until the ...The auto bracketing selector returns to the original position when your finger is ISO 6 to a larger number (higher film speed), depress the [ A ] button repeatedly until the desired film speed appears on the LCD panel. • [ ISO ] on the LCD panel. While holding the auto bracketing...
...the auto bracketing selector to [ ISO ]. • The film speed setting range is lifted. 2. To change the film speed to 6400 in 2/3 1 lea, 111111111111111111111111 :1/3 2/3 T nnn 1. To change the film speed to a smaller number (lower film speed), depress the [ V ] button repeatedly until the ...The auto bracketing selector returns to the original position when your finger is ISO 6 to a larger number (higher film speed), depress the [ A ] button repeatedly until the desired film speed appears on the LCD panel. • [ ISO ] on the LCD panel. While holding the auto bracketing...
Operation Manual
Page 25
... securely on the back of the paper leader to prevent from accidental unwinding of the exposed roll. • Remove the film in the shade or by using your body to shade the camera. • The number of the leader paper is wound to the take-up spool. [End] on the LCD panel... disappears from the camera. 3.Fold the tip of leader paper as the back of exposed frames on the LCD panel is displayed. 2. Detach the film holder from the LCD panel. (NOLLVEntd3Eld) NOID183d0 0ISVEI 1 /v J • 0 545N 0 7t. 0FFiip ON 111111111111 ...
... securely on the back of the paper leader to prevent from accidental unwinding of the exposed roll. • Remove the film in the shade or by using your body to shade the camera. • The number of the leader paper is wound to the take-up spool. [End] on the LCD panel... disappears from the camera. 3.Fold the tip of leader paper as the back of exposed frames on the LCD panel is displayed. 2. Detach the film holder from the LCD panel. (NOLLVEntd3Eld) NOID183d0 0ISVEI 1 /v J • 0 545N 0 7t. 0FFiip ON 111111111111 ...

Operation Manual
Page 26
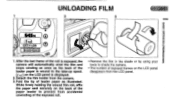
...PREPARATION) NEM UNLOADING THE FILM IN MID-ROLL 1 2 3 4 0 • 645N oF1F0.A0RN 1 41 LIENOMMENJ 65) If you wish to [ ON ]. 2. Before detaching the film holder, check that [End] is displayed on the LCD panel disappears from the LCD panel. • When removing the film from the camera, protect it from ...accidental unwinding of the exposed roll. • The number of leader paper as illustrated. While firmly holding the wound film roll, affix the paper seal securely on the back of ...
...PREPARATION) NEM UNLOADING THE FILM IN MID-ROLL 1 2 3 4 0 • 645N oF1F0.A0RN 1 41 LIENOMMENJ 65) If you wish to [ ON ]. 2. Before detaching the film holder, check that [End] is displayed on the LCD panel disappears from the LCD panel. • When removing the film from the camera, protect it from ...accidental unwinding of the exposed roll. • The number of leader paper as illustrated. While firmly holding the wound film roll, affix the paper seal securely on the back of ...

Operation Manual
Page 37
... off the shutter release button. 0 • If the drive mode switch is set , the rn camera focuses only the first picture. • The shutter cannot be released if the subject is out of focus. • The film counter indication advances each time the shutter is fixed (focus lock). From the second picture...
... off the shutter release button. 0 • If the drive mode switch is set , the rn camera focuses only the first picture. • The shutter cannot be released if the subject is out of focus. • The film counter indication advances each time the shutter is fixed (focus lock). From the second picture...

Operation Manual
Page 40
Turn the multi-exposure switch in the direc- Depress the shutter release button to shoot an initial exposure. tion of the arrow until it locks. 2. The frame counter on the LCD panel blinks. 3. 345 MULTIPLE EXPOSURE MODE 1 2 0d / 3 O • 045N 0 49 100 Si OFF.30ON Y %I.") oe 111111111111 SNOILVkl3dO O3ONVAOV Procedure 1. The film will not advance.
Turn the multi-exposure switch in the direc- Depress the shutter release button to shoot an initial exposure. tion of the arrow until it locks. 2. The frame counter on the LCD panel blinks. 3. 345 MULTIPLE EXPOSURE MODE 1 2 0d / 3 O • 045N 0 49 100 Si OFF.30ON Y %I.") oe 111111111111 SNOILVkl3dO O3ONVAOV Procedure 1. The film will not advance.

Operation Manual
Page 41
The film will advance and the single-frame shooting will be restored. • When using the Multi-Exposure Mode, you usually get the best result using a flash ... the frame, and depress the shutter release button to shoot the third shot. Notes: • To exposure the third shot, leave the multi-expo- The film does not advance at on this stage. 4 5 Ir • /I 4.Return the multi-exposure switch to the original position to the original position. Then return the...
The film will advance and the single-frame shooting will be restored. • When using the Multi-Exposure Mode, you usually get the best result using a flash ... the frame, and depress the shutter release button to shoot the third shot. Notes: • To exposure the third shot, leave the multi-expo- The film does not advance at on this stage. 4 5 Ir • /I 4.Return the multi-exposure switch to the original position to the original position. Then return the...

Operation Manual
Page 67
... release button halfway down will restart charging of the flash unit. The aperture value will also be fixed but will vary depending on what ISO film is set to 1/60 of second to a slower speed which does not cause...
... release button halfway down will restart charging of the flash unit. The aperture value will also be fixed but will vary depending on what ISO film is set to 1/60 of second to a slower speed which does not cause...

Operation Manual
Page 73
..., O2, R2, and Circular Polarizing Filter are available. • AF400T Bracket for 645 z Attaches AF400T flash unit to a 645 camera or 645N Cn camera via tripod socket on both sides of the viewfinder. Each filter is an accessory to the grooves on the base of...camera can be switched from 1X to 2X. • AF500FTZ A TTL Auto Zoom flash with a built-in AF spotbeam and large guide number of 50 in meters (ISO 100). z z • Remote Battery Pack 645 0 The remote battery pack is available in extremely cold temper- 0 ature. m • Film back 645 120 film back and 220 film...
..., O2, R2, and Circular Polarizing Filter are available. • AF400T Bracket for 645 z Attaches AF400T flash unit to a 645 camera or 645N Cn camera via tripod socket on both sides of the viewfinder. Each filter is an accessory to the grooves on the base of...camera can be switched from 1X to 2X. • AF500FTZ A TTL Auto Zoom flash with a built-in AF spotbeam and large guide number of 50 in meters (ISO 100). z z • Remote Battery Pack 645 0 The remote battery pack is available in extremely cold temper- 0 ature. m • Film back 645 120 film back and 220 film...
