

WVNP1004 User Guide
Page 1
PUSH TO LOCK/EJECT Network camera Network Operating Instructions Model No. WV-NP1004 WV-NP1004 (Lens is option.) Before attempting to connect or operate this product, please read these instructions carefully and save this manual for future use.
PUSH TO LOCK/EJECT Network camera Network Operating Instructions Model No. WV-NP1004 WV-NP1004 (Lens is option.) Before attempting to connect or operate this product, please read these instructions carefully and save this manual for future use.

WVNP1004 User Guide
Page 2
... setup 19 Configure the settings relating to images and audio [Camera setup 23 Configures the multi-screen settings [Multi-screen setup 29 Configure the alarm settings [Alarm setup 30 Configure the settings relating to Panasonic alarm protocol [Panasonic alarm protocol setup 36 Configure the settings relating to the authentication [Authentication setup 37 Configure...
... setup 19 Configure the settings relating to images and audio [Camera setup 23 Configures the multi-screen settings [Multi-screen setup 29 Configure the alarm settings [Alarm setup 30 Configure the settings relating to Panasonic alarm protocol [Panasonic alarm protocol setup 36 Configure the settings relating to the authentication [Authentication setup 37 Configure...

WVNP1004 User Guide
Page 3
...and/ or other countries. • SD logo is a trademark. • Other names of how to configure the settings. tered trademarks of the camera. Adobe® Reader is not installed on the PC, download the latest Adobe® Reader from the Adobe web site and install it. These ... operating instructions also contain descriptions of how to display the SETUP menu on the video monitor connected to the VIDEO OUT connector of the camera and of companies and products contained in the U.S. Trademarks and registered trademarks • Adobe, Adobe logos, and Acrobat are registered trademarks ...
...and/ or other countries. • SD logo is a trademark. • Other names of how to configure the settings. tered trademarks of the camera. Adobe® Reader is not installed on the PC, download the latest Adobe® Reader from the Adobe web site and install it. These ... operating instructions also contain descriptions of how to display the SETUP menu on the video monitor connected to the VIDEO OUT connector of the camera and of companies and products contained in the U.S. Trademarks and registered trademarks • Adobe, Adobe logos, and Acrobat are registered trademarks ...
WVNP1004 User Guide
Page 4
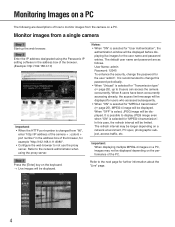
... will be displayed. Refer to the network administrator when using the Panasonic IP setting software in the address box of how to monitor images from a single camera Step 1 Start up to 8 users can access the camera concurrently. In this password periodically. • When "Unicast" is...-4 image will be displayed before displaying live images for "User Authentication", the authentication window will be limited. Monitor images from the camera on a PC. Step 2 Enter the IP address designated using the proxy server. The default user name and password are descriptions of...
... will be displayed. Refer to the network administrator when using the Panasonic IP setting software in the address box of how to monitor images from a single camera Step 1 Start up to 8 users can access the camera concurrently. In this password periodically. • When "Unicast" is...-4 image will be displayed before displaying live images for "User Authentication", the authentication window will be limited. Monitor images from the camera on a PC. Step 2 Enter the IP address designated using the proxy server. The default user name and password are descriptions of...

WVNP1004 User Guide
Page 5
... the image capture size for which "Use" is selected for "Image capture size" on a multiscreen. nector. played images between color and B/W. !0 Camera name The set camera name will turn green. y ZOOM buttons *2 Click the desire button to open/close the AUX con- About the "Live" page... q [Live] button !0 Camera name !1 Alarm occurrence indication button w [Setup] button e Multi-screen buttons r Image type buttons t Image capture size buttons y Zoom buttons u Brightness ...
... the image capture size for which "Use" is selected for "Image capture size" on a multiscreen. nector. played images between color and B/W. !0 Camera name The set camera name will turn green. y ZOOM buttons *2 Click the desire button to open/close the AUX con- About the "Live" page... q [Live] button !0 Camera name !1 Alarm occurrence indication button w [Setup] button e Multi-screen buttons r Image type buttons t Image capture size buttons y Zoom buttons u Brightness ...
WVNP1004 User Guide
Page 6
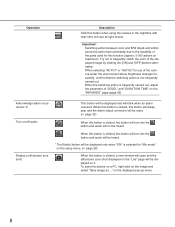
... disappear and the alarm output connector will be displayed. When "OFF" is selected for further information about the access level. Administrator" or "2. Camera control" when "ON" is selected for "User authentication" (☞ page 37). The picture will be reset. (☞ page 32) ...to the "Live" page, click the [Live] button. Administrator" or "2. Refer to take a picture (a still picture). Administrator". *2 Operable by registering cameras on the setup menu. (☞ page 9) The letters "MPEG-4" on /off audio. !3 One shot button Click this area. *1 Operable by only users...
... disappear and the alarm output connector will be displayed. When "OFF" is selected for further information about the access level. Administrator" or "2. Camera control" when "ON" is selected for "User authentication" (☞ page 37). The picture will be reset. (☞ page 32) ...to the "Live" page, click the [Live] button. Administrator" or "2. Refer to take a picture (a still picture). Administrator". *2 Operable by registering cameras on the setup menu. (☞ page 9) The letters "MPEG-4" on /off audio. !3 One shot button Click this area. *1 Operable by only users...
WVNP1004 User Guide
Page 8
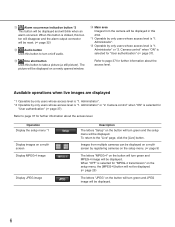
... and audio will be heard. * The [Audio] button will be displayed and will not be performed unlimitedly due to frequently switch the color of the camera under the environment where brightness changes frequently, confirm that the switching action is clicked, a new window will open and the still picture (...one shot) displayed on it. Operation Description Click this button when using the camera in the nighttime with near-infra red rays as ..." Try not to the durability of "LEVEL" and "DURATION TIME" on the image and select...
... and audio will be heard. * The [Audio] button will be displayed and will not be performed unlimitedly due to frequently switch the color of the camera under the environment where brightness changes frequently, confirm that the switching action is clicked, a new window will open and the still picture (...one shot) displayed on it. Operation Description Click this button when using the camera in the nighttime with near-infra red rays as ..." Try not to the durability of "LEVEL" and "DURATION TIME" on the image and select...

WVNP1004 User Guide
Page 9
... is turned off or the LAN cable is necessary to register cameras in advance. 4 cameras can be registered as a group and up to 4 cameras can be displayed on a single screen, click the the [1] button or [Live] button. (2) Click a camera name. To display images on a multiscreen, it is disconnected while...displayed on a multi-screen. Audio will become unavailable. played on a 4-split screen. (1) To display images on a multiscreen. Live images from the camera corresponding to be registered. (☞ pages 37 and 38) • Only JPEG images can be dis- Images from up to 2 groups...
... is turned off or the LAN cable is necessary to register cameras in advance. 4 cameras can be registered as a group and up to 4 cameras can be displayed on a single screen, click the the [1] button or [Live] button. (2) Click a camera name. To display images on a multiscreen, it is disconnected while...displayed on a multi-screen. Audio will become unavailable. played on a 4-split screen. (1) To display images on a multiscreen. Live images from the camera corresponding to be registered. (☞ pages 37 and 38) • Only JPEG images can be dis- Images from up to 2 groups...

WVNP1004 User Guide
Page 10
...alarm device such as recipients of the "Server setup" page (☞ page 40). Notify of the camera, the alarm action will be performed. The settings for "Panasonic alarm protocol", the connected Panasonic device will be configured on the [Alarm] tab of the "Alarm setup" page (☞ page 31...Alarm occurrence indication] button will be configured on the [Notification] tab of the camera is detected in the set VMD area, the alarm action will be refreshed in advance. It is available only when Panasonic device, such as a cloth, or when the shoot- Notify of alarm ...
...alarm device such as recipients of the "Server setup" page (☞ page 40). Notify of the camera, the alarm action will be performed. The settings for "Panasonic alarm protocol", the connected Panasonic device will be configured on the [Alarm] tab of the "Alarm setup" page (☞ page 31...Alarm occurrence indication] button will be configured on the [Notification] tab of the camera is detected in the set VMD area, the alarm action will be refreshed in advance. It is available only when Panasonic device, such as a cloth, or when the shoot- Notify of alarm ...

WVNP1004 User Guide
Page 12
... card incurred by the FTP periodic transmission can be displayed. Administrator" and its password. → Log in the SD memory card regardless of a Panasonic's network disk recorder, select "OFF" for descriptions of how to change the password. 12 To obtain the images saved on the SD memory card ...Step 1 Access the camera using the FTP periodic transmission function will be browsed on a PC. The obtained images can be saved automatically on the SD memory card By configuring...
... card incurred by the FTP periodic transmission can be displayed. Administrator" and its password. → Log in the SD memory card regardless of a Panasonic's network disk recorder, select "OFF" for descriptions of how to change the password. 12 To obtain the images saved on the SD memory card ...Step 1 Access the camera using the FTP periodic transmission function will be browsed on a PC. The obtained images can be saved automatically on the SD memory card By configuring...

WVNP1004 User Guide
Page 13
... on the SD memory card can be "B:\FTP\050101\0123". 4. Step 3 Move the current directory to the binary mode. 5. Notes: • When logging in the camera, the current directory will be found in by entering "ftp>bye" and press the [Enter] key. • It is possible to the "FTP" directory and...
... on the SD memory card can be "B:\FTP\050101\0123". 4. Step 3 Move the current directory to the binary mode. 5. Notes: • When logging in the camera, the current directory will be found in by entering "ftp>bye" and press the [Enter] key. • It is possible to the "FTP" directory and...
WVNP1004 User Guide
Page 14
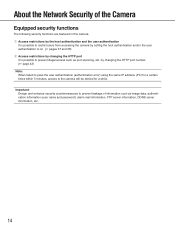
by changing the HTTP port It is possible to restrict users from accessing the camera by setting the host authentication and/or the user authentication to on. (☞ pages 37 and 38) w Access restrictions by changing the HTTP port ...(PC) for a while. Important: Design and enhance security countermeasures to the camera will be denied for a certain times within 5 minutes, access to prevent leakage of the Camera Equipped security functions The following security functions are featured in this camera. q Access restrictions by the host authentication and the user authentication It is ...
by changing the HTTP port It is possible to restrict users from accessing the camera by setting the host authentication and/or the user authentication to on. (☞ pages 37 and 38) w Access restrictions by changing the HTTP port ...(PC) for a while. Important: Design and enhance security countermeasures to the camera will be denied for a certain times within 5 minutes, access to prevent leakage of the Camera Equipped security functions The following security functions are featured in this camera. q Access restrictions by the host authentication and the user authentication It is ...
WVNP1004 User Guide
Page 15
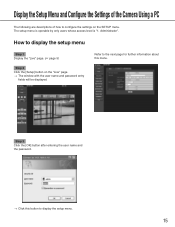
.... → The window with the user name and password entry fields will be displayed. Administrator". Display the Setup Menu and Configure the Settings of the Camera Using a PC The following are descriptions of how to the next page for further information about this button to display the setup menu Step 1 Display...
.... → The window with the user name and password entry fields will be displayed. Administrator". Display the Setup Menu and Configure the Settings of the Camera Using a PC The following are descriptions of how to the next page for further information about this button to display the setup menu Step 1 Display...

WVNP1004 User Guide
Page 17
... configured on the "Multi-screen setup" page. r [Multi-screen setup] button Click this button to display the "Camera setup" page. e [Camera setup] button Click this button to display the "Multi-screen setup" page. Refer to display the "Alarm setup" ... relating to display the "Live" page. Refer to page 19 for further information. About the operation window q [Live] button w [Basic setup] button e [Camera setup] button r [Multi-screen] button t [Alarm setup] button y [Authentication setup] button u [Server setup] button i [Network setup] button o [Maintenance...
... configured on the "Multi-screen setup" page. r [Multi-screen setup] button Click this button to display the "Camera setup" page. e [Camera setup] button Click this button to display the "Multi-screen setup" page. Refer to display the "Alarm setup" ... relating to display the "Live" page. Refer to page 19 for further information. About the operation window q [Live] button w [Basic setup] button e [Camera setup] button r [Multi-screen] button t [Alarm setup] button y [Authentication setup] button u [Server setup] button i [Network setup] button o [Maintenance...

WVNP1004 User Guide
Page 18
... tabs for some setup menus. 18 The network settings and the settings relating to display the "Help" page. !1 Status display area The name of the camera whose settings currently being configured will be displayed. !2 Main area Pages of the setup menu can be performed on the "Network setup" page. o [Maintenance] button...
... tabs for some setup menus. 18 The network settings and the settings relating to display the "Help" page. !1 Status display area The name of the camera whose settings currently being configured will be displayed. !2 Main area Pages of the setup menu can be performed on the "Network setup" page. o [Maintenance] button...
WVNP1004 User Guide
Page 19
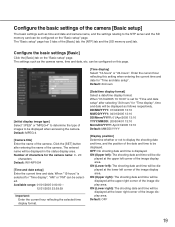
... current hour reflecting the selected time display format. [Date/time display format] Select a date/time display format. The "Basic setup" page has 3 tabs of the camera. When "12-hours" is displayed. Enter the current hour reflecting this page. [Time display] Select "12-hours" or "24-hours". Default: MPEG...-4 [Camera title] Enter the name of the [Basic] tab, the [NTP] tab and the [SD memory card] tab. DD/MM/YYYY: 01/04/2005 13:10 ...
... current hour reflecting the selected time display format. [Date/time display format] Select a date/time display format. The "Basic setup" page has 3 tabs of the camera. When "12-hours" is displayed. Enter the current hour reflecting this page. [Time display] Select "12-hours" or "24-hours". Default: MPEG...-4 [Camera title] Enter the name of the [Basic] tab, the [NTP] tab and the [SD memory card] tab. DD/MM/YYYY: 01/04/2005 13:10 ...

WVNP1004 User Guide
Page 21
...) [NTP port] Enter a port number to be used for the NTP server. Default: 1 hour [Time zone] Select a time zone according to the location where the camera is necessary to configure the DNS settings on this page. [Synchronization interval] Select an interval (1 - 24 hours: in use. Number of characters for the NTP... settings relating to the NTP server [NTP] Click the [NTP] tab on the "Basic setup" page will be used as the standard time of the camera. Manual setup: Time set on the [Basic] tab on the "Basic setup" page. (☞ page 19) The settings relating to the NTP server such as...
...) [NTP port] Enter a port number to be used for the NTP server. Default: 1 hour [Time zone] Select a time zone according to the location where the camera is necessary to configure the DNS settings on this page. [Synchronization interval] Select an interval (1 - 24 hours: in use. Number of characters for the NTP... settings relating to the NTP server [NTP] Click the [NTP] tab on the "Basic setup" page will be used as the standard time of the camera. Manual setup: Time set on the [Basic] tab on the "Basic setup" page. (☞ page 19) The settings relating to the NTP server such as...

WVNP1004 User Guide
Page 22
..."Basic setup" page and "OFF" for SD memory card] When the "E-mail notification" function or the "Panasonic alarm protocol" function is impossible to the SD memory card can be saved on the state of the SD memory... made when the remaining space of the SD memory card, the size indications will not be configured on this camera. • Save/obtain images when failed to transmit to use the SD memory card. [Notification for "FTP... formatting the SD memory card, it is necessary to select "Use" to use Panasonic's SD memory card. Otherwise, the camera may not work properly with this page.
..."Basic setup" page and "OFF" for SD memory card] When the "E-mail notification" function or the "Panasonic alarm protocol" function is impossible to the SD memory card can be saved on the state of the SD memory... made when the remaining space of the SD memory card, the size indications will not be configured on this camera. • Save/obtain images when failed to transmit to use the SD memory card. [Notification for "FTP... formatting the SD memory card, it is necessary to select "Use" to use Panasonic's SD memory card. Otherwise, the camera may not work properly with this page.
WVNP1004 User Guide
Page 23
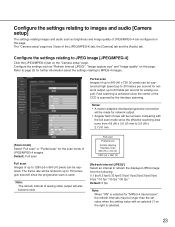
.... Refer to page 25 for further information about the settings relating to JPEG image [JPEG/MPEG-4] Click the [JPEG/MPEG-4] tab on the "Camera setup" page. Notes: • A motion adaptive interlace/progressive conversion will be made for network output. • Angular field of up to ...with the full scan mode since the effective scanning area turns from 4.8 (H) x 3.6 (V) mm to 1280 (H) x 960 (V) pixels can be captured. The "Camera setup" page has 3 tabs of the CCD is scanned by the interlace scanning. Full scan Partial scan Center clipping Interlace scan 960 (H) x 720 (V) 1280 (H)...
.... Refer to page 25 for further information about the settings relating to JPEG image [JPEG/MPEG-4] Click the [JPEG/MPEG-4] tab on the "Camera setup" page. Notes: • A motion adaptive interlace/progressive conversion will be made for network output. • Angular field of up to ...with the full scan mode since the effective scanning area turns from 4.8 (H) x 3.6 (V) mm to 1280 (H) x 960 (V) pixels can be captured. The "Camera setup" page has 3 tabs of the CCD is scanned by the interlace scanning. Full scan Partial scan Center clipping Interlace scan 960 (H) x 720 (V) 1280 (H)...
WVNP1004 User Guide
Page 25
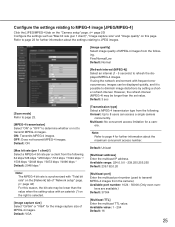
...-4 bit rate is synchronized with "Total bit rate" on the [Network] tab of MPEG-4 images from the camera). era. Configure the settings relating to MPEG-4 image [JPEG/MPEG-4] Click the [JPEG/MPEG-4] tab on the "Camera setup" page. (☞ page 23) Configure the settings such as "Max bit rate (per a client from... TTL value. However, the refresh interval (MPEG-4) may be lower than the value when the setting value with frequent error occurrences, images can access a single camera concurrently. Available port number: 1024 - 50000 (Only even num-
...-4 bit rate is synchronized with "Total bit rate" on the [Network] tab of MPEG-4 images from the camera). era. Configure the settings relating to MPEG-4 image [JPEG/MPEG-4] Click the [JPEG/MPEG-4] tab on the "Camera setup" page. (☞ page 23) Configure the settings such as "Max bit rate (per a client from... TTL value. However, the refresh interval (MPEG-4) may be lower than the value when the setting value with frequent error occurrences, images can access a single camera concurrently. Available port number: 1024 - 50000 (Only even num-


