

WVCP460 User Guide
Page 1
... his own expense. You should note the serial number of your purchase to rain or moisture. PREFACE Panasonic's WV-CP460 (WV-CP464) series color digital camera introduces a new level of high picture quality and high resolution through the use of electric shock. 4. Do not attempt... be caused. 7. Caution: To prevent fire or electric shock hazard, use only shielded interface cables when connecting to clean the camera when dirty. Color CCTV Cameras Operating Instructions Model No. N0100-1020 YWV8QA5377BN Printed in which case the user will be damaged by the party responsible for WV...
... his own expense. You should note the serial number of your purchase to rain or moisture. PREFACE Panasonic's WV-CP460 (WV-CP464) series color digital camera introduces a new level of high picture quality and high resolution through the use of electric shock. 4. Do not attempt... be caused. 7. Caution: To prevent fire or electric shock hazard, use only shielded interface cables when connecting to clean the camera when dirty. Color CCTV Cameras Operating Instructions Model No. N0100-1020 YWV8QA5377BN Printed in which case the user will be damaged by the party responsible for WV...

WVCP460 User Guide
Page 2
Minimum illumination of 0.8 lx (0.08 footcandle) with Panasonic aspherical high speed (F0.75) lenses. 5. 480 ... (0.83mm2) Resistance Ω/m 0.078 0.050 0.030 0.018 Resistance Ω/ft 0.026 0.017 0.010 0.006 • Calculation of maximum cable length between camera and power supply 10.8 V DC ≤ VA - (R x 0.42 x L) ≤ 16 V DC L : Cable length (m) R : Resistance...a spotlight. B. The 12 V DC or 24 V AC power supply cord can be pulled off the camera when the camera pans or tilts. Rotate this terminal. Notes: • Connect the power cord firmly. • The ...
Minimum illumination of 0.8 lx (0.08 footcandle) with Panasonic aspherical high speed (F0.75) lenses. 5. 480 ... (0.83mm2) Resistance Ω/m 0.078 0.050 0.030 0.018 Resistance Ω/ft 0.026 0.017 0.010 0.006 • Calculation of maximum cable length between camera and power supply 10.8 V DC ≤ VA - (R x 0.42 x L) ≤ 16 V DC L : Cable length (m) R : Resistance...a spotlight. B. The 12 V DC or 24 V AC power supply cord can be pulled off the camera when the camera pans or tilts. Rotate this terminal. Notes: • Connect the power cord firmly. • The ...

WVCP460 User Guide
Page 3
...the power cord (supplied as a standard accessory). !5 AC/DC Compatible Input Terminal (DC 12 V IN/AC 24 V IN) This terminal is for better color signal-to-noise ratio (c) Minimum of aliasing on the rear panel of the monitor. !4 AC Inlet Socket This socket is used to shoot indoor scenes... correction for greater picture detail of bright objects 7. It also selects the mode and can be used to connect the VIDEO IN connector of the camera. Connect to the GND terminal when the power is looped through. Copper wire #24 #22 #20 #18 size (AWG) (0.22mm2) (0.33mm2) (0.52mm2) (0.83mm2) ...
...the power cord (supplied as a standard accessory). !5 AC/DC Compatible Input Terminal (DC 12 V IN/AC 24 V IN) This terminal is for better color signal-to-noise ratio (c) Minimum of aliasing on the rear panel of the monitor. !4 AC Inlet Socket This socket is used to shoot indoor scenes... correction for greater picture detail of bright objects 7. It also selects the mode and can be used to connect the VIDEO IN connector of the camera. Connect to the GND terminal when the power is looped through. Copper wire #24 #22 #20 #18 size (AWG) (0.22mm2) (0.33mm2) (0.52mm2) (0.83mm2) ...

WVCP460 User Guide
Page 4
... following adjustment should be secured by force, the inner lens or CCD image sensor may be damaged. 1. Loosen the screw on the side of the camera. 2. Mount the lens by force will cause damage to the screw or deviation of the lens connector to the auto iris lens connector on the... side of the camera by qualified service personnel or system installers. (1) Cut the iris control cable at the end, the inner glass or CCD image sensor may damage inner...
... following adjustment should be secured by force, the inner lens or CCD image sensor may be damaged. 1. Loosen the screw on the side of the camera. 2. Mount the lens by force will cause damage to the screw or deviation of the lens connector to the auto iris lens connector on the... side of the camera by qualified service personnel or system installers. (1) Cut the iris control cable at the end, the inner glass or CCD image sensor may damage inner...

WVCP460 User Guide
Page 5
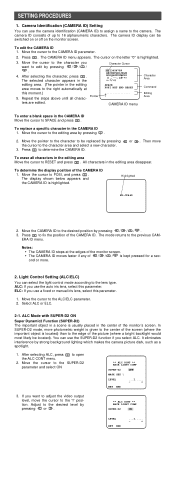
...button to the left. The message ALL RESET momentarily appears on the side panel. Move the cursor to END, then to the normal camera picture. 2. CAMERA SETUP MENU This camera utilizes a user setup menu that is moved to END and the CAM SET UP menu closed and the mode returns to the item.... Set Button ( ): Executes selections and displays a submenu for 2 seconds or The CAM SET UP menu appears on the menu. ** CAM SET UP ** ↵↵ CAMERA ID OFF ALC/ELC ALC SHUTTER OFF AGC ON SENS UP OFF SYNC INT ↵ WHITE BAL ATW MOTION DET OFF LENS DRIVE DC Highlighted...
...button to the left. The message ALL RESET momentarily appears on the side panel. Move the cursor to END, then to the normal camera picture. 2. CAMERA SETUP MENU This camera utilizes a user setup menu that is moved to END and the CAM SET UP menu closed and the mode returns to the item.... Set Button ( ): Executes selections and displays a submenu for 2 seconds or The CAM SET UP menu appears on the menu. ** CAM SET UP ** ↵↵ CAMERA ID OFF ALC/ELC ALC SHUTTER OFF AGC ON SENS UP OFF SYNC INT ↵ WHITE BAL ATW MOTION DET OFF LENS DRIVE DC Highlighted...
WVCP460 User Guide
Page 6
... Repeat the steps above until all characters in the editing area moves to the right automatically at the edges of the monitor screen. • The CAMERA ID moves faster if any of / / / is located) than to 16 alphanumeric characters. Move the cursor to the previous CAM- Highlighted WV-... area Move the cursor to the character area and select a new character. 3. Character Cursor 0123456789 ABCDEFGHIJKLM NOPQRSTUVWXYZ SPACE POSI RET END RESET CAMERA ID menu Character Area Command Editing Area To enter a blank space in the center of the screen (where the important object is kept ...
... Repeat the steps above until all characters in the editing area moves to the right automatically at the edges of the monitor screen. • The CAMERA ID moves faster if any of / / / is located) than to 16 alphanumeric characters. Move the cursor to the previous CAM- Highlighted WV-... area Move the cursor to the character area and select a new character. 3. Character Cursor 0123456789 ABCDEFGHIJKLM NOPQRSTUVWXYZ SPACE POSI RET END RESET CAMERA ID menu Character Area Command Editing Area To enter a blank space in the center of the screen (where the important object is kept ...

WVCP460 User Guide
Page 7
... result in the ALC CONT menu. Electronic Sensitivity Enhancement (SENS UP) There are two modes for SUPER-D2 in an afterimage. 5. Additionally, this camera, the camera automatically switches to just X32. To cancel masking, move the "I ..... - + RET END Blinking 3. Move the cursor to the SHUTTER parameter and...and press . 48 mask areas appear on the CAM SET UP menu or ON is selected, set to this model accepts the VBS signal (color composite video or blackburst signal) and VS signal (B/W composite video or composite sync signal). The ALC CONT menu appears. 6. Turns to white...
... result in the ALC CONT menu. Electronic Sensitivity Enhancement (SENS UP) There are two modes for SUPER-D2 in an afterimage. 5. Additionally, this camera, the camera automatically switches to just X32. To cancel masking, move the "I ..... - + RET END Blinking 3. Move the cursor to the SHUTTER parameter and...and press . 48 mask areas appear on the CAM SET UP menu or ON is selected, set to this model accepts the VBS signal (color composite video or blackburst signal) and VS signal (B/W composite video or composite sync signal). The ALC CONT menu appears. 6. Turns to white...

WVCP460 User Guide
Page 8
...the SYNC parameter and select line-lock (LL) or internal (INT). 2. Line-lock (LL) 3. Color Composite Video or Blackburst Signal (VBS) 4. No gen-lock input signal should not contain jitter, ** CAM SET UP ** ↵↵ CAMERA ID OFF ALC/ELC ALC SHUTTER OFF AGC ON SENS UP OFF SYNC EXT(VS... video output or the gen-lock input is as a Matrix Switcher, the camera sync mode is to the Gen-lock Input Connector on the rear panel. 5. If the camera installation is changed to match the color (hue) of the camera to the Gen-lock Input Connector on the rear panel. 3. VBS Gen-...
...the SYNC parameter and select line-lock (LL) or internal (INT). 2. Line-lock (LL) 3. Color Composite Video or Blackburst Signal (VBS) 4. No gen-lock input signal should not contain jitter, ** CAM SET UP ** ↵↵ CAMERA ID OFF ALC/ELC ALC SHUTTER OFF AGC ON SENS UP OFF SYNC EXT(VS... video output or the gen-lock input is as a Matrix Switcher, the camera sync mode is to the Gen-lock Input Connector on the rear panel. 5. If the camera installation is changed to match the color (hue) of the camera to the Gen-lock Input Connector on the rear panel. 3. VBS Gen-...

WVCP460 User Guide
Page 9
... Auto-Tracing White Balance Mode (ATW) You can select one step to obtain the optimum amount of the camera video output signal may not be disturbed. 7. The color temperature range for white balance setting manually. 1. Move the cursor to normal display. When the white balance setting... the same time, COARSE is being highlighted. ↵ ↵↵ 4. The color temperature is out of two modes for white balance adjustment as possible. (FINE adjustment can be adjusted and the reference camera video output signal to a FINE I " cursor reaches the "+" end, it jumps...
... Auto-Tracing White Balance Mode (ATW) You can select one step to obtain the optimum amount of the camera video output signal may not be disturbed. 7. The color temperature range for white balance setting manually. 1. Move the cursor to normal display. When the white balance setting... the same time, COARSE is being highlighted. ↵ ↵↵ 4. The color temperature is out of two modes for white balance adjustment as possible. (FINE adjustment can be adjusted and the reference camera video output signal to a FINE I " cursor reaches the "+" end, it jumps...

WVCP460 User Guide
Page 10
...the cursor to the AP GAIN parameter. 2. While observing the vectorscope or color video monitor, move the "I .... While holding down . 10-2. You can select the level of the VCR after the camera detects the object. To set 48 mask areas. Repeat the procedures above... wave form monitor or color video monitor, move the "I " cursor to meet your requirements. are swayed by the wind. • When the object is connected to a compatible intelligent CCTV system, the camera transmits an alarm signal by monitoring changes in a Panasonic Intelligent CCTV System select OFF to ...
...the cursor to the AP GAIN parameter. 2. While observing the vectorscope or color video monitor, move the "I .... While holding down . 10-2. You can select the level of the VCR after the camera detects the object. To set 48 mask areas. Repeat the procedures above... wave form monitor or color video monitor, move the "I " cursor to meet your requirements. are swayed by the wind. • When the object is connected to a compatible intelligent CCTV system, the camera transmits an alarm signal by monitoring changes in a Panasonic Intelligent CCTV System select OFF to ...


