
Installation Guide
Page 1
The model number is abbreviated in some descriptions in this manual for future use. Installation Guide Network Camera Model No. WV-SW155/WV-SW155M WV-SW152/WV-SW152M WV-SW155E/WV-SW155ME WV-SW152E/WV-SW152ME WV-SW155 Before attempting to connect or operate this product, please read these instructions carefully and save this manual.
The model number is abbreviated in some descriptions in this manual for future use. Installation Guide Network Camera Model No. WV-SW155/WV-SW155M WV-SW152/WV-SW152M WV-SW155E/WV-SW155ME WV-SW152E/WV-SW152ME WV-SW155 Before attempting to connect or operate this product, please read these instructions carefully and save this manual.

Installation Guide
Page 5
Limitation of warranty IN NO EVENT SHALL Panasonic System Networks Co., Ltd. BE LIABLE TO ANY PARTY OR ANY PERSON, EXCEPT FOR REPLACEMENT OR REASONABLE MAINTENANCE OF THE PRODUCT, FOR THE CASES, INCLUDING ... CLAIM OR ACTION FOR DAMAGES, BROUGHT BY ANY PERSON OR ORGANIZATION BEING A PHOTOGENIC SUBJECT, DUE TO VIOLATION OF PRIVACY WITH THE RESULT OF THAT SURVEILLANCE-CAMERA'S PICTURE, INCLUDING SAVED DATA, FOR SOME REASON, BECOMES PUBLIC OR IS USED FOR ANY PURPOSE; (7) LOSS OF REGISTERED DATA CAUSED BY ANY FAILURE. 5 Disclaimer of...
Limitation of warranty IN NO EVENT SHALL Panasonic System Networks Co., Ltd. BE LIABLE TO ANY PARTY OR ANY PERSON, EXCEPT FOR REPLACEMENT OR REASONABLE MAINTENANCE OF THE PRODUCT, FOR THE CASES, INCLUDING ... CLAIM OR ACTION FOR DAMAGES, BROUGHT BY ANY PERSON OR ORGANIZATION BEING A PHOTOGENIC SUBJECT, DUE TO VIOLATION OF PRIVACY WITH THE RESULT OF THAT SURVEILLANCE-CAMERA'S PICTURE, INCLUDING SAVED DATA, FOR SOME REASON, BECOMES PUBLIC OR IS USED FOR ANY PURPOSE; (7) LOSS OF REGISTERED DATA CAUSED BY ANY FAILURE. 5 Disclaimer of...

Installation Guide
Page 6
... browser. SDHC/SD memory card slot equipped It is possible.) (Recommended SDHC/SD memory card ☞ page 40) 6 Preface The network cameras WV-SW155/WV-SW155M/WV-SW152/WV-SW152M are designed to operate using a PC on a network (10BASE-T/100BASE-TX), and can be installed under eaves (sheltered outdoor). It ... connecting with a PoE (Power over Ethernet) device, power will be monitored on the PC. By connecting to monitor images from the camera can be supplied by simply connecting a LAN cable. (IEEE802.3af compliant) Adaptive darkness correction mode Corrects the blacked-out parts of dark...
... browser. SDHC/SD memory card slot equipped It is possible.) (Recommended SDHC/SD memory card ☞ page 40) 6 Preface The network cameras WV-SW155/WV-SW155M/WV-SW152/WV-SW152M are designed to operate using a PC on a network (10BASE-T/100BASE-TX), and can be installed under eaves (sheltered outdoor). It ... connecting with a PoE (Power over Ethernet) device, power will be monitored on the PC. By connecting to monitor images from the camera can be supplied by simply connecting a LAN cable. (IEEE802.3af compliant) Adaptive darkness correction mode Corrects the blacked-out parts of dark...

Installation Guide
Page 7
...is necessary to read the operating instructions and use the software on the provided CD-ROM.) 7 "WV-SW155, WV-SW155M, WV-SW152, WV-SW152M" or "SW155, SW155M, SW152, SW152M" shown in the instructions and illustrations used when describing the functions limited ...by all models. About the user manuals There are 2 sets of operating instructions for the WV-SW155, WV-SW155M, WV-SW152, WV-SW152M (P model), WV-SW155E, WV-SW155ME, WV-SW152E, WV-SW152ME (E model) as follows. • Installation Guide: Explains how to install and connect ...174; Reader® (It is necessary to operate this camera.
...is necessary to read the operating instructions and use the software on the provided CD-ROM.) 7 "WV-SW155, WV-SW155M, WV-SW152, WV-SW152M" or "SW155, SW155M, SW152, SW152M" shown in the instructions and illustrations used when describing the functions limited ...by all models. About the user manuals There are 2 sets of operating instructions for the WV-SW155, WV-SW155M, WV-SW152, WV-SW152M (P model), WV-SW155E, WV-SW155ME, WV-SW152E, WV-SW152ME (E model) as follows. • Installation Guide: Explains how to install and connect ...174; Reader® (It is necessary to operate this camera.

Installation Guide
Page 9
...• After the unit is called to close the browser. • Change the administrator password periodically. • Do not install the camera in with an authorized user name and password. • Apply measures such as user authentication to protect your network against unauthorized access by ...restricting users to those who log in locations where the camera or the cables can be destroyed or damaged by the administrator, make sure to the following security risks. q Leakage or theft of...
...• After the unit is called to close the browser. • Change the administrator password periodically. • Do not install the camera in with an authorized user name and password. • Apply measures such as user authentication to protect your network against unauthorized access by ...restricting users to those who log in locations where the camera or the cables can be destroyed or damaged by the administrator, make sure to the following security risks. q Leakage or theft of...

Installation Guide
Page 11
... restart just as a heater. Do not touch the dome with this product to direct heat sources such as when the power is recommended to clean camera lenses or lenses of spectacles).
... restart just as a heater. Do not touch the dome with this product to direct heat sources such as when the power is recommended to clean camera lenses or lenses of spectacles).

Installation Guide
Page 12
... approx. 2 hours, and then connect the power again. 12 Code label The code labels (accessory) are detailed drawing patterns on images caused by changing the camera direction. • Set the brightness (illuminance) level on the screen may cause discoloration.
... approx. 2 hours, and then connect the power again. 12 Code label The code labels (accessory) are detailed drawing patterns on images caused by changing the camera direction. • Set the brightness (illuminance) level on the screen may cause discoloration.

Installation Guide
Page 13
.... Procure fixing screws separately. The screws that the installation area is strong enough to hold this product, such as a concrete ceiling. • Install the camera in the foundation area of the architecture or where sufficient strength is assured. • If a ceiling board such as plaster board is too weak to... the screws or bolts, perform visual check to the surface. This product is no power switch. The product has no backlash. Precautions for installation Panasonic assumes no responsibility for assistance if you are not supplied. Be sure to be installed. 13
.... Procure fixing screws separately. The screws that the installation area is strong enough to hold this product, such as a concrete ceiling. • Install the camera in the foundation area of the architecture or where sufficient strength is assured. • If a ceiling board such as plaster board is too weak to... the screws or bolts, perform visual check to the surface. This product is no power switch. The product has no backlash. Precautions for installation Panasonic assumes no responsibility for assistance if you are not supplied. Be sure to be installed. 13

Installation Guide
Page 14
... for further information about the port forwarding function. Refer to the Operating Instructions (included in the CD-ROM) for descriptions of camera, or camera dropping may be distorted and noise sound may result in injury. Time & date setting It is compliant with the port forwarding... function (NAT, IP masquerade). Do not remove or loosen the internal camera screws Do not loosen the internal camera screws. Otherwise, water exposure may cause damage or malfunction of how to the Internet, use a broadband router with IEEE802...
... for further information about the port forwarding function. Refer to the Operating Instructions (included in the CD-ROM) for descriptions of camera, or camera dropping may be distorted and noise sound may result in injury. Time & date setting It is compliant with the port forwarding... function (NAT, IP masquerade). Do not remove or loosen the internal camera screws Do not loosen the internal camera screws. Otherwise, water exposure may cause damage or malfunction of how to the Internet, use a broadband router with IEEE802...

Installation Guide
Page 15
... (lit when accessing) About the initial set button After turning off the power of the camera during the process of the camera while holding down the settings in advance. 15 Do not turn off the power of the camera, turn on the power of initialization. Before initializing the settings, it is recommended to...
... (lit when accessing) About the initial set button After turning off the power of the camera during the process of the camera while holding down the settings in advance. 15 Do not turn off the power of the camera, turn on the power of initialization. Before initializing the settings, it is recommended to...

Installation Guide
Page 16
After removing the cover film, do not touch the dome with your hands. Cover film z Loosen the 3 dome cover fixing screws (M3) using the tamperproof screw bit (accessory). • One of the screws is loosened after the camera installation is completed. Screw cover Screw x Remove the dome cover. 16 Removing the dome cover base Important: • Remove the cover film attached to the dome after taking off the screw cover.
After removing the cover film, do not touch the dome with your hands. Cover film z Loosen the 3 dome cover fixing screws (M3) using the tamperproof screw bit (accessory). • One of the screws is loosened after the camera installation is completed. Screw cover Screw x Remove the dome cover. 16 Removing the dome cover base Important: • Remove the cover film attached to the dome after taking off the screw cover.

Installation Guide
Page 17
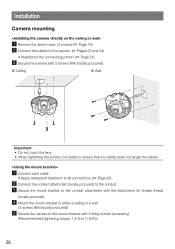
...ceiling or a wall • Use the supplied mount bracket • Use the one-gang junction box Important: • Procure 3 screws (M4) to secure the camera or the mount bracket (accessory) to a ceiling or a wall according to the material of a single screw/bolt is 196 N {44.06 lbf} or more. ... Appropriate mount place bracket Ceiling/wall (direct mounting) Ceiling/wall* Mount bracket (accessory) Ceiling/wall One-gang junction box Recommended Number of the camera are described here. 17 Do not use an anchor bolt (for M4) or an AY plug bolt (M4) for securing the mount bracket to...
...ceiling or a wall • Use the supplied mount bracket • Use the one-gang junction box Important: • Procure 3 screws (M4) to secure the camera or the mount bracket (accessory) to a ceiling or a wall according to the material of a single screw/bolt is 196 N {44.06 lbf} or more. ... Appropriate mount place bracket Ceiling/wall (direct mounting) Ceiling/wall* Mount bracket (accessory) Ceiling/wall One-gang junction box Recommended Number of the camera are described here. 17 Do not use an anchor bolt (for M4) or an AY plug bolt (M4) for securing the mount bracket to...

Installation Guide
Page 18
...hole Place the installation template label (accessory) on the ceiling or wall, mark the hole for the cable to the front of camera installation Installing the camera directly on the ceiling or wall, mark the holes for the fixing screws (3 places), then open the holes. Remove the ...installation template label, and mount the camera with 3 fixing screws (locally procured). (☞ Page 26) Place the installation template label (accessory) on the ceiling or wall Note: • ...
...hole Place the installation template label (accessory) on the ceiling or wall, mark the hole for the cable to the front of camera installation Installing the camera directly on the ceiling or wall, mark the holes for the fixing screws (3 places), then open the holes. Remove the ...installation template label, and mount the camera with 3 fixing screws (locally procured). (☞ Page 26) Place the installation template label (accessory) on the ceiling or wall Note: • ...

Installation Guide
Page 19
... threads) 3/4" or G3/4 of ISO 228-1. • Ceiling installation: The mount bracket shall be mounted with aligning the front side (the lens side) of the camera with the position of the arrow in "h". • Wall installation: The mount bracket shall be such that there is no intrusion of water into the...
... threads) 3/4" or G3/4 of ISO 228-1. • Ceiling installation: The mount bracket shall be mounted with aligning the front side (the lens side) of the camera with the position of the arrow in "h". • Wall installation: The mount bracket shall be such that there is no intrusion of water into the...

Installation Guide
Page 21
Using a one-gang junction box • Secure the mount bracket (accessory) to the one-gang junction box built in a ceiling or a wall. [Mounting hole pattern] One-gang junction box 83.5 mm {3-9/32"} Mount bracket (accessory) Note: • Ceiling installation: The mount bracket shall be mounted with aligning the front side (the lens side) of the camera with the position of the arrow in "h". • Wall installation: The mount bracket shall be mounted with "h" facing upward. 21
Using a one-gang junction box • Secure the mount bracket (accessory) to the one-gang junction box built in a ceiling or a wall. [Mounting hole pattern] One-gang junction box 83.5 mm {3-9/32"} Mount bracket (accessory) Note: • Ceiling installation: The mount bracket shall be mounted with aligning the front side (the lens side) of the camera with the position of the arrow in "h". • Wall installation: The mount bracket shall be mounted with "h" facing upward. 21

Installation Guide
Page 22
.../SD memory card is inserted or removed with the power on the [SD memory card] tab of the camera first. • When inserting an SDHC/SD memory card, make sure the direction. • Before removing...Not use " selection, and then unload the SDHC/SD memory card. c Attach the dome cover to the camera again. (☞ Page 31) Label side 22 After the SDHC/SD memory card is heard. Insert/remove an...fully into the SDHC/SD memory card slot until a click is removed, attach the dome cover to the camera. (☞ Page 31) v When removing the SDHC/SD memory card from the SDHC/SD memory card slot...
.../SD memory card is inserted or removed with the power on the [SD memory card] tab of the camera first. • When inserting an SDHC/SD memory card, make sure the direction. • Before removing...Not use " selection, and then unload the SDHC/SD memory card. c Attach the dome cover to the camera again. (☞ Page 31) Label side 22 After the SDHC/SD memory card is heard. Insert/remove an...fully into the SDHC/SD memory card slot until a click is removed, attach the dome cover to the camera. (☞ Page 31) v When removing the SDHC/SD memory card from the SDHC/SD memory card slot...
Installation Guide
Page 23
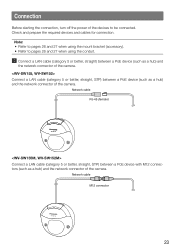
... a LAN cable (category 5 or better, straight, STP) between a PoE device with M12 connectors (such as a hub) and the network connector of the camera. z Connect a LAN cable (category 5 or better, straight) between a PoE device (such as a hub) and the network connector of the devices to ... Connect a LAN cable (category 5 or better, straight, STP) between a PoE device (such as a hub) and the network connector of the camera. Check and prepare the required devices and cables for connection. Note: • Refer to pages 26 and 27 when using the conduit. Connection Before starting...
... a LAN cable (category 5 or better, straight, STP) between a PoE device with M12 connectors (such as a hub) and the network connector of the camera. z Connect a LAN cable (category 5 or better, straight) between a PoE device (such as a hub) and the network connector of the devices to ... Connect a LAN cable (category 5 or better, straight, STP) between a PoE device (such as a hub) and the network connector of the camera. Check and prepare the required devices and cables for connection. Note: • Refer to pages 26 and 27 when using the conduit. Connection Before starting...

Installation Guide
Page 24
... all 4 pairs (8 pins) of the network cable. • To install this product outdoors, be supplied from the PoE device. The camera body is required for the cables when installing the camera outdoors. Insufficient tape stretch causes insufficient waterproofing. The mount brackets are not waterproof. When the cable is quickly reconnected, the power...
... all 4 pairs (8 pins) of the network cable. • To install this product outdoors, be supplied from the PoE device. The camera body is required for the cables when installing the camera outdoors. Insufficient tape stretch causes insufficient waterproofing. The mount brackets are not waterproof. When the cable is quickly reconnected, the power...

Installation Guide
Page 25
Connection example PoE device (hub) LAN cable (category 5 or better, straight) LAN cable (category 5 or better, straight) PC LAN cable (category 5 or better, straight) LAN cable (category 5 or better, straight) Important: • Use a switching hub which is compliant with 10BASE-T/100BASE-TX. • When connecting WV-SW155M cameras, use a PoE hub with M12 connectors. 25
Connection example PoE device (hub) LAN cable (category 5 or better, straight) LAN cable (category 5 or better, straight) PC LAN cable (category 5 or better, straight) LAN cable (category 5 or better, straight) Important: • Use a switching hub which is compliant with 10BASE-T/100BASE-TX. • When connecting WV-SW155M cameras, use a PoE hub with M12 connectors. 25
Installation Guide
Page 26
... mount bracket to either a ceiling or a wall. (3 screws (M4) (locally procured)) b Secure the camera to the camera. (☞ Pages 23 and 24) • Waterproof the connecting portion. (☞ Page 24) c Secure the camera with 3 screws (M4) (locally procured). Installation Camera mounting z Remove the dome cover. (3 screws) (☞ Page 16) x Connect the cables to the...
... mount bracket to either a ceiling or a wall. (3 screws (M4) (locally procured)) b Secure the camera to the camera. (☞ Pages 23 and 24) • Waterproof the connecting portion. (☞ Page 24) c Secure the camera with 3 screws (M4) (locally procured). Installation Camera mounting z Remove the dome cover. (3 screws) (☞ Page 16) x Connect the cables to the...


