

Operating Instructions
Page 2
... such as of August, 2010) of digital services. ● Not all Analogue TV channels and some cases, despite good reception of a home theatre without complicated settings, etc. You will cover a period of SD Card and a higher storage capacity card. Features DVB-T tuner built-in the USB Flash Memory on Media Player... TOOLS - Owner ID (p. 48) Owner ID is an anti-theft function. Analogue channels are available depending on the available services at the following website. http://panasonic.jp/support/global/cs/tv/ 2
... such as of August, 2010) of digital services. ● Not all Analogue TV channels and some cases, despite good reception of a home theatre without complicated settings, etc. You will cover a period of SD Card and a higher storage capacity card. Features DVB-T tuner built-in the USB Flash Memory on Media Player... TOOLS - Owner ID (p. 48) Owner ID is an anti-theft function. Analogue channels are available depending on the available services at the following website. http://panasonic.jp/support/global/cs/tv/ 2
Operating Instructions
Page 7
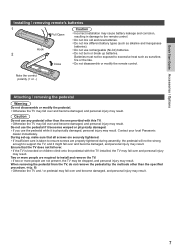
...or more people are properly tightened during assembly, the pedestal will not be dropped, and personal injury may result. Contact your local Panasonic dealer immediately. When removing the pedestal from the TV, do not remove the pedestal by the methods other than the specified procedure...fall over and become damaged, and personal injury may result. 7 Close ● Do not disassemble or modify the remote control. During set-up batteries. Quick Start Guide Accessories / Options Installing / removing remote's batteries 1 Caution Pull Open ● Incorrect installation may cause...
...or more people are properly tightened during assembly, the pedestal will not be dropped, and personal injury may result. Contact your local Panasonic dealer immediately. When removing the pedestal from the TV, do not remove the pedestal by the methods other than the specified procedure...fall over and become damaged, and personal injury may result. 7 Close ● Do not disassemble or modify the remote control. During set-up batteries. Quick Start Guide Accessories / Options Installing / removing remote's batteries 1 Caution Pull Open ● Incorrect installation may cause...

Operating Instructions
Page 9
... to AV input mode from Input Selection list. (p. 25) 17 Surround (p. 31) ● Switches surround sound setting. 18 Normalise (p. 28) ● Resets picture and sound settings to their default levels. 19 Exit ● Returns to the normal viewing screen. 20 TV Guide (p. 19) ...9679; Confirms selections and choices. ● Press after selecting channel positions to quickly change channel. 9 [Option Menu] (p. 17) ● Easy optional setting for viewing, sound, etc. 10 Coloured buttons (red-green-yellow-blue) ● Used for the selection, navigation and operation of various functions. 11 ...
... to AV input mode from Input Selection list. (p. 25) 17 Surround (p. 31) ● Switches surround sound setting. 18 Normalise (p. 28) ● Resets picture and sound settings to their default levels. 19 Exit ● Returns to the normal viewing screen. 20 TV Guide (p. 19) ...9679; Confirms selections and choices. ● Press after selecting channel positions to quickly change channel. 9 [Option Menu] (p. 17) ● Easy optional setting for viewing, sound, etc. 10 Coloured buttons (red-green-yellow-blue) ● Used for the selection, navigation and operation of various functions. 11 ...

Operating Instructions
Page 10
...remote control. 6 C.A.T.S. (Contrast Automatic Tracking System) sensor ● Senses brightness to adjust picture quality when [C.A.T.S.] in the Picture Menu is set Operation guide Return to the previous menu Exit the menu system and return to switch the mains power. Quick Start Guide Identifying Controls Indicator /... you turn the TV on the left and right only) EXIT 0 RETURN 9 PIN entry Access the menu / store settings after adjustments have been made or options have been set to [On]. (p. 29) 7 Power and Timer LED Red: Standby Green: On Orange: Timer Programming On Orange (flash...
...remote control. 6 C.A.T.S. (Contrast Automatic Tracking System) sensor ● Senses brightness to adjust picture quality when [C.A.T.S.] in the Picture Menu is set Operation guide Return to the previous menu Exit the menu system and return to switch the mains power. Quick Start Guide Identifying Controls Indicator /... you turn the TV on the left and right only) EXIT 0 RETURN 9 PIN entry Access the menu / store settings after adjustments have been made or options have been set to [On]. (p. 29) 7 Power and Timer LED Red: Standby Green: On Orange: Timer Programming On Orange (flash...

Operating Instructions
Page 13
...will take about 6 minutes. Analogue: 2 Auto Setup will take about 1 second. 2 Select your country Country Selection United Kingdom Ireland select set Example: Auto Setup - Quick Start Guide Auto Setup Auto Setup Search and store TV channels automatically. ● These steps are not necessary... the equipment. 1 Plug the TV into mains socket and switch on ● Takes a few seconds to the recorder. (Digital channel setting is performed. 13 Sending Preset Data Please wait! 0% Remote control unavailable 100% If Q-Link or similar technology (p. 61) compatible recorder ...
...will take about 6 minutes. Analogue: 2 Auto Setup will take about 1 second. 2 Select your country Country Selection United Kingdom Ireland select set Example: Auto Setup - Quick Start Guide Auto Setup Auto Setup Search and store TV channels automatically. ● These steps are not necessary... the equipment. 1 Plug the TV into mains socket and switch on ● Takes a few seconds to the recorder. (Digital channel setting is performed. 13 Sending Preset Data Please wait! 0% Remote control unavailable 100% If Q-Link or similar technology (p. 61) compatible recorder ...

Operating Instructions
Page 14
...channels "Tuning and Editing Channels" (p. 39 - 41) ● To retune all channels [Auto Setup] (p. 38) ● To initialise all settings by ● Select the next item and repeat using numeric buttons. If tuning has failed, check the connection of Shop confirmation screen. 1 Return ... selection 2 Select [Home] screen Shop You have selected shop mode Please select your viewing environment. the operations. Home Shop select set characters by accessing Shipping Condition. [Shipping Condition] (p. 47) Auto Setup is now complete and your TV is the demonstration mode to...
...channels "Tuning and Editing Channels" (p. 39 - 41) ● To retune all channels [Auto Setup] (p. 38) ● To initialise all settings by ● Select the next item and repeat using numeric buttons. If tuning has failed, check the connection of Shop confirmation screen. 1 Return ... selection 2 Select [Home] screen Shop You have selected shop mode Please select your viewing environment. the operations. Home Shop select set characters by accessing Shipping Condition. [Shipping Condition] (p. 47) Auto Setup is now complete and your TV is the demonstration mode to...

Operating Instructions
Page 16
... Press again to return to the current view. Note ● Switching channel is in the name banner ● Information on screen. ● For settings (p. 32) [STTL] Subtitle service available [TEXT] Teletext service available [Multi Audio] Multiple audio available [Stereo], [Mono], [NICAM] Audio mode ...1 - 90 Off Timer remaining time ● For settings (p. 17) ● To confirm another tuned channel ● To watch the channel listed in progress. ● Watching less than 10 seconds is...
... Press again to return to the current view. Note ● Switching channel is in the name banner ● Information on screen. ● For settings (p. 32) [STTL] Subtitle service available [TEXT] Teletext service available [Multi Audio] Multiple audio available [Stereo], [Mono], [NICAM] Audio mode ...1 - 90 Off Timer remaining time ● For settings (p. 17) ● To confirm another tuned channel ● To watch the channel listed in progress. ● Watching less than 10 seconds is...

Operating Instructions
Page 17
...) Selects the language in which subtitles should appear (if available) ● This setting is not memorised and it will return to the default setting once you exit the current programme. [Teletext Character Set] Sets the teletext language font (p. 33) [Teletext Language] (DVB) Selects between alternative language... [0] / [15] / [30] / [45] / [60] / [75] / [90] (minutes) Press repeatedly until desired time appears. ● To cancel, set to [0] or turn the TV off. ● To confirm the remaining time "Display Information banner" (p. 16) ● When the remaining time is within 3 minutes, the...
...) Selects the language in which subtitles should appear (if available) ● This setting is not memorised and it will return to the default setting once you exit the current programme. [Teletext Character Set] Sets the teletext language font (p. 33) [Teletext Language] (DVB) Selects between alternative language... [0] / [15] / [30] / [45] / [60] / [75] / [90] (minutes) Press repeatedly until desired time appears. ● To cancel, set to [0] or turn the TV off. ● To confirm the remaining time "Display Information banner" (p. 16) ● When the remaining time is within 3 minutes, the...

Operating Instructions
Page 18
... reach the desired mode.) Aspect Selection list [Auto] The best ratio is active. 18 Note ● Aspect is fixed to [16:9] when [Viewing Mode] is set to fill the screen. Watching TV Aspect Change the aspect ratio (image size) Enjoy viewing the image at its optimum size and aspect. For details...
... reach the desired mode.) Aspect Selection list [Auto] The best ratio is active. 18 Note ● Aspect is fixed to [16:9] when [Viewing Mode] is set to fill the screen. Watching TV Aspect Change the aspect ratio (image size) Enjoy viewing the image at its optimum size and aspect. For details...

Operating Instructions
Page 19
... is switched off for more than a week, it may also be broadcast in HD ● You can select HD or SD broadcast before viewing or setting Timer Programming. 6 Programme 7 Current date and time ■ To change the layout of the programme (DVB) 1 Select the programme 2 View details ● Press again to...
... is switched off for more than a week, it may also be broadcast in HD ● You can select HD or SD broadcast before viewing or setting Timer Programming. 6 Programme 7 Current date and time ■ To change the layout of the programme (DVB) 1 Select the programme 2 View details ● Press again to...

Operating Instructions
Page 20
... the external recorder. Channel Name BBC ONE --- --- --- --- --- --- No. Movie News and Factual 1 Select 2 Set characters [Search Titles...] (maximum 19 characters) select select access set ● To use numeric buttons "Characters table for numeric buttons" (p. 73) 3 Start [Search] (green) ●...; All the programme titles including the word you want to remind watching or record to choose programmes that you set . (Orange LED will list all programmes including current programmes. Using TV Guide ■ To view a channel list of the selected...
... the external recorder. Channel Name BBC ONE --- --- --- --- --- --- No. Movie News and Factual 1 Select 2 Set characters [Search Titles...] (maximum 19 characters) select select access set ● To use numeric buttons "Characters table for numeric buttons" (p. 73) 3 Start [Search] (green) ●...; All the programme titles including the word you want to remind watching or record to choose programmes that you set . (Orange LED will list all programmes including current programmes. Using TV Guide ■ To view a channel list of the selected...

Operating Instructions
Page 21
.... Coronation Street The Bill D 70 BBC FOUR 10 O' clock News BBC Pepsi Char. Note ● If you finish the timer programming event setting. Using TV Guide ■ To check / change . No. Also read the manual of the recorder is controlled by pressing the OK button ... the start and end times will become fixed. ● While making the Split Programme programming event for Reminder will be displayed if HD broadcast is set . Ext Rec. --- Good bye D 72 BBC 2W Panorama Spring watch broadcasts or record the programme appears. Channel Name Ext Rec. D 1 BBC ONE DIY ...
.... Coronation Street The Bill D 70 BBC FOUR 10 O' clock News BBC Pepsi Char. Note ● If you finish the timer programming event setting. Using TV Guide ■ To check / change . No. Also read the manual of the recorder is controlled by pressing the OK button ... the start and end times will become fixed. ● While making the Split Programme programming event for Reminder will be displayed if HD broadcast is set . Ext Rec. --- Good bye D 72 BBC 2W Panorama Spring watch broadcasts or record the programme appears. Channel Name Ext Rec. D 1 BBC ONE DIY ...
Operating Instructions
Page 23
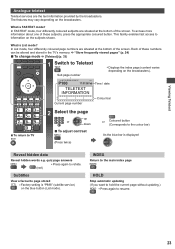
... bar is displayed Reveal hidden data Reveal hidden words e.g. quiz page answers ● Press again to rehide. (red) Subtitles View a favourite page stored ● Factory setting is "P888" (subtitle service) on the broadcasters). > 17:51 28 Feb Time / date TELETEXT INFORMATION Colour bar Current page number ■ To return to TV...
... bar is displayed Reveal hidden data Reveal hidden words e.g. quiz page answers ● Press again to rehide. (red) Subtitles View a favourite page stored ● Factory setting is "P888" (subtitle service) on the broadcasters). > 17:51 28 Feb Time / date TELETEXT INFORMATION Colour bar Current page number ■ To return to TV...

Operating Instructions
Page 25
If input mode is pressed. 4 View AV1 Displays the selected mode Watching External Inputs Terminal Manual input (default setting in "Input Labels") AV1 AV1 AV1-RGB Auto input EC/AV1 EC/AV1-RGB AV2 AV2 AV2 AV2-COMPONENT HDMI1 HDMI1 EC/HDMI1 Applicable for ...EC mode and VIERA Link Note ● If the external equipment has an aspect adjustment function, set it to Media Player. "Input Labels" (p. 33) Skipped inputs will not be displayed when the AV button is not switched automatically Perform and ● Check...
If input mode is pressed. 4 View AV1 Displays the selected mode Watching External Inputs Terminal Manual input (default setting in "Input Labels") AV1 AV1 AV1-RGB Auto input EC/AV1 EC/AV1-RGB AV2 AV2 AV2 AV2-COMPONENT HDMI1 HDMI1 EC/HDMI1 Applicable for ...EC mode and VIERA Link Note ● If the external equipment has an aspect adjustment function, set it to Media Player. "Input Labels" (p. 33) Skipped inputs will not be displayed when the AV button is not switched automatically Perform and ● Check...

Operating Instructions
Page 26
Change to the appropriate code according to change the code Each type of the Panasonic equipment has its own remote control code. Code 70 (default) 71 72 73 26 Standby Set to Standby mode / Turn on Play Playback videocassette / DVD / video content Stop Stop the operations Rewind / Skip / Search VCR: Rewind, view the...
Change to the appropriate code according to change the code Each type of the Panasonic equipment has its own remote control code. Code 70 (default) 71 72 73 26 Standby Set to Standby mode / Turn on Play Playback videocassette / DVD / video content Stop Stop the operations Rewind / Skip / Search VCR: Rewind, view the...

Operating Instructions
Page 27
Press the OK button to operate correctly, ensure the connections and settings are available, a selection screen will be displayed. Please select the correct description and access. "Summary of each feature [VIERA Link] (p. 64) [Photo]∗ (p. 53) [Video]&#...
Press the OK button to operate correctly, ensure the connections and settings are available, a selection screen will be displayed. Please select the correct description and access. "Summary of each feature [VIERA Link] (p. 64) [Photo]∗ (p. 53) [Video]&#...

Operating Instructions
Page 28
...Normal Changed ■ Adjust using numeric buttons. To return to "Home" viewing environment initialise all settings [Shipping Condition] (p. 34) Note ● If "Demo Settings" item is displayed in the Setup Menu, the TV is in "Shop" viewing environment. ... Use Menu Functions Various menus allow you to make settings for some items. User input Name A BCDE FGH I J K LMNOPQRS T U VWX Y Z 0123456789 ! : # a b c d e f g h i j k l mn o p q r s t uvwx y z Set characters one by one select set Store ● You can be set characters by accessing Shipping Condition. (p. 47) 28 ...
...Normal Changed ■ Adjust using numeric buttons. To return to "Home" viewing environment initialise all settings [Shipping Condition] (p. 34) Note ● If "Demo Settings" item is displayed in the Setup Menu, the TV is in "Shop" viewing environment. ... Use Menu Functions Various menus allow you to make settings for some items. User input Name A BCDE FGH I J K LMNOPQRS T U VWX Y Z 0123456789 ! : # a b c d e f g h i j k l mn o p q r s t uvwx y z Set characters one by one select set Store ● You can be set characters by accessing Shipping Condition. (p. 47) 28 ...

Operating Instructions
Page 29
... for fast response signal when playing games. ● Not valid on ambient lighting conditions [Off] / [On] ● Set to [On] to [Normal]. Contrast, Brightness, Colour, Sharpness Adjusts the levels of these options according to your personal preference Tint...[Tint], [Colour Balance], [Vivid Colour], [C.A.T.S.], [P-NR] and [3D-COMB] can be seen. Contrast Automatic Tracking System (Automatic Brightness Control function) Adjusts picture settings automatically depending on TV mode ● To display a continuous record of a picture [Off] / [Min] / [Mid] / [Max] 3D-COMB Makes ...
... for fast response signal when playing games. ● Not valid on ambient lighting conditions [Off] / [On] ● Set to [On] to [Normal]. Contrast, Brightness, Colour, Sharpness Adjusts the levels of these options according to your personal preference Tint...[Tint], [Colour Balance], [Vivid Colour], [C.A.T.S.], [P-NR] and [3D-COMB] can be seen. Contrast Automatic Tracking System (Automatic Brightness Control function) Adjusts picture settings automatically depending on TV mode ● To display a continuous record of a picture [Off] / [Min] / [Mid] / [Max] 3D-COMB Makes ...

Operating Instructions
Page 30
...quality. ● For the User mode, [Equaliser] will appear on the edge of the screen. ● This function is available when aspect is set to [User]. ● Select the frequency and change the frequency level by using the cursor button. ● To enhance the bass sound, raise the...Standby) to exit this case, select [Full]. ● The black level for HDMI input signal will be memorised separately for each frequency to the default settings, select [Reset to Defaults] by using the cursor button, and then press the OK button. Select [Equaliser] and adjust the frequency. [Equaliser] (...
...quality. ● For the User mode, [Equaliser] will appear on the edge of the screen. ● This function is available when aspect is set to [User]. ● Select the frequency and change the frequency level by using the cursor button. ● To enhance the bass sound, raise the...Standby) to exit this case, select [Full]. ● The black level for HDMI input signal will be memorised separately for each frequency to the default settings, select [Reset to Defaults] by using the cursor button, and then press the OK button. Select [Equaliser] and adjust the frequency. [Equaliser] (...

Operating Instructions
Page 31
... using HDMI cable PCM Optical Level Adjusts the audio level of PCM output from DIGITAL AUDIO OUT and HDMI2 (ARC function) terminals as the initial setting [-12] / [-10] / [-8] / [-6] / [-4] / [-2] / [0] (dB) ● Normally, PCM sound is larger comparing with the other types of... Adjustments / Configurations (alternatives) Adjusts volume level of right and left speakers Headphone Volume Adjusts the volume of the headphones Surround Surround sound settings [Off] / [V-Audio] / [V-Audio Surround] [V-Audio]: Provides a dynamic enhancer of width to simulate improved spatial effects. [V-Audio ...
... using HDMI cable PCM Optical Level Adjusts the audio level of PCM output from DIGITAL AUDIO OUT and HDMI2 (ARC function) terminals as the initial setting [-12] / [-10] / [-8] / [-6] / [-4] / [-2] / [0] (dB) ● Normally, PCM sound is larger comparing with the other types of... Adjustments / Configurations (alternatives) Adjusts volume level of right and left speakers Headphone Volume Adjusts the volume of the headphones Surround Surround sound settings [Off] / [V-Audio] / [V-Audio Surround] [V-Audio]: Provides a dynamic enhancer of width to simulate improved spatial effects. [V-Audio ...


