
Operating Instructions
Page 2
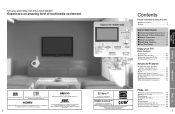
... 4 Notes 5 Quick Start Guide Accessories/Optional Accessory ··· 6 To Prevent TV from SD Card 22 Watching Videos and DVDs 24 Displaying PC Screen on TV 26 Advanced Features How to Use Menu Functions •(picture, sound quality, etc 28 EZ SyncTM "HDAVI ControlTM 32 •Lock 34 •Editing and Setting Channels 36 •Input Labels/Monitor Out/Closed Caption 38 •Using Timer 40 •Operating Peripheral...
... 4 Notes 5 Quick Start Guide Accessories/Optional Accessory ··· 6 To Prevent TV from SD Card 22 Watching Videos and DVDs 24 Displaying PC Screen on TV 26 Advanced Features How to Use Menu Functions •(picture, sound quality, etc 28 EZ SyncTM "HDAVI ControlTM 32 •Lock 34 •Editing and Setting Channels 36 •Input Labels/Monitor Out/Closed Caption 38 •Using Timer 40 •Operating Peripheral...

Operating Instructions
Page 3
... electric shock. KEEP SMALL PARTS AWAY FROM YOUNG CHILDREN. Continued use If a problem occurs (such as power-supply cord or plug is dropped, or if the cabinet becomes damaged, disconnect the power cord plug immediately. Have the TV evaluated at the rear. • Wall-hanging bracket (Vertical) TY-WK42PV3U (TH-42PZ700U, TH-50PZ700U, TH-58PZ700U) • Wall-hanging bracket (Angled) TY-WK42PR3U ■When using the pedestal, leave a space of...
... electric shock. KEEP SMALL PARTS AWAY FROM YOUNG CHILDREN. Continued use If a problem occurs (such as power-supply cord or plug is dropped, or if the cabinet becomes damaged, disconnect the power cord plug immediately. Have the TV evaluated at the rear. • Wall-hanging bracket (Vertical) TY-WK42PV3U (TH-42PZ700U, TH-50PZ700U, TH-58PZ700U) • Wall-hanging bracket (Angled) TY-WK42PR3U ■When using the pedestal, leave a space of...
Operating Instructions
Page 6
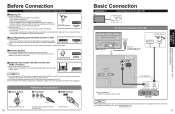
... cables and external equipment shown in this TV's remote control (p. 25 EZ SyncTM). Cable Box/Cable You need to subscribe to a cable TV service to enjoy viewing their VHF/UHF Antenna Cable Box/ Cable programming. •You can be done with a single cable. VCR DVD Recorder Connection can enjoy high-definition programming by hand. 10 red blue green green ••Match colors of an RF cable and Composite Video/S Video cable. Satellite Antenna Satellite Receiver ■Enjoying Home...
... cables and external equipment shown in this TV's remote control (p. 25 EZ SyncTM). Cable Box/Cable You need to subscribe to a cable TV service to enjoy viewing their VHF/UHF Antenna Cable Box/ Cable programming. •You can be done with a single cable. VCR DVD Recorder Connection can enjoy high-definition programming by hand. 10 red blue green green ••Match colors of an RF cable and Composite Video/S Video cable. Satellite Antenna Satellite Receiver ■Enjoying Home...

Operating Instructions
Page 9
... removes the channel banner (p. 20) Sound mute On/Off Numeric keypad to select any channel (p. 20) or press to fix cables. 16 tab Insert Accessories Band (2) (Supplied with Pedestal) Identifying Controls Display the Main menu. SD CARD slot Switches TV/VIDEO Video Input 3 connector Selects channels in sequence (Move cursor up or down during menu mode.) Volume up/down (Move cursor right or left during menu mode.) POWER button Remote Swing up /down Changes aspect ratio (p. 21) Operates the Favorite channel list...
... removes the channel banner (p. 20) Sound mute On/Off Numeric keypad to select any channel (p. 20) or press to fix cables. 16 tab Insert Accessories Band (2) (Supplied with Pedestal) Identifying Controls Display the Main menu. SD CARD slot Switches TV/VIDEO Video Input 3 connector Selects channels in sequence (Move cursor up or down during menu mode.) Volume up/down (Move cursor right or left during menu mode.) POWER button Remote Swing up /down Changes aspect ratio (p. 21) Operates the Favorite channel list...

Operating Instructions
Page 10
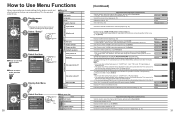
..." Program channel ANT in Cable Auto Select "Auto" Program channel ANT in Cable Auto next select set . Yes . ... Yes ok . ... First Time Setup "First time setup" is displayed only when the TV is turned on for the first time after the power cord is inserted into a wall outlet and when "Auto power on" (p. 30-31) is not pressed after selecting "Apply", the channels will not be saved. If you perform scanning more channels featuring high-quality video and sound Auto program Scanning digital channel progress...
..." Program channel ANT in Cable Auto Select "Auto" Program channel ANT in Cable Auto next select set . Yes . ... Yes ok . ... First Time Setup "First time setup" is displayed only when the TV is turned on for the first time after the power cord is inserted into a wall outlet and when "Auto power on" (p. 30-31) is not pressed after selecting "Apply", the channels will not be saved. If you perform scanning more channels featuring high-quality video and sound Auto program Scanning digital channel progress...

Operating Instructions
Page 11
... identifier SAP indication Signal resolution Closed caption Rating Level Picture mode Sleep timer remaining time Aspect ratio 20 Change aspect ratio ■Press ASPECT to cycle through the aspect modes. (p. 50) • 480i, 480p: FULL/JUST/4:3/ZOOM • 1080p, 1080i, 720p: FULL/H-FILL/JUST/4:3/ZOOM Call up or down OK while its position is turned off. By doing 2 so, the displayed channel will 3 be removed from the list with SAP (Secondary Audio Program) •Digital mode Press SAP to select...
... identifier SAP indication Signal resolution Closed caption Rating Level Picture mode Sleep timer remaining time Aspect ratio 20 Change aspect ratio ■Press ASPECT to cycle through the aspect modes. (p. 50) • 480i, 480p: FULL/JUST/4:3/ZOOM • 1080p, 1080i, 720p: FULL/H-FILL/JUST/4:3/ZOOM Call up or down OK while its position is turned off. By doing 2 so, the displayed channel will 3 be removed from the list with SAP (Secondary Audio Program) •Digital mode Press SAP to select...

Operating Instructions
Page 12
No.: Image number or file name is displayed. Note ••For large image sizes, the display time will be longer than SD Cards may not be displayed correctly. Refer to p. 51 (Data format for SD card browsing) for download to your television. 23 Viewing from SD Card Viewing To stop in Slide show mode. (1-10/15/20/30/45/60/120 sec) Turn the slide show...
No.: Image number or file name is displayed. Note ••For large image sizes, the display time will be longer than SD Cards may not be displayed correctly. Refer to p. 51 (Data format for SD card browsing) for download to your television. 23 Viewing from SD Card Viewing To stop in Slide show mode. (1-10/15/20/30/45/60/120 sec) Turn the slide show...

Operating Instructions
Page 13
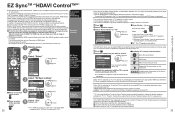
...;The terminal and label of the equipment. (p. 41) 1 With the connected equipment turned On Display the Input select menu 2 Select the input mode Input select 1 TV 2 Component 1 3 Component 2 or 4 HDMI 1 5 HDMI 2 6 Video 1 7 Video 2 8 Video 3 9 PC (example) Video 1 VCR Terminal Label Press corresponding NUMBER button on p. 32-33. 1 Display EZ Sync menu 2 Select the equipment DVD recorder Home theater HD camcorder Speaker output TV select enter 3 Operate You can select the external equipment to access. To label each of the equipment and enjoy watching. Rewind...
...;The terminal and label of the equipment. (p. 41) 1 With the connected equipment turned On Display the Input select menu 2 Select the input mode Input select 1 TV 2 Component 1 3 Component 2 or 4 HDMI 1 5 HDMI 2 6 Video 1 7 Video 2 8 Video 3 9 PC (example) Video 1 VCR Terminal Label Press corresponding NUMBER button on p. 32-33. 1 Display EZ Sync menu 2 Select the equipment DVD recorder Home theater HD camcorder Speaker output TV select enter 3 Operate You can select the external equipment to access. To label each of the equipment and enjoy watching. Rewind...

Operating Instructions
Page 14
... to PC sound with the audio cable connected. Clock phase Alleviates the problem if the whole picture appears to wide display. To connect PC (p. 42) 1 Display the Input select menu Input select 1 TV 2 Component 1 3 Component 2 4 HDMI 1 5 HDMI 2 6 Video 1 7 Video 2 8 Video 3 9 PC 2 Select "PC" PC ■To return to TV •Corresponding signals (p. 53) Displays PC screen ■PC menu setting (changed as desired) •Making settings "How to Use Menu Functions" Menu Item to (p. 28) Adjustments/Configurations (options) Normal Sync Resets PC adjust (Set/No) •...
... to PC sound with the audio cable connected. Clock phase Alleviates the problem if the whole picture appears to wide display. To connect PC (p. 42) 1 Display the Input select menu Input select 1 TV 2 Component 1 3 Component 2 4 HDMI 1 5 HDMI 2 6 Video 1 7 Video 2 8 Video 3 9 PC 2 Select "PC" PC ■To return to TV •Corresponding signals (p. 53) Displays PC screen ■PC menu setting (changed as desired) •Making settings "How to Use Menu Functions" Menu Item to (p. 28) Adjustments/Configurations (options) Normal Sync Resets PC adjust (Set/No) •...

Operating Instructions
Page 15
... Set Picture mode Vivid +20 Tint 0 0 Sharpness 0 0 Color temp. regular TV (NTSC) is connected (Auto/Digital/Analog) Auto: Automatically selects Analog / Digital signal Minimizes volume disparity after switching to external inputs Mosquito NR Black level 3:2 pulldown Off Light Off HD Size size1 Normal Bass Treble Balance AI sound Set + 4 0 0 On BBE VIVA 3D On BBE On Surround Off Speaker output On HDMI1 in HDMI2 in Audio leveler Timer Sleep, Timer 1-5 Lock Memory Card Memory card 28 Adjustments/Configurations (alternatives) [DVD recorder/Home...
... Set Picture mode Vivid +20 Tint 0 0 Sharpness 0 0 Color temp. regular TV (NTSC) is connected (Auto/Digital/Analog) Auto: Automatically selects Analog / Digital signal Minimizes volume disparity after switching to external inputs Mosquito NR Black level 3:2 pulldown Off Light Off HD Size size1 Normal Bass Treble Balance AI sound Set + 4 0 0 On BBE VIVA 3D On BBE On Surround Off Speaker output On HDMI1 in HDMI2 in Audio leveler Timer Sleep, Timer 1-5 Lock Memory Card Memory card 28 Adjustments/Configurations (alternatives) [DVD recorder/Home...
Operating Instructions
Page 16
... screen menu language (p. 18) Adjusts the clock (p. 18) Sets channels (p. 36) Selects the terminal and label of the external equipment (p. 38) Surf mode All Language Clock Program channel [Comp. 1/Comp. 2/HDMI 1/HDMI 2/Video 1/Video 2/Video 3] To prevent howling and image oscillation, stops output of the pictures and audio specified in this menu. (p. 38) (On/Off) Displays subtitles (Closed Caption) (p. 38) Controls equipment connected to HDMI terminals (p. 32) (On/Off) "Power off ". The on a digital image. (p. 36) 31 How to Use Menu Functions (picture, sound...
... screen menu language (p. 18) Adjusts the clock (p. 18) Sets channels (p. 36) Selects the terminal and label of the external equipment (p. 38) Surf mode All Language Clock Program channel [Comp. 1/Comp. 2/HDMI 1/HDMI 2/Video 1/Video 2/Video 3] To prevent howling and image oscillation, stops output of the pictures and audio specified in this menu. (p. 38) (On/Off) Displays subtitles (Closed Caption) (p. 38) Controls equipment connected to HDMI terminals (p. 32) (On/Off) "Power off ". The on a digital image. (p. 36) 31 How to Use Menu Functions (picture, sound...
Operating Instructions
Page 17
... the input •based on link, Power off link Set select Power on and Play mode is displayed. Press ■Home theater: Adjustment for "HDAVI Control 2") Power on link Power off link Default speakers One-touch theater playback At the start of the TV is muted. •When the equipment is connected or standard HDMI 32 equipment (non- Continue using your TV's remote control to the previous screen 5 Select "On" (default is On) change The sound...
... the input •based on link, Power off link Set select Power on and Play mode is displayed. Press ■Home theater: Adjustment for "HDAVI Control 2") Power on link Power off link Default speakers One-touch theater playback At the start of the TV is muted. •When the equipment is connected or standard HDMI 32 equipment (non- Continue using your TV's remote control to the previous screen 5 Select "On" (default is On) change The sound...
Operating Instructions
Page 18
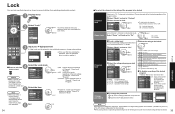
Locks all channels Game lock Program lock Change password Locks Channel 3, Channel 4 and external inputs. Off C.F.L.R. Off On: Turns on a specific-age-based-rating level, the Off rating and any other ratings. When placing a block on the monitor terminal output for programs that have been set select U.S.TV Off C.E.L.R. Custom: Locks specified inputs of "Channel", "Game" and "Program". All: Locks all channels set to "Blocked." Off C.F.L.R. Off MPAA: U.S movie ratings U.S.TV: U.S TV program ratings C.E.L.R.: Canadian English ratings C.F.L.R.: Canadian ...
Locks all channels Game lock Program lock Change password Locks Channel 3, Channel 4 and external inputs. Off C.F.L.R. Off On: Turns on a specific-age-based-rating level, the Off rating and any other ratings. When placing a block on the monitor terminal output for programs that have been set select U.S.TV Off C.E.L.R. Custom: Locks specified inputs of "Channel", "Game" and "Program". All: Locks all channels set to "Blocked." Off C.F.L.R. Off MPAA: U.S movie ratings U.S.TV: U.S TV program ratings C.E.L.R.: Canadian English ratings C.F.L.R.: Canadian ...

Operating Instructions
Page 19
... Input your 4-digit password with number buttons Select "YES" on a digital image. Also, use to add or skip channels from menu screen Select the function Program channel ANT in Cable Auto Manual Signal meter next select 5 Set ■ To reset the settings of receiving channels or changing the channel display. Yes 4 ... ... Fav...orite Yes ... page G Next page B Y Proceed to next page select item to edit (Caption/Favorite/Add) next Caption: •Changes the station identifier Favorite: •Registers channel to Favorite • List...
... Input your 4-digit password with number buttons Select "YES" on a digital image. Also, use to add or skip channels from menu screen Select the function Program channel ANT in Cable Auto Manual Signal meter next select 5 Set ■ To reset the settings of receiving channels or changing the channel display. Yes 4 ... ... Fav...orite Yes ... page G Next page B Y Proceed to next page select item to edit (Caption/Favorite/Add) next Caption: •Changes the station identifier Favorite: •Registers channel to Favorite • List...
Operating Instructions
Page 20
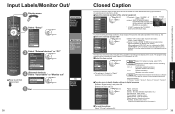
... CC Mode On Analog CC1 Digital Primary Digital setting CC reset select set •Terminals: Comp. 1-2/HDMI 1-2/ • Video 1-3/PC Label: SKIP*/VCR/DVD/CABLE/ DBS/PVR/GAME/AUX/[BLANK] HDMI 1 3 (for easier identification during input selection. (In selecting input mode from menu screen (External devices) Select "Input labels" or "Monitor out" External devices Input labels Monitor out next select 5 Set Input labels Display labels of external devices Monitor out Stop output of the picture and audio CC Display Closed Caption 38 Closed Caption Devices connected to view...
... CC Mode On Analog CC1 Digital Primary Digital setting CC reset select set •Terminals: Comp. 1-2/HDMI 1-2/ • Video 1-3/PC Label: SKIP*/VCR/DVD/CABLE/ DBS/PVR/GAME/AUX/[BLANK] HDMI 1 3 (for easier identification during input selection. (In selecting input mode from menu screen (External devices) Select "Input labels" or "Monitor out" External devices Input labels Monitor out next select 5 Set Input labels Display labels of external devices Monitor out Stop output of the picture and audio CC Display Closed Caption 38 Closed Caption Devices connected to view...

Operating Instructions
Page 22
...camcorder images Camcorder VCR DVD Player AUDIO VIDEO AC 120 V 60 Hz AC Cord (Connect after connection After making connections as shown above, set the input mode to HDMI 2 (p. 24) initially before connecting to their •respective operating instruction manuals. Optional HDMI and/or optical cables are complete.) Cable TV or Cable Box R L HDMI 1 Y Y or AUDIO IN VIDEO S VIDEO PB PB or PR PR L LL L L DIGITAL AUDIO OUT R RR R R COMPONENT VIDEO TO AUDIO AMP INPUT INPUT INPUT PROG OUT 1 2 1 2 AUDIO AUDIO IN PC HDMI 2 AUDIO IN 1 AV IN 2 or ANTENNA Cable In...
...camcorder images Camcorder VCR DVD Player AUDIO VIDEO AC 120 V 60 Hz AC Cord (Connect after connection After making connections as shown above, set the input mode to HDMI 2 (p. 24) initially before connecting to their •respective operating instruction manuals. Optional HDMI and/or optical cables are complete.) Cable TV or Cable Box R L HDMI 1 Y Y or AUDIO IN VIDEO S VIDEO PB PB or PR PR L LL L L DIGITAL AUDIO OUT R RR R R COMPONENT VIDEO TO AUDIO AMP INPUT INPUT INPUT PROG OUT 1 2 1 2 AUDIO AUDIO IN PC HDMI 2 AUDIO IN 1 AV IN 2 or ANTENNA Cable In...

Operating Instructions
Page 26
... the DIGITAL AUDIO OUT jack will overlap. The TV does not support the format. If digital connected equipment is used for displaying or recording, Closed Caption (CC) should be set On/Off on the back of data is not supported. •• The file is 720p/1080i/1080p, the aspect mode automatically defaults to Full after changed signal resolution other than 720p/1080i/1080p. •Zoom adjust Vertical image position and size can...
... the DIGITAL AUDIO OUT jack will overlap. The TV does not support the format. If digital connected equipment is used for displaying or recording, Closed Caption (CC) should be set On/Off on the back of data is not supported. •• The file is 720p/1080i/1080p, the aspect mode automatically defaults to Full after changed signal resolution other than 720p/1080i/1080p. •Zoom adjust Vertical image position and size can...
Operating Instructions
Page 27
.... (However, the image will not be displayed properly if the signals exceed 1,200 lines.) Some PC models cannot be connected to the set -top box or a DVD player, can be displayed when adjusting the volume of the equipment. • If you to the audio input terminal. HDMI-compatible equipment (*1) with an HDMI or DVI output terminal, such as this function on even if TV is used with a horizontal scanning frequency of...
.... (However, the image will not be displayed properly if the signals exceed 1,200 lines.) Some PC models cannot be connected to the set -top box or a DVD player, can be displayed when adjusting the volume of the equipment. • If you to the audio input terminal. HDMI-compatible equipment (*1) with an HDMI or DVI output terminal, such as this function on even if TV is used with a horizontal scanning frequency of...
Operating Instructions
Page 28
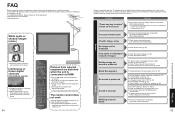
... screen saver is activated if the TV unit is not operated for assistance. Check Picture menu (p. 28) and volume. Are the remote control codes correct? (p. 45-47) •Change settings of Closed Caption (CC). (p. 38 Are the speakers' cables connected correctly? (p. 42) Is "Sound Mute" active? (p. 17) Is the volume set to "Off"? (p. 28) Change "SAP" settings. (p. 20) Check "HDMI 1 in" or "HDMI 2 in cooling fan (not a sign of the aerial. Check an input signal...
... screen saver is activated if the TV unit is not operated for assistance. Check Picture menu (p. 28) and volume. Are the remote control codes correct? (p. 45-47) •Change settings of Closed Caption (CC). (p. 38 Are the speakers' cables connected correctly? (p. 42) Is "Sound Mute" active? (p. 17) Is the volume set to "Off"? (p. 28) Change "SAP" settings. (p. 20) Check "HDMI 1 in" or "HDMI 2 in cooling fan (not a sign of the aerial. Check an input signal...
Operating Instructions
Page 29
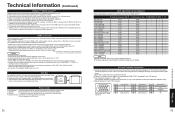
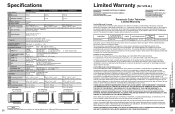
... the problem is extended only to defects in -home repairs will not be no charge for parts. Specifications Consumption Display panel Power Source Maximum TH-42PZ700U AC 120 V, 60 Hz 580 W TH-50PZ700U 695 W TH-58PZ700U 735 W Power Plasma Standby condition Drive method Aspect Ratio Visible screen size (W × H × Diagonal) (No. This Limited Warranty only applies to the product by the authorized servicer and does not include removal or re-installation...
... the problem is extended only to defects in -home repairs will not be no charge for parts. Specifications Consumption Display panel Power Source Maximum TH-42PZ700U AC 120 V, 60 Hz 580 W TH-50PZ700U 695 W TH-58PZ700U 735 W Power Plasma Standby condition Drive method Aspect Ratio Visible screen size (W × H × Diagonal) (No. This Limited Warranty only applies to the product by the authorized servicer and does not include removal or re-installation...


