
Operating Instructions
Page 3
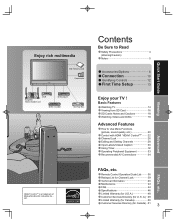
... Sure to Use Menu Functions picture, sound quality, etc 20 Control with HDMI "HDAVI ControlTM 22 Channel Lock 26 Editing and Setting Channels 28 Input Labels/Closed Caption 30 Using Timer 32 Operating Peripheral Equipment 33 Recommended AV Connections 34 FAQs, etc. A.)·· 49 Limited Warranty (for Canada 50 Customer Services Directory (for U. S. Remote Control Operation/Code List 36 Ratings List for Channel Lock 39 Technical Information 40 Maintenance 43 FAQ 44 Specifications 46 Limited Warranty (for U.S.A 48...
... Sure to Use Menu Functions picture, sound quality, etc 20 Control with HDMI "HDAVI ControlTM 22 Channel Lock 26 Editing and Setting Channels 28 Input Labels/Closed Caption 30 Using Timer 32 Operating Peripheral Equipment 33 Recommended AV Connections 34 FAQs, etc. A.)·· 49 Limited Warranty (for Canada 50 Customer Services Directory (for U. S. Remote Control Operation/Code List 36 Ratings List for Channel Lock 39 Technical Information 40 Maintenance 43 FAQ 44 Specifications 46 Limited Warranty (for U.S.A 48...
Operating Instructions
Page 4
... has been exposed to Part 15 of the FCC Rules. No user-serviceable parts inside the product are designed to qualified service personnel. If this equipment does cause harmful interference to radio or television reception, which can radiate radio frequency energy and, if not installed and used , use only shielded interface cables when connecting TV to persons. Any changes or modifications not expressly...
... has been exposed to Part 15 of the FCC Rules. No user-serviceable parts inside the product are designed to qualified service personnel. If this equipment does cause harmful interference to radio or television reception, which can radiate radio frequency energy and, if not installed and used , use only shielded interface cables when connecting TV to persons. Any changes or modifications not expressly...
Operating Instructions
Page 5
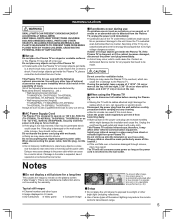
... power cord plug with its high voltage dangerous nature. therefore, it from becoming dusty. Do not do anything that need to carry out set-up onto the television or use it repaired at an Authorized Service Center. fire or electric shock. TV, unplug the power cord immediately. Have the TV evaluated at the rear. • Wall-hanging bracket (Vertical): TY-WK42PV3U (TH-37PX60U, TH-42PX60U, TH-50PX60U, TH...
... power cord plug with its high voltage dangerous nature. therefore, it from becoming dusty. Do not do anything that need to carry out set-up onto the television or use it repaired at an Authorized Service Center. fire or electric shock. TV, unplug the power cord immediately. Have the TV evaluated at the rear. • Wall-hanging bracket (Vertical): TY-WK42PV3U (TH-37PX60U, TH-42PX60U, TH-50PX60U, TH...

Operating Instructions
Page 12
... (p. 17) POWER button Remote control sensor Power indicator (on: red, off: no light) Switches TV to On or Standby Sets the remote to communicate with other equipments (p. 33) Changes input signal (p. 19) Display Main Menu (p. 20) Sound mute On/Off Changes aspect ratio (p. 15) Switch to enter alphanumeric input in sequence Swing up the door at "PULL". - Selects channels in menus. (p. 14) Direct channel access for DTV and DBS (p. 14) Volume Sleep Timer (p. 14, 32) External equipment operations (p. 19, 36) (VCRs, DVDs, etc...
... (p. 17) POWER button Remote control sensor Power indicator (on: red, off: no light) Switches TV to On or Standby Sets the remote to communicate with other equipments (p. 33) Changes input signal (p. 19) Display Main Menu (p. 20) Sound mute On/Off Changes aspect ratio (p. 15) Switch to enter alphanumeric input in sequence Swing up the door at "PULL". - Selects channels in menus. (p. 14) Direct channel access for DTV and DBS (p. 14) Volume Sleep Timer (p. 14, 32) External equipment operations (p. 19, 36) (VCRs, DVDs, etc...
Operating Instructions
Page 13
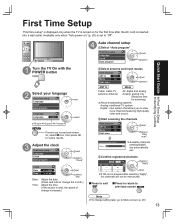
... Add select "Apply" - - - Quick Start Guide First Time Setup Identifying Controls 4 Auto channel setup Select "Auto program" First time setup next Language Clock select - Progress start select "Start scan" •Available channels (analog/digital) are automatically set. No ok 2 Yes •If OK is not pressed after the AC cord is inserted into a wall outlet. First Time Setup "First time setup" is displayed only when the TV is turned on " (p. 20) is set select ANT In Mode Cable: Cable TV All: digital and analog Antenna: Antenna Analog: analog only (Reduces time...
... Add select "Apply" - - - Quick Start Guide First Time Setup Identifying Controls 4 Auto channel setup Select "Auto program" First time setup next Language Clock select - Progress start select "Start scan" •Available channels (analog/digital) are automatically set. No ok 2 Yes •If OK is not pressed after the AC cord is inserted into a wall outlet. First Time Setup "First time setup" is displayed only when the TV is turned on " (p. 20) is set select ANT In Mode Cable: Cable TV All: digital and analog Antenna: Antenna Analog: analog only (Reduces time...

Operating Instructions
Page 14
... Display or remove the channel banner. press the button to TV mode 2 Turn power on •POWER button on unit should be On. - 3 Select a channel number up or down ■To directly input the digital channel • number When tuning digital channel, - HD - 10:30 Andrew's cooking show CC SAP TV-G 1080I Standard 4 : 3 10:00 am 30 Station identifier SAP Signal resolution Rating Level Picture mode Sleep timer remaining time Aspect ratio Channel Ending time Show title Clock 15-2 ABC - Watching TV Connect cable Box...
... Display or remove the channel banner. press the button to TV mode 2 Turn power on •POWER button on unit should be On. - 3 Select a channel number up or down ■To directly input the digital channel • number When tuning digital channel, - HD - 10:30 Andrew's cooking show CC SAP TV-G 1080I Standard 4 : 3 10:00 am 30 Station identifier SAP Signal resolution Rating Level Picture mode Sleep timer remaining time Aspect ratio Channel Ending time Show title Clock 15-2 ABC - Watching TV Connect cable Box...
Operating Instructions
Page 19
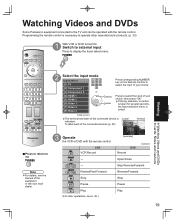
Watching Videos and DVDs Some Panasonic equipment connected to the TV unit can be operated with the remote control VCR VCR Record Rewind/Fast Forward Stop Pause Play (For other manufacturers' products. (p. 33) 1 With VCR or DVD turned On Switch to external input Press to display the Input select menu. Programming the remote control is indicated. Viewing Watching Videos and DVDs Cards: Notes and Cautions 2 Select the input mode Input select [1] TV [2] Component 1 [3] Component 2 or Press corresponding NUMBER key on the Remote Control to select the input of your...
Watching Videos and DVDs Some Panasonic equipment connected to the TV unit can be operated with the remote control VCR VCR Record Rewind/Fast Forward Stop Pause Play (For other manufacturers' products. (p. 33) 1 With VCR or DVD turned On Switch to external input Press to display the Input select menu. Programming the remote control is indicated. Viewing Watching Videos and DVDs Cards: Notes and Cautions 2 Select the input mode Input select [1] TV [2] Component 1 [3] Component 2 or Press corresponding NUMBER key on the Remote Control to select the input of your...
Operating Instructions
Page 20
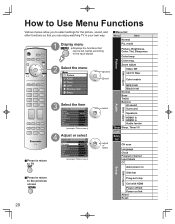
... Y/C filter Color matrix select adjust or select Other adjust Audio MPEG NR Black level Normal Bass Treble Balance AI sound Surround Speakers HDMI1 in HDMI2 in your own way. Menu Item Normal 1 • Display menu Displays the functions that you to select settings for the picture, sound, and Menu list other functions so that can enjoy watching TV in Audio leveler Timer Sleep, Timer1-5 Lock Memory Card CH scan Language Clock Program channel Input labels CC Auto power on...
... Y/C filter Color matrix select adjust or select Other adjust Audio MPEG NR Black level Normal Bass Treble Balance AI sound Surround Speakers HDMI1 in HDMI2 in your own way. Menu Item Normal 1 • Display menu Displays the functions that you to select settings for the picture, sound, and Menu list other functions so that can enjoy watching TV in Audio leveler Timer Sleep, Timer1-5 Lock Memory Card CH scan Language Clock Program channel Input labels CC Auto power on...
Operating Instructions
Page 21
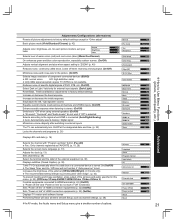
... color reproduction, especially outdoor scenes. (On/Off) Adjusts vertical alignment and size when aspect setting is not available. Emphasize the left / right speaker volume. Adjustments/Configurations (alternatives) Resets all channels and VIDEO inputs. (On/Off) Enhances audio response when listening to stereo. (On/Off) Switches to "Off" when using external speakers (On/Off) "AI sound", "Surround" and "Audio leveler" do not work if "Off" is selected Selects according to the signal when HDMI is connected (Auto/Digital/Analog) Auto...
... color reproduction, especially outdoor scenes. (On/Off) Adjusts vertical alignment and size when aspect setting is not available. Emphasize the left / right speaker volume. Adjustments/Configurations (alternatives) Resets all channels and VIDEO inputs. (On/Off) Enhances audio response when listening to stereo. (On/Off) Switches to "Off" when using external speakers (On/Off) "AI sound", "Surround" and "Audio leveler" do not work if "Off" is selected Selects according to the signal when HDMI is connected (Auto/Digital/Analog) Auto...

Operating Instructions
Page 22
... compatibility information. Theater speaker Power on link Set Select "On" select change •Default setting is limited to the TV's HDMI input are available. Limited features such as of January 2006.) Automatic input switching 1 Display menu 2 Select "Setup" Menu Home theater Picture Audio Timer Lock Memory card Setup - Newer Panasonic audio-video products with HDMI output connections can be utilized. •We recommend using Panasonic HDMI cables RP-CDHG15 (1.5 m), RP-CDHG30 (3.0 m), •RP-CDHG50 (5.0 m), etc. (Product numbers correct as home theater system volume...
... compatibility information. Theater speaker Power on link Set Select "On" select change •Default setting is limited to the TV's HDMI input are available. Limited features such as of January 2006.) Automatic input switching 1 Display menu 2 Select "Setup" Menu Home theater Picture Audio Timer Lock Memory card Setup - Newer Panasonic audio-video products with HDMI output connections can be utilized. •We recommend using Panasonic HDMI cables RP-CDHG15 (1.5 m), RP-CDHG30 (3.0 m), •RP-CDHG50 (5.0 m), etc. (Product numbers correct as home theater system volume...

Operating Instructions
Page 23
Display menu Select "Home theater" or "TV speakers" Menu Menu Home theater TV speakers Picture Audio change Picture Audio Timer Timer Lock Lock Memory card Memory card Setup Setup ■Home theater: Adjustment for the TV to automatically turn on and switch to the appropriate HDMI input whenever a "Control with TV's remote control. If home theater/RAM theater/Player theater is currently off the connected home theater/ RAM theater/player theater and/or DIGA-DVD player. Audio is muted on link" below. Control with HDMI "HDAVI ControlTM" At the start...
Display menu Select "Home theater" or "TV speakers" Menu Menu Home theater TV speakers Picture Audio change Picture Audio Timer Timer Lock Lock Memory card Memory card Setup Setup ■Home theater: Adjustment for the TV to automatically turn on and switch to the appropriate HDMI input whenever a "Control with TV's remote control. If home theater/RAM theater/Player theater is currently off the connected home theater/ RAM theater/player theater and/or DIGA-DVD player. Audio is muted on link" below. Control with HDMI "HDAVI ControlTM" At the start...
Operating Instructions
Page 25
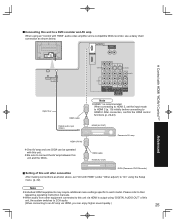
... menu settings specific to their •respective operating instruction manuals. After connection, confirm the HDMI control functions (p. 22-23). Please refer to each model. Note •HDMI 1 is output using "DIGITAL AUDIO OUT" of this •unit and the DIGA. When connecting to HDMI 2, set "Ctrl with HDMI" (under "Other adjust") to HDMI 2. Control with HDMI" audio-video amplifier and a compatible DIGA recorder, use a daisy chain connection as shown above, set the input mode to HDMI 2 (p. 19) initially before connecting to "On" using an "Control...
... menu settings specific to their •respective operating instruction manuals. After connection, confirm the HDMI control functions (p. 22-23). Please refer to each model. Note •HDMI 1 is output using "DIGITAL AUDIO OUT" of this •unit and the DIGA. When connecting to HDMI 2, set "Ctrl with HDMI" (under "Other adjust") to HDMI 2. Control with HDMI" audio-video amplifier and a compatible DIGA recorder, use a daisy chain connection as shown above, set the input mode to HDMI 2 (p. 19) initially before connecting to "On" using an "Control...

Operating Instructions
Page 26
... . ---- 4 Select the Lock mode Lock Mode Off select ■Press to exit Channel Program Change password Caution •Make a note of your password in next select 3 Input your 4-digit password A 4-digit code must be entered to view a blocked program or change the password In , select "Change password" and press "OK" button Note •When you select a locked channel, a message will be asked to enter your password each time you input 26 your password. Menu Picture Audio Timer Lock Memory card Setup - Enter password. •For the first time, input the number twice...
... . ---- 4 Select the Lock mode Lock Mode Off select ■Press to exit Channel Program Change password Caution •Make a note of your password in next select 3 Input your 4-digit password A 4-digit code must be entered to view a blocked program or change the password In , select "Change password" and press "OK" button Note •When you select a locked channel, a message will be asked to enter your password each time you input 26 your password. Menu Picture Audio Timer Lock Memory card Setup - Enter password. •For the first time, input the number twice...

Operating Instructions
Page 29
... 5 - - - - - - select Caption detail Preset set select Select "Start scan" Auto program ANT In Cable Mode All Start scan start select Settings are erased. Signal strength ok Current Peak level 85 % 85 % Signal intensity Note •Not available if "Cable" is found or freezing occurs on a digital image. All previous memorized •channels are made automatically After completing the setting, •select "Apply". (see above). Also, use to be displayed. 29 If no problem is...
... 5 - - - - - - select Caption detail Preset set select Select "Start scan" Auto program ANT In Cable Mode All Start scan start select Settings are erased. Signal strength ok Current Peak level 85 % 85 % Signal intensity Note •Not available if "Cable" is found or freezing occurs on a digital image. All previous memorized •channels are made automatically After completing the setting, •select "Apply". (see above). Also, use to be displayed. 29 If no problem is...

Operating Instructions
Page 31
... when switched with TV/VIDEO button. Digital (The Digital Closed Caption menu lets you configure the way you choose to pictures (Appears at bottom of screen) CC reset T1-4: Textual information (Appears over entire screen) •The settings in "Analog" or "Digital" depend on the broadcaster. The labels of devices connected to external input terminals can be indicated Label for easy recognition on the screen. (In selecting input mode of p. 19 ) Video 1 VCR Select the...
... when switched with TV/VIDEO button. Digital (The Digital Closed Caption menu lets you configure the way you choose to pictures (Appears at bottom of screen) CC reset T1-4: Textual information (Appears over entire screen) •The settings in "Analog" or "Digital" depend on the broadcaster. The labels of devices connected to external input terminals can be indicated Label for easy recognition on the screen. (In selecting input mode of p. 19 ) Video 1 VCR Select the...

Operating Instructions
Page 40
... analog format. Aspect Ratio Let you use HDMI connection. •If analog connected equipment is used for input, CC should be set On on the •connected equipment. The CC mode setting of the side bar may occur from each unit will also be set to the screen's side edges. If a digital program is 720p/1080i/1080p, the aspect mode automatically defaults to the four corners of the screen. (Recommended for displaying or recording, closed caption...
... analog format. Aspect Ratio Let you use HDMI connection. •If analog connected equipment is used for input, CC should be set On on the •connected equipment. The CC mode setting of the side bar may occur from each unit will also be set to the screen's side edges. If a digital program is 720p/1080i/1080p, the aspect mode automatically defaults to the four corners of the screen. (Recommended for displaying or recording, closed caption...
Operating Instructions
Page 41
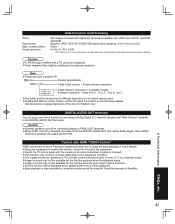
... cameras compatible with JPEG files of files: Image resolution: Data format for Amplifier. Please confirm the latest information on even if TV is also available by connecting a Dolby Digital (5.1 channel) decoder and "Multi Channel" amplifier to PROG.OUT terminals. Image or sound may be Dolby Digital. Volume function will be connected directly to the DIGITAL AUDIO OUT terminals. Partly degraded files might be available for the first few seconds when Input mode...
... cameras compatible with JPEG files of files: Image resolution: Data format for Amplifier. Please confirm the latest information on even if TV is also available by connecting a Dolby Digital (5.1 channel) decoder and "Multi Channel" amplifier to PROG.OUT terminals. Image or sound may be Dolby Digital. Volume function will be connected directly to the DIGITAL AUDIO OUT terminals. Partly degraded files might be available for the first few seconds when Input mode...

Operating Instructions
Page 42
... -images 4:3 Screen Display Pic. Caution Use with a non-compression standard. mode 42 •••Vivid (default) Standard Cinema : Provides enhanced picture contrast and sharpness for viewing in a darkened room. Audio settings can be connected to enjoy high-definition digital images and high-quality sound by connecting the TV unit and the devices. The HDMI input terminal can be displayed properly. If the external device has only a DVI output, connect to the HDMI...
... -images 4:3 Screen Display Pic. Caution Use with a non-compression standard. mode 42 •••Vivid (default) Standard Cinema : Provides enhanced picture contrast and sharpness for viewing in a darkened room. Audio settings can be connected to enjoy high-definition digital images and high-quality sound by connecting the TV unit and the devices. The HDMI input terminal can be displayed properly. If the external device has only a DVI output, connect to the HDMI...
Operating Instructions
Page 44
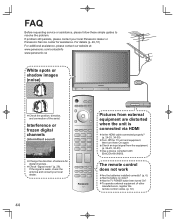
..., register the remote control codes. (p. 33) Check an input signal from external equipment are distorted when the unit is connected via HDMI Is the HDMI cable connected properly? •(p. 24-25, 34-35) Turn Off the TV unit and equipment, •then turn them On again. Has the TV POWER button been turned On? Interference or frozen digital channels (intermittent sound) •Change the direction of antenna for assistance. To operate external equipment of...
..., register the remote control codes. (p. 33) Check an input signal from external equipment are distorted when the unit is connected via HDMI Is the HDMI cable connected properly? •(p. 24-25, 34-35) Turn Off the TV unit and equipment, •then turn them On again. Has the TV POWER button been turned On? Interference or frozen digital channels (intermittent sound) •Change the direction of antenna for assistance. To operate external equipment of...
Operating Instructions
Page 45
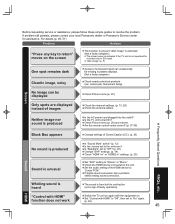
... the minimum? Check Picture menu (p. 20) and volume. If digital sound connection has a problem, •select analog sound connection. Are the remote control codes correct? (p. 37-38) Black Box appears No sound is produced Sound is unusual •Change settings of Closed Caption (CC). (p. 30) Is "Sound Mute" active? (p. 12) Is the volume set to prevent "after image" (p. 5) One spot remains dark Chaotic image, noisy •A pixel or luminescent spot can be missing in plasma displays. (Not a faulty symptom...
... the minimum? Check Picture menu (p. 20) and volume. If digital sound connection has a problem, •select analog sound connection. Are the remote control codes correct? (p. 37-38) Black Box appears No sound is produced Sound is unusual •Change settings of Closed Caption (CC). (p. 30) Is "Sound Mute" active? (p. 12) Is the volume set to prevent "after image" (p. 5) One spot remains dark Chaotic image, noisy •A pixel or luminescent spot can be missing in plasma displays. (Not a faulty symptom...


