
User Guide
Page 1
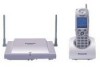
... System). Please use only the battery provided and charge the battery for about 7 hours before using the handset for purchasing the Panasonic KX-TD7896 Wireless PT (Wireless Proprietary Telephone). Advanced Hybrid System User Guide for KX-TD7896 Model KX-TA308/KX-TA624/KX-TA824 HOLD 1 2 4 5 7 8 0 RCL FLASH XFER CLR 3 6 9 Thank you for the first time. Please read this manual...
... System). Please use only the battery provided and charge the battery for about 7 hours before using the handset for purchasing the Panasonic KX-TD7896 Wireless PT (Wireless Proprietary Telephone). Advanced Hybrid System User Guide for KX-TD7896 Model KX-TA308/KX-TA624/KX-TA824 HOLD 1 2 4 5 7 8 0 RCL FLASH XFER CLR 3 6 9 Thank you for the first time. Please read this manual...

User Guide
Page 2
...Keys 7 Adjusting the Ringer Volume 8 Adjusting the Vibrate Setting 9 Adjusting the Receiver/Speaker/Headset Volume 9 Handset Display 10 Icons ...10 Soft Keys...11 Operation Outline ...12 Operation for the KX-TA308/624/824 16 Making Calls ...16 Receiving Calls ...18 When the Dialed Extension is Busy/No ...Answer 19 During a Conversation 20 Useful Features...20 Making Use of the Voice Mail Service 22 Using the Handset Phonebook 23 Handset Phonebook 23 Storing an ...
...Keys 7 Adjusting the Ringer Volume 8 Adjusting the Vibrate Setting 9 Adjusting the Receiver/Speaker/Headset Volume 9 Handset Display 10 Icons ...10 Soft Keys...11 Operation Outline ...12 Operation for the KX-TA308/624/824 16 Making Calls ...16 Receiving Calls ...18 When the Dialed Extension is Busy/No ...Answer 19 During a Conversation 20 Useful Features...20 Making Use of the Voice Mail Service 22 Using the Handset Phonebook 23 Handset Phonebook 23 Storing an ...
User Guide
Page 3
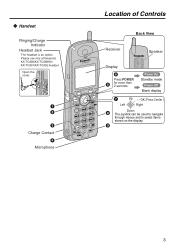
Power On Standby mode Power Off Blank display 7 Up OK (Press Center.) Left Right Down 8 The joystick can be used to navigate through menus and to select items shown on the display. 9 3 Open the cover. 1 2 3 Charge Contact 4 Microphone Location of Controls Handset Ringing/Charge Indicator Headset Jack The headset is an option. Please use only a Panasonic KX-TCA86/KX-TCA88HA/ KX-TCA91/KX-TCA92 headset. Location of Controls Back View Receiver Speaker 1 23 456 789 0 Display 6 Press POWER 5 for more than 2 seconds.
Power On Standby mode Power Off Blank display 7 Up OK (Press Center.) Left Right Down 8 The joystick can be used to navigate through menus and to select items shown on the display. 9 3 Open the cover. 1 2 3 Charge Contact 4 Microphone Location of Controls Handset Ringing/Charge Indicator Headset Jack The headset is an option. Please use only a Panasonic KX-TCA86/KX-TCA88HA/ KX-TCA91/KX-TCA92 headset. Location of Controls Back View Receiver Speaker 1 23 456 789 0 Display 6 Press POWER 5 for more than 2 seconds.

User Guide
Page 5
...Select the desired language. (English/Español/FRANÇAIS) Press the Joystick. • The display language of both the handset and PBX can select the desired language (English/Spanish/French). Selecting the Display Language You can be selected, and both should be ...set to the user documentation for your PBX. 5 Joystick. Before Operating the Handset Before Operating the Handset Unsupported PBX Features The following PBX features are not supported when using a KX-TD7896: 1) Turning Background Music (BGM) on and off. 2) Switching displays between "date and...
...Select the desired language. (English/Español/FRANÇAIS) Press the Joystick. • The display language of both the handset and PBX can select the desired language (English/Spanish/French). Selecting the Display Language You can be selected, and both should be ...set to the user documentation for your PBX. 5 Joystick. Before Operating the Handset Before Operating the Handset Unsupported PBX Features The following PBX features are not supported when using a KX-TD7896: 1) Turning Background Music (BGM) on and off. 2) Switching displays between "date and...

User Guide
Page 6
...) from the left. If you should set a date and time. Option". Enter Password ---- Joystick. Joystick. Select "On". Handset". Joystick. Before Operating the Handset Setting the Date and Time If you selected "PBX Type-Type 2 (KX-TA308)" in the Outgoing Call Log. 6 Enabling the Outgoing Call Log The default setting is "Off" for the...
...) from the left. If you should set a date and time. Option". Enter Password ---- Joystick. Joystick. Select "On". Handset". Joystick. Before Operating the Handset Setting the Date and Time If you selected "PBX Type-Type 2 (KX-TA308)" in the Outgoing Call Log. 6 Enabling the Outgoing Call Log The default setting is "Off" for the...

User Guide
Page 12
... values have been set: *1 Setting Base: PBX Type → Type 2 (KX-TA308)/Date&Time/Incoming Log (See page 34.) You cannot make a call using the Incoming Call Log. *2 Setting Handset → Other Option → Outgoing Log → On (See page 6, 33.) *3 Setting Handset → Display Option → Guidance → On (See page 33...
... values have been set: *1 Setting Base: PBX Type → Type 2 (KX-TA308)/Date&Time/Incoming Log (See page 34.) You cannot make a call using the Incoming Call Log. *2 Setting Handset → Other Option → Outgoing Log → On (See page 6, 33.) *3 Setting Handset → Display Option → Guidance → On (See page 33...

User Guide
Page 16
...the first letter of your dealer. To use Hot Key Dial X - Calling idle F-Key To use F-Keys X idle F-Key (0-9, , #) OR idle F-Key phone no. To use the Phonebook OR X - Note that, the Outgoing Log setting of the desired name. (0-9) OR name • To enter a character, press ... 24. 16 OR 8 CO line group no . Operation for the KX-TA308/624/824 For further OperationfortheKX-TA308/624/824 information, refer to the user documentation for your PBX or consult your handset must be set to on the Speakerphone. Making Calls Desired Function Operation Making...
...the first letter of your dealer. To use Hot Key Dial X - Calling idle F-Key To use F-Keys X idle F-Key (0-9, , #) OR idle F-Key phone no. To use the Phonebook OR X - Note that, the Outgoing Log setting of the desired name. (0-9) OR name • To enter a character, press ... 24. 16 OR 8 CO line group no . Operation for the KX-TA308/624/824 For further OperationfortheKX-TA308/624/824 information, refer to the user documentation for your PBX or consult your handset must be set to on the Speakerphone. Making Calls Desired Function Operation Making...

User Guide
Page 28
.... Select the desired item. When selecting Caller ID Indication-Personal for "PBX Type-Type 1" (for more than 1 second. X Press the dialing key for KX-TA624/824)* X Press Caller ID Indication -Personal Key (0-9, , #). CLEAR. • If you delete a Phonebook item that you also stored as a Hot...To delete all information in the Incoming Call Log stored in the personal and common areas or information in the Incoming Call Log stored in Handset Phonebook/Hot Key Dial/ Incoming Call Log/Outgoing Call Log Press the Select the Left Soft Key. desired item. Select "Delete" or...
.... Select the desired item. When selecting Caller ID Indication-Personal for "PBX Type-Type 1" (for more than 1 second. X Press the dialing key for KX-TA624/824)* X Press Caller ID Indication -Personal Key (0-9, , #). CLEAR. • If you delete a Phonebook item that you also stored as a Hot...To delete all information in the Incoming Call Log stored in the personal and common areas or information in the Incoming Call Log stored in Handset Phonebook/Hot Key Dial/ Incoming Call Log/Outgoing Call Log Press the Select the Left Soft Key. desired item. Select "Delete" or...

User Guide
Page 30
Setting the Handset and Base Unit Handset and Base Unit Menu Layout Setting Handset Incoming Option (See page 31.) Talk Option Answer Option Tone Option Display Option Other Option Setting Base (See page 34.) * There are 2 types of PBX PBX Type PBX Models Type 1 KX-TA624/824 Type 2 KX-TA308 PBX Type* Fwd/DND Icon Caller... Backlight LCD Contrast Standby Display Category Name F-Key Name Guidance Date&Time Form "PBX Type-Type 2" only (See page 34.) Change Password Outgoing Log Reset Handset "PBX Type-Type 1" only "PBX Type-Type 2" only "PBX Type-Type 2" only
Setting the Handset and Base Unit Handset and Base Unit Menu Layout Setting Handset Incoming Option (See page 31.) Talk Option Answer Option Tone Option Display Option Other Option Setting Base (See page 34.) * There are 2 types of PBX PBX Type PBX Models Type 1 KX-TA624/824 Type 2 KX-TA308 PBX Type* Fwd/DND Icon Caller... Backlight LCD Contrast Standby Display Category Name F-Key Name Guidance Date&Time Form "PBX Type-Type 2" only (See page 34.) Change Password Outgoing Log Reset Handset "PBX Type-Type 1" only "PBX Type-Type 2" only "PBX Type-Type 2" only

User Guide
Page 34
..., not the PBX itself. 34 Date Time 01-01-05 (D-M-Y) 12:00 AM (H:M) Incoming Log "PBX Type-Type 2 (KX-TA308)" only Sets each line. Setting the Handset and Base Unit Main Item PBX Type Description Selects the type of PBX that tone type will be logged. • These settings...After you set at least one of information is displayed beside a tone type, the incoming call in the Phonebook, the handset rings according to .*1 Fwd/DND Icon When using a PBX other than a KX-TAW848/KX-TDA series PBX, you are using, see page 30. *3 When a check mark is displayed as Caller ID.
..., not the PBX itself. 34 Date Time 01-01-05 (D-M-Y) 12:00 AM (H:M) Incoming Log "PBX Type-Type 2 (KX-TA308)" only Sets each line. Setting the Handset and Base Unit Main Item PBX Type Description Selects the type of PBX that tone type will be logged. • These settings...After you set at least one of information is displayed beside a tone type, the incoming call in the Phonebook, the handset rings according to .*1 Fwd/DND Icon When using a PBX other than a KX-TAW848/KX-TDA series PBX, you are using, see page 30. *3 When a check mark is displayed as Caller ID.
User Guide
Page 35
... when viewing the Incoming Call Log. → Only for "PBX Type-Type 2 (KX-TA308)": Set the correct date and time on page 4.) You cannot use the handset during a power failure. • The handset will not function during a power failure because the base unit stops emitting radiowaves. The...→ Check the telephone line. You cannot have a conversation in hands-free mode. → Set program [617] Wireless PT Port Assignment to "Not Connect" in the Installation Instructions.) The handset does not ring. • Ringer volume is set to "Off". → Adjust the ringer volume level. (See ...
... when viewing the Incoming Call Log. → Only for "PBX Type-Type 2 (KX-TA308)": Set the correct date and time on page 4.) You cannot use the handset during a power failure. • The handset will not function during a power failure because the base unit stops emitting radiowaves. The...→ Check the telephone line. You cannot have a conversation in hands-free mode. → Set program [617] Wireless PT Port Assignment to "Not Connect" in the Installation Instructions.) The handset does not ring. • Ringer volume is set to "Off". → Adjust the ringer volume level. (See ...

User Guide
Page 36
... the battery for APT to "Disable" in PBX System Programming. → KX-TA308/624: Press "1" to the base unit. adaptor feels warm. rapidly. → Make sure the battery is inserted properly. → Set the handset in standby mode, you press the Incoming Call Log, the during a conversation.... • The radio signal is displayed in standby → KX-TA824: Set program [626] BGM Control for 7 • The battery charge...
... the battery for APT to "Disable" in PBX System Programming. → KX-TA308/624: Press "1" to the base unit. adaptor feels warm. rapidly. → Make sure the battery is inserted properly. → Set the handset in standby mode, you press the Incoming Call Log, the during a conversation.... • The radio signal is displayed in standby → KX-TA824: Set program [626] BGM Control for 7 • The battery charge...


