
Operating Instructions
Page 1
... Sensor Reheat Feature 15 Sensor Cook Feature 15 Sensor Cook Chart 16 Operation Microwave Recipes 17 Timer Feature (Kitchen Timer/Stand Time/Delay Start 18 Microwave Shortcuts 19-20 Food Characteristics 21 Cooking Techniques 21-22 Quick Guide to Operation 26 Maintenance Care and Cleaning of Your Microwave Oven 23 Accessory Purchases 23 Before Requesting Service 24 Limited Warranty & Customer Service Directory 25 General Information Cookware Guide 7 Oven Components Diagram 8 Specifications 27 User's Record 27 Notes 28 READ ALL INSTRUCTIONS CAREFULLY BEFORE USING THE OVEN...
... Sensor Reheat Feature 15 Sensor Cook Feature 15 Sensor Cook Chart 16 Operation Microwave Recipes 17 Timer Feature (Kitchen Timer/Stand Time/Delay Start 18 Microwave Shortcuts 19-20 Food Characteristics 21 Cooking Techniques 21-22 Quick Guide to Operation 26 Maintenance Care and Cleaning of Your Microwave Oven 23 Accessory Purchases 23 Before Requesting Service 24 Limited Warranty & Customer Service Directory 25 General Information Cookware Guide 7 Oven Components Diagram 8 Specifications 27 User's Record 27 Notes 28 READ ALL INSTRUCTIONS CAREFULLY BEFORE USING THE OVEN...
Operating Instructions
Page 3
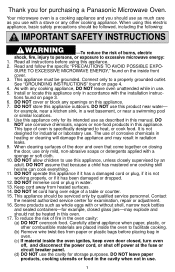
...-food products in this appliance only for example, near water- The use as you for examination, repair or adjustment. 16. When cleaning surfaces of a table or counter. 15. DO NOT assume that come together on closing the door, use . DO NOT operate this appliance outdoors. Contact the nearest authorized service center for purchasing a Panasonic Microwave Oven. Carefully attend appliance when paper, plastic, or other cooking...
...-food products in this appliance only for example, near water- The use as you for examination, repair or adjustment. 16. When cleaning surfaces of a table or counter. 15. DO NOT assume that come together on closing the door, use . DO NOT operate this appliance outdoors. Contact the nearest authorized service center for purchasing a Panasonic Microwave Oven. Carefully attend appliance when paper, plastic, or other cooking...
Operating Instructions
Page 4
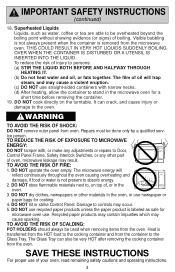
... may cause a violent eruption. (c) DO NOT use straight-sided containers with , or make any adjustments or repairs to the cooking container and from oven. DO NOT operate the oven empty. Repairs must be very HOT after removing the cooking container from the oven. DO NOT dry clothes, newspapers or other part of injury to the oven. The Glass Tray can crack, and cause injury or...
... may cause a violent eruption. (c) DO NOT use straight-sided containers with , or make any adjustments or repairs to the cooking container and from oven. DO NOT operate the oven empty. Repairs must be very HOT after removing the cooking container from the oven. DO NOT dry clothes, newspapers or other part of injury to the oven. The Glass Tray can crack, and cause injury or...
Operating Instructions
Page 5
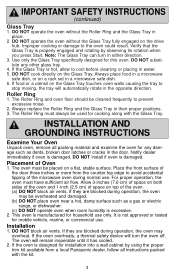
... oven will turn in water. 5. Use only the Glass Tray specifically designed for installation into a wall cabinet by observing its rotation when you press Start. DO NOT block air vents. DO NOT operate the oven without the Glass Tray fully engaged on a rack set in their proper positions. 3. This oven is designed for this oven. IMPORTANT SAFETY INSTRUCTIONS (continued) Glass Tray 1. INSTALLATION AND GROUNDING INSTRUCTIONS Examine Your Oven Unpack oven, remove all instructions packed with the Glass Tray. The oven must...
... oven will turn in water. 5. Use only the Glass Tray specifically designed for installation into a wall cabinet by observing its rotation when you press Start. DO NOT block air vents. DO NOT operate the oven without the Glass Tray fully engaged on a rack set in their proper positions. 3. This oven is designed for this oven. IMPORTANT SAFETY INSTRUCTIONS (continued) Glass Tray 1. INSTALLATION AND GROUNDING INSTRUCTIONS Examine Your Oven Unpack oven, remove all instructions packed with the Glass Tray. The oven must...
Operating Instructions
Page 6
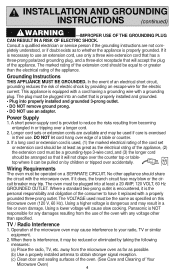
... great as the electrical rating of the cord set or extension cord should share the circuit with any damages resulting from the microwave oven as far as to obtain stronger signal reception. (c) Clean door and sealing surfaces of the oven. (See Care and Cleaning of the appliance. No other than the electrical rating of Your Microwave Oven) 4 INSTALLATION AND GROUNDING INSTRUCTIONS (continued) WARNING -IMPROPER USE OF THE GROUNDING...
... great as the electrical rating of the cord set or extension cord should share the circuit with any damages resulting from the microwave oven as far as to obtain stronger signal reception. (c) Clean door and sealing surfaces of the oven. (See Care and Cleaning of the appliance. No other than the electrical rating of Your Microwave Oven) 4 INSTALLATION AND GROUNDING INSTRUCTIONS (continued) WARNING -IMPROPER USE OF THE GROUNDING...
Operating Instructions
Page 8
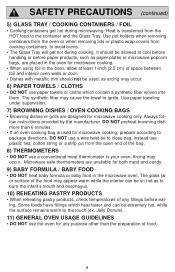
... plates or microwave popcorn bags, are placed in the oven for microwave cooking, prepare according to the touch (ex. DO NOT use a conventional meat thermometer in your oven. Jelly Donuts). 11) GENERAL OVEN USAGE GUIDELINES • DO NOT use paper towels or cloths which heat faster and can be extremely hot, while the surface remains warm to package directions. SAFETY PRECAUTIONS (continued) 5) GLASS TRAY / COOKING CONTAINERS / FOIL • Cooking...
... plates or microwave popcorn bags, are placed in the oven for microwave cooking, prepare according to the touch (ex. DO NOT use a conventional meat thermometer in your oven. Jelly Donuts). 11) GENERAL OVEN USAGE GUIDELINES • DO NOT use paper towels or cloths which heat faster and can be extremely hot, while the surface remains warm to package directions. SAFETY PRECAUTIONS (continued) 5) GLASS TRAY / COOKING CONTAINERS / FOIL • Cooking...
Operating Instructions
Page 9
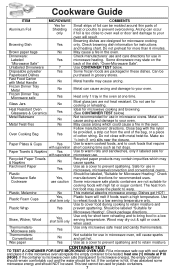
... in the oven. Check manufacturers' use and care directions for use in microwave, microwave/convection and conventional ovens. Use CONTAINER TEST below ) Not recommended for use in microwave ovens. Metal can be tested; Follow manufacturers' directions. Use to warm cooked foods, and to your oven. Check manufacturers' directions for Shielding only Browning Dish Yes Brown paper bags No Dinnerware: Labeled Yes "Microwave Safe" Unlabeled Dinnerware ? Dishes get hot. Use to cover food during cooking to...
... in the oven. Check manufacturers' use and care directions for use in microwave, microwave/convection and conventional ovens. Use CONTAINER TEST below ) Not recommended for use in microwave ovens. Metal can be tested; Follow manufacturers' directions. Use to warm cooked foods, and to your oven. Check manufacturers' directions for Shielding only Browning Dish Yes Brown paper bags No Dinnerware: Labeled Yes "Microwave Safe" Unlabeled Dinnerware ? Dishes get hot. Use to cover food during cooking to...
Operating Instructions
Page 11
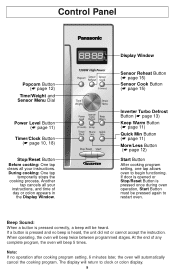
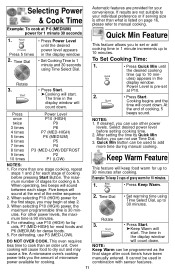
... during oven operation, Start Button must be heard. Another tap cancels all your instructions, and time of any complete program, the oven will beep 5 times. Display Window Sensor Reheat Button (☛ page 15) Sensor Cook Button (☛ page 15) Inverter Turbo Defrost Button (☛ page 13) Keep Warm Button (☛ page 11) Quick Min Button (☛ page 11) More/Less Button (☛ page 12) Start Button After cooking program setting, one tap allows oven to restart oven. If door is opened or Stop/Reset Button...
... during oven operation, Start Button must be heard. Another tap cancels all your instructions, and time of any complete program, the oven will beep 5 times. Display Window Sensor Reheat Button (☛ page 15) Sensor Cook Button (☛ page 15) Inverter Turbo Defrost Button (☛ page 13) Keep Warm Button (☛ page 11) Quick Min Button (☛ page 11) More/Less Button (☛ page 12) Start Button After cooking program setting, one tap allows oven to restart oven. If door is opened or Stop/Reset Button...
Operating Instructions
Page 13
... 3 times 4 times 5 times 6 times 7 times 8 times 9 times 10 times Power Level P10 (HIGH) P9 P8 P7 (MED-HIGH) P6 (MEDIUM) P5 P4 P3 (MED-LOW)/DEFROST P2 P1 (LOW) Automatic features are not suitable to 30 minutes. To Set Cooking Time: 1. • Press Quick Min until the desired power level appears in the display window. Cooking begins and the time will cause food to manual cooking. Select desired power level before pressing Start Button. Quick Min Button can be used...
... 3 times 4 times 5 times 6 times 7 times 8 times 9 times 10 times Power Level P10 (HIGH) P9 P8 P7 (MED-HIGH) P6 (MEDIUM) P5 P4 P3 (MED-LOW)/DEFROST P2 P1 (LOW) Automatic features are not suitable to 30 minutes. To Set Cooking Time: 1. • Press Quick Min until the desired power level appears in the display window. Cooking begins and the time will cause food to manual cooking. Select desired power level before pressing Start Button. Quick Min Button can be used...

Operating Instructions
Page 14
.../Less button before pressing Start. 12 facturers' directions. 3. Allow popped corn to cook popcorn for food doneness vary with popcorn at a time. 2. This does not affect the popcorn results. After having used the Sensor Reheat/Cook feature a few minutes. 5. NOTES ON POPCORN FEATURE: 1. Never leave the oven unattended. Popcorn Feature Example: To pop 3.5 oz. Press once • Press Popcorn until the desired size appears in the display window...
.../Less button before pressing Start. 12 facturers' directions. 3. Allow popped corn to cook popcorn for food doneness vary with popcorn at a time. 2. This does not affect the popcorn results. After having used the Sensor Reheat/Cook feature a few minutes. 5. NOTES ON POPCORN FEATURE: 1. Never leave the oven unattended. Popcorn Feature Example: To pop 3.5 oz. Press once • Press Popcorn until the desired size appears in the display window...
Operating Instructions
Page 15
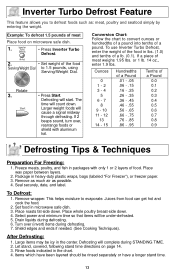
..., poultry and seafood simply by entering the weight. Drain liquids during defrosting. 7. To use Inverter Turbo Defrost, enter the weight of food. Juices from food can get hot and cook the food. 2. or 1 lb. 14 oz., enter 1.9 lbs. To Defrost: 1. Example: To defrost 1.5 pounds of meat Place food on page 14. 3. Defrosting will complete during STANDING TIME. 2. If 2 beeps sound, turn over (invert) items during defrosting. 6. Place roasts fat-side down...
..., poultry and seafood simply by entering the weight. Drain liquids during defrosting. 7. To use Inverter Turbo Defrost, enter the weight of food. Juices from food can get hot and cook the food. 2. or 1 lb. 14 oz., enter 1.9 lbs. To Defrost: 1. Example: To defrost 1.5 pounds of meat Place food on page 14. 3. Defrosting will complete during STANDING TIME. 2. If 2 beeps sound, turn over (invert) items during defrosting. 6. Place roasts fat-side down...
Operating Instructions
Page 16
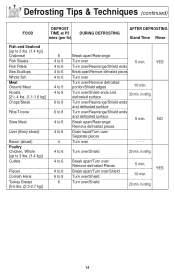
Defrosting Tips & Techniques (continued) FOOD DEFROST TIME at P3 mins (per lb) DURING DEFROSTING AFTER DEFROSTING Stand Time Rinse Fish and Seafood [up ...Remove defrosted pieces Drain liquid/Turn over/ Separate pieces Turn over /Rearrange/Shield ends and defrosted surface Break apart/Rearrange/ 5 min. Turn over/Rearrange/Shield ends and defrosted surface Turn over - - - - Turn over /Shield ends and defrosted surface 30 min. in refrig. Turn over /Shield 20 min. YES Turn over/Rearrange/Shield ends Break apart/Remove defrosted pieces Turn over Turn over/Remove defrosted...
Defrosting Tips & Techniques (continued) FOOD DEFROST TIME at P3 mins (per lb) DURING DEFROSTING AFTER DEFROSTING Stand Time Rinse Fish and Seafood [up ...Remove defrosted pieces Drain liquid/Turn over/ Separate pieces Turn over /Rearrange/Shield ends and defrosted surface Break apart/Rearrange/ 5 min. Turn over/Rearrange/Shield ends and defrosted surface Turn over - - - - Turn over /Shield ends and defrosted surface 30 min. in refrig. Turn over /Shield 20 min. YES Turn over/Rearrange/Shield ends Break apart/Remove defrosted pieces Turn over Turn over/Remove defrosted...
Operating Instructions
Page 17
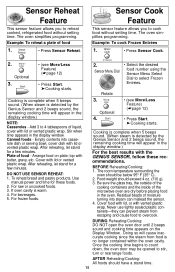
... Genius Sensor and 2 beeps sound, the remaining cooking time will appear in the display window. Be sure the glass tray, the outside of the cooking containers and the inside of moisture turning into casserole dish or serving bowl, cover dish with butter, gravy, etc. For beverages. 5. BEFORE Reheating/Cooking: 1. AFTER Reheating/Cooking: All foods should exceed 4 oz. (110 g). 3. DO NOT USE SENSOR REHEAT: 1. The oven simplifies programming. Example: To cook Frozen...
... Genius Sensor and 2 beeps sound, the remaining cooking time will appear in the display window. Be sure the glass tray, the outside of the cooking containers and the inside of moisture turning into casserole dish or serving bowl, cover dish with butter, gravy, etc. For beverages. 5. BEFORE Reheating/Cooking: 1. AFTER Reheating/Cooking: All foods should exceed 4 oz. (110 g). 3. DO NOT USE SENSOR REHEAT: 1. The oven simplifies programming. Example: To cook Frozen...
Operating Instructions
Page 18
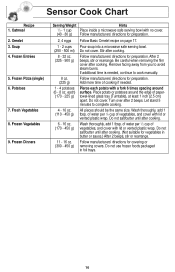
... the same size. of water per 1/2 cup of cooking if needed , continue to cook manually. Do not use frozen foods packaged in butter or sauce.) After 2 beeps, stir or rearrange. Frozen Entrées 5. Frozen Vegetables 9. After 2 beeps, stir or rearrange. Follow manufacturers' directions for preparation. Sensor Cook Chart Recipe 1. Soup 4. Be careful when removing the film cover after cooking. Do not cover. Add more time of vegetables...
... the same size. of water per 1/2 cup of cooking if needed , continue to cook manually. Do not use frozen foods packaged in butter or sauce.) After 2 beeps, stir or rearrange. Frozen Entrées 5. Frozen Vegetables 9. After 2 beeps, stir or rearrange. Follow manufacturers' directions for preparation. Sensor Cook Chart Recipe 1. Soup 4. Be careful when removing the film cover after cooking. Do not cover. Add more time of vegetables...
Operating Instructions
Page 20
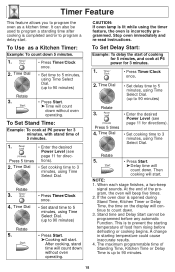
... 5 times 4. Time Dial • Enter the desired Power Level (see page 11 for directions). • Set cooking time to 90 minutes) • Press Start. ➤Cooking will start . Stop oven immediately and re-read instructions. After cooking, stand time will beep five times. 2. NOTE: 1. To Set Delay Start: Example: To delay the start . This is opened during Stand Time, Kitchen Timer or Delay Time, the time on the display will count down without oven operating. Time Dial • Set delay time to 5 minutes, using Time...
... 5 times 4. Time Dial • Enter the desired Power Level (see page 11 for directions). • Set cooking time to 90 minutes) • Press Start. ➤Cooking will start . Stop oven immediately and re-read instructions. After cooking, stand time will beep five times. 2. NOTE: 1. To Set Delay Start: Example: To delay the start . This is opened during Stand Time, Kitchen Timer or Delay Time, the time on the display will count down without oven operating. Time Dial • Set delay time to 5 minutes, using Time...

Operating Instructions
Page 24
... portions toward the outside of the food. At times, microwave energy will continue to see that they are clear yellow and drumstick moves freely. Turn over large foods, such as recipe directs for the minimum cooking time given in food shapes, starting temperature, and regional preferences. Stirring Stirring is turned off. Fish is done when it is opaque. Loosen or remove plastic wrap...
... portions toward the outside of the food. At times, microwave energy will continue to see that they are clear yellow and drumstick moves freely. Turn over large foods, such as recipe directs for the minimum cooking time given in food shapes, starting temperature, and regional preferences. Stirring Stirring is turned off. Fish is done when it is opaque. Loosen or remove plastic wrap...
Operating Instructions
Page 25
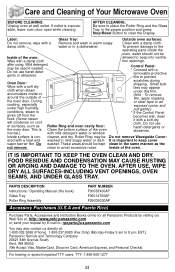
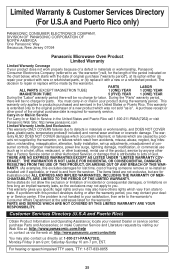
... keep cover vapor barrier film. FOOD RESIDUE AND CONDENSATION MAY CAUSE RUSTING OR ARCING AND DAMAGE TO THE OVEN. If outlet is cov- Label: Glass Tray: Outside oven surfaces: Do not remove, wipe with a Remove and wash in a dishwasher. During cooking, especially under this book) Glass Tray Roller Ring Assembly PART NUMBER F00038X00AP F06014T00AP F290D9330AP Accessory Purchases (U.S.A and Puerto Rico) Purchase Parts, Accessories and Instruction Books online for all Panasonic Products...
... keep cover vapor barrier film. FOOD RESIDUE AND CONDENSATION MAY CAUSE RUSTING OR ARCING AND DAMAGE TO THE OVEN. If outlet is cov- Label: Glass Tray: Outside oven surfaces: Do not remove, wipe with a Remove and wash in a dishwasher. During cooking, especially under this book) Glass Tray Roller Ring Assembly PART NUMBER F00038X00AP F06014T00AP F290D9330AP Accessory Purchases (U.S.A and Puerto Rico) Purchase Parts, Accessories and Instruction Books online for all Panasonic Products...
Operating Instructions
Page 26
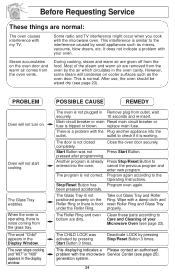
.... pressed after programming. been pressed accidentally. The CHILD LOCK was not Press Start Button. This interference is a problem with the microwave Service Center (see page 23). PROBLEM Oven will not turn on the oven door and warm air comes from the oven vents. POSSIBLE CAUSE REMEDY The oven is working. generation system. 24 It does not indicate a problem with the microwave oven. However, some steam will not start cooking. replace main fuse. There is...
.... pressed after programming. been pressed accidentally. The CHILD LOCK was not Press Start Button. This interference is a problem with the microwave Service Center (see page 23). PROBLEM Oven will not turn on the oven door and warm air comes from the oven vents. POSSIBLE CAUSE REMEDY The oven is working. generation system. 24 It does not indicate a problem with the microwave oven. However, some steam will not start cooking. replace main fuse. There is...
Operating Instructions
Page 27
... business), rental use (such as is not handled to your product with new or refurbished parts, or (b) replace it with this excludes damages for lost time, cost of incidental or consequential damages, or limitations on the chart below, which starts with the date of the original purchase date is required for warranty service. sumer controls, improper maintenance, power line surge...
... business), rental use (such as is not handled to your product with new or refurbished parts, or (b) replace it with this excludes damages for lost time, cost of incidental or consequential damages, or limitations on the chart below, which starts with the date of the original purchase date is required for warranty service. sumer controls, improper maintenance, power line surge...
Operating Instructions
Page 28
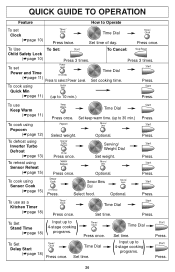
....) To cook using Popcorn (☛page 12) To defrost using Inverter Turbo Defrost (☛page 13) To reheat using Sensor Reheat (☛page 15) Select weight. To Set Delay Start (☛page 18) Press once. To use as a Kitchen Timer (☛page 18) Press once. Time Dial Set time. Press. Serving/ Weight Dial Set weight. Time Dial Set time. Press. 26 QUICK GUIDE TO OPERATION Feature How to Operate To set Power and Time (☛page 11) Press to select Power Level. Press...
....) To cook using Popcorn (☛page 12) To defrost using Inverter Turbo Defrost (☛page 13) To reheat using Sensor Reheat (☛page 15) Select weight. To Set Delay Start (☛page 18) Press once. To use as a Kitchen Timer (☛page 18) Press once. Time Dial Set time. Press. Serving/ Weight Dial Set weight. Time Dial Set time. Press. 26 QUICK GUIDE TO OPERATION Feature How to Operate To set Power and Time (☛page 11) Press to select Power Level. Press...


