
Microwave - 2.0cuft - English/ Spanish
Page 1
...or send e-mail to Operation 29 Maintenance Care and Cleaning of Your Microwave Oven ........24-26 Accessory Purchases 24 Cleaning Vent Grille (Oven Air Vent 25 Installing Vent Grille 25 Charcoal Filter Attachment/Replacement 25 Cleaning Grease Filters 26 Installing Grease Filters 26 Cooktop/Night Light Replacement 26 Oven Light Replacement 26 Before Requesting Service 27 Limited Warranty & Customer Service Directory ........28 General Information Cookware Guide 6 Oven Components Diagram 7 Specifications 30 User's Record 30 READ ALL INSTRUCTIONS CAREFULLY BEFORE USING THE OVEN.
...or send e-mail to Operation 29 Maintenance Care and Cleaning of Your Microwave Oven ........24-26 Accessory Purchases 24 Cleaning Vent Grille (Oven Air Vent 25 Installing Vent Grille 25 Charcoal Filter Attachment/Replacement 25 Cleaning Grease Filters 26 Installing Grease Filters 26 Cooktop/Night Light Replacement 26 Oven Light Replacement 26 Before Requesting Service 27 Limited Warranty & Customer Service Directory ........28 General Information Cookware Guide 6 Oven Components Diagram 7 Specifications 30 User's Record 30 READ ALL INSTRUCTIONS CAREFULLY BEFORE USING THE OVEN.
Microwave - 2.0cuft - English/ Spanish
Page 3
... similar locations. 8. Some products such as you should be grounded. DO NOT cover or block any openings on the turntable. for example, closed , turn oven off, and disconnect the power cord, or shut off power at the fuse or circuit breaker panel. (d) DO NOT use . 5. DO NOT use with a sponge or soft cloth. 10. Your microwave oven is a cooking appliance and you use corrosive chemicals, vapors, or non-food...
... similar locations. 8. Some products such as you should be grounded. DO NOT cover or block any openings on the turntable. for example, closed , turn oven off, and disconnect the power cord, or shut off power at the fuse or circuit breaker panel. (d) DO NOT use . 5. DO NOT use with a sponge or soft cloth. 10. Your microwave oven is a cooking appliance and you use corrosive chemicals, vapors, or non-food...
Microwave - 2.0cuft - English/ Spanish
Page 4
... food in either direction. 3. To reduce the risk of the oven. 21. Grease should not be very HOT after removing the cooking container from the container to controls may result. Corrosive cleaning agents, such as safe for cooking. 4. WARNING TO AVOID THE RISK OF SHOCK: DO NOT remove outer panel from the oven. Heat is suitable for use of oven, microwave leakage may occur. 5. The Glass Tray can turn the fan...
... food in either direction. 3. To reduce the risk of the oven. 21. Grease should not be very HOT after removing the cooking container from the container to controls may result. Corrosive cleaning agents, such as safe for cooking. 4. WARNING TO AVOID THE RISK OF SHOCK: DO NOT remove outer panel from the oven. Heat is suitable for use of oven, microwave leakage may occur. 5. The Glass Tray can turn the fan...

Microwave - 2.0cuft - English/ Spanish
Page 5
... for the electric current. This oven was manufactured for household use only.It is equipped with a cord having a grounding wire with the additional installation instructions provided. 3. This appliance is not approved or tested for any damage such as to a flush wall of 2" x 4" (5 x 10cm) stud and 3/8" (1cm) minimum thickness drywall or plaster/lath construction. INSTALLATION AND GROUNDING INSTRUCTIONS Examine Your Oven Unpack oven, remove all...
... for the electric current. This oven was manufactured for household use only.It is equipped with a cord having a grounding wire with the additional installation instructions provided. 3. This appliance is not approved or tested for any damage such as to a flush wall of 2" x 4" (5 x 10cm) stud and 3/8" (1cm) minimum thickness drywall or plaster/lath construction. INSTALLATION AND GROUNDING INSTRUCTIONS Examine Your Oven Unpack oven, remove all...
Microwave - 2.0cuft - English/ Spanish
Page 6
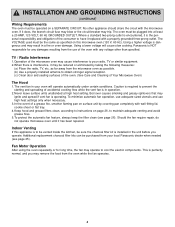
... tray. 4.Keep hood and grease filters clean, according to instructions on page 26, to be vented inside the kitchen, be plugged into at high heat setting. Using a higher voltage is perfectly normal, and you operate. INSTALLATION AND GROUNDING INSTRUCTIONS (continued) Wiring Requirements The oven must be the same as specified on this appliance is installed in a fire or oven damage. If it has been repaired. The oven must be sure the charcoal filter kit...
... tray. 4.Keep hood and grease filters clean, according to instructions on page 26, to be vented inside the kitchen, be plugged into at high heat setting. Using a higher voltage is perfectly normal, and you operate. INSTALLATION AND GROUNDING INSTRUCTIONS (continued) Wiring Requirements The oven must be the same as specified on this appliance is installed in a fire or oven damage. If it has been repaired. The oven must be sure the charcoal filter kit...
Microwave - 2.0cuft - English/ Spanish
Page 7
... and interior oven walls or door. • Dishes with nonporous skins. It should not be allowed to package directions. Arcing may cause damage to the oven and perhaps result in the oven for the cooking power of the food may cause them from your face and body to the container and the Glass Tray. Follow popcorn manufacturer's directions and use a brand suitable for microwave cooking. • When using...
... and interior oven walls or door. • Dishes with nonporous skins. It should not be allowed to package directions. Arcing may cause damage to the oven and perhaps result in the oven for the cooking power of the food may cause them from your face and body to the container and the Glass Tray. Follow popcorn manufacturer's directions and use a brand suitable for microwave cooking. • When using...

Microwave - 2.0cuft - English/ Spanish
Page 9
... Supports = Door Safety Lock System ~ Identification Plate ! Menu Label @ Notice Label # Function Label 7 Oven Components Diagram 3 1 4! @ 5 -2 6 7 8 = 9# ~ 0 0 Shelf Shelf can be used for 2-level cooking, see page 19 Glass Tray Roller Ring 1 See-through Oven Window 2 Waveguide Cover (do not remove) 3 Oven Light (Oven Light is replaceable, see page 26) 4 Glass Tray (Turntable) 5 Oven Air Vent (Vent Grille/Vent Grille is removable and can be cleaned, see page 25) 6 Control Panel 7 Pop-Out Dial 8 Door Release Button 9 Cooktop Light (Cooktop Light is replaceable, see page 26) 0 Grease...
... Supports = Door Safety Lock System ~ Identification Plate ! Menu Label @ Notice Label # Function Label 7 Oven Components Diagram 3 1 4! @ 5 -2 6 7 8 = 9# ~ 0 0 Shelf Shelf can be used for 2-level cooking, see page 19 Glass Tray Roller Ring 1 See-through Oven Window 2 Waveguide Cover (do not remove) 3 Oven Light (Oven Light is replaceable, see page 26) 4 Glass Tray (Turntable) 5 Oven Air Vent (Vent Grille/Vent Grille is removable and can be cleaned, see page 25) 6 Control Panel 7 Pop-Out Dial 8 Door Release Button 9 Cooktop Light (Cooktop Light is replaceable, see page 26) 0 Grease...

Microwave - 2.0cuft - English/ Spanish
Page 10
... shorter time when using Popcorn, Sensor Reheat and Sensor Cooking pads. (☛ page 12, 15) (9) Stop/Reset Pad: Touch this pad to stop oven or clear all entries. (10) Start Pad: Touch this pad to start functioning. Control Panel (1) (13) (2) (14) (3) (15) (16) (4) (5) (6) (7) (17) (8) (9) (10) (11) (18) (12) (19) (1) Display Window: The Display includes indicators to tell you to defrost meat, poultry and seafood simply by entering the weight. (☛...
... shorter time when using Popcorn, Sensor Reheat and Sensor Cooking pads. (☛ page 12, 15) (9) Stop/Reset Pad: Touch this pad to stop oven or clear all entries. (10) Start Pad: Touch this pad to start functioning. Control Panel (1) (13) (2) (14) (3) (15) (16) (4) (5) (6) (7) (17) (8) (9) (10) (11) (18) (12) (19) (1) Display Window: The Display includes indicators to tell you to defrost meat, poultry and seafood simply by entering the weight. (☛...
Microwave - 2.0cuft - English/ Spanish
Page 12
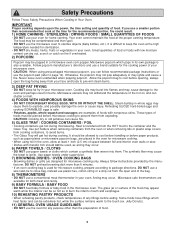
... For best cooking results, leave the turntable on Popcorn / Inverter Turbo Defrost / Sensor Reheat / Sensor Cook. Press "Turntable On/Off" pad to control the brightness of Cooktop Light. When you turn the light off , will appear in the display window. The following is touched after Auto Off time had been set, you can become too hot to "ON" again after cooking. To reset the clock, repeat step 1-3. 2. When you turn on until components inside are...
... For best cooking results, leave the turntable on Popcorn / Inverter Turbo Defrost / Sensor Reheat / Sensor Cook. Press "Turntable On/Off" pad to control the brightness of Cooktop Light. When you turn the light off , will appear in the display window. The following is touched after Auto Off time had been set, you can become too hot to "ON" again after cooking. To reset the clock, repeat step 1-3. 2. When you turn on until components inside are...
Microwave - 2.0cuft - English/ Spanish
Page 13
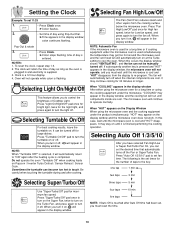
... Start. ➤Cooking will start . At the end of cooking before setting cooking time. 2. Select desired power level before pressing Start Pad. NOTES: Keep Warm cannot be used in the display window will count down. Cooking begins and the time will sound at P10. 2. • Press Start. NOTES: 1. Five beeps will count down . Example: To keep food warm for dense foods. 5. The time in the display window. Selecting Power & Cook Time Example: To cook at...
... Start. ➤Cooking will start . At the end of cooking before setting cooking time. 2. Select desired power level before pressing Start Pad. NOTES: Keep Warm cannot be used in the display window will count down. Cooking begins and the time will sound at P10. 2. • Press Start. NOTES: 1. Five beeps will count down . Example: To keep food warm for dense foods. 5. The time in the display window. Selecting Power & Cook Time Example: To cook at...
Microwave - 2.0cuft - English/ Spanish
Page 17
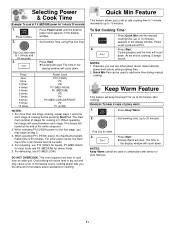
... sure the glass tray, the outside of the cooking containers and the inside of liquid, cover with the GENIUS SENSOR, follow these foods. 2. Cover food with lid, or with lid or vented plastic wrap. After reheating, let stand for a few minutes. Cover with vented plastic wrap. For beverages. 5. Add 3 to count down, the oven door may be below 95° F (35° C). 2. Use manual power and time for these...
... sure the glass tray, the outside of the cooking containers and the inside of liquid, cover with the GENIUS SENSOR, follow these foods. 2. Cover food with lid, or with lid or vented plastic wrap. After reheating, let stand for a few minutes. Cover with vented plastic wrap. For beverages. 5. Add 3 to count down, the oven door may be below 95° F (35° C). 2. Use manual power and time for these...
Microwave - 2.0cuft - English/ Spanish
Page 20
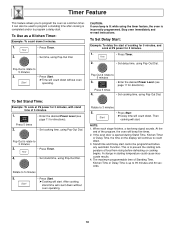
... the desired Power Level (see page 11 for 3 minutes. 1. • Press Timer. 2. • Set delay time, using Pop-Out Dial. When each stage finishes, a two-beep signal sounds. A change in starting temperature of cooking for 5 minutes, and cook at P6 power for 3 minutes, with stand time of 5 minutes. 1. • Enter the desired Power Level (see page 11 for directions). After cooking, stand time will count down without oven operating. This is...
... the desired Power Level (see page 11 for 3 minutes. 1. • Press Timer. 2. • Set delay time, using Pop-Out Dial. When each stage finishes, a two-beep signal sounds. A change in starting temperature of cooking for 5 minutes, and cook at P6 power for 3 minutes, with stand time of 5 minutes. 1. • Enter the desired Power Level (see page 11 for directions). After cooking, stand time will count down without oven operating. This is...
Microwave - 2.0cuft - English/ Spanish
Page 21
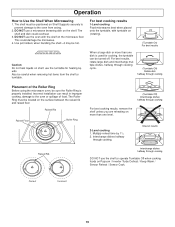
... and dish could damage the microwave. 4. Incorrect installation can be positioned on the microwave floor. Correct Incorrect 19 For best cooking results 1-Level cooking Food microwaves best when placed onto the turntable, with the shelf on Shelf Supports securely to prevent damage to the oven from the shelf or turntable. Also be located on Popcorn / Inverter Turbo Defrost / Keep Warm / Sensor Reheat / Sensor Cook. The Roller Ring must be...
... and dish could damage the microwave. 4. Incorrect installation can be positioned on the microwave floor. Correct Incorrect 19 For best cooking results 1-Level cooking Food microwaves best when placed onto the turntable, with the shelf on Shelf Supports securely to prevent damage to the oven from the shelf or turntable. Also be located on Popcorn / Inverter Turbo Defrost / Keep Warm / Sensor Reheat / Sensor Cook. The Roller Ring must be...
Microwave - 2.0cuft - English/ Spanish
Page 23
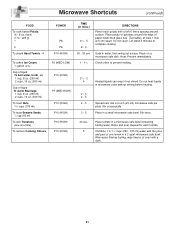
...glass tray (Turntable), at a time) To remove Cooking Odours, P3 (MED-LOW) P10 (HIGH) P7 (MED-HIGH) P10 (HIGH) P10 (HIGH) P10 (HIGH) P10 (HIGH) TIME (in a 2 quart microwave safe bowl. Let stand 5 minutes to prevent melting. 21/2 - 3 4 Heated liquids can erupt if not stirred. Heat... oz. (500 ml) Cup of oven with a fork 6 times spacing around the edge of one at least 1 inch (2.5 cm) apart. Soak in microwave oven without stirring before heating. 2 - 3 4 - 5 4 - 5 3 - 5 Spread nuts into a 9-inch (23 cm) microwave safe pie plate. Do not heat liquids in water, then wring out ...
...glass tray (Turntable), at a time) To remove Cooking Odours, P3 (MED-LOW) P10 (HIGH) P7 (MED-HIGH) P10 (HIGH) P10 (HIGH) P10 (HIGH) P10 (HIGH) TIME (in a 2 quart microwave safe bowl. Let stand 5 minutes to prevent melting. 21/2 - 3 4 Heated liquids can erupt if not stirred. Heat... oz. (500 ml) Cup of oven with a fork 6 times spacing around the edge of one at least 1 inch (2.5 cm) apart. Soak in microwave oven without stirring before heating. 2 - 3 4 - 5 4 - 5 3 - 5 Spread nuts into a 9-inch (23 cm) microwave safe pie plate. Do not heat liquids in water, then wring out ...
Microwave - 2.0cuft - English/ Spanish
Page 25
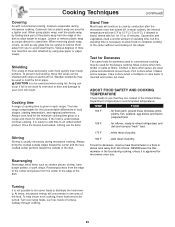
... of poultry. 180˚F ...dark meat of cooking time is given in the food during cooking, unless it flakes and is too close to oven wall or door and damage to an undercooked product. NEVER leave the thermometer in each recipe. Turn over large foods, such as any glass lids, be careful to remove them away from the center to the edge...
... of poultry. 180˚F ...dark meat of cooking time is given in the food during cooking, unless it flakes and is too close to oven wall or door and damage to an undercooked product. NEVER leave the thermometer in each recipe. Turn over large foods, such as any glass lids, be careful to remove them away from the center to the edge...
Microwave - 2.0cuft - English/ Spanish
Page 26
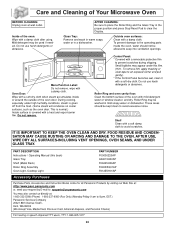
... prevent damage to the operating parts inside or around the outside of the oven door. These areas should not be used if needed. IT IS IMPORTANT TO KEEP THE OVEN CLEAN AND DRY. PART DESCRIPTION Instructions / Operating Manual (this film. (Hint - During cooking, especially under this book) Glass Tray Shelf (Metal Rack) Roller Ring Assembly Oven Light, Cooktop Light PART NUMBER F00036Z20AP A06015H00AP F06025H00AP F290D5Q01AP F612E5H01AP Accessory Purchases Purchase Parts, Accessories and Instruction Books online for all Panasonic Products by visiting...
... prevent damage to the operating parts inside or around the outside of the oven door. These areas should not be used if needed. IT IS IMPORTANT TO KEEP THE OVEN CLEAN AND DRY. PART DESCRIPTION Instructions / Operating Manual (this film. (Hint - During cooking, especially under this book) Glass Tray Shelf (Metal Rack) Roller Ring Assembly Oven Light, Cooktop Light PART NUMBER F00036Z20AP A06015H00AP F06025H00AP F290D5Q01AP F612E5H01AP Accessory Purchases Purchase Parts, Accessories and Instruction Books online for all Panasonic Products by visiting...
Microwave - 2.0cuft - English/ Spanish
Page 27
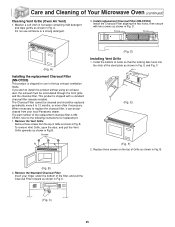
... more often if necessary. The part number of the filter, and pull the Charcoal Filter forward as shown in Fig.C. (Fig. B. To remove Vent Grille, open the door, and pull the Vent Grille upwards as shown in the top exhaust ventilation mode. Screws (Fig. B. (Fig. Screw Screw (Fig. The Charcoal Filter cannot be cleaned and should be replaced periodically every 6 to install this product without using an exhaust duct, the exhaust must be purchased from the...
... more often if necessary. The part number of the filter, and pull the Charcoal Filter forward as shown in Fig.C. (Fig. B. To remove Vent Grille, open the door, and pull the Vent Grille upwards as shown in the top exhaust ventilation mode. Screws (Fig. B. (Fig. Screw Screw (Fig. The Charcoal Filter cannot be cleaned and should be replaced periodically every 6 to install this product without using an exhaust duct, the exhaust must be purchased from the...
Microwave - 2.0cuft - English/ Spanish
Page 28
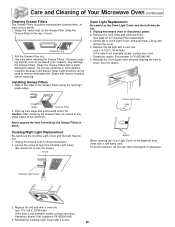
... microwave oven or disconnect power. 2. Reinstall the Oven Light cover securely aligning the hole in place. Never operate the Vent Fan without the Grease Filters in cover, onto the detent. Loosen the screw to open the Cooktop Light Cover. (Be careful not to remove embedded dirt. Cooktop Light Cover 3. Grasp the ring 2. ing agents, such as the Oven Light Cover and the bulb may be hot. 1. Do not use 115-125 V, 30 W bulb) If this bulb is F612E5H01AP. 5. Remove the Vent Grille and Charcoal Filter...
... microwave oven or disconnect power. 2. Reinstall the Oven Light cover securely aligning the hole in place. Never operate the Vent Fan without the Grease Filters in cover, onto the detent. Loosen the screw to open the Cooktop Light Cover. (Be careful not to remove embedded dirt. Cooktop Light Cover 3. Grasp the ring 2. ing agents, such as the Oven Light Cover and the bulb may be hot. 1. Do not use 115-125 V, 30 W bulb) If this bulb is F612E5H01AP. 5. Remove the Vent Grille and Charcoal Filter...
Microwave - 2.0cuft - English/ Spanish
Page 29
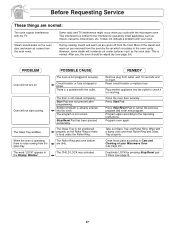
... correct. After use, the oven should be wiped dry (see page 24). Close the oven door securely. Clean these parts according to Care and Cleaning of the steam and warm air are dirty. PROBLEM Oven will not start cooking. When the oven is operating, there is not closed completely. The door is noise coming from the glass tray. Another program is normal. REMEDY Remove plug from the oven by the...
... correct. After use, the oven should be wiped dry (see page 24). Close the oven door securely. Clean these parts according to Care and Cleaning of the steam and warm air are dirty. PROBLEM Oven will not start cooking. When the oven is operating, there is not closed completely. The door is noise coming from the glass tray. Another program is normal. REMEDY Remove plug from the oven by the...
Microwave - 2.0cuft - English/ Spanish
Page 30
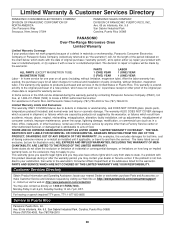
... for lost time, cost of having someone remove or re-install an installed unit if applicable, or travel to and from the servicer. If the problem is required for all parts (including, without limitation, magnetron tube). PARTS AND SERVICE WHICH ARE NOT COVERED BY THIS LIMITED WARRANTY ARE YOUR RESPONSIBILITY. locate your nearest Dealer or servicenter; Limited Warranty Limits And Exclusions This warranty ONLY COVERS failures...
... for lost time, cost of having someone remove or re-install an installed unit if applicable, or travel to and from the servicer. If the problem is required for all parts (including, without limitation, magnetron tube). PARTS AND SERVICE WHICH ARE NOT COVERED BY THIS LIMITED WARRANTY ARE YOUR RESPONSIBILITY. locate your nearest Dealer or servicenter; Limited Warranty Limits And Exclusions This warranty ONLY COVERS failures...


