
NNH624BF User Guide
Page 1
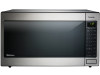
... the Operating Instructions Manual and make sure to remove a blue protective film from the cabinet. Before using your purchase of the oven or on the back of a Panasonic Microwave Oven. Install roller ring and glass tray into oven. 1Initial Set-Up Make sure you for your oven, follow these quick steps. With some models, you may need to write down in a place easily accessible. Locate the glass tray and roller ring. set-up guide...
... the Operating Instructions Manual and make sure to remove a blue protective film from the cabinet. Before using your purchase of the oven or on the back of a Panasonic Microwave Oven. Install roller ring and glass tray into oven. 1Initial Set-Up Make sure you for your oven, follow these quick steps. With some models, you may need to write down in a place easily accessible. Locate the glass tray and roller ring. set-up guide...
NNH624BF User Guide
Page 6
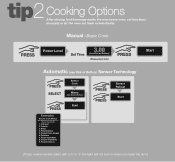
... 5. Manual -Basic Cook Automatic (use Dial or Button) Sensor Technology PRESS SELECT Sensor Cook Menu (use Dial or Button) PRESS Start PRESS PRESS Sensor Reheat Start Sensor Cook Menus (See Operating Instructions for Sensor Cook Chart) 1. Fresh Vegetables 8. Frozen Dinners (If your model number starts with a '5' or '6' the light will not turn on when you open the door.) Frozen Vegetables 9. Soup 4. Frozen Pizza (single) 6. tip2 Cooking Options After placing food/beverage inside the microwave oven, set functions manually or let the oven set them...
... 5. Manual -Basic Cook Automatic (use Dial or Button) Sensor Technology PRESS SELECT Sensor Cook Menu (use Dial or Button) PRESS Start PRESS PRESS Sensor Reheat Start Sensor Cook Menus (See Operating Instructions for Sensor Cook Chart) 1. Fresh Vegetables 8. Frozen Dinners (If your model number starts with a '5' or '6' the light will not turn on when you open the door.) Frozen Vegetables 9. Soup 4. Frozen Pizza (single) 6. tip2 Cooking Options After placing food/beverage inside the microwave oven, set functions manually or let the oven set them...
NNH624BF User Guide
Page 7
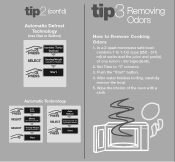
... microwave safe bowl combine 1 to "5" minutes. 3. Set Time to 1-1/2 cups (250 - 375 ml) of water and the juice and peel(s) of the oven with a cloth. After water finishes boiling, carefully remove the bowl. 5. Push the "Start" button. 4. stir ingredients. 2. Wipe the interior of one lemon - tip2 (cont'd) PRESS Inverter Turbo Defrost SELECT Serving/Weight (use Dial or Button) PRESS Start Automatic Technology PRESS SELECT Auto Cook Menu (use Dial...
... microwave safe bowl combine 1 to "5" minutes. 3. Set Time to 1-1/2 cups (250 - 375 ml) of water and the juice and peel(s) of the oven with a cloth. After water finishes boiling, carefully remove the bowl. 5. Push the "Start" button. 4. stir ingredients. 2. Wipe the interior of one lemon - tip2 (cont'd) PRESS Inverter Turbo Defrost SELECT Serving/Weight (use Dial or Button) PRESS Start Automatic Technology PRESS SELECT Auto Cook Menu (use Dial...

User Manual
Page 1
Operating Instructions Microwave Oven Models: NN-P794/SN747/SN757/ SN797/T945/SN947/ SN957/SN977 Safety Information Operation Precautions Inside cover Important Safety Instructions .........1-3 Installation and Grounding Instructions 3-4 Safety Precautions 5-6 Operation Control Panel 9 Starting to Use Your Oven 10 Setting the Clock 10 Function Features 10-11 Selecting Power & Cook Time 12 Quick Min Feature 12 Keep Warm Feature 12 Popcorn Feature 13 More/Less Feature 13 Beverages 13 Inverter Turbo Defrost Feature 14 Defrosting Tips & Techniques.........14-15 Sensor Reheat...
Operating Instructions Microwave Oven Models: NN-P794/SN747/SN757/ SN797/T945/SN947/ SN957/SN977 Safety Information Operation Precautions Inside cover Important Safety Instructions .........1-3 Installation and Grounding Instructions 3-4 Safety Precautions 5-6 Operation Control Panel 9 Starting to Use Your Oven 10 Setting the Clock 10 Function Features 10-11 Selecting Power & Cook Time 12 Quick Min Feature 12 Keep Warm Feature 12 Popcorn Feature 13 More/Less Feature 13 Beverages 13 Inverter Turbo Defrost Feature 14 Defrosting Tips & Techniques.........14-15 Sensor Reheat...
User Manual
Page 3
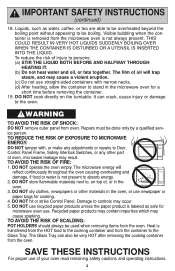
... oven cavity: (a) Do not overcook food. To reduce the risk of a table or counter. 15. Read all instructions before placing bag in oven. (c) If material inside front cover. 3. tions found on page 3. 6. Contact the nearest authorized service center for example, closed , turn oven off, and disconnect the power cord, or shut off power at the fuse or circuit breaker panel. (d) DO NOT use the cavity for its intended use...
... oven cavity: (a) Do not overcook food. To reduce the risk of a table or counter. 15. Read all instructions before placing bag in oven. (c) If material inside front cover. 3. tions found on page 3. 6. Contact the nearest authorized service center for example, closed , turn oven off, and disconnect the power cord, or shut off power at the fuse or circuit breaker panel. (d) DO NOT use the cavity for its intended use...
User Manual
Page 4
... HOT food to the oven. The Glass Tray can crack, cause injury or damage to the cooking container and from the oven. WARNING TO AVOID THE RISK OF SHOCK: DO NOT remove outer panel from the oven. DO NOT operate the oven empty. DO NOT store flammable materials next to Door, Control Panel Frame, Safety Interlock Switches, or any other materials in the microwave oven for a short time before removing...
... HOT food to the oven. The Glass Tray can crack, cause injury or damage to the cooking container and from the oven. WARNING TO AVOID THE RISK OF SHOCK: DO NOT remove outer panel from the oven. DO NOT operate the oven empty. DO NOT store flammable materials next to Door, Control Panel Frame, Safety Interlock Switches, or any other materials in the microwave oven for a short time before removing...
User Manual
Page 5
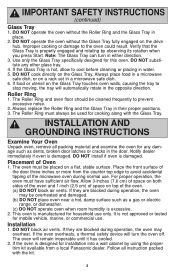
... the Glass Tray touches oven walls, causing the tray to stop moving, the tray will automatically rotate in their proper positions. 3. Use only the Glass Tray specifically designed for mobile vehicle, marine, or commercial use. DO NOT substitute any damage such as dents, broken door latches or cracks in place. 2. The Roller Ring and oven floor should be used for household use . INSTALLATION AND GROUNDING INSTRUCTIONS Examine Your Oven Unpack oven, remove all instruction packed...
... the Glass Tray touches oven walls, causing the tray to stop moving, the tray will automatically rotate in their proper positions. 3. Use only the Glass Tray specifically designed for mobile vehicle, marine, or commercial use. DO NOT substitute any damage such as dents, broken door latches or cracks in place. 2. The Roller Ring and oven floor should be used for household use . INSTALLATION AND GROUNDING INSTRUCTIONS Examine Your Oven Unpack oven, remove all instruction packed...

User Manual
Page 6
... oven. (See Care and Cleaning of the consumer to your radio, TV or similar equipment. 2. Panasonic is used must be a grounding-type 3-wire cord, and (3) the longer cord should share the circuit with a grounding plug. If a long cord or extension cord is NOT responsible for the electric current. No other than the electrical rating of the microwave oven may trip. INSTALLATION AND GROUNDING INSTRUCTIONS (continued) WARNING -IMPROPER USE...
... oven. (See Care and Cleaning of the consumer to your radio, TV or similar equipment. 2. Panasonic is used must be a grounding-type 3-wire cord, and (3) the longer cord should share the circuit with a grounding plug. If a long cord or extension cord is NOT responsible for the electric current. No other than the electrical rating of the microwave oven may trip. INSTALLATION AND GROUNDING INSTRUCTIONS (continued) WARNING -IMPROPER USE...
User Manual
Page 8
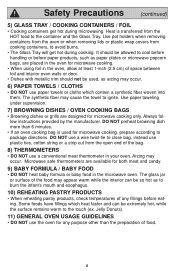
... (continued) 5) GLASS TRAY / COOKING CONTAINERS / FOIL • Cooking containers get hot during microwaving. It should not be used for microwave cooking, prepare according to cool before handling or before eating. Jelly Donuts). 11) GENERAL OVEN USAGE GUIDELINES • DO NOT use a conventional meat thermometer in the microwave oven. Use pot holders when removing containers from the oven or when removing lids or plastic wrap covers from the HOT food to the touch (ex...
... (continued) 5) GLASS TRAY / COOKING CONTAINERS / FOIL • Cooking containers get hot during microwaving. It should not be used for microwave cooking, prepare according to cool before handling or before eating. Jelly Donuts). 11) GENERAL OVEN USAGE GUIDELINES • DO NOT use a conventional meat thermometer in the microwave oven. Use pot holders when removing containers from the oven or when removing lids or plastic wrap covers from the HOT food to the touch (ex...

User Manual
Page 9
... microwave, microwave/convection and conventional ovens. Check manufacturers' use and care directions for use for cooking or reheating. Some frozen foods are not suitable for microwave cooking only. Do not use in microwave heating. Do not close to oven wall or door and damage to prevent overcooking. Should be labeled "Suitable for more than 6 minutes. Dishes get hot. Some dinnerware may cause sparks. Metal handle may cause the plastic to microwave...
... microwave, microwave/convection and conventional ovens. Check manufacturers' use and care directions for use for cooking or reheating. Some frozen foods are not suitable for microwave cooking only. Do not use in microwave heating. Do not close to oven wall or door and damage to prevent overcooking. Should be labeled "Suitable for more than 6 minutes. Dishes get hot. Some dinnerware may cause sparks. Metal handle may cause the plastic to microwave...

User Manual
Page 13
... quickly. *2 MEDIUM ➻ Scrolling speed returns to be turned off . 0 DEMO MODE ON/OFF Demo mode is not in Demo mode. * DEFAULT MODE 11 The oven displays the weight in English when you to program your oven, the prompt can be demonstrated with no beep, it in. *1 LB 2 KG ➻ Weight can be set in oz/lb, (Imperial). ➻ Weight can be set and operation will not be accepted. ➻ Child Lock...
... quickly. *2 MEDIUM ➻ Scrolling speed returns to be turned off . 0 DEMO MODE ON/OFF Demo mode is not in Demo mode. * DEFAULT MODE 11 The oven displays the weight in English when you to program your oven, the prompt can be demonstrated with no beep, it in. *1 LB 2 KG ➻ Weight can be set in oz/lb, (Imperial). ➻ Weight can be set and operation will not be accepted. ➻ Child Lock...
User Manual
Page 14
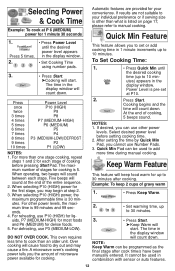
... the display window. • Set Cooking Time using number pads. 3. • Press Start. ➤Cooking will count down . The maximum number of the entire sequence. 2. Five beeps will cause food to 30 minutes after cook time/s have been manually entered. When selecting P10 (HIGH) power for cooking is 30 minutes. For defrosting, use P10 (HIGH) for liquids, P7 (MEDIUM-HIGH) for most foods and P6 (MEDIUM) for each stage. A microwave oven's cooking power...
... the display window. • Set Cooking Time using number pads. 3. • Press Start. ➤Cooking will count down . The maximum number of the entire sequence. 2. Five beeps will cause food to 30 minutes after cook time/s have been manually entered. When selecting P10 (HIGH) power for cooking is 30 minutes. For defrosting, use P10 (HIGH) for liquids, P7 (MEDIUM-HIGH) for most foods and P6 (MEDIUM) for each stage. A microwave oven's cooking power...

User Manual
Page 17
.../Rearrange/Shield ends Break apart/Remove defrosted pieces Turn over Turn over /Shield ends and defrosted surface 30 min. Turn over /Remove defrosted portion/Shield edges 10 min. NO Remove defrosted pieces Drain liquid/Turn over/ Separate pieces Turn over 5 min. Defrosting Tips & Techniques (continued) FOOD DEFROST TIME at P3 mins (per lb) DURING DEFROSTING AFTER DEFROSTING Stand Time Rinse Fish and Seafood [up to 3 lbs. (1.4 kg)] Crabmeat Fish...
.../Rearrange/Shield ends Break apart/Remove defrosted pieces Turn over Turn over /Shield ends and defrosted surface 30 min. Turn over /Remove defrosted portion/Shield edges 10 min. NO Remove defrosted pieces Drain liquid/Turn over/ Separate pieces Turn over 5 min. Defrosting Tips & Techniques (continued) FOOD DEFROST TIME at P3 mins (per lb) DURING DEFROSTING AFTER DEFROSTING Stand Time Rinse Fish and Seafood [up to 3 lbs. (1.4 kg)] Crabmeat Fish...
User Manual
Page 18
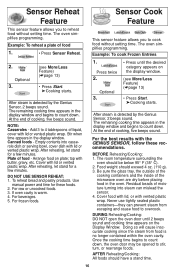
... mislead the sensor. 4. Sensor Reheat Sensor Cook Feature Feature This sensor feature allows you to cook food without setting time. The oven simplifies programming. The remaining cooking time appears in the display window. DO NOT USE SENSOR REHEAT: 1. Food weight should have a stand time. 16 Example: To cook Frozen Entrées 2. Plate of cooking, five beeps sound. To reheat bread and pastry products. This sensor feature allows you to reheat food without setting time. The oven simplifies programming. After...
... mislead the sensor. 4. Sensor Reheat Sensor Cook Feature Feature This sensor feature allows you to cook food without setting time. The oven simplifies programming. The remaining cooking time appears in the display window. DO NOT USE SENSOR REHEAT: 1. Food weight should have a stand time. 16 Example: To cook Frozen Entrées 2. Plate of cooking, five beeps sound. To reheat bread and pastry products. This sensor feature allows you to reheat food without setting time. The oven simplifies programming. After...

User Manual
Page 19
...'s directions for preparation. Let stand 5 minutes to cook manually. of water per 1/2 cup of pre-cooked breakfast sausage. Place rice with lid or vented plastic wrap. Let stand 5 to 10 minutes before serving. Do not use frozen foods packaged in glass bowl or colander. Cover with hot tap water in a microwave safe casserole dish. After 2 beeps, stir. Frozen Entrées Serving/Weight...
...'s directions for preparation. Let stand 5 minutes to cook manually. of water per 1/2 cup of pre-cooked breakfast sausage. Place rice with lid or vented plastic wrap. Let stand 5 to 10 minutes before serving. Do not use frozen foods packaged in glass bowl or colander. Cover with hot tap water in a microwave safe casserole dish. After 2 beeps, stir. Frozen Entrées Serving/Weight...

User Manual
Page 21
... opened during Stand Time, Kitchen Timer or Delay Time, the time on the display will continue to count down. 3. To Use as a kitchen timer. A change in starting temperature of Stand Time using number pads. 3. • Press Timer. 4. • Set desired amount of food from rising before any automatic Function. Then cooking will count down. Press 5 times 4. • Enter the desired Power Level (see page 12 for directions). When each stage finishes, a two-beep signal sounds. Stop oven...
... opened during Stand Time, Kitchen Timer or Delay Time, the time on the display will continue to count down. 3. To Use as a kitchen timer. A change in starting temperature of Stand Time using number pads. 3. • Press Timer. 4. • Set desired amount of food from rising before any automatic Function. Then cooking will count down. Press 5 times 4. • Enter the desired Power Level (see page 12 for directions). When each stage finishes, a two-beep signal sounds. Stop oven...
User Manual
Page 25
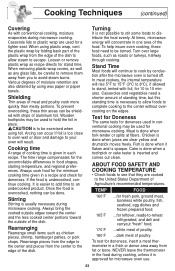
.... Cooking time A range of poultry. Fish is done when it is inserted and comes out clean. Rearrange pieces from the edge to the center and pieces from the edge of the dish to allow foods to complete cooking to your oven will concentrate in place. Cooking Techniques (continued) Covering As with conventional cooking, moisture evaporates during microwave cooking. When removing plastic wrap covers, as...
.... Cooking time A range of poultry. Fish is done when it is inserted and comes out clean. Rearrange pieces from the edge to the center and pieces from the edge of the dish to allow foods to complete cooking to your oven will concentrate in place. Cooking Techniques (continued) Covering As with conventional cooking, moisture evaporates during microwave cooking. When removing plastic wrap covers, as...
User Manual
Page 26
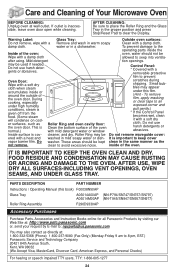
... Inside of the oven: oven, water should be used if needed. Small bubbles may also contact us directly at wall outlet. To remove film, apply masking or clear tape to seep into ventila- Roller Ring may be kept clean in a dishwasher. IT IS IMPORTANT TO KEEP THE OVEN CLEAN AND DRY. AFTER USE, WIPE DRY ALL SURFACES-INCLUDING VENT OPENINGS, OVEN SEAMS, AND UNDER GLASS TRAY. PARTS DESCRIPTION PART NUMBER Instructions / Operating Manual...
... Inside of the oven: oven, water should be used if needed. Small bubbles may also contact us directly at wall outlet. To remove film, apply masking or clear tape to seep into ventila- Roller Ring may be kept clean in a dishwasher. IT IS IMPORTANT TO KEEP THE OVEN CLEAN AND DRY. AFTER USE, WIPE DRY ALL SURFACES-INCLUDING VENT OPENINGS, OVEN SEAMS, AND UNDER GLASS TRAY. PARTS DESCRIPTION PART NUMBER Instructions / Operating Manual...
User Manual
Page 27
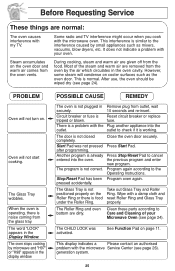
The Glass Tray wobbles. The word "LOCK" appears in Remove plug from the oven vents. Circuit breaker or fuse is not closed completely. The door is Reset circuit breaker or replace tripped or blown. Start Pad was activated. the previous program and enter new program. Stop/Reset Pad has been Program oven again. Wipe with your Microwave Oven (see page 24). The Roller Ring and oven Clean these parts according to bottom are given off...
The Glass Tray wobbles. The word "LOCK" appears in Remove plug from the oven vents. Circuit breaker or fuse is not closed completely. The door is Reset circuit breaker or replace tripped or blown. Start Pad was activated. the previous program and enter new program. Stop/Reset Pad has been Program oven again. Wipe with your Microwave Oven (see page 24). The Roller Ring and oven Clean these parts according to bottom are given off...
User Manual
Page 28
... PANASONIC PUERTO RICO, INC. If the problem is extended only to the original purchaser of having someone remove or re-install an installed unit if applicable, or travel to repair or replace will , for warranty service. This warranty gives you specific legal rights and you . Ave. 65 de Infanteria, Km. 9.5 San Gabriel Industrial Park Carolina, Puerto Rico 00985 Panasonic Microwave Oven Product Limited Warranty Limited Warranty...
... PANASONIC PUERTO RICO, INC. If the problem is extended only to the original purchaser of having someone remove or re-install an installed unit if applicable, or travel to repair or replace will , for warranty service. This warranty gives you specific legal rights and you . Ave. 65 de Infanteria, Km. 9.5 San Gabriel Industrial Park Carolina, Puerto Rico 00985 Panasonic Microwave Oven Product Limited Warranty Limited Warranty...


