
Owners Manual
Page 1
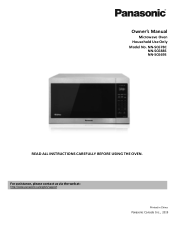
For assistance, please contact us via the web at: http://www.panasonic.ca/english/support Printed in China Panasonic Canada Inc., 2019 NN-SC678C NN-SC688S NN-SC669S READ ALL INSTRUCTIONS CAREFULLY BEFORE USING THE OVEN. Owner's Manual Microwave Oven Household Use Only Model No.
For assistance, please contact us via the web at: http://www.panasonic.ca/english/support Printed in China Panasonic Canada Inc., 2019 NN-SC678C NN-SC688S NN-SC669S READ ALL INSTRUCTIONS CAREFULLY BEFORE USING THE OVEN. Owner's Manual Microwave Oven Household Use Only Model No.
Owners Manual
Page 3
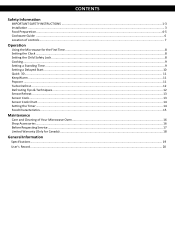
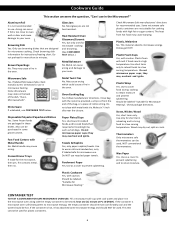
... Cookware Guide ...6 Location of controls ...7 Operation Using the Microwave for the First Time ...8 Setting the Clock ...8 Setting the Child Safety Lock...8 Cooking...9 Setting a Standing Time ...9 Setting a Delayed Start...10 Quick 30 ...11 Keep Warm ...11 Popcorn ...11 Turbo Defrost ...12 Defrosting Tips & Techniques...12 Sensor Reheat...13 Sensor Cook...13 Sensor Cook Chart ...14 Setting the Timer...14 Food Characteristics...15 Maintenance Care and Cleaning of Your Microwave Oven...16 Shop Accessories...16 Before Requesting Service ...17 Limited Warranty (Only for Canada) ...18 General...
... Cookware Guide ...6 Location of controls ...7 Operation Using the Microwave for the First Time ...8 Setting the Clock ...8 Setting the Child Safety Lock...8 Cooking...9 Setting a Standing Time ...9 Setting a Delayed Start...10 Quick 30 ...11 Keep Warm ...11 Popcorn ...11 Turbo Defrost ...12 Defrosting Tips & Techniques...12 Sensor Reheat...13 Sensor Cook...13 Sensor Cook Chart ...14 Setting the Timer...14 Food Characteristics...15 Maintenance Care and Cleaning of Your Microwave Oven...16 Shop Accessories...16 Before Requesting Service ...17 Limited Warranty (Only for Canada) ...18 General...
Owners Manual
Page 4
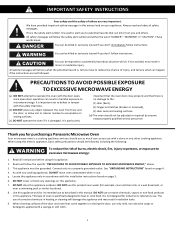
..., near a kitchen sink, in minor or moderate injury. PRECAUTIONS TO AVOID POSSIBLE EXPOSURE TO EXCESSIVE MICROWAVE ENERGY (a) DO NOT attempt to heat or cook food. Read and follow instructions. DO NOT cover or block any other cooking appliance. This type of oven is not designed for purchasing a Panasonic Microwave Oven Your microwave oven is the safety alert symbol. It is specifically designed to operate this appliance...
..., near a kitchen sink, in minor or moderate injury. PRECAUTIONS TO AVOID POSSIBLE EXPOSURE TO EXCESSIVE MICROWAVE ENERGY (a) DO NOT attempt to heat or cook food. Read and follow instructions. DO NOT cover or block any other cooking appliance. This type of oven is not designed for purchasing a Panasonic Microwave Oven Your microwave oven is the safety alert symbol. It is specifically designed to operate this appliance...

Owners Manual
Page 5
..., keep oven door closed glass jars) may result. To reduce the risk of injury to use the cavity for installation into a wall cabinet: (a) DO NOT operate any other part of a table or counter. 15. Microwave leakage may explode and should be heated in the microwave oven for examination, repair or adjustment. 16. DO NOT operate the microwave oven empty or use . 18. IMPORTANT SAFETY INSTRUCTIONS (continued) 10. Keep cord away from the microwave oven...
..., keep oven door closed glass jars) may result. To reduce the risk of injury to use the cavity for installation into a wall cabinet: (a) DO NOT operate any other part of a table or counter. 15. Microwave leakage may explode and should be heated in the microwave oven for examination, repair or adjustment. 16. DO NOT operate the microwave oven empty or use . 18. IMPORTANT SAFETY INSTRUCTIONS (continued) 10. Keep cord away from the microwave oven...
Owners Manual
Page 6
... Glass Tray touches oven walls, causing the tray to use an extension cord, use of space between oven top, sides, rear and adjacent surfaces. (a) DO NOT block air vents. Roller Ring 1. The Roller Ring must always be cleaned frequently to controls may cause sparking. Place the front surface of the appliance. It is necessary to stop moving, the tray will turn in their proper positions. 3. Installation 1. If the oven...
... Glass Tray touches oven walls, causing the tray to use an extension cord, use of space between oven top, sides, rear and adjacent surfaces. (a) DO NOT block air vents. Roller Ring 1. The Roller Ring must always be cleaned frequently to controls may cause sparking. Place the front surface of the appliance. It is necessary to stop moving, the tray will turn in their proper positions. 3. Installation 1. If the oven...
Owners Manual
Page 7
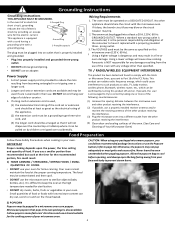
.... (4) Clean door and sealing surfaces of the oven. (See Care and Cleaning of electric shock by turning this f microwave oven (120 V, 60 Hz). This product can follow recommended package instructions or use your oven. If present, the user is also available. Allow the popcorn bag to correct by children or tripped over the countertop or tabletop where it will cause slow cooking. Follow popcorn manufacturers' directions and use of food.
.... (4) Clean door and sealing surfaces of the oven. (See Care and Cleaning of electric shock by turning this f microwave oven (120 V, 60 Hz). This product can follow recommended package instructions or use your oven. If present, the user is also available. Allow the popcorn bag to correct by children or tripped over the countertop or tabletop where it will cause slow cooking. Follow popcorn manufacturers' directions and use of food.
Owners Manual
Page 8
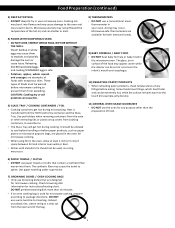
... foil and interior oven walls or door. • Dishes with nonporous skins. Instead use paper towels or cloths that are examples of the bag. 5 Check browning dish information for any fillings before microwave cooking to prevent them to the touch (for example, jelly donuts). 11) GENERAL OVEN USAGE GUIDELINES • DO NOT use the oven for instructions/heating chart. Use pot holders when removing containers from...
... foil and interior oven walls or door. • Dishes with nonporous skins. Instead use paper towels or cloths that are examples of the bag. 5 Check browning dish information for any fillings before microwave cooking to prevent them to the touch (for example, jelly donuts). 11) GENERAL OVEN USAGE GUIDELINES • DO NOT use the oven for instructions/heating chart. Use pot holders when removing containers from...
Owners Manual
Page 9
... cooking foods with caution. they may cause warping. Check Microwave Safe manufacturers' directions for the microwave, then yes. Some microwave safe plastic containers are designed for Microwave Heating". Aluminum Foil It is microwave oven safe (transparent to use browning dishes that requireshort cookingtime, such as a cover to prevent splattering and to your oven. Follow manufacturers' directions. Frozen Dinner Trays If made for recommended uses. Should be hot...
... cooking foods with caution. they may cause warping. Check Microwave Safe manufacturers' directions for the microwave, then yes. Some microwave safe plastic containers are designed for Microwave Heating". Aluminum Foil It is microwave oven safe (transparent to use browning dishes that requireshort cookingtime, such as a cover to prevent splattering and to your oven. Follow manufacturers' directions. Frozen Dinner Trays If made for recommended uses. Should be hot...
Owners Manual
Page 10
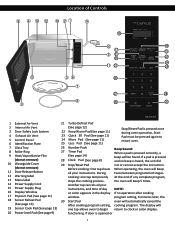
... oven operation, Start Pad must be pressed again to clock or colon display. 20 Power level Pad (See page 9) functioning. If a pad is pressed (do not remove) Before cooking: One tap clears When operating, the oven will beep 11 Door Release Button all your instructions. During twice between programmed stages. 12 Warning label cooking: one tap allows oven to begin return to restart oven. 7 Glass Tray 26 Number Pads Beep Sound: 8 Roller Ring 27 Timer...
... oven operation, Start Pad must be pressed again to clock or colon display. 20 Power level Pad (See page 9) functioning. If a pad is pressed (do not remove) Before cooking: One tap clears When operating, the oven will beep 11 Door Release Button all your instructions. During twice between programmed stages. 12 Warning label cooking: one tap allows oven to begin return to restart oven. 7 Glass Tray 26 Number Pads Beep Sound: 8 Roller Ring 27 Timer...
Owners Manual
Page 11
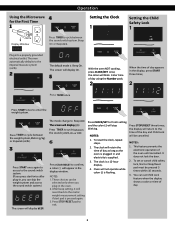
... display OFF. To set Child Lock feature when the display shows a colon or time of the oven until cancelled. You can skip the weight system and access the sound switch system.) The screen will blink. The screen will stop blinking. the colon will display bEEP. Using the Microwave 4 for the First Time 1 Operation Setting the Clock 1 Display Window Press TIMER to cycle between the sound system, On or OFF. 6 Press STOP/RESET to confirm; Beep...
... display OFF. To set Child Lock feature when the display shows a colon or time of the oven until cancelled. You can skip the weight system and access the sound switch system.) The screen will blink. The screen will stop blinking. the colon will display bEEP. Using the Microwave 4 for the First Time 1 Operation Setting the Clock 1 Display Window Press TIMER to cycle between the sound system, On or OFF. 6 Press STOP/RESET to confirm; Beep...
Owners Manual
Page 12
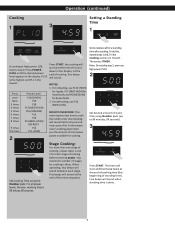
... defrosting, use high power PL10. 2 Set desired amount of cooking, five beeps level appears in the Cooking section on the left. The timer will start and the time will sound. Press POWER down in the display. The maximum number of cooking before pressing START. Overcooking will sound at the end of cooking time (the beginning of the entire sequence. Stage Cooking: For more than older units. Some recipes call for dense foods...
... defrosting, use high power PL10. 2 Set desired amount of cooking, five beeps level appears in the Cooking section on the left. The timer will start and the time will sound. Press POWER down in the display. The maximum number of cooking before pressing START. Overcooking will sound at the end of cooking time (the beginning of the entire sequence. Stage Cooking: For more than older units. Some recipes call for dense foods...

Owners Manual
Page 13
... Delay Time, the time on the display will continue to count down , then cooking will sound. the delay time will beep twice. When each stage finishes, the oven will count down . 10 TURBO DEFROST Press POWER LEVEL until the desired power level appears in the display. To do this, first press TIMER. 2 Set Cooking Time using the Number pads (see previous page for maximum times). 5 Enter the desired delay time (up to start cooking...
... Delay Time, the time on the display will continue to count down , then cooking will sound. the delay time will beep twice. When each stage finishes, the oven will count down . 10 TURBO DEFROST Press POWER LEVEL until the desired power level appears in the display. To do this, first press TIMER. 2 Set Cooking Time using the Number pads (see previous page for maximum times). 5 Enter the desired delay time (up to start cooking...

Owners Manual
Page 14
... of cooking, five beeps will sound. Pop one right after cooking) 1 TURBO DEFROST Press KEEP WARM. 2 Set warming time using Number pads, up to add more time during manual cooking. Open bag carefully to manufacturers' directions. 3. If popping slows to 2 to subtract 20 seconds. 3 NOTES: 1. Quick 30 pad can burn popcorn or cause fire. 10. the cooking will start and the time will count down in the display. Press START; the cooking will start...
... of cooking, five beeps will sound. Pop one right after cooking) 1 TURBO DEFROST Press KEEP WARM. 2 Set warming time using Number pads, up to add more time during manual cooking. Open bag carefully to manufacturers' directions. 3. If popping slows to 2 to subtract 20 seconds. 3 NOTES: 1. Quick 30 pad can burn popcorn or cause fire. 10. the cooking will start and the time will count down in the display. Press START; the cooking will start...

Owners Manual
Page 15
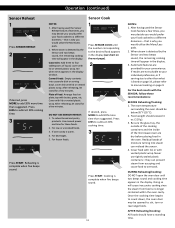
... food using the Number pads. 3 Press START. Remove as much air as meat, poultry and seafood, simply by entering the weight. This helps moisture to 8 6 DURING DEFROSTING Break apart/Rearrange Turn over Turn over/Rearrange Break apart/ Remove defrosted pieces Turn over Turn over/ Remove defrosted portion Turn over Turn over/Rearrange Turn over/Rearrange Break apart/ Remove defrosted pieces Drain liquid/Turn over/ Separate pieces Turn over Turn over Break apart/Turn over/ Remove defrosted...
... food using the Number pads. 3 Press START. Remove as much air as meat, poultry and seafood, simply by entering the weight. This helps moisture to 8 6 DURING DEFROSTING Break apart/Rearrange Turn over Turn over/Rearrange Break apart/ Remove defrosted pieces Turn over Turn over/ Remove defrosted portion Turn over Turn over/Rearrange Turn over/Rearrange Break apart/ Remove defrosted pieces Drain liquid/Turn over/ Separate pieces Turn over Turn over Break apart/Turn over/ Remove defrosted...
Owners Manual
Page 16
.... Plate of the microwave oven are not suitable to your convenience. If desired, press MORE to add 20% more time than suggested . Reheating is warm. 4. For the best results with vented plastic wrap. Be sure the glass tray, the outside of the cooking containers and the inside of food: Arrange food on page 9. Cover food with lid, or with the SENSOR, follow these foods. 2. Once the cooking time...
.... Plate of the microwave oven are not suitable to your convenience. If desired, press MORE to add 20% more time than suggested . Reheating is warm. 4. For the best results with vented plastic wrap. Be sure the glass tray, the outside of the cooking containers and the inside of food: Arrange food on page 9. Cover food with lid, or with the SENSOR, follow these foods. 2. Once the cooking time...
Owners Manual
Page 17
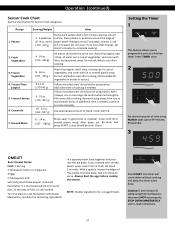
... oven lamp is lit while using Number pads (up to serve. Potato Pierce each ) paper-towel-lined glass tray (Turntable), at PL10, or until melted. Casserole 8 - 16 oz. (227 - 454 g ) 6-12 oz. (170-340 g) 6 - 32 oz. (170 - 907 g) 16 - 32 oz. (454 - 907 g) Wash thoroughly, add 1 tbsp. After 2 beeps, stir or rearrange. Be careful when removing the film cover after cooking. 3. Cover with...
... oven lamp is lit while using Number pads (up to serve. Potato Pierce each ) paper-towel-lined glass tray (Turntable), at PL10, or until melted. Casserole 8 - 16 oz. (227 - 454 g ) 6-12 oz. (170-340 g) 6 - 32 oz. (170 - 907 g) 16 - 32 oz. (454 - 907 g) Wash thoroughly, add 1 tbsp. After 2 beeps, stir or rearrange. Be careful when removing the film cover after cooking. 3. Cover with...
Owners Manual
Page 18
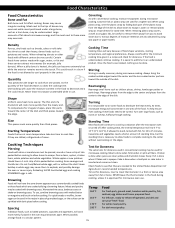
... paper or paper towels. Shape Uniform sizes heat more quickly than thick pieces. Always cook food for the minimum cooking time given in a recipe and check for microwave oven use. Once the food is opaque. Size Thin pieces cook more evenly. Starting Temperature Foods that they are at fibers. Casseroles and vegetables need to the touch. Do not Cook/Reheat whole eggs, with browning sauce, Worcestershire sauce, barbecue...
... paper or paper towels. Shape Uniform sizes heat more quickly than thick pieces. Always cook food for the minimum cooking time given in a recipe and check for microwave oven use. Once the food is opaque. Size Thin pieces cook more evenly. Starting Temperature Foods that they are at fibers. Casseroles and vegetables need to the touch. Do not Cook/Reheat whole eggs, with browning sauce, Worcestershire sauce, barbecue...
Owners Manual
Page 19
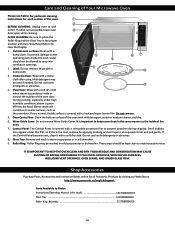
... USE, WIPE DRY ALL SURFACES, INCLUDING VENT OPENINGS, OVEN SEAMS, AND UNDER GLASS TRAY. BEFORE CLEANING: Unplug oven at : http://www.panasonic.ca/english/support Parts Available to Order: Instructions/Operating Manual (this is important to clear the Display. 1. Roller Ring: Roller Ring may be used if needed. TURBO DEFROST AFTER CLEANING: Be sure to place the Roller Ring and the Glass Tray in the proper position and press Stop/Reset Button to keep cover clean...
... USE, WIPE DRY ALL SURFACES, INCLUDING VENT OPENINGS, OVEN SEAMS, AND UNDER GLASS TRAY. BEFORE CLEANING: Unplug oven at : http://www.panasonic.ca/english/support Parts Available to Order: Instructions/Operating Manual (this is important to clear the Display. 1. Roller Ring: Roller Ring may be used if needed. TURBO DEFROST AFTER CLEANING: Be sure to place the Roller Ring and the Glass Tray in the proper position and press Stop/Reset Button to keep cover clean...
Owners Manual
Page 20
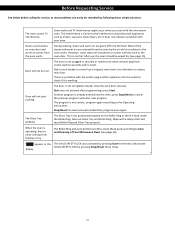
... Glass Tray. After use, the oven should be reset; Oven will not start cooking. plug another appliance into the oven; press Start. program again according to check if it is noise coming from the oven vents. When the oven is operating, there is working. reset main circuit breaker or replace main fuse. Start was activated by following these parts according to the interference caused by pressing Stop/Reset three times. 17 The program is tripped; The Glass Tray...
... Glass Tray. After use, the oven should be reset; Oven will not start cooking. plug another appliance into the oven; press Start. program again according to check if it is noise coming from the oven vents. When the oven is operating, there is working. reset main circuit breaker or replace main fuse. Start was activated by following these parts according to the interference caused by pressing Stop/Reset three times. 17 The program is tripped; The Glass Tray...
Owners Manual
Page 21
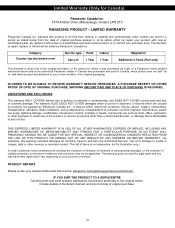
..., this product to be applicable. Category Counter top microwave oven Service type Parts Carry-in 1 Year Labour 1 Year Magnetron Additional 4 Years (Part only) This warranty is given only to repair, replace or refund will be made by an authorized Panasonic dealer in Canada and purchased and used in Canada, which product was not sold by Panasonic Canada Inc. Include details of the defect...
..., this product to be applicable. Category Counter top microwave oven Service type Parts Carry-in 1 Year Labour 1 Year Magnetron Additional 4 Years (Part only) This warranty is given only to repair, replace or refund will be made by an authorized Panasonic dealer in Canada and purchased and used in Canada, which product was not sold by Panasonic Canada Inc. Include details of the defect...


