

NE1257R User Guide
Page 1
Before Calling for Service: If failure code "F**" appears in the display, unplug oven and wait for 10 seconds before operating this oven. If normal operation does not resume, call the service agent with the information of failure code. Operating Instructions Commercial Microwave Ovens NE-1257R/NE-1258R/NE-1757R/NE-2157R HI MED DEF PROG POWER x2 A B LEVEL x3 1 2 3 4 5 6 7 8 9 0 STOP/ RESET START Please read these instructions completely before reconnecting.
Before Calling for Service: If failure code "F**" appears in the display, unplug oven and wait for 10 seconds before operating this oven. If normal operation does not resume, call the service agent with the information of failure code. Operating Instructions Commercial Microwave Ovens NE-1257R/NE-1258R/NE-1757R/NE-2157R HI MED DEF PROG POWER x2 A B LEVEL x3 1 2 3 4 5 6 7 8 9 0 STOP/ RESET START Please read these instructions completely before reconnecting.
NE1257R User Guide
Page 16
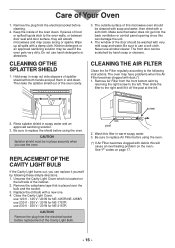
.../NE-1258R use 230 V - 250 V / 20 W for NE-1757R use 230 V - 250 V / 20 W for NE-2157R CAUTION Remove the plug from the electrical socket before replacement of splatter shield with a new one. 4. post 2. Then take the splatter shield out of the oven clean. The oven may have problems when the ...cause arcing or sparks. Remove the celophane tape that water does not get into the back ventilation or control panel opening since this microwave oven should be in and down. Remove the plug from the electrical socket before cleaning. 2. Remove Air Filter from the front bottom ...
.../NE-1258R use 230 V - 250 V / 20 W for NE-1757R use 230 V - 250 V / 20 W for NE-2157R CAUTION Remove the plug from the electrical socket before replacement of splatter shield with a new one. 4. post 2. Then take the splatter shield out of the oven clean. The oven may have problems when the ...cause arcing or sparks. Remove the celophane tape that water does not get into the back ventilation or control panel opening since this microwave oven should be in and down. Remove the plug from the electrical socket before cleaning. 2. Remove Air Filter from the front bottom ...


