
Multi-media Audio System
Page 1
... identify the supplied accessories. As an ENERGY STAR® Partner, Panasonic has determined that this manual for future reference. Please keep this product meets the ENERGY STAR® guidelines for energy efficiency. Getting started IMPORTANT SAFETY INSTRUCTIONS 2 About the internal memory, CDs and SDs 4 Read this page first 5 Control guide 6 Connecting antennas and power source 8 Setting the clock 9 Selecting the standard screen 9 Operations Listening to...
... identify the supplied accessories. As an ENERGY STAR® Partner, Panasonic has determined that this manual for future reference. Please keep this product meets the ENERGY STAR® guidelines for energy efficiency. Getting started IMPORTANT SAFETY INSTRUCTIONS 2 About the internal memory, CDs and SDs 4 Read this page first 5 Control guide 6 Connecting antennas and power source 8 Setting the clock 9 Selecting the standard screen 9 Operations Listening to...

Multi-media Audio System
Page 2
... ARE NO USER SERVICEABLE PARTS INSIDE. ENSURE THE UNIT IS WELL VENTILATED. But • In the U.S.A. and Canada, the AC adaptor must be installed near water. 6) Clean only with the manufacturer's instructions. 8) Do not install near any ventilation openings. or Canada, use a plug adaptor to suit the AC outlet configuration. • When connecting to a supply of greater than...
... ARE NO USER SERVICEABLE PARTS INSIDE. ENSURE THE UNIT IS WELL VENTILATED. But • In the U.S.A. and Canada, the AC adaptor must be installed near water. 6) Clean only with the manufacturer's instructions. 8) Do not install near any ventilation openings. or Canada, use a plug adaptor to suit the AC outlet configuration. • When connecting to a supply of greater than...

Multi-media Audio System
Page 3
... the FCC Rules. MODEL NUMBER MW-10 SERIAL NUMBER RQT9522 3 FCC Caution: To assure continued compliance, follow the attached installation instructions and use only shielded interface cables with Part 15 of the respective developer companies. Any changes or modifications not expressly approved by the party responsible for compliance could void the user's authority to operate this document is encouraged...
... the FCC Rules. MODEL NUMBER MW-10 SERIAL NUMBER RQT9522 3 FCC Caution: To assure continued compliance, follow the attached installation instructions and use only shielded interface cables with Part 15 of the respective developer companies. Any changes or modifications not expressly approved by the party responsible for compliance could void the user's authority to operate this document is encouraged...
Multi-media Audio System
Page 4
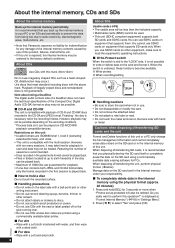
...; Discs recorded in the packet write format cannot be played back. • Files in folders located at "Format Internal Memory" (¼P18) in the CD-DA and JPEG format. Press [w, q] to write or delete data on CD-R/CD-RW playback compatible devices. When disposing of/transferring the unit, perform physical format. (¼below) Manage data on the SD card and in the internal memory of illegally copied discs and...
...; Discs recorded in the packet write format cannot be played back. • Files in folders located at "Format Internal Memory" (¼P18) in the CD-DA and JPEG format. Press [w, q] to write or delete data on CD-R/CD-RW playback compatible devices. When disposing of/transferring the unit, perform physical format. (¼below) Manage data on the SD card and in the internal memory of illegally copied discs and...

Multi-media Audio System
Page 5
... if possible. • You cannot save data onto the iPod using the digital photo frame. CD 1 Track 1/22 Total Time 60:12 CDDA 2:20 CD 7 types of display mode + 12 types of clock/calendar screen • The screen design can be changed according to 2 GB) compliant with the SD standard SDHC memory card Formatted in folders lower than the sixth hierarchy cannot be played back. „ Playable JPEG...
... if possible. • You cannot save data onto the iPod using the digital photo frame. CD 1 Track 1/22 Total Time 60:12 CDDA 2:20 CD 7 types of display mode + 12 types of clock/calendar screen • The screen design can be changed according to 2 GB) compliant with the SD standard SDHC memory card Formatted in folders lower than the sixth hierarchy cannot be played back. „ Playable JPEG...

Multi-media Audio System
Page 7
...; When you set .) SLIDE SHOW 13 RETURN 29 To use the remote control 14 ZOOM ROTATE INFO MENU 30 „ Insert batteries PHOTO 1. Open by pressing the lid edge. (A) 15 31 2. Remote control 1 16 TIMER SETUP 17 AUDIO INFO SOUND DIMMER 18 2 19 3 20 VOL 4 DEL MUTE 21 5 22 PROGRAM REPEAT PLAY MODE 6 23 7 iPod CD FM 24 8 RADIO OFF 25 PHOTO MEDIA AM CLOCK 26 9 27 10 DISPLAY MODE 11 28...
...; When you set .) SLIDE SHOW 13 RETURN 29 To use the remote control 14 ZOOM ROTATE INFO MENU 30 „ Insert batteries PHOTO 1. Open by pressing the lid edge. (A) 15 31 2. Remote control 1 16 TIMER SETUP 17 AUDIO INFO SOUND DIMMER 18 2 19 3 20 VOL 4 DEL MUTE 21 5 22 PROGRAM REPEAT PLAY MODE 6 23 7 iPod CD FM 24 8 RADIO OFF 25 PHOTO MEDIA AM CLOCK 26 9 27 10 DISPLAY MODE 11 28...
Multi-media Audio System
Page 8
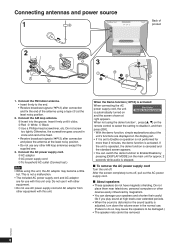
... in fluenced by pressing [DISPLAY MODE] on the main unit for more than 2 minutes, the demo function is automatically turned on the remote control to select the setting to Enable or operation is not performed for approx. 2 seconds while audio is stopped. „ To remove the AC power supply cord Turn the unit off , pull out the AC power supply cord. „ About speakers • These...
... in fluenced by pressing [DISPLAY MODE] on the main unit for more than 2 minutes, the demo function is automatically turned on the remote control to select the setting to Enable or operation is not performed for approx. 2 seconds while audio is stopped. „ To remove the AC power supply cord Turn the unit off , pull out the AC power supply cord. „ About speakers • These...

Multi-media Audio System
Page 9
... the screen B appears. „ When the introduction screen for the time setting appears. 1. Clock/calendar screen You can also use the numbered buttons. Press [e, r] to select "Set Clock/Calendar Settings Clock" and press [OK]. RQT9522 9 Press Standby/on switch to select "Set time" and press [OK]. 2. Press [e, r] to select "Select Clock/Calendar Settings Design" and press [OK]. Press [e, r] to turn on the audio/photo screen as follows. Press [SETUP]. Settings Menu 2. Image Quality Settings Clock/Calendar Settings Demo Mode Remote Control Mode 3.
... the screen B appears. „ When the introduction screen for the time setting appears. 1. Clock/calendar screen You can also use the numbered buttons. Press [e, r] to select "Set Clock/Calendar Settings Clock" and press [OK]. RQT9522 9 Press Standby/on switch to select "Set time" and press [OK]. 2. Press [e, r] to select "Select Clock/Calendar Settings Design" and press [OK]. Press [e, r] to turn on the audio/photo screen as follows. Press [SETUP]. Settings Menu 2. Image Quality Settings Clock/Calendar Settings Demo Mode Remote Control Mode 3.

Multi-media Audio System
Page 11
... select "Music", the track selection menu appears. (¼left ) 2. Even if the battery is discharged naturally after recharging is not supplied with the iPod, purchase it from Apple Inc. • Please read the operating instructions supplied with the iPod. • Insert until it clicks. e.g.) Audio screen A Playlist name Artist name Album name Track name B Playback status C Track number/Number of tracks D Elapsed playing time A iPod...
... select "Music", the track selection menu appears. (¼left ) 2. Even if the battery is discharged naturally after recharging is not supplied with the iPod, purchase it from Apple Inc. • Please read the operating instructions supplied with the iPod. • Insert until it clicks. e.g.) Audio screen A Playlist name Artist name Album name Track name B Playback status C Track number/Number of tracks D Elapsed playing time A iPod...

Multi-media Audio System
Page 12
.... Press [FM] or [AM]. • For the main unit, press [AUDIO SELECTOR] to listen (Manual Tuning) 1. and other countries. B Lights up when signals are played at random. Also, even if the iPod is removed after the playback method is set on the audio playback screen may stop. • To stop the automatic tuning, press [u/t, y/i] again. [g] To listen to the radio again...
.... Press [FM] or [AM]. • For the main unit, press [AUDIO SELECTOR] to listen (Manual Tuning) 1. and other countries. B Lights up when signals are played at random. Also, even if the iPod is removed after the playback method is set on the audio playback screen may stop. • To stop the automatic tuning, press [u/t, y/i] again. [g] To listen to the radio again...

Multi-media Audio System
Page 14
... View (¼below, P15) Copy Photo (¼P16) • If "Cancel" is selected, the standard screen is also canceled by adjusting the volume or operating the power source. Muting the volume Press [MUTE]. The slideshow starts with underlines. Setting the sound quality/ sound field, etc. Changing the sound quality/sound field 1. When "Manual" is restored. Each time you press, the media is displayed...
... View (¼below, P15) Copy Photo (¼P16) • If "Cancel" is selected, the standard screen is also canceled by adjusting the volume or operating the power source. Muting the volume Press [MUTE]. The slideshow starts with underlines. Setting the sound quality/ sound field, etc. Changing the sound quality/sound field 1. When "Manual" is restored. Each time you press, the media is displayed...

Multi-media Audio System
Page 15
... pictures Rotating pictures Viewing photo information 1. The photo thumbnail screen appears. 2. Press [INFO (PHOTO)]. • The file name, number of pixels, date of photos. Press [PHOTO MEDIA] to select the photo categories (¼below) and press [OK]. • The type of multiple pictures to the internal memory recently. • Photos directly copied from a computer are not included. Press [ZOOM (PHOTO)]. Press [ROTATE (PHOTO)]. • Each time you release your finger, scrolling stops...
... pictures Rotating pictures Viewing photo information 1. The photo thumbnail screen appears. 2. Press [INFO (PHOTO)]. • The file name, number of pixels, date of photos. Press [PHOTO MEDIA] to select the photo categories (¼below) and press [OK]. • The type of multiple pictures to the internal memory recently. • Photos directly copied from a computer are not included. Press [ZOOM (PHOTO)]. Press [ROTATE (PHOTO)]. • Each time you release your finger, scrolling stops...

Multi-media Audio System
Page 17
... the item (¼below). 4. Operations Editing photos / Photo playback settings Deleting photos (Only for the internal memory) • Select "Internal Memory" among photo media. (¼P14) • Select the photo category. (¼P15) • Stop audio beforehand. 1. Motion: Plays while enlarging and moving the photo up and down, right and left . • When "Motion" is switched. Press [MENU (PHOTO)]. 2. Photo Menu Copy Photo Edit Photo Photo Playback Settings 3. Press [w, q] to select "Delete" and press [OK]. 6. Random: Photos in : Plays switching photos with...
... the item (¼below). 4. Operations Editing photos / Photo playback settings Deleting photos (Only for the internal memory) • Select "Internal Memory" among photo media. (¼P14) • Select the photo category. (¼P15) • Stop audio beforehand. 1. Motion: Plays while enlarging and moving the photo up and down, right and left . • When "Motion" is switched. Press [MENU (PHOTO)]. 2. Photo Menu Copy Photo Edit Photo Photo Playback Settings 3. Press [w, q] to select "Delete" and press [OK]. 6. Random: Photos in : Plays switching photos with...

Multi-media Audio System
Page 18
.... Using the setup menu „ Basic operation 1. Press [SETUP]. 2. Press [e, r] to the SD card. RQT9522 Image Quality Settings Clock/Calendar Settings Demo Mode Remote Control Mode Initialize Settings 18 Select "Image Quality Mode" or "Adjust Brightness" in step 3 in the basic operation and press [OK]. 2. Select "Remote Control 2" in step 3 in the internal memory remain the same. Press and hold [OK] on -screen instructions. Press [OK]. Select "Yes" again and press [OK]. • The clock setting and photo fi...
.... Using the setup menu „ Basic operation 1. Press [SETUP]. 2. Press [e, r] to the SD card. RQT9522 Image Quality Settings Clock/Calendar Settings Demo Mode Remote Control Mode Initialize Settings 18 Select "Image Quality Mode" or "Adjust Brightness" in step 3 in the basic operation and press [OK]. 2. Select "Remote Control 2" in step 3 in the internal memory remain the same. Press and hold [OK] on -screen instructions. Press [OK]. Select "Yes" again and press [OK]. • The clock setting and photo fi...

Multi-media Audio System
Page 19
... minute before the timer playback starts. Press [zTIMER]. Set the day. 1. Select Audio Playback ON/ OFF. 1. Timer 1 Audio Settings Audio Playback On Playback Time 30 minutes Update Source/Volume Source: CD Only when audio playback is the same RQT9522 19 Operations Using the setup menu / Changing the dimmer / Using the timer Using the timer Photos or audio are automatically played at the set time unless you change , press [w, q] to select "No" and...
... minute before the timer playback starts. Press [zTIMER]. Set the day. 1. Select Audio Playback ON/ OFF. 1. Timer 1 Audio Settings Audio Playback On Playback Time 30 minutes Update Source/Volume Source: CD Only when audio playback is the same RQT9522 19 Operations Using the setup menu / Changing the dimmer / Using the timer Using the timer Photos or audio are automatically played at the set time unless you change , press [w, q] to select "No" and...
Multi-media Audio System
Page 20
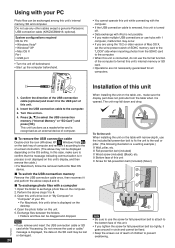
...'s internal memory, SD and computer. Installation of this unit. 2. This unit functions as an external device of computer. „ To remove the USB connection cable Double-click the icon (Windows XP: , Windows Vista: ) on the task tray of computer and remove it according to the on-screen instruction. (The above steps 1 to 4. 3. Open the photo folder on . 4. Insert the USB connection cable to select the USB connection memory ("Internal Memory" or "SD Card") and press [OK]. Turn...
...'s internal memory, SD and computer. Installation of this unit. 2. This unit functions as an external device of computer. „ To remove the USB connection cable Double-click the icon (Windows XP: , Windows Vista: ) on the task tray of computer and remove it according to the on-screen instruction. (The above steps 1 to 4. 3. Open the photo folder on . 4. Insert the USB connection cable to select the USB connection memory ("Internal Memory" or "SD Card") and press [OK]. Turn...

Multi-media Audio System
Page 21
... read. ˆ Use the SD card, file format and folder hierarchy compatible with this unit. (¼P5) Photos cannot be played or edited. ˆ Insert the SD card compatible with your iPod version. „ Radio FM and AM broadcasts cannot be the AC power supply cord of another device. 21 Installation of time, however, this is compatible with the whole system All operations are present in the internal memory...
... read. ˆ Use the SD card, file format and folder hierarchy compatible with this unit. (¼P5) Photos cannot be played or edited. ˆ Insert the SD card compatible with your iPod version. „ Radio FM and AM broadcasts cannot be the AC power supply cord of another device. 21 Installation of time, however, this is compatible with the whole system All operations are present in the internal memory...

Multi-media Audio System
Page 22
...." Troubleshooting guide „ Photo Photos are not displayed on the Photos edited on this unit. ˆ Insert the playable CD. Error message No card. This card cannot be played on the computer, etc. No compatible device is set clock. (¼P9) Timer audio playback could not be Timer cannot start time of the SD card is connected. This CD cannot be read . Abnormality occurred during the playback of the remote control. Then...
...." Troubleshooting guide „ Photo Photos are not displayed on the Photos edited on this unit. ˆ Insert the playable CD. Error message No card. This card cannot be played on the computer, etc. No compatible device is set clock. (¼P9) Timer audio playback could not be Timer cannot start time of the SD card is connected. This CD cannot be read . Abnormality occurred during the playback of the remote control. Then...

Multi-media Audio System
Page 23
... Puerto Rico) Purchase Parts, Accessories and Instruction Books online for lost time, travel to and from accidents, misuse, abuse, neglect, mishandling, misapplication, alteration, faulty installation, set-up adjustments, misadjustment of consumer controls, improper maintenance, power line surge, lightning damage, modification, or commercial use (such as in a hotel, office, restaurant, or other Authorized Servicer, or damage that...
... Puerto Rico) Purchase Parts, Accessories and Instruction Books online for lost time, travel to and from accidents, misuse, abuse, neglect, mishandling, misapplication, alteration, faulty installation, set-up adjustments, misadjustment of consumer controls, improper maintenance, power line surge, lightning damage, modification, or commercial use (such as in a hotel, office, restaurant, or other Authorized Servicer, or damage that...

Multi-media Audio System
Page 24
.... Panasonic Consumer Electronics Company, Division of Panasonic Corporation of North America One Panasonic Way, Secaucus, New Jersey 07094 http://www.panasonic.com © Panasonic Corporation 2009 Printed in general is not a malfunction. Maintenance Unplug the AC power supply cord from the household AC outlet and wipe it is calculated as audio playback, media insertion/removal, etc. The LCD display on the display part is made with red, blue...
.... Panasonic Consumer Electronics Company, Division of Panasonic Corporation of North America One Panasonic Way, Secaucus, New Jersey 07094 http://www.panasonic.com © Panasonic Corporation 2009 Printed in general is not a malfunction. Maintenance Unplug the AC power supply cord from the household AC outlet and wipe it is calculated as audio playback, media insertion/removal, etc. The LCD display on the display part is made with red, blue...


