
Single-line Phone
Page 4
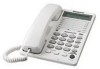
Contents Preparation Location of Controls 16 Display 17 Settings 18 Installing the Batteries 18 Connecting the Handset/Telephone Line Cord 18 Connecting a Communication Device 9 Programming Summary 10 Dialing Mode 11 Time Adjustment 12 LCD Contrast 13 Ringer Volume 13 Wall Mounting 14 Basic Operation Making Calls 15 Answering Calls 17 Advanced Operation Speed Dialer 18 Storing Phone Numbers 18 Dialing a Stored Number 19 One-Touch Dialer 20 Storing Phone Numbers 20 Dialing a Stored Number 22 4
Contents Preparation Location of Controls 16 Display 17 Settings 18 Installing the Batteries 18 Connecting the Handset/Telephone Line Cord 18 Connecting a Communication Device 9 Programming Summary 10 Dialing Mode 11 Time Adjustment 12 LCD Contrast 13 Ringer Volume 13 Wall Mounting 14 Basic Operation Making Calls 15 Answering Calls 17 Advanced Operation Speed Dialer 18 Storing Phone Numbers 18 Dialing a Stored Number 19 One-Touch Dialer 20 Storing Phone Numbers 20 Dialing a Stored Number 22 4

Single-line Phone
Page 9
....) or the communication device may not operate properly. After connecting the handset and telephone line cord (p. 8), connect the communication device telephone line cord to the telephone line, you can connect it through this unit (making calls, storing phone numbers in use before using this unit using the DATA jack. Preparation " Connecting a Communication Device...
....) or the communication device may not operate properly. After connecting the handset and telephone line cord (p. 8), connect the communication device telephone line cord to the telephone line, you can connect it through this unit (making calls, storing phone numbers in use before using this unit using the DATA jack. Preparation " Connecting a Communication Device...

Single-line Phone
Page 14
" Settings Wall Mounting The unit can be mounted on a wall phone plate. 1 Pull down during a conversation, place it in the direction of the arrow. ≥"UP" should be facing upward. 3 Connect the telephone line cord. To temporarily set the handset down the handset hook until it locks, so the tab holds the handset. 2 Tuck the telephone line cord inside the wall mounting adaptor, and push it as shown here. Mount the unit, and slide down. Wall Phone Plate 14
" Settings Wall Mounting The unit can be mounted on a wall phone plate. 1 Pull down during a conversation, place it in the direction of the arrow. ≥"UP" should be facing upward. 3 Connect the telephone line cord. To temporarily set the handset down the handset hook until it locks, so the tab holds the handset. 2 Tuck the telephone line cord inside the wall mounting adaptor, and push it as shown here. Mount the unit, and slide down. Wall Phone Plate 14

Single-line Phone
Page 37
... will not occur in a room where the temperature is encouraged to try to Part 15 of the authorized Panasonic Factory Service Centers. If the known working phone does not operate properly, consult your unit repaired by the party responsible for a Class B digital device, ...harmful interference to provide reasonable protection against harmful interference in accordance with the instructions, may cause undesired operation. A FCC compliant telephone cord and modular plug is connected. -Consult the dealer or an experienced radio/TV technician for proper ventilation. Allow 10 cm (4q)...
... will not occur in a room where the temperature is encouraged to try to Part 15 of the authorized Panasonic Factory Service Centers. If the known working phone does not operate properly, consult your unit repaired by the party responsible for a Class B digital device, ...harmful interference to provide reasonable protection against harmful interference in accordance with the instructions, may cause undesired operation. A FCC compliant telephone cord and modular plug is connected. -Consult the dealer or an experienced radio/TV technician for proper ventilation. Allow 10 cm (4q)...


