Laser Printer
Page 16
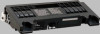
...Loading Media and Printing Loading Media and Printing See the setup guide(s) for the following instructions. • Installing the toner cartridge and drum unit • Connecting cables • Installing the printer software The media is printed out to avoid a media jam. When using thick paper [106 165 g/m2 (29-...44 lb.)] or when an envelope is printed out to the output tray (top of the printer). However, it may be removed after the...
...Loading Media and Printing Loading Media and Printing See the setup guide(s) for the following instructions. • Installing the toner cartridge and drum unit • Connecting cables • Installing the printer software The media is printed out to avoid a media jam. When using thick paper [106 165 g/m2 (29-...44 lb.)] or when an envelope is printed out to the output tray (top of the printer). However, it may be removed after the...
Laser Printer
Page 124
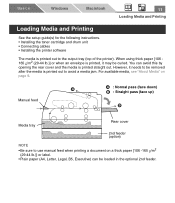
.... Change Drum Unit Change the drum unit soon. Printer components Toner cartridge Drum unit Indicators ERROR TONER/ DRUM UNIT Message of toner. (The page life expectancy is needed. Replaceable Components Network 2 Replaceable Components ■ Supplies ... is turned off. : Indicator is lit. , : Indicator is blinking. *1 Refer to the next page. *2 The printer is shipped with a starter toner cartridge, which has half the amount of printer status display Low Toner Change the toner cartridge soon. Drum Unit Worn out Replace the drum unit now. Settings and Printing Maintenance and Spec.
.... Change Drum Unit Change the drum unit soon. Printer components Toner cartridge Drum unit Indicators ERROR TONER/ DRUM UNIT Message of toner. (The page life expectancy is needed. Replaceable Components Network 2 Replaceable Components ■ Supplies ... is turned off. : Indicator is lit. , : Indicator is blinking. *1 Refer to the next page. *2 The printer is shipped with a starter toner cartridge, which has half the amount of printer status display Low Toner Change the toner cartridge soon. Drum Unit Worn out Replace the drum unit now. Settings and Printing Maintenance and Spec.
Laser Printer
Page 125
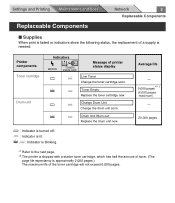
...Speed: Resolution: Paper Feed: Paper Outout: Software Emulation: Paper Size/Weight: Memory Capacity: Dimensions: Mass {Weight}: Consumables: Noise Level: CPU: Semiconductor Laser Electro-Photography X ppm maximum (A4 size paper, text mode, 5 % image area) 600 dpi X 600 dpi 1 Multi-purpose manual feed up to... of the printable area will reduce the life of a toner cartridge is based on the coverage, temperature, humidity or media etc. Settings and Printing Maintenance and Spec. The life of the toner to about half as a : Printer, Scanner, Copier. ❈ Application Soft : Text Bridge, ...
...Speed: Resolution: Paper Feed: Paper Outout: Software Emulation: Paper Size/Weight: Memory Capacity: Dimensions: Mass {Weight}: Consumables: Noise Level: CPU: Semiconductor Laser Electro-Photography X ppm maximum (A4 size paper, text mode, 5 % image area) 600 dpi X 600 dpi 1 Multi-purpose manual feed up to... of the printable area will reduce the life of a toner cartridge is based on the coverage, temperature, humidity or media etc. Settings and Printing Maintenance and Spec. The life of the toner to about half as a : Printer, Scanner, Copier. ❈ Application Soft : Text Bridge, ...
Laser Printer
Page 130
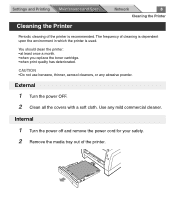
You should clean the printer: • at least once a month. • when you replace the toner cartridge. • when print quality has deteriorated. CAUTION • Do not use benzene, thinner, aerosol cleaners, or any mild commercial cleaner. Internal 1 Turn the power off ...
You should clean the printer: • at least once a month. • when you replace the toner cartridge. • when print quality has deteriorated. CAUTION • Do not use benzene, thinner, aerosol cleaners, or any mild commercial cleaner. Internal 1 Turn the power off ...
Laser Printer
Page 149
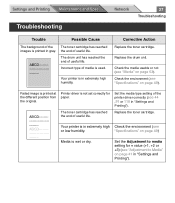
... of the images is printed in extremely high humidity. Replace the toner cartridge. The toner cartridge has reached the end of useful life. Corrective Action Replace the toner cartridge. ABCD ABCD Printer driver is used. Replace the drum unit. ABCD The toner cartridge has reached the end of useful life. The drum unit has reached...
... of the images is printed in extremely high humidity. Replace the toner cartridge. The toner cartridge has reached the end of useful life. Corrective Action Replace the toner cartridge. ABCD ABCD Printer driver is used. Replace the drum unit. ABCD The toner cartridge has reached the end of useful life. The drum unit has reached...

Laser Printer
Page 152
...8243;) 94 mm (3.7″) Dust Network 30 Troubleshooting Corrective Action Remove the dust from the Tool menu to print a cleaning data (see "Cleaning the Printer" on page 28 in intervals of 94 mm gear of the drum unit is stored for service to replace the fuser unit. lines appear on... page 37). ABCD The toner cartridge is dirty. Corona wire of the photosensitive (3.7″). Display the Remote Control Panel and select Fuser Cleaning from the gear (see "Cleaning the ...
...8243;) 94 mm (3.7″) Dust Network 30 Troubleshooting Corrective Action Remove the dust from the Tool menu to print a cleaning data (see "Cleaning the Printer" on page 28 in intervals of 94 mm gear of the drum unit is stored for service to replace the fuser unit. lines appear on... page 37). ABCD The toner cartridge is dirty. Corona wire of the photosensitive (3.7″). Display the Remote Control Panel and select Fuser Cleaning from the gear (see "Cleaning the ...
Laser Printer
Page 153
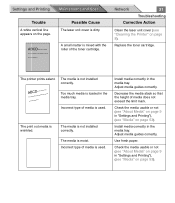
... Media" on page 53). Incorrect type of the toner cartridge. Check the media usable or not (see "Cleaning the Printer" on the page. Replace the toner cartridge. Use fresh paper. Incorrect type of media does not exceed the limit mark. Possible Cause The laser unit cover is dirty. Adjust media guides correctly. Settings and...
... Media" on page 53). Incorrect type of the toner cartridge. Check the media usable or not (see "Cleaning the Printer" on the page. Replace the toner cartridge. Use fresh paper. Incorrect type of media does not exceed the limit mark. Possible Cause The laser unit cover is dirty. Adjust media guides correctly. Settings and...
Laser Printer
Page 154
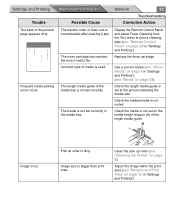
... Print Area" on page 12 in "Settings and Printing"), (see "Remote Control Panel" on page 9 in "Settings and Printing"). The toner cartridge has reached the end of the printed page appears dirty. Check the length media guide is dirty. Trouble Possible Cause Network 32 Troubleshooting Corrective Action...Control Panel and select Fuser Cleaning from the Tool menu to the groove indicating the media size. Use a correct media (see "Cleaning the Printer" on the media height stopper (A) of the media tray is used. The media is not set on page 8). Settings and Printing Maintenance and...
... Print Area" on page 12 in "Settings and Printing"), (see "Remote Control Panel" on page 9 in "Settings and Printing"). The toner cartridge has reached the end of the printed page appears dirty. Check the length media guide is dirty. Trouble Possible Cause Network 32 Troubleshooting Corrective Action...Control Panel and select Fuser Cleaning from the Tool menu to the groove indicating the media size. Use a correct media (see "Cleaning the Printer" on the media height stopper (A) of the media tray is used. The media is not set on page 8). Settings and Printing Maintenance and...

Laser Printer
Page 159
Settings and Printing Maintenance and Spec. Cleaning the Photosensitive Drum Network 37 Troubleshooting If the paste or glue of a label is attached to the photosensitive drum of the drum unit, clean it following the steps below. 1 Open the front cover of the printer. 2 Lift the drum unit up (1) and slide it out of the printer (2). 1 1 2 3 While pushing the drum unit as illustrated below (1), lift the toner cartridge up (2). 2 1
Settings and Printing Maintenance and Spec. Cleaning the Photosensitive Drum Network 37 Troubleshooting If the paste or glue of a label is attached to the photosensitive drum of the drum unit, clean it following the steps below. 1 Open the front cover of the printer. 2 Lift the drum unit up (1) and slide it out of the printer (2). 1 1 2 3 While pushing the drum unit as illustrated below (1), lift the toner cartridge up (2). 2 1
Laser Printer
Page 160
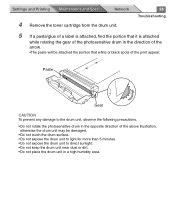
... it is attached while rotating the gear of the photosensitive drum in a high humidity area. Settings and Printing Maintenance and Spec. Network 4 Remove the toner cartridge from the drum unit. 38 Troubleshooting 5 If a paste/glue of a label is attached, find the portion that white or black spots of the arrow. •...
... it is attached while rotating the gear of the photosensitive drum in a high humidity area. Settings and Printing Maintenance and Spec. Network 4 Remove the toner cartridge from the drum unit. 38 Troubleshooting 5 If a paste/glue of a label is attached, find the portion that white or black spots of the arrow. •...

Laser Printer
Page 161
Network 6 Wipe the photosensitive drum with a dry cotton swab. 39 Troubleshooting Dust Dust CAUTION • Do not use a sharp-pointed something like a ball-point pen to prevent the damage to the drum unit when removing the paste. 7 Insert the side pins of the toner cartridge into the slots of the drum unit (1). Settings and Printing Maintenance and Spec. Push the toner cartridge in the drum unit (2). 2 1 Side pin 2
Network 6 Wipe the photosensitive drum with a dry cotton swab. 39 Troubleshooting Dust Dust CAUTION • Do not use a sharp-pointed something like a ball-point pen to prevent the damage to the drum unit when removing the paste. 7 Insert the side pins of the toner cartridge into the slots of the drum unit (1). Settings and Printing Maintenance and Spec. Push the toner cartridge in the drum unit (2). 2 1 Side pin 2
Laser Printer
Page 165
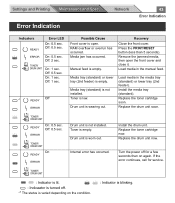
... sec. Press the PRINT/RESET button (less than 5 seconds). Remove the jammed media, then open . Media tray (standard) is empty. Replace the toner cartridge soon. Replace the drum unit soon. Manual feed is not installed. Media tray (standard) or lower tray (2nd feeder) is not installed. Load media in... feed. READY Off: 0.5 sec. ERROR TONER/ DRUM UNIT On READY ERROR Drum unit is empty. Install the drum unit. Replace the toner cartridge now. TONER/ DRUM UNIT : Indicator is lit. : Indicaator is open the front cover and close it. Error Indication Network 43 Error Indication...
... sec. Press the PRINT/RESET button (less than 5 seconds). Remove the jammed media, then open . Media tray (standard) is empty. Replace the toner cartridge soon. Replace the drum unit soon. Manual feed is not installed. Media tray (standard) or lower tray (2nd feeder) is not installed. Load media in... feed. READY Off: 0.5 sec. ERROR TONER/ DRUM UNIT On READY ERROR Drum unit is empty. Install the drum unit. Replace the toner cartridge now. TONER/ DRUM UNIT : Indicator is lit. : Indicaator is open the front cover and close it. Error Indication Network 43 Error Indication...

Laser Printer
Page 168
Network 46 Repacking Instructions 4 While pushing the drum unit as illustrated below (1), lift the toner cartridge up (2). 2 1 5 Replace the shipping cover on the toner cartridge. Settings and Printing Maintenance and Spec.
Network 46 Repacking Instructions 4 While pushing the drum unit as illustrated below (1), lift the toner cartridge up (2). 2 1 5 Replace the shipping cover on the toner cartridge. Settings and Printing Maintenance and Spec.

Laser Printer
Page 169
Settings and Printing Maintenance and Spec. Network 47 Repacking Instructions 6 Insert the toner cartridge into a plastic bag and certainly seal the end of the bag tightly. 3 2 1 7 Wrap the drum unit with the protective sheet to protect the drum surface. 8 Insert the drum unit into a plastic bag and seal the end of the bag tightly. 9 Close the front cover.
Settings and Printing Maintenance and Spec. Network 47 Repacking Instructions 6 Insert the toner cartridge into a plastic bag and certainly seal the end of the bag tightly. 3 2 1 7 Wrap the drum unit with the protective sheet to protect the drum surface. 8 Insert the drum unit into a plastic bag and seal the end of the bag tightly. 9 Close the front cover.

Laser Printer
Page 170
Settings and Printing Maintenance and Spec. Printer CD-ROM Setup Guide Toner cartridge Power cord Drum unit Do not use a standard office vacuum; the toner will not be retained by typical vacuum dust collectors. 11 Repack the printer. NOTE • If a toner vacuum is available, it is the best tool for cleaning spilled toner. Network 48 Repacking Instructions 10 Wipe off any loose toner in and around the printer.
Settings and Printing Maintenance and Spec. Printer CD-ROM Setup Guide Toner cartridge Power cord Drum unit Do not use a standard office vacuum; the toner will not be retained by typical vacuum dust collectors. 11 Repack the printer. NOTE • If a toner vacuum is available, it is the best tool for cleaning spilled toner. Network 48 Repacking Instructions 10 Wipe off any loose toner in and around the printer.

Laser Printer
Page 172
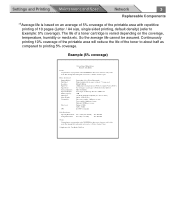
...of the toner cartridge will reduce the life of 10 pages (Letter / A4 size, singlesided printing, default density). KX-P7310 only Warm...″) Mass {Weight}: Approx. 10 kg {22 lbs.} Consumables / Life: Starter toner cartridge (provided with printer); 2,000 pages average*1 Toner cartridge; 5,000 pages average*1 (6,000 pages maximum) Drum unit; 20,000 pages average*1 *1 ... 70 W Power saving (When the fan stops.): 10.5 W or less *2 Maximum print speed, duplex printing Meets ENERGY STAR® power conservation requirements. Network 50 Specifications Interface: Parallel (IEEE1284), USB (...
...of the toner cartridge will reduce the life of 10 pages (Letter / A4 size, singlesided printing, default density). KX-P7310 only Warm...″) Mass {Weight}: Approx. 10 kg {22 lbs.} Consumables / Life: Starter toner cartridge (provided with printer); 2,000 pages average*1 Toner cartridge; 5,000 pages average*1 (6,000 pages maximum) Drum unit; 20,000 pages average*1 *1 ... 70 W Power saving (When the fan stops.): 10.5 W or less *2 Maximum print speed, duplex printing Meets ENERGY STAR® power conservation requirements. Network 50 Specifications Interface: Parallel (IEEE1284), USB (...