Operating Instructions
Page 2
...this unit is listed on the rear of FCC Rules. All Rights Reserved. © COPYRIGHT 1994 KYUSHU MATSUSHITA ELECTRIC CO., LTD. 2 KX-P3696 NAME OF DEALER SERIAL NO. The serial number of this book, along with your proof of purchase, to serve as a permanent record of...be determined by turning the equipment off and on a circuit different from FCC local regional offices helpful. Any details given in a particular installation. Proprinter is a trademark of moisture. • When you operate this equipment does cause harmful interference to radio or television reception, which...
...this unit is listed on the rear of FCC Rules. All Rights Reserved. © COPYRIGHT 1994 KYUSHU MATSUSHITA ELECTRIC CO., LTD. 2 KX-P3696 NAME OF DEALER SERIAL NO. The serial number of this book, along with your proof of purchase, to serve as a permanent record of...be determined by turning the equipment off and on a circuit different from FCC local regional offices helpful. Any details given in a particular installation. Proprinter is a trademark of moisture. • When you operate this equipment does cause harmful interference to radio or television reception, which...
Operating Instructions
Page 3
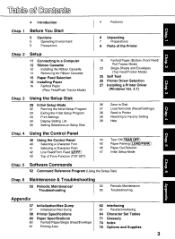
... 7 Preparations 9 Parts of the Printer Chap. 2 Setup 11 Connecting to a Computer 12 Ribbon Cassette 12 Installing the Ribbon Cassette 14 Removing the Ribbon Cassette 15 Paper Feed Selection 16 Installing Paper 16 Fanfold Paper (Rear Feed/Push Tractor Mode) C) 19 Fanfold Paper (Bottom, Front Feed/ Pull ...Tractor Mode) 23 Single Sheets and Envelopes (Top Feed/Friction Mode) 25 Self Test 26 Printer Driver Selection C) 27 Installing a Printer Driver tv (Windows Ver. 3.1) Chap. 3 Using the Setup Disk 28 Initial Setup Mode 32 Running the Initial Setup Program 33 ...
... 7 Preparations 9 Parts of the Printer Chap. 2 Setup 11 Connecting to a Computer 12 Ribbon Cassette 12 Installing the Ribbon Cassette 14 Removing the Ribbon Cassette 15 Paper Feed Selection 16 Installing Paper 16 Fanfold Paper (Rear Feed/Push Tractor Mode) C) 19 Fanfold Paper (Bottom, Front Feed/ Pull ...Tractor Mode) 23 Single Sheets and Envelopes (Top Feed/Friction Mode) 25 Self Test 26 Printer Driver Selection C) 27 Installing a Printer Driver tv (Windows Ver. 3.1) Chap. 3 Using the Setup Disk 28 Initial Setup Mode 32 Running the Initial Setup Program 33 ...
Operating Instructions
Page 4
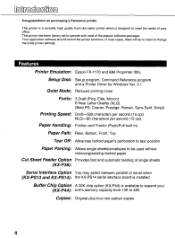
0 0 Congratulations on purchasing a Panasonic printer. Your application software should control the printer functions. Features Printer Emulation: Epson FX-1170 and IBM Proprinter IIIXL Setup Disk: Setup program, Command Reference ... to meet the needs of your office. In most of single sheets (KX-P38): Serial Interface Option You may select between parallel or serial when (KX-PS13 and KX-PS14): the KX-PS14 serial interface board is installed Buffer Chip Option A 32K chip option (KX-P44) is designed to 45K Copies: Original plus four non-carbon...
0 0 Congratulations on purchasing a Panasonic printer. Your application software should control the printer functions. Features Printer Emulation: Epson FX-1170 and IBM Proprinter IIIXL Setup Disk: Setup program, Command Reference ... to meet the needs of your office. In most of single sheets (KX-P38): Serial Interface Option You may select between parallel or serial when (KX-PS13 and KX-PS14): the KX-PS14 serial interface board is installed Buffer Chip Option A 32K chip option (KX-P44) is designed to 45K Copies: Original plus four non-carbon...
Operating Instructions
Page 5
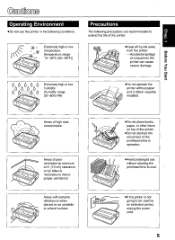
... extended period, unplug the power cord. 5 Operating Environment •Do not use the printer in operation. •Avoid prolonged use without paper and a ribbon cassette installed.
... extended period, unplug the power cord. 5 Operating Environment •Do not use the printer in operation. •Avoid prolonged use without paper and a ribbon cassette installed.
Operating Instructions
Page 9
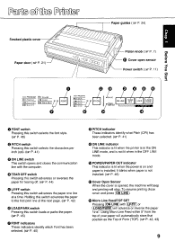
... (LOAD/PARK will automatically store that position as the Top of Form (TOF). (or P. 42, 43) 9 It blinks when paper is not installed. (a P. 46) (D Cover Open Sensor When the cover is installed. Or P. 42) LOAD/PARK switch Pressing this switch advances the paper to the first print line of the next page.
... (LOAD/PARK will automatically store that position as the Top of Form (TOF). (or P. 42, 43) 9 It blinks when paper is not installed. (a P. 46) (D Cover Open Sensor When the cover is installed. Or P. 42) LOAD/PARK switch Pressing this switch advances the paper to the first print line of the next page.
Operating Instructions
Page 12
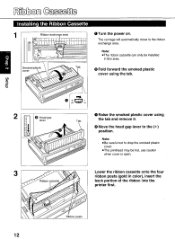
... gap lever 0 Raise the smoked plastic cover using Tab the tab and remove it. The carriage will automatically move to -ac 0 Turn the power on. 0 a Installing the Ribbon Cassette 1 Ribbon exchange area O tv n) Smoked plastic Tab cover to the ribbon exchange area. O Move the head gap lever to the (+) position. .O .Oc... O00° Note: •Be careful not to drop the smoked plastic cover. •The printhead may be installed in color), insert the Ribbon cassette r' back portion of the ribbon into the printer first.
... gap lever 0 Raise the smoked plastic cover using Tab the tab and remove it. The carriage will automatically move to -ac 0 Turn the power on. 0 a Installing the Ribbon Cassette 1 Ribbon exchange area O tv n) Smoked plastic Tab cover to the ribbon exchange area. O Move the head gap lever to the (+) position. .O .Oc... O00° Note: •Be careful not to drop the smoked plastic cover. •The printhead may be installed in color), insert the Ribbon cassette r' back portion of the ribbon into the printer first.

Operating Instructions
Page 14
... open. •Do not lift up the flat cable located under the carriage when removing the ribbon cassette. Or P. 12) 2 Then reverse the installation procedure. (step 5 step 4 -) step 3 of "Installing the Ribbon Cassette" at first. Position 1 or 2 3, 4, 5 or 6 Used for the thickness of paper you are using. 0 0 0 Cassette 7 Smoked plastic cover 0 Replace... head gap lever for Thinner sheets Thick sheets, multi-part forms or envelopes Removing the Ribbon Cassette 1 To remove the ribbon cassette, perform step 1-2 of "Installing the Ribbon Cassette".
... open. •Do not lift up the flat cable located under the carriage when removing the ribbon cassette. Or P. 12) 2 Then reverse the installation procedure. (step 5 step 4 -) step 3 of "Installing the Ribbon Cassette" at first. Position 1 or 2 3, 4, 5 or 6 Used for the thickness of paper you are using. 0 0 0 Cassette 7 Smoked plastic cover 0 Replace... head gap lever for Thinner sheets Thick sheets, multi-part forms or envelopes Removing the Ribbon Cassette 1 To remove the ribbon cassette, perform step 1-2 of "Installing the Ribbon Cassette".
Operating Instructions
Page 15
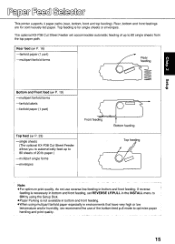
...and front feedings are for single sheets or envelopes. If reverse feeding is necessary in bottom and front feeding, set REVERSE LF/PULL in the INSTALL menu to ON by using multipart fanfold paper especially in bottom and front feeding. a 0 0 This printer supports 4 paper paths (rear, ...P. 19) -multipart fanfold forms -fanfold labels -fanfold paper (1 part) c O Front feeding Bottom feeding Top feed (a P. 23) -single sheets (The optional KX-P38 Cut Sheet Feeder allows you to automatically feed up to 80 sheets of 20 lb paper.) -multipart single forms -envelopes Top feeding O Note: •...
...and front feedings are for single sheets or envelopes. If reverse feeding is necessary in bottom and front feeding, set REVERSE LF/PULL in the INSTALL menu to ON by using multipart fanfold paper especially in bottom and front feeding. a 0 0 This printer supports 4 paper paths (rear, ...P. 19) -multipart fanfold forms -fanfold labels -fanfold paper (1 part) c O Front feeding Bottom feeding Top feed (a P. 23) -single sheets (The optional KX-P38 Cut Sheet Feeder allows you to automatically feed up to 80 sheets of 20 lb paper.) -multipart single forms -envelopes Top feeding O Note: •...

Operating Instructions
Page 16
... feed selector N-N .0 ccoo 2 V 3 4 las 5 Head gap 6 lever 0 0 OFF POWER ON OTurn the power on. The PAPER OUT indicator will flash indicating that paper is not installed in the printer.
... feed selector N-N .0 ccoo 2 V 3 4 las 5 Head gap 6 lever 0 0 OFF POWER ON OTurn the power on. The PAPER OUT indicator will flash indicating that paper is not installed in the printer.

Operating Instructions
Page 18
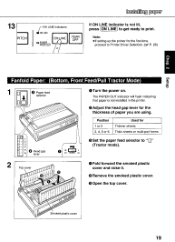
... paper separator by first raising the paper easel by the tractor units themselves. IV Lower the paper easel by pushing the tractor clamping levers back. Installing paper Tractor cl mping levers Oar O at 0 N 9 CA c ON LINE TEAR OFF LF/FF LOAD PARK '0 0 Adjust the tractors to load paper. 10 Top cover...
... paper separator by first raising the paper easel by the tractor units themselves. IV Lower the paper easel by pushing the tractor clamping levers back. Installing paper Tractor cl mping levers Oar O at 0 N 9 CA c ON LINE TEAR OFF LF/FF LOAD PARK '0 0 Adjust the tractors to load paper. 10 Top cover...
Operating Instructions
Page 19
... IL o MEI OFF POWER ON ()Set the paper feed selector to print. Smoked plastic cover 19 O Remove the smoked plastic cover. 0 Open the top cover. Installing paper 13 PITCH ON LINE indicators ON LINE • ON LINE 0 POWER PAPER OUT TEAR OFF If ON LINE indicator is not... installed in the printer. 0 Adjust the head gap lever for the thickness of paper you are using. Note: •If setting up the printer for the ...
... IL o MEI OFF POWER ON ()Set the paper feed selector to print. Smoked plastic cover 19 O Remove the smoked plastic cover. 0 Open the top cover. Installing paper 13 PITCH ON LINE indicators ON LINE • ON LINE 0 POWER PAPER OUT TEAR OFF If ON LINE indicator is not... installed in the printer. 0 Adjust the head gap lever for the thickness of paper you are using. Note: •If setting up the printer for the ...

Operating Instructions
Page 20
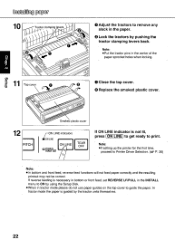
... supports between the tractors at both left most applications, you feel it release, then lift up roller unit. Paper support 20 In most print position. Installing paper Tab Pull up roller unit I Remove the pull up roller unit by pulling the tractor clamping levers forward. 0 Slide the tractors to accommodate the...
... supports between the tractors at both left most applications, you feel it release, then lift up roller unit. Paper support 20 In most print position. Installing paper Tab Pull up roller unit I Remove the pull up roller unit by pulling the tractor clamping levers forward. 0 Slide the tractors to accommodate the...
Operating Instructions
Page 21
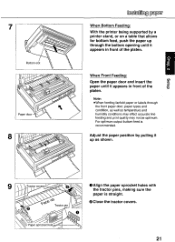
...: •When feeding fanfold paper or labels through the bottom opening until it appears in front of the -o platen. e Bottom slot r -o\ Paper door 04 6 153 .o\ Installing i t.licaji When Bottom Feeding: With the printer being supported by pulling it up through the front paper door, paper types and condition, as well as...
...: •When feeding fanfold paper or labels through the bottom opening until it appears in front of the -o platen. e Bottom slot r -o\ Paper door 04 6 153 .o\ Installing i t.licaji When Bottom Feeding: With the printer being supported by pulling it up through the front paper door, paper types and condition, as well as...
Operating Instructions
Page 22
Installing paper 10 C) Tractor clamping levers Di o ° 0 0 Adjust the tractors to guide the paper. In tractor mode the paper is not lit, press LON LINE ... correctly and the resulting printout may not be correct. If reverse feeding is necessary in bottom or front feed, set REVERSE LF/PULL in the INSTALL menu to ON by using the Setup Disk. •When in tractor mode please do not use paper guides on the top cover to remove...
Installing paper 10 C) Tractor clamping levers Di o ° 0 0 Adjust the tractors to guide the paper. In tractor mode the paper is not lit, press LON LINE ... correctly and the resulting printout may not be correct. If reverse feeding is necessary in bottom or front feed, set REVERSE LF/PULL in the INSTALL menu to ON by using the Setup Disk. •When in tractor mode please do not use paper guides on the top cover to remove...
Operating Instructions
Page 23
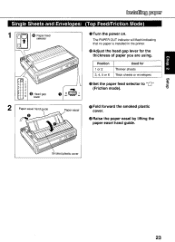
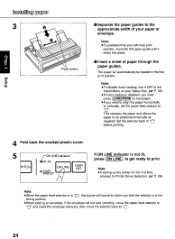
O Raise the paper easel by lifting the paper easel hand guide. Installing paper Single Sheets and Envelopes: (Top Feed/Friction Mode) Ella Paper feed selector 0 Turn the power on. oro .0 Smoked plastic cover 23 O Adjust the head ... sheets or envelopes 0 Set the paper feed selector to "El" tD - 34 (Friction mode). 0 U- The PAPER OUT indicator will flash indicating that no paper is installed in the printer. C) Position Used for the thickness of paper you are using. e 5 6 • Head gap lever 0 0 MSS OFF POWER ON 2 Paper easel hand guide...
O Raise the paper easel by lifting the paper easel hand guide. Installing paper Single Sheets and Envelopes: (Top Feed/Friction Mode) Ella Paper feed selector 0 Turn the power on. oro .0 Smoked plastic cover 23 O Adjust the head ... sheets or envelopes 0 Set the paper feed selector to "El" tD - 34 (Friction mode). 0 U- The PAPER OUT indicator will flash indicating that no paper is installed in the printer. C) Position Used for the thickness of paper you are using. e 5 6 • Head gap lever 0 0 MSS OFF POWER ON 2 Paper easel hand guide...
Operating Instructions
Page 24
... TEAR OFF If ON LINE indicator is disabled, you must press [LOAD/PARK to load paper. • If you that the selector is in the Install Menu on your Setup Disk. (er P. 30) • If Auto Loading is not lit, press (ON LINE,, to get ready to be loaded to the...
... TEAR OFF If ON LINE indicator is disabled, you must press [LOAD/PARK to load paper. • If you that the selector is in the Install Menu on your Setup Disk. (er P. 30) • If Auto Loading is not lit, press (ON LINE,, to get ready to be loaded to the...
Operating Instructions
Page 26
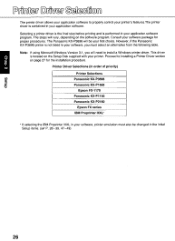
... Initial Setup items. (air P. 28-39, 47-49) 26 Proceed to install a Windows printer driver. The Panasonic KX-P3696 will vary, depending on page 27 for proper procedures. Printer Driver Selections (in order of priority) Printer Selections Panasonic KX-P3696 Panasonic KX-P1695 Epson FX-1170 Panasonic KX-P1150 Panasonic KX-P2180 Epson FX series IBM Proprinter IIIXL* If selecting the IBM Proprinter...
... Initial Setup items. (air P. 28-39, 47-49) 26 Proceed to install a Windows printer driver. The Panasonic KX-P3696 will vary, depending on page 27 for proper procedures. Printer Driver Selections (in order of priority) Printer Selections Panasonic KX-P3696 Panasonic KX-P1695 Epson FX-1170 Panasonic KX-P1150 Panasonic KX-P2180 Epson FX series IBM Proprinter IIIXL* If selecting the IBM Proprinter...

Operating Instructions
Page 27
... Connect... a OO0n_5,°riEiRgi D 0 0 The following steps are only necessary if using Microsoft Windows Version 3.1, The Setup Disk packaged with your printer contains a Panasonic KX-P3696 Printer Driver for the proper installation procedure. Go to your DOS manual for further information. 1 In "Main Group", select "Control Panel". 2 In "Control Panel", select "Printers". Remove Add...
... Connect... a OO0n_5,°riEiRgi D 0 0 The following steps are only necessary if using Microsoft Windows Version 3.1, The Setup Disk packaged with your printer contains a Panasonic KX-P3696 Printer Driver for the proper installation procedure. Go to your DOS manual for further information. 1 In "Main Group", select "Control Panel". 2 In "Control Panel", select "Printers". Remove Add...
Operating Instructions
Page 30
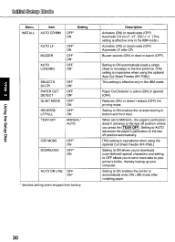
...mode after CR. Paper Out Detector is operational when using the optional Auto Cut Sheet Feeder (KX-P38).] This setting is effective only in the IBM mode.) Activates (ON) or deactivates (OFF) Automatic LF after installing paper. Reduces (ON) or doesn't reduce (OFF) the printing noise. Setting to AUTO ...ON) or deactivates (OFF) Automatic CR on LF, VT, ESC+"J". (This setting is effective only in bottom and front feed. Initial Setup Mode Menu INSTALL Item AUTO CR/IBM Setting OFF' ON AUTO LF BUZZER AUTO LOADING OFF" ON OFF ON* OFF ON' C) SELECTS OFF 20 CPI ON' PAPER...
...mode after CR. Paper Out Detector is operational when using the optional Auto Cut Sheet Feeder (KX-P38).] This setting is effective only in the IBM mode.) Activates (ON) or deactivates (OFF) Automatic LF after installing paper. Reduces (ON) or doesn't reduce (OFF) the printing noise. Setting to AUTO ...ON) or deactivates (OFF) Automatic CR on LF, VT, ESC+"J". (This setting is effective only in bottom and front feed. Initial Setup Mode Menu INSTALL Item AUTO CR/IBM Setting OFF' ON AUTO LF BUZZER AUTO LOADING OFF" ON OFF ON* OFF ON' C) SELECTS OFF 20 CPI ON' PAPER...

Operating Instructions
Page 31
... byte or 256 byte to 12.70 cm) The number increases or decreases by 1/ 72" (about 0.35 mm). " displayed only when SERIAL is installed.] INTERFACE DATA LENGTH BAUD RATE" PARALLEL* SERIAL 8 BITS* 7 BITS 150 BPS 300 BPS 600 BPS 1200 BPS 2400 BPS 4800 BPS 9600 BPS* ...Selects the desired interface parallel or serial. Initial Setup Mode Menu Item Setting Description INTERFACE [This setting is effective only when the optional KX-PS14, RS-232C serial interface board is selected in INTERFACE. )1Sia dnieS Mil Bu!Sfl 31 SETTING (Top of Form Setting) TRACTOR FRICTION...
... byte or 256 byte to 12.70 cm) The number increases or decreases by 1/ 72" (about 0.35 mm). " displayed only when SERIAL is installed.] INTERFACE DATA LENGTH BAUD RATE" PARALLEL* SERIAL 8 BITS* 7 BITS 150 BPS 300 BPS 600 BPS 1200 BPS 2400 BPS 4800 BPS 9600 BPS* ...Selects the desired interface parallel or serial. Initial Setup Mode Menu Item Setting Description INTERFACE [This setting is effective only when the optional KX-PS14, RS-232C serial interface board is selected in INTERFACE. )1Sia dnieS Mil Bu!Sfl 31 SETTING (Top of Form Setting) TRACTOR FRICTION...

