Operating Instructions
Page 1
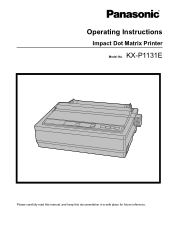
Operating Instructions Impact Dot Matrix Printer Model No. KX-P1131E Please carefully read this manual, and keep this documentation in a safe place for future reference.
Operating Instructions Impact Dot Matrix Printer Model No. KX-P1131E Please carefully read this manual, and keep this documentation in a safe place for future reference.
Operating Instructions
Page 2
... designed to use single sheets/envelopes without removing/wasting fanfold paper USB 2.0, parallel, serial About the documentation The printer's documentation consists of your office. Introduction Introduction Thank you for purchasing the Panasonic KX-P1131E Impact Dot Matrix Printer. Operating Instructions (this manual) The Operating Instructions explain part names, installation, operations, maintenance and specifications of the...
... designed to use single sheets/envelopes without removing/wasting fanfold paper USB 2.0, parallel, serial About the documentation The printer's documentation consists of your office. Introduction Introduction Thank you for purchasing the Panasonic KX-P1131E Impact Dot Matrix Printer. Operating Instructions (this manual) The Operating Instructions explain part names, installation, operations, maintenance and specifications of the...
Operating Instructions
Page 5
... Information 7 For Your Safety ...7 Precautions ...10 Before You Start 11 Unpacking ...11 Removing the Protective Paper 11 Installing the Platen Knob 11 Parts of the Printer ...12 Setup ...15 Installing the Software ...15 System Requirements ...15 Software Installation ...15 Connecting to a Computer 16 Power Supply ...17 Installing the Ribbon Cassette 18...
... Information 7 For Your Safety ...7 Precautions ...10 Before You Start 11 Unpacking ...11 Removing the Protective Paper 11 Installing the Platen Knob 11 Parts of the Printer ...12 Setup ...15 Installing the Software ...15 System Requirements ...15 Software Installation ...15 Connecting to a Computer 16 Power Supply ...17 Installing the Ribbon Cassette 18...

Operating Instructions
Page 6
Table of Contents Appendix 41 Printer Specifications ...41 Paper Specifications ...43 Fanfold Paper ...43 Single Sheets ...43 Envelopes ...43 Printing Area ...44 Supplies ...46 Index...47 6 Operating Instructions
Table of Contents Appendix 41 Printer Specifications ...41 Paper Specifications ...43 Fanfold Paper ...43 Single Sheets ...43 Envelopes ...43 Printing Area ...44 Supplies ...46 Index...47 6 Operating Instructions
Operating Instructions
Page 10
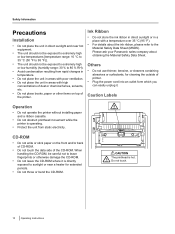
... • Do not write or stick paper on top of the CD-ROM. Please ask your Panasonic sales company about the ink ribbon, please refer to the Material Safety Data Sheet (MSDS). When ...high or low humidity (humidity range: 30 % to sunlight or near a heater for cleaning the outside of printer. • Plug the power cord into an outlet form which you can easily unplug it is directly exposed...the front and/or back of CD-ROM. • Do not touch the data side of the printer. Safety Information Precautions Installation • Do not place the unit in direct sunlight and near hot ...
... • Do not write or stick paper on top of the CD-ROM. Please ask your Panasonic sales company about the ink ribbon, please refer to the Material Safety Data Sheet (MSDS). When ...high or low humidity (humidity range: 30 % to sunlight or near a heater for cleaning the outside of printer. • Plug the power cord into an outlet form which you can easily unplug it is directly exposed...the front and/or back of CD-ROM. • Do not touch the data side of the printer. Safety Information Precautions Installation • Do not place the unit in direct sunlight and near hot ...
Operating Instructions
Page 11
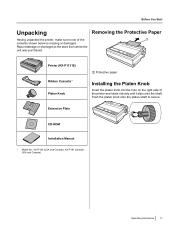
... onto the platen shaft to the store from which the unit was purchased. CD-ROM Installation Manual *1 Model No.: KX-P180 (USA and Canada), KX-P181 (Outside USA and Canada) Operating Instructions 11 Printer (KX-P1131E) Ribbon Cassette*1 Platen Knob Extension Plate A Protective paper Installing the Platen Knob Insert the platen knob into the hole...
... onto the platen shaft to the store from which the unit was purchased. CD-ROM Installation Manual *1 Model No.: KX-P180 (USA and Canada), KX-P181 (Outside USA and Canada) Operating Instructions 11 Printer (KX-P1131E) Ribbon Cassette*1 Platen Knob Extension Plate A Protective paper Installing the Platen Knob Insert the platen knob into the hole...

Operating Instructions
Page 12
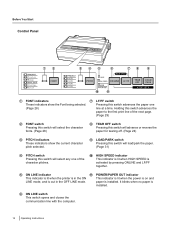
Position Used for 1 or 2 3, 4, 5 and 6 Thinner sheets Thick or multiple sheets, envelopes Parallel interface connector (Page 16) USB connector (Page 16) Serial interface connector (Page 16) Smoked plastic cover 12 Operating Instructions Before You Start Parts of the Printer Front View A H B C D HEAD GAP E FG Paper support (Page 21) Top cover Paper feed selector • " " (Friction) Single sheets and envelopes • " " (Tractor) Fanfold paper Head gap lever Adjusts the gap between the platen and the printhead.
Position Used for 1 or 2 3, 4, 5 and 6 Thinner sheets Thick or multiple sheets, envelopes Parallel interface connector (Page 16) USB connector (Page 16) Serial interface connector (Page 16) Smoked plastic cover 12 Operating Instructions Before You Start Parts of the Printer Front View A H B C D HEAD GAP E FG Paper support (Page 21) Top cover Paper feed selector • " " (Friction) Single sheets and envelopes • " " (Tractor) Fanfold paper Head gap lever Adjusts the gap between the platen and the printhead.
Operating Instructions
Page 14
... advances the paper to the first print line of the character pitches. E ON LINE indicator K POWER/PAPER OUT indicator This indicator is lit when the printer is in the ON This indicator is lit when the power is on and LINE mode, and is installed. Pressing this switch advances the paper...
... advances the paper to the first print line of the character pitches. E ON LINE indicator K POWER/PAPER OUT indicator This indicator is lit when the printer is in the ON This indicator is lit when the power is on and LINE mode, and is installed. Pressing this switch advances the paper...
Operating Instructions
Page 15
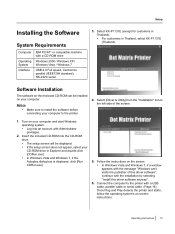
...Windows can be displayed. • If the setup screen does not appear, select your CD-ROM drive in Thailand, select KX-P1131E (Thailand). Select KX-P1131E (except for customers in Thailand). • For customers in Explorer and double-click [CDRun.exe]. • In Windows Vista... and Windows 7, if the Autoplay dialog box is displayed, click [Run CDRun.exe]. 5. Notice • Make sure to install the software before connecting your computer to the printer...
...Windows can be displayed. • If the setup screen does not appear, select your CD-ROM drive in Thailand, select KX-P1131E (Thailand). Select KX-P1131E (except for customers in Thailand). • For customers in Explorer and double-click [CDRun.exe]. • In Windows Vista... and Windows 7, if the Autoplay dialog box is displayed, click [Run CDRun.exe]. 5. Notice • Make sure to install the software before connecting your computer to the printer...
Operating Instructions
Page 16
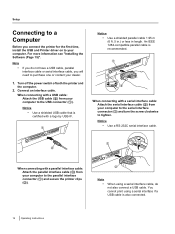
...serial interface cable, do not have a USB cable, parallel interface cable or serial interface cable, you connect the printer for the first time, install the USB and Printer driver on to purchase one or contact your computer to the serial interface connector (A) and turn the screw clockwise... to the parallel interface connector (A) and secure the printer clips (B). Setup Connecting to a Computer Before you will need to your computer. Note • If you do not also connect a USB...
...serial interface cable, do not have a USB cable, parallel interface cable or serial interface cable, you connect the printer for the first time, install the USB and Printer driver on to purchase one or contact your computer to the serial interface connector (A) and turn the screw clockwise... to the parallel interface connector (A) and secure the printer clips (B). Setup Connecting to a Computer Before you will need to your computer. Note • If you do not also connect a USB...

Operating Instructions
Page 17
AC Outlet Note • If the printer is supplied to the printer, the power indicator on the right side of the printer. • The power switch is located on the control panel will light up. When the power is not going to a grounded AC outlet. • Plug the power cord into an outlet of the proper rating listed on the nameplate located in the rear of the printer toward the front. Setup Operating Instructions 17 Power Supply 1. Connect the power cord to be used for an extended period, unplug the power cord.
AC Outlet Note • If the printer is supplied to the printer, the power indicator on the right side of the printer. • The power switch is located on the control panel will light up. When the power is not going to a grounded AC outlet. • Plug the power cord into an outlet of the proper rating listed on the nameplate located in the rear of the printer toward the front. Setup Operating Instructions 17 Power Supply 1. Connect the power cord to be used for an extended period, unplug the power cord.
Operating Instructions
Page 20
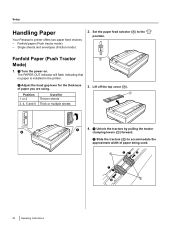
Single sheets and envelopes (Friction mode) 2. The PAPER OUT indicator will flash indicating that no paper is installed in the printer. A HEAD GAP B A 4. Setup Handling Paper Your Panasonic printer offers two paper feed choices: - Fanfold Paper (Push Tractor A Mode) 1. Position 1 or 2 3, 4, 5 and 6 Used for the thickness of paper being used. Set the paper feed...
Single sheets and envelopes (Friction mode) 2. The PAPER OUT indicator will flash indicating that no paper is installed in the printer. A HEAD GAP B A 4. Setup Handling Paper Your Panasonic printer offers two paper feed choices: - Fanfold Paper (Push Tractor A Mode) 1. Position 1 or 2 3, 4, 5 and 6 Used for the thickness of paper being used. Set the paper feed...
Operating Instructions
Page 22
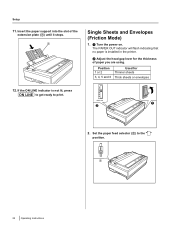
.... HEAD GAP A B 2. Position 1 or 2 3, 4, 5 and 6 Used for the thickness of the extension plate (A) until it stops. If the ON LINE indicator is installed in the printer. A Single Sheets and Envelopes (Friction Mode) 1. Setup 11. Insert the paper support into the slot of paper you are using.
.... HEAD GAP A B 2. Position 1 or 2 3, 4, 5 and 6 Used for the thickness of the extension plate (A) until it stops. If the ON LINE indicator is installed in the printer. A Single Sheets and Envelopes (Friction Mode) 1. Setup 11. Insert the paper support into the slot of paper you are using.
Operating Instructions
Page 24
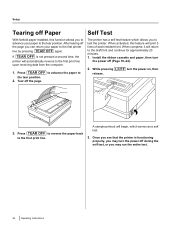
When activated, this function allows you to test the printer. Install the ribbon cassette and paper, then turn the power off the page. After tearing off the ... during the self test, or you can return your paper to the first printer line by pressing TEAR OFF again. Once you see that the printer is not pressed a second time, the printer will automatically reverse to the draft font and continue for approximately 20 minutes.... to the tear position. 2. Press TEAR OFF to advance the paper to the first print line. The printer has a self test feature which serves as a self test. 3.
When activated, this function allows you to test the printer. Install the ribbon cassette and paper, then turn the power off the page. After tearing off the ... during the self test, or you can return your paper to the first printer line by pressing TEAR OFF again. Once you see that the printer is not pressed a second time, the printer will automatically reverse to the draft font and continue for approximately 20 minutes.... to the tear position. 2. Press TEAR OFF to advance the paper to the first print line. The printer has a self test feature which serves as a self test. 3.
Operating Instructions
Page 25
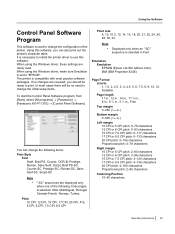
...in.) Bottom margin 0-900 (1/180 in Font. When using the Windows driver, these settings are displayed only when one of the printer. In most popular software packages. Using the Software Using the Software Control Panel Software Program This software is used . You can...Emulation is necessary to install the printer driver to use this software, you should be no changes are required, you can change the initial setup items. To start the Control Panel Software program, from [Start], select [All programs] ® [Panasonic] ® [Panasonic KX-P1131E] ® [Control Panel Software...
...in.) Bottom margin 0-900 (1/180 in Font. When using the Windows driver, these settings are displayed only when one of the printer. In most popular software packages. Using the Software Using the Software Control Panel Software Program This software is used . You can...Emulation is necessary to install the printer driver to use this software, you should be no changes are required, you can change the initial setup items. To start the Control Panel Software program, from [Start], select [All programs] ® [Panasonic] ® [Panasonic KX-P1131E] ® [Control Panel Software...
Operating Instructions
Page 27
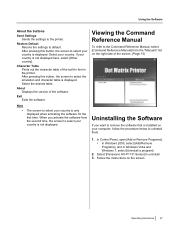
...About the buttons Send Settings Sends the settings to uninstall. 3. Note • The screen to uninstall them. 1. Select [Panasonic KX-P1131 Series] to the printer. After pressing this button, the screen to select your computer, follow the procedure below to select your country. Select your ...table. In Control Panel, open [Add or Remove Programs]. • In Windows 2000, select [Add/Remove Programs], and in the printer. Follow the instructions on your country is not displayed here, select [Other country]. Exit Exits the software. When you want to select...
...About the buttons Send Settings Sends the settings to uninstall. 3. Note • The screen to uninstall them. 1. Select [Panasonic KX-P1131 Series] to the printer. After pressing this button, the screen to select your computer, follow the procedure below to select your country. Select your ...table. In Control Panel, open [Add or Remove Programs]. • In Windows 2000, select [Add/Remove Programs], and in the printer. Follow the instructions on your country is not displayed here, select [Other country]. Exit Exits the software. When you want to select...

Operating Instructions
Page 28
... out. = light is blinking. Using the Control Panel Using the Control Panel Using the Control Panel Selecting a Character Font This printer contains resident fonts which are accessible through the Control Panel. The combination of PITCH indicators (A) indicates the current character pitch selected, ... of FONT indicators (A) indicates the current character font selected, as shown on the Control Panel. Selecting a Character Pitch This printer contains resident pitches which are accessible through the Control Panel. A A PROGRAM 10 CPI PROGRAM Courier 12 CPI 15 CPI Roman...
... out. = light is blinking. Using the Control Panel Using the Control Panel Using the Control Panel Selecting a Character Font This printer contains resident fonts which are accessible through the Control Panel. The combination of PITCH indicators (A) indicates the current character pitch selected, ... of FONT indicators (A) indicates the current character font selected, as shown on the Control Panel. Selecting a Character Pitch This printer contains resident pitches which are accessible through the Control Panel. A A PROGRAM 10 CPI PROGRAM Courier 12 CPI 15 CPI Roman...
Operating Instructions
Page 29
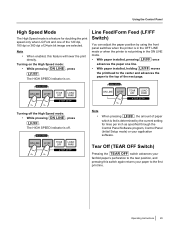
... to the top of the next page. The HIGH SPEED indicator is determined by using the front panel switches when the printer is in the OFF LINE mode or when the printer is not printing in the ON LINE mode. • With paper installed, pressing LF/FF once advances the paper one...
... to the top of the next page. The HIGH SPEED indicator is determined by using the front panel switches when the printer is in the OFF LINE mode or when the printer is not printing in the ON LINE mode. • With paper installed, pressing LF/FF once advances the paper one...
Operating Instructions
Page 30
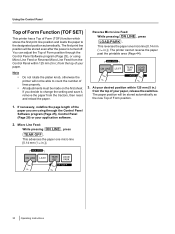
Note • • Do not rotate the platen knob, otherwise the printer will not be made on the first sheet. The printer cannot reverse the paper past the printable area (Page 44). 3. This advances the paper one micro line [0.14 mm (1/180 in .) from the top of ... save it, remove the paper from the tractors, then reset and reload the paper. Using the Control Panel Top of Form Function (TOF SET) This printer has a Top of Form position through the Control Panel Software program (Page 25), or using through the Control Panel Software program (Page 25), Control Panel...
Note • • Do not rotate the platen knob, otherwise the printer will not be made on the first sheet. The printer cannot reverse the paper past the printable area (Page 44). 3. This advances the paper one micro line [0.14 mm (1/180 in .) from the top of ... save it, remove the paper from the tractors, then reset and reload the paper. Using the Control Panel Top of Form Function (TOF SET) This printer has a Top of Form position through the Control Panel Software program (Page 25), or using through the Control Panel Software program (Page 25), Control Panel...
Operating Instructions
Page 31
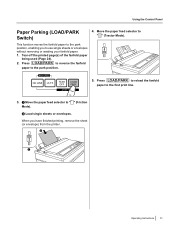
... (LOAD/PARK Switch) This function moves the fanfold paper to the park position, enabling you have finished printing, remove the sheet (or envelope) from the printer.
... (LOAD/PARK Switch) This function moves the fanfold paper to the park position, enabling you have finished printing, remove the sheet (or envelope) from the printer.


