
EP1014 User Guide
Page 3
... opening. 10. Never insert hands in the appliance. Call your nearest authorized service center for purchasing the Panasonic Household Massage Lounger EP1014. An appliance should not be caught in use outdoors. 11. To reduce the risk of this appliance to persons: 1. Keep the cords away from massage lounger. Thank you for repair. 8. Unplug from the electrical outlet immediately after...
... opening. 10. Never insert hands in the appliance. Call your nearest authorized service center for purchasing the Panasonic Household Massage Lounger EP1014. An appliance should not be caught in use outdoors. 11. To reduce the risk of this appliance to persons: 1. Keep the cords away from massage lounger. Thank you for repair. 8. Unplug from the electrical outlet immediately after...
EP1014 User Guide
Page 4
... discomfort when first using the chair, do not use immediately. Thin clothing increases the effectiveness, but exposing the skin directly to use on the legrest. Do not remove the back cushion without consulting a physician prior to the chair. While using the massager, if you adjust to use against bare skin; Never put any kind, without first reading instructions on the...
... discomfort when first using the chair, do not use immediately. Thin clothing increases the effectiveness, but exposing the skin directly to use on the legrest. Do not remove the back cushion without consulting a physician prior to the chair. While using the massager, if you adjust to use against bare skin; Never put any kind, without first reading instructions on the...
EP1014 User Guide
Page 5
...under the Limited Warranty. 2. After each massage, slide the power switch, which is located on the chair. • Exposure to the massage heads, they may cause the switch to be user abuse and is due to the "lock" position. If the plastic portions become soiled use thinner, benzene or...maximum user weight of the controller between the armrest and the chair back. 3. Do not sit on it . Do not attempt to have the massager checked by an authorized service center. 6. If the back hits a wall or pillar, the chair may stop moving the heads up . 11. Be sure to repair the massager ...
...under the Limited Warranty. 2. After each massage, slide the power switch, which is located on the chair. • Exposure to the massage heads, they may cause the switch to be user abuse and is due to the "lock" position. If the plastic portions become soiled use thinner, benzene or...maximum user weight of the controller between the armrest and the chair back. 3. Do not sit on it . Do not attempt to have the massager checked by an authorized service center. 6. If the back hits a wall or pillar, the chair may stop moving the heads up . 11. Be sure to repair the massager ...

EP1014 User Guide
Page 6
... GROUNDING INSTRUCTIONS • This product must be plugged into an appropriate outlet that looks like the plug shown in Figure A. DANGER • Improper connection of the equipment-grounding conductor can result in a risk of electric shock. • This product is properly installed and grounded...for its weight and exercise caution when moving it should be used with all local codes and ordinances. GROUNDING PIN Figure A GROUNDED OUTLET HOW TO MOVE THE CHAIR CAUTION Do not move the chair if the massage heads have been moved to their resting positions and the backrest ...
... GROUNDING INSTRUCTIONS • This product must be plugged into an appropriate outlet that looks like the plug shown in Figure A. DANGER • Improper connection of the equipment-grounding conductor can result in a risk of electric shock. • This product is properly installed and grounded...for its weight and exercise caution when moving it should be used with all local codes and ordinances. GROUNDING PIN Figure A GROUNDED OUTLET HOW TO MOVE THE CHAIR CAUTION Do not move the chair if the massage heads have been moved to their resting positions and the backrest ...
EP1014 User Guide
Page 7
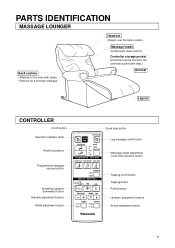
PARTS IDENTIFICATION MASSAGE LOUNGER Back cushion • Attaches to the chair with zipper. • Remove for a stronger massage. Massage heads (Underneath chair cushion) Controller storage pocket (Controller can be stored in the controller pocket [left side].) Armrest Legrest CONTROLLER On/off button Operation indicator lamp Reclining buttons Programmed massage course buttons Kneading (upward/ downward) button Intensity adjustment buttons Width adjustment button Quick stop button on quick...
PARTS IDENTIFICATION MASSAGE LOUNGER Back cushion • Attaches to the chair with zipper. • Remove for a stronger massage. Massage heads (Underneath chair cushion) Controller storage pocket (Controller can be stored in the controller pocket [left side].) Armrest Legrest CONTROLLER On/off button Operation indicator lamp Reclining buttons Programmed massage course buttons Kneading (upward/ downward) button Intensity adjustment buttons Width adjustment button Quick stop button on quick...

EP1014 User Guide
Page 8
...power switch by moving the operating lock switch to the "on the controller twice. NOTE: Position the chair at the rear of the massage lounger backrest in the resting position. • If the massage heads are in the resting position, sit down in the "lock" position. 3. BEFORE USE PLACE OF USE • Do not use the massage lounger... for the massage heads to harsh light can cause discoloring and mildew. on ". • When the operating lock switch is in the massage lounger. Water and heat can discolor or harden the cover. • Do not use the massage lounger in hot ...
...power switch by moving the operating lock switch to the "on the controller twice. NOTE: Position the chair at the rear of the massage lounger backrest in the resting position. • If the massage heads are in the resting position, sit down in the "lock" position. 3. BEFORE USE PLACE OF USE • Do not use the massage lounger... for the massage heads to harsh light can cause discoloring and mildew. on ". • When the operating lock switch is in the massage lounger. Water and heat can discolor or harden the cover. • Do not use the massage lounger in hot ...
EP1014 User Guide
Page 9
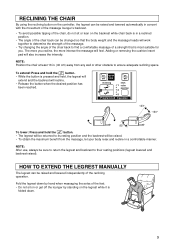
... the massage heads will work together to determine the strength of the massage. • Try changing the angle of the chair back to their resting positions (legrest lowered and backrest raised). RECLINING THE CHAIR By using the reclining button on the controller, the legrest can be raised and lowered automatically in concert with the movement of the massage lounger...
... the massage heads will work together to determine the strength of the massage. • Try changing the angle of the chair back to their resting positions (legrest lowered and backrest raised). RECLINING THE CHAIR By using the reclining button on the controller, the legrest can be raised and lowered automatically in concert with the movement of the massage lounger...

EP1014 User Guide
Page 10
...USE TO START/STOP MASSAGE ACTION Before using the massager as the section on off neck 1 roller position 3 5 Quick stop button If you can sit comfortably, using , first read all the instructions including the warnings and safety and operating precautions, as well as a regular lounge chair. • To resume the massage...a retracted resting position more comfortable for massage lounger • To prevent excessive massage, there is lit. 2. The massage heads will go up, spread out and stop " button. To stop in their resting position will reset the time for another 15 minutes (...
...USE TO START/STOP MASSAGE ACTION Before using the massager as the section on off neck 1 roller position 3 5 Quick stop button If you can sit comfortably, using , first read all the instructions including the warnings and safety and operating precautions, as well as a regular lounge chair. • To resume the massage...a retracted resting position more comfortable for massage lounger • To prevent excessive massage, there is lit. 2. The massage heads will go up, spread out and stop " button. To stop in their resting position will reset the time for another 15 minutes (...

EP1014 User Guide
Page 11
Press the leg massage "on/off" button to turn on the leg massager. • Check to be sure that the operation indicator lamp on the leg massage on/off button is a built-in timer that will automatically turn off the leg massager, press this leg massage on off neck 1 roller position 3 5 Leg massage button Automatic timer for leg massager • To prevent continuous operation of operation. 11 To turn off button again. LEG MASSAGER OPERATION 1. on quick off stop reclining leg massage on /off the leg massager after 30 minutes of the leg massager, there is lit. 2.
Press the leg massage "on/off" button to turn on the leg massager. • Check to be sure that the operation indicator lamp on the leg massage on/off button is a built-in timer that will automatically turn off the leg massager, press this leg massage on off neck 1 roller position 3 5 Leg massage button Automatic timer for leg massager • To prevent continuous operation of operation. 11 To turn off button again. LEG MASSAGER OPERATION 1. on quick off stop reclining leg massage on /off the leg massager after 30 minutes of the leg massager, there is lit. 2.
EP1014 User Guide
Page 12
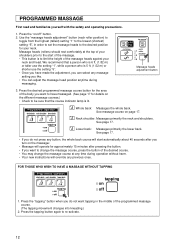
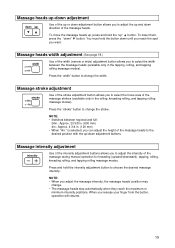
Use the "massage heads adjustment" button (neck roller position) to toggle from the highest (tallest) setting "1" to the lowest (shortest) setting "5", in the middle of the programmed massage course. (The tapping movement changes into kneading.) 2. on quick off stop reclining leg massage on off Whole back: Massages the whole back. Neck shoulder: Massages...6 ft. (1.82 m) or taller use the setting "5". • Once you have made the adjustment, you can adjust the massage head position anytime during operation without harm. • Your new instructions will operate for your neck and head...
Use the "massage heads adjustment" button (neck roller position) to toggle from the highest (tallest) setting "1" to the lowest (shortest) setting "5", in the middle of the programmed massage course. (The tapping movement changes into kneading.) 2. on quick off stop reclining leg massage on off Whole back: Massages the whole back. Neck shoulder: Massages...6 ft. (1.82 m) or taller use the setting "5". • Once you have made the adjustment, you can adjust the massage head position anytime during operation without harm. • Your new instructions will operate for your neck and head...
EP1014 User Guide
Page 13
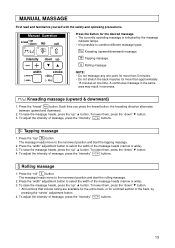
..., press the "up " button. Press the "width" adjustment button to the narrowest position and start the rolling massage. 2. Press the "roll" button. To adjust the intensity of massage, press the "intensity" buttons. MANUAL MASSAGE First read and familiarize yourself with the safety and operating precautions. Press the "knead" button. To adjust the intensity of...
..., press the "up " button. Press the "width" adjustment button to the narrowest position and start the rolling massage. 2. Press the "roll" button. To adjust the intensity of massage, press the "intensity" buttons. MANUAL MASSAGE First read and familiarize yourself with the safety and operating precautions. Press the "knead" button. To adjust the intensity of...
EP1014 User Guide
Page 14
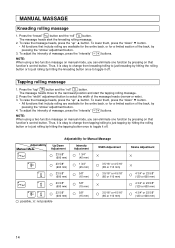
...width of the back, by pressing the "stroke" adjustment button. 3. The massage heads start the tapping rolling massage. 2. NOTE: When using a two function massage on manual mode, you can eliminate one function by pressing on that include rolling are available...press the "down " button. • All functions that function's control button. Tapping rolling massage 1. To adjust the intensity of massage, press the "intensity" buttons. Thus, it off . MANUAL MASSAGE Kneading rolling massage 1. Press the "width" adjustment button to toggle it is okay to...
...width of the back, by pressing the "stroke" adjustment button. 3. The massage heads start the tapping rolling massage. 2. NOTE: When using a two function massage on manual mode, you can eliminate one function by pressing on that include rolling are available...press the "down " button. • All functions that function's control button. Tapping rolling massage 1. To adjust the intensity of massage, press the "intensity" buttons. Thus, it off . MANUAL MASSAGE Kneading rolling massage 1. Press the "width" adjustment button to toggle it is okay to...
EP1014 User Guide
Page 15
... you adjust the massage intensity, the massage heads' position may change. • The massage heads stop automatically when they reach the maximum or minimum intensity positions. Massage heads width adjustment (See page 18.) width narrow wide Use of the width (narrow or wide) adjustment button allows you to adjust the intensity of the massage during manual operation for...
... you adjust the massage intensity, the massage heads' position may change. • The massage heads stop automatically when they reach the maximum or minimum intensity positions. Massage heads width adjustment (See page 18.) width narrow wide Use of the width (narrow or wide) adjustment button allows you to adjust the intensity of the massage during manual operation for...
EP1014 User Guide
Page 16
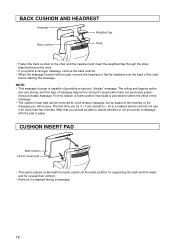
... the chair before starting the massage. CUSHION INSERT PAD Back cushion Cushion insert pad • This pad is capable of providing a vigorous "shiatsu" massage. After that you should be able to soften the effect of the massage. • The cushion insert pad can be removed for people who have not previously experienced a shiatsu massage. For this type of massage may be used, remove...
... the chair before starting the massage. CUSHION INSERT PAD Back cushion Cushion insert pad • This pad is capable of providing a vigorous "shiatsu" massage. After that you should be able to soften the effect of the massage. • The cushion insert pad can be removed for people who have not previously experienced a shiatsu massage. For this type of massage may be used, remove...
EP1014 User Guide
Page 17
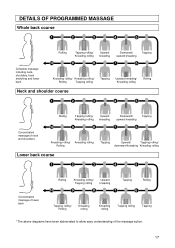
...Kneading rolling/ Rolling Tapping rolling Tapping Upward kneading/ Kneading rolling Rolling Neck and shoulder course 1 2 3 4 5 Concentrated massage of neck and shoulders Rolling Tapping rolling/ Kneading rolling Upward kneading Downward/ upward kneading Tapping 10 9 8 7 6 ... Kneading rolling Rolling Tapping Upward/ Tapping rolling/ downward kneading Kneading rolling Lower back course 1 2 3 4 5 Concentrated massage of lower back Rolling Kneading rolling/ Tapping rolling Upward kneading 10 9 8 7 Tapping Rolling 6 Tapping rolling/ Rolling Kneading...
...Kneading rolling/ Rolling Tapping rolling Tapping Upward kneading/ Kneading rolling Rolling Neck and shoulder course 1 2 3 4 5 Concentrated massage of neck and shoulders Rolling Tapping rolling/ Kneading rolling Upward kneading Downward/ upward kneading Tapping 10 9 8 7 6 ... Kneading rolling Rolling Tapping Upward/ Tapping rolling/ downward kneading Kneading rolling Lower back course 1 2 3 4 5 Concentrated massage of lower back Rolling Kneading rolling/ Tapping rolling Upward kneading 10 9 8 7 Tapping Rolling 6 Tapping rolling/ Rolling Kneading...
EP1014 User Guide
Page 18
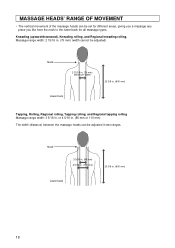
... (85 mm) 4 5/16 in. (110 mm) 23 5/8 in two ranges. or 4 5/16 in. (85 mm or 110 mm) The width (distance) between the massage heads can be adjusted) Neck 2 15/16 in. (75 mm) (Minimum width) 23 5/8 in. (600 mm) Lower back Tapping, Rolling, Regional rolling, Tapping rolling, and... Regional tapping rolling Massage range width: 3 5/16 in. Massage range width: 2 15/16 in. (75 mm) (width cannot be set for different areas, giving you a massage any place you like from the neck to the lower back for all...
... (85 mm) 4 5/16 in. (110 mm) 23 5/8 in two ranges. or 4 5/16 in. (85 mm or 110 mm) The width (distance) between the massage heads can be adjusted) Neck 2 15/16 in. (75 mm) (Minimum width) 23 5/8 in. (600 mm) Lower back Tapping, Rolling, Regional rolling, Tapping rolling, and... Regional tapping rolling Massage range width: 3 5/16 in. Massage range width: 2 15/16 in. (75 mm) (width cannot be set for different areas, giving you a massage any place you like from the neck to the lower back for all...

EP1014 User Guide
Page 19
... the manual operation mode. If the leg massage operation indicator lamp on the controller blinks and the chair stops, turn off " position. Wait until the massage heads are aligned when stopped. Plug the power cord into an AC outlet (120 V). Your shoulders are at 1-800-338-0552 to locate the servicer near to the narrowest position for safety. TROUBLESHOOTING GUIDE Before requesting service...
... the manual operation mode. If the leg massage operation indicator lamp on the controller blinks and the chair stops, turn off " position. Wait until the massage heads are aligned when stopped. Plug the power cord into an AC outlet (120 V). Your shoulders are at 1-800-338-0552 to locate the servicer near to the narrowest position for safety. TROUBLESHOOTING GUIDE Before requesting service...
EP1014 User Guide
Page 20
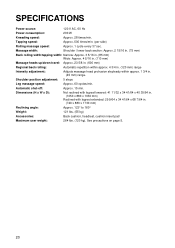
...41/64 x 68 7/64 in . (45 mm) range. See precautions on page 5. 20 Shoulder position adjustment: 5 steps Leg massage speed: Approx. 60 cycles/min. Massage width: Shoulder / lower back section: Approx. 2 15/16 in. (75 mm) Back rolling width/tapping width: Narrow: Approx... massage head protrusion steplessly within approx. 1 3/4 in . (740 x 880 x 1730 mm) Reclining angle: Approx. 123° to 160° Weight: 121 lbs. (55 kg) Accessories: Back cushion, headrest, cushion insert pad Maximum user weight: 264 lbs. (120 kg). SPECIFICATIONS Power source: 120 V AC, 60 Hz Power ...
...41/64 x 68 7/64 in . (45 mm) range. See precautions on page 5. 20 Shoulder position adjustment: 5 steps Leg massage speed: Approx. 60 cycles/min. Massage width: Shoulder / lower back section: Approx. 2 15/16 in. (75 mm) Back rolling width/tapping width: Narrow: Approx... massage head protrusion steplessly within approx. 1 3/4 in . (740 x 880 x 1730 mm) Reclining angle: Approx. 123° to 160° Weight: 121 lbs. (55 kg) Accessories: Back cushion, headrest, cushion insert pad Maximum user weight: 264 lbs. (120 kg). SPECIFICATIONS Power source: 120 V AC, 60 Hz Power ...

EP1014 User Guide
Page 40
www.panasonic.com/massage Printed in USA No. 1 EN, SP Panasonic Consumer Electronics Company One Panasonic Way 4A-3 Secaucus, New Jersey 07094 1-800-338-0552 for questions and comments.
www.panasonic.com/massage Printed in USA No. 1 EN, SP Panasonic Consumer Electronics Company One Panasonic Way 4A-3 Secaucus, New Jersey 07094 1-800-338-0552 for questions and comments.


