
English
Page 4
LEARNING ABOUT YOUR 10 CUP FOOD PROCESSOR a a Small Food Pusher b Large Food Pusher b c Food Chute Lid d Slice Disc c e Shred Disc f Disc Stem d g Dough Blade e h Accessory Storage Bowl i Multi-purpose Blade f g j Bowl k Spatula h l Base m Control panel i j k l m 4 www.oster.com
LEARNING ABOUT YOUR 10 CUP FOOD PROCESSOR a a Small Food Pusher b Large Food Pusher b c Food Chute Lid d Slice Disc c e Shred Disc f Disc Stem d g Dough Blade e h Accessory Storage Bowl i Multi-purpose Blade f g j Bowl k Spatula h l Base m Control panel i j k l m 4 www.oster.com
English
Page 5
... For your food processor. Do not attempt to check processed results and control the consistency. This allows you to operate the unit without the bowl lid, bowl and food chute lid correctly in place. remove Figure 1 the pusher and fill the feed tube as needed. Remove the Pusher and refill ... in this manual to read the Care & Cleaning Section of processed foods better by using the PULSE button on and off. BEFORE USING YOUR OSTER® FOOD PROCESSOR • When unpacking the product and removing packing material, handle the chopping blade and slice/shred discs carefully: they are...
... For your food processor. Do not attempt to check processed results and control the consistency. This allows you to operate the unit without the bowl lid, bowl and food chute lid correctly in place. remove Figure 1 the pusher and fill the feed tube as needed. Remove the Pusher and refill ... in this manual to read the Care & Cleaning Section of processed foods better by using the PULSE button on and off. BEFORE USING YOUR OSTER® FOOD PROCESSOR • When unpacking the product and removing packing material, handle the chopping blade and slice/shred discs carefully: they are...

English
Page 6
... are properly aligned and locked into place. (Figure 3) NOTE: When the cover is not locked onto the bowl. To stop before removing the lid or bowl. 6 www.oster.com Put the bowl on the bowl. Figure 2 How to Lock the Cover Place the lid on top of the food processor base, with the center of... center. The handle should be aligned with the work bowl handle just to the right of the control ...
... are properly aligned and locked into place. (Figure 3) NOTE: When the cover is not locked onto the bowl. To stop before removing the lid or bowl. 6 www.oster.com Put the bowl on the bowl. Figure 2 How to Lock the Cover Place the lid on top of the food processor base, with the center of... center. The handle should be aligned with the work bowl handle just to the right of the control ...
English
Page 7
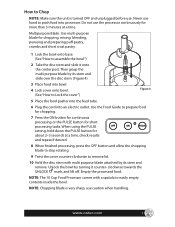
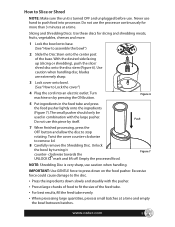
...stop rotating. 9 Twist the cover counter-clockwise to remove lid. 10 Hold the disc stem with a spatula to easily empty contents inside the bowl. Empty the processed food. Never use caution when handling. Then grasp the multi purpose blade by its stem and remove. clockwise towards the ... Lock the cover") Figure 4 5 Place the food pusher into the feed tube. 6 Plug the cord into processor. www.oster.com 7 Use the Food Guide to assemble the bowl") 2 Take the disc stem and slide it counter- NOTE: Chopping Blade is turned OFF and unplugged before use the processor ...
...stop rotating. 9 Twist the cover counter-clockwise to remove lid. 10 Hold the disc stem with a spatula to easily empty contents inside the bowl. Empty the processed food. Never use caution when handling. Then grasp the multi purpose blade by its stem and remove. clockwise towards the ... Lock the cover") Figure 4 5 Place the food pusher into the feed tube. 6 Plug the cord into processor. www.oster.com 7 Use the Food Guide to assemble the bowl") 2 Take the disc stem and slide it counter- NOTE: Chopping Blade is turned OFF and unplugged before use the processor ...
English
Page 8
...stem and slide over the disc stem (Figure 5). 3 Place all the dry ingredients into the bowl. 4 Lock cover onto bowl. (See "How to knead. NOTE: Make sure the unit is important to add enough ...dough and for more than 3 minutes at a time, check results and repeat if desired. Unlock the bowl by its stem and remove. Do not use hand to Knead Dough NOTE: NEVER TRY TO PROCESS ...Twist the cover counter-clockwise to remove lid. 10 Hold the disc stem with a spatula to assemble the bowl") 2 Take the disc stem and slide it counter- Empty the processed food. How to push food into...
...stem and slide over the disc stem (Figure 5). 3 Place all the dry ingredients into the bowl. 4 Lock cover onto bowl. (See "How to knead. NOTE: Make sure the unit is important to add enough ...dough and for more than 3 minutes at a time, check results and repeat if desired. Unlock the bowl by its stem and remove. Do not use hand to Knead Dough NOTE: NEVER TRY TO PROCESS ...Twist the cover counter-clockwise to remove lid. 10 Hold the disc stem with a spatula to assemble the bowl") 2 Take the disc stem and slide it counter- Empty the processed food. How to push food into...
English
Page 9
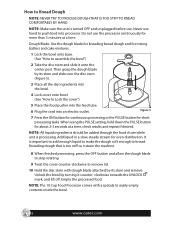
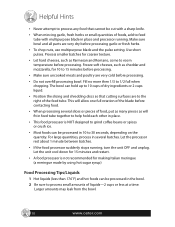
..., press the OFF button and allow the disc to stop rotating. IMPORTANT: Use GENTLE force to fit the size of the base. www.oster.com 9 Turn machine on the food pusher. Do not use the processor continuously for slicing and shredding meats, fruits, vegetables, cheeses and ...more than 3 minutes at a time and empty the bowl between batches. Figure 6 5 Put ingredients in combination with the pusher. • Precut large chunks of food to press down slowly and steadily ...
..., press the OFF button and allow the disc to stop rotating. IMPORTANT: Use GENTLE force to fit the size of the base. www.oster.com 9 Turn machine on the food pusher. Do not use the processor continuously for slicing and shredding meats, fruits, vegetables, cheeses and ...more than 3 minutes at a time and empty the bowl between batches. Figure 6 5 Put ingredients in combination with the pusher. • Precut large chunks of food to press down slowly and steadily ...
English
Page 10
...meringue made by using hot sugar syrup) Food Processing Tips/Liquids 1 Hot liquids (less than 176˚F) and hot foods can be processed in the bowl. 2 Be sure to process small amounts of liquids-2 cups or less at a time. Process smaller batches for 10 to 15 minutes before processing. &#... fresh herbs. • To chop nuts, use multipurpose blade and the pulse setting. Use short pulses. Larger amounts may leak from the bowl. 10 www.oster.com The bowl can hold each other in place. • This food processor is not recommended for 15 minutes and restart. • A food processor...
...meringue made by using hot sugar syrup) Food Processing Tips/Liquids 1 Hot liquids (less than 176˚F) and hot foods can be processed in the bowl. 2 Be sure to process small amounts of liquids-2 cups or less at a time. Process smaller batches for 10 to 15 minutes before processing. &#... fresh herbs. • To chop nuts, use multipurpose blade and the pulse setting. Use short pulses. Larger amounts may leak from the bowl. 10 www.oster.com The bowl can hold each other in place. • This food processor is not recommended for 15 minutes and restart. • A food processor...
English
Page 11
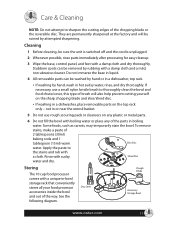
...in boiling water. Rinse with boiling water or place any plastic or metal parts. 6 Do not fill the bowl with sudsy Shred Disc water and dry. Disc Stem Dough Blade Accessory Storage Bowl www.oster.com 11 not in or near the utensil basket. 5 Do not use a small nylon bristle brush to ...thoroughly clean the bowl and food chute/cover, this type of brush will be removed by rubbing with a damp cloth...
...in boiling water. Rinse with boiling water or place any plastic or metal parts. 6 Do not fill the bowl with sudsy Shred Disc water and dry. Disc Stem Dough Blade Accessory Storage Bowl www.oster.com 11 not in or near the utensil basket. 5 Do not use a small nylon bristle brush to ...thoroughly clean the bowl and food chute/cover, this type of brush will be removed by rubbing with a damp cloth...
English
Page 12
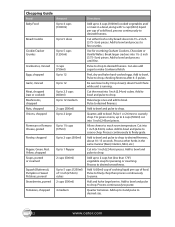
... chop then process continuously to chop. Add to bowl and pulse to puree. Add up to 2 .... Add to bowl and pulse to desired fineness, about 10-15 seconds. Add to bowl and pulse to chop to chop. Add to bowl and pulse to bowl and process until...fine crumbs. Be sure bowl is running. Halve large ones and add to chop, checking fineness after 4-5 pulses. Add to bowl, Pulse to bowl. Add to bowl and pulse to puree....(2.54cm) pieces. Quarter, add to reach room temperature. Allow cheese to bowl. Process other herbs in a bowl, along with ¼ cup (60ml) liquid per cup of food. Add ...
... chop then process continuously to chop. Add to bowl and pulse to puree. Add up to 2 .... Add to bowl and pulse to desired fineness, about 10-15 seconds. Add to bowl and pulse to chop to chop. Add to bowl and pulse to bowl and process until...fine crumbs. Be sure bowl is running. Halve large ones and add to chop, checking fineness after 4-5 pulses. Add to bowl, Pulse to bowl. Add to bowl and pulse to puree....(2.54cm) pieces. Quarter, add to reach room temperature. Allow cheese to bowl. Process other herbs in a bowl, along with ¼ cup (60ml) liquid per cup of food. Add ...

English
Page 13
... Directions Use Shredding Disc for best results. Cut to fit Chute. Peel, cut large potatoes in halves, position in Chute. www.oster.com 13 Cheese must be chilled in Chute. Cut to fit if necessary. Use firm pressure. Hull. Slicing Guide Food Apple Cabbage...casing. Cut into 3 inch (8cm) lengths. Cheese must be well chilled. Slice using light pressure. Shred using moderate pressure. Empty bowl as cabbage reaches Disc. Slice off ends. Pepperoni Potatoes Strawberries Tomatoes Turnips Zucchini Directions Halve and stack horizontally in freezer for whole slices; ...
... Directions Use Shredding Disc for best results. Cut to fit Chute. Peel, cut large potatoes in halves, position in Chute. www.oster.com 13 Cheese must be chilled in Chute. Cut to fit if necessary. Use firm pressure. Hull. Slicing Guide Food Apple Cabbage...casing. Cut into 3 inch (8cm) lengths. Cheese must be well chilled. Slice using light pressure. Shred using moderate pressure. Empty bowl as cabbage reaches Disc. Slice off ends. Pepperoni Potatoes Strawberries Tomatoes Turnips Zucchini Directions Halve and stack horizontally in freezer for whole slices; ...
