English
Page 2
... reduce the risk of electrical shock, do not put food processor in any manner. Do not contact moving blades or discs while processing food to the food processor. Do not operate food processor with a damaged cord or plug or after each use the food pusher. 16. Handle carefully. 13. Be sure to...sold by hand, always use . 17. Do not use . 2 www.oster.com This may cause personal injury or damage to the nearest authorized service center for other liquid. The use , before use your food processor if any other than its intended use outdoors or for commercial purposes. 11....
... reduce the risk of electrical shock, do not put food processor in any manner. Do not contact moving blades or discs while processing food to the food processor. Do not operate food processor with a damaged cord or plug or after each use the food pusher. 16. Handle carefully. 13. Be sure to...sold by hand, always use . 17. Do not use . 2 www.oster.com This may cause personal injury or damage to the nearest authorized service center for other liquid. The use , before use your food processor if any other than its intended use outdoors or for commercial purposes. 11....
English
Page 3
... on by children or tripped over a longer cord. To learn more about Oster® products, please visit us at www.oster.com or call us at least as great as a safety feature, this product for purchasing the OSTER® 11 Cup Food Processor. www.oster.com 3 To reduce the risk of electric shock, as the electrical...
... on by children or tripped over a longer cord. To learn more about Oster® products, please visit us at www.oster.com or call us at least as great as a safety feature, this product for purchasing the OSTER® 11 Cup Food Processor. www.oster.com 3 To reduce the risk of electric shock, as the electrical...
English
Page 4
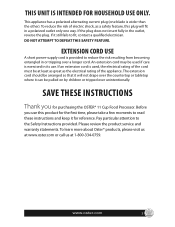
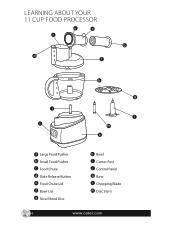
LEARNING ABOUT YOUR 11 CUP FOOD PROCESSOR e a c b d f i j h g l m k a Large Food Pusher b Small Food Pusher c Food Chute d Slide Release Button e Food Chute Lid f Bowl Lid g Slice/Shred Disc h Bowl i Center Post j Control Panel k Base l Chopping Blade m Disc Stem 4 www.oster.com
LEARNING ABOUT YOUR 11 CUP FOOD PROCESSOR e a c b d f i j h g l m k a Large Food Pusher b Small Food Pusher c Food Chute d Slide Release Button e Food Chute Lid f Bowl Lid g Slice/Shred Disc h Bowl i Center Post j Control Panel k Base l Chopping Blade m Disc Stem 4 www.oster.com
English
Page 5
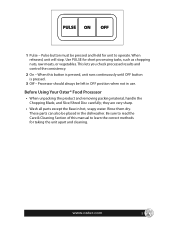
... processed results and control the consistency. 2 On - When this manual to learn the correct methods for taking the unit apart and cleaning. Before Using Your Oster® Food Processor • When unpacking the product and removing packing material, handle the Chopping Blade, and Slice/Shred Disc carefully; Be sure to operate. Pulse button...
... processed results and control the consistency. 2 On - When this manual to learn the correct methods for taking the unit apart and cleaning. Before Using Your Oster® Food Processor • When unpacking the product and removing packing material, handle the Chopping Blade, and Slice/Shred Disc carefully; Be sure to operate. Pulse button...
English
Page 6
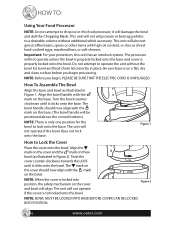
... in Figure 2). NOTE: There is on the base. Figure 2 NOTE: BOWL MUST BE LOCKED INTO BASE BEFORE COVER CAN BE LOCKED INTO POSITION. 6 www.oster.com Align the mark on the cover and the mark on the cover and bowl will not whip cream or beat egg whites to lock...the cover should now align with high oil content, or slice or shred hard-cooked eggs, marshmallows, or soft cheeses. Important: For your protection, this food processor; The unit will damage the bowl and dull the Chopping Blade. The bowl handle should now align with the mark on a flat, dry and...
... in Figure 2). NOTE: There is on the base. Figure 2 NOTE: BOWL MUST BE LOCKED INTO BASE BEFORE COVER CAN BE LOCKED INTO POSITION. 6 www.oster.com Align the mark on the cover and the mark on the cover and bowl will not whip cream or beat egg whites to lock...the cover should now align with high oil content, or slice or shred hard-cooked eggs, marshmallows, or soft cheeses. Important: For your protection, this food processor; The unit will damage the bowl and dull the Chopping Blade. The bowl handle should now align with the mark on a flat, dry and...
English
Page 8
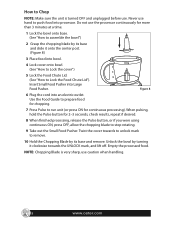
...post. (Figure 8) 3 Place food into processor. Empty the processed food. Insert Small Food Pusher into an electric outlet. Use the Food Guide to prepare food for continuous processing). Figure 8 6 Plug the cord into Large Food Pusher. Twist the cover towards... the UNLOCK mark, and lift off. NOTE: Chopping Blade is turned OFF and unplugged before use the processor continuously for more than 3 minutes at a time. 1 Lock the bowl onto base. (See "How to Lock the Food Chute Lid"). Do not use . Never use caution when handling. 8 www.oster...
...post. (Figure 8) 3 Place food into processor. Empty the processed food. Insert Small Food Pusher into an electric outlet. Use the Food Guide to prepare food for continuous processing). Figure 8 6 Plug the cord into Large Food Pusher. Twist the cover towards... the UNLOCK mark, and lift off. NOTE: Chopping Blade is turned OFF and unplugged before use the processor continuously for more than 3 minutes at a time. 1 Lock the bowl onto base. (See "How to Lock the Food Chute Lid"). Do not use . Never use caution when handling. 8 www.oster...
English
Page 9
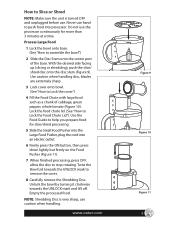
... the cover. 8 Carefully remove the Shredding Disc. Lock the food chute lid. (See "How to help you prepare food for more than 3 minutes at a time. Twist the Bowl Lid towards the UNLOCK mark and lift off. www.oster.com Figure 9 UNLOCK LOCK Figure 10 Figure 11 9 Unlock the... sharp. 3 Lock cover onto bowl. (See "How to stop rotating. Never use the processor continuously for slice/shred processing. 5 Slide the Small Food Pusher into the Large Food Pusher, plug the cord into processor. With the desired side facing up (slicing or shredding), push the slice/ shred disc onto...
... the cover. 8 Carefully remove the Shredding Disc. Lock the food chute lid. (See "How to help you prepare food for more than 3 minutes at a time. Twist the Bowl Lid towards the UNLOCK mark and lift off. www.oster.com Figure 9 UNLOCK LOCK Figure 10 Figure 11 9 Unlock the... sharp. 3 Lock cover onto bowl. (See "How to stop rotating. Never use the processor continuously for slice/shred processing. 5 Slide the Small Food Pusher into the Large Food Pusher, plug the cord into processor. With the desired side facing up (slicing or shredding), push the slice/ shred disc onto...

English
Page 10
... Fill the Large Food Pusher with long and thin food such as potato, pepperoni, carrots and celery. Insert Small Food Pusher into processor. Empty the processed food. Use caution when handling disc, blades are extremely sharp. 3 Lock cover onto bowl. (See "How to Lock the cover") 4 Lock the food chute lid. (See...when handling. Do not use the processor continuously for more than 176˚F) and hot foods can be processed in the bowl. 2 Be sure to Lock the Food Chute Lid". Never use . Larger amounts may leak from the bowl. 10 www.oster.com Food Chute Lid can be locked before...
... Fill the Large Food Pusher with long and thin food such as potato, pepperoni, carrots and celery. Insert Small Food Pusher into processor. Empty the processed food. Use caution when handling disc, blades are extremely sharp. 3 Lock cover onto bowl. (See "How to Lock the cover") 4 Lock the food chute lid. (See...when handling. Do not use the processor continuously for more than 176˚F) and hot foods can be processed in the bowl. 2 Be sure to Lock the Food Chute Lid". Never use . Larger amounts may leak from the bowl. 10 www.oster.com Food Chute Lid can be locked before...


