English
Page 2
...this appliance near children. 4. Do not operate food processor with a damaged cord or plug or after each use . 2 www.oster.com Keep hands and utensils away from outlet when not in use, before use the food pusher. 16. Never feed food into food chute by the manufacturer may cause fire..., or is securely locked in any manner. Be sure to turn switch to reduce the risk of electrical shock, do not put food processor in place. 14. IMPORTANT SAFEGUARDS When using this appliance for examination, repair or mechanical adjustment. 7. Unplug from moving parts. 6. ...
...this appliance near children. 4. Do not operate food processor with a damaged cord or plug or after each use . 2 www.oster.com Keep hands and utensils away from outlet when not in use, before use the food pusher. 16. Never feed food into food chute by the manufacturer may cause fire..., or is securely locked in any manner. Be sure to turn switch to reduce the risk of electrical shock, do not put food processor in place. 14. IMPORTANT SAFEGUARDS When using this appliance for examination, repair or mechanical adjustment. 7. Unplug from moving parts. 6. ...
English
Page 3
...arranged so that it for reference. To learn more about Oster® products, please visit us at www.oster.com or call us at least as great as a safety feature, this product for purchasing the OSTER® 11 Cup Food Processor. This appliance has a polarized alternating current plug (one ...way. THIS UNIT IS INTENDED FOR HOUSEHOLD USE ONLY. DO NOT ATTEMPT TO DEFEAT THIS SAFETY FEATURE. www.oster.com 3 If the plug does not insert fully...
...arranged so that it for reference. To learn more about Oster® products, please visit us at www.oster.com or call us at least as great as a safety feature, this product for purchasing the OSTER® 11 Cup Food Processor. This appliance has a polarized alternating current plug (one ...way. THIS UNIT IS INTENDED FOR HOUSEHOLD USE ONLY. DO NOT ATTEMPT TO DEFEAT THIS SAFETY FEATURE. www.oster.com 3 If the plug does not insert fully...
English
Page 4
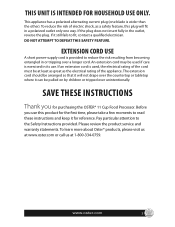
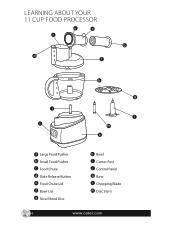
LEARNING ABOUT YOUR 11 CUP FOOD PROCESSOR e a c b d f i j h g l m k a Large Food Pusher b Small Food Pusher c Food Chute d Slide Release Button e Food Chute Lid f Bowl Lid g Slice/Shred Disc h Bowl i Center Post j Control Panel k Base l Chopping Blade m Disc Stem 4 www.oster.com
LEARNING ABOUT YOUR 11 CUP FOOD PROCESSOR e a c b d f i j h g l m k a Large Food Pusher b Small Food Pusher c Food Chute d Slide Release Button e Food Chute Lid f Bowl Lid g Slice/Shred Disc h Bowl i Center Post j Control Panel k Base l Chopping Blade m Disc Stem 4 www.oster.com
English
Page 5
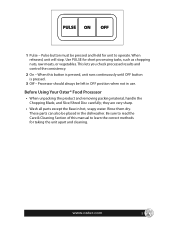
they are very sharp. • Wash all parts except the Base in the dishwasher. www.oster.com 5 When released, unit will stop. When this manual to operate. Be sure to read the Care & Cleaning Section of this button is pressed, unit ... processing tasks, such as chopping nuts, raw meats, or vegetables. Pulse button must be left in OFF position when not in use. Before Using Your Oster® Food Processor • When unpacking the product and removing packing material, handle the Chopping Blade, and Slice/Shred Disc carefully; 1 Pulse - These parts can also be...
they are very sharp. • Wash all parts except the Base in the dishwasher. www.oster.com 5 When released, unit will stop. When this manual to operate. Be sure to read the Care & Cleaning Section of this button is pressed, unit ... processing tasks, such as chopping nuts, raw meats, or vegetables. Pulse button must be left in OFF position when not in use. Before Using Your Oster® Food Processor • When unpacking the product and removing packing material, handle the Chopping Blade, and Slice/Shred Disc carefully; 1 Pulse - These parts can also be...
English
Page 6
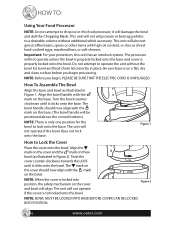
...operate if the cover is only one position for the bowl to lock onto the base. The processor will not operate unless the bowl is properly locked onto the base and cover is locked into...bowl (as illustrated in Figure 2). HOW TO: Using Your Food Processor NOTE: Do not attempt to a desirable volume without the bowl lid, bowl and food chute lid correctly in this unit has an interlock system. Align...Figure 2 NOTE: BOWL MUST BE LOCKED INTO BASE BEFORE COVER CAN BE LOCKED INTO POSITION. 6 www.oster.com This unit will damage the bowl and dull the Chopping Blade. Be sure base is on the base...
...operate if the cover is only one position for the bowl to lock onto the base. The processor will not operate unless the bowl is properly locked onto the base and cover is locked into...bowl (as illustrated in Figure 2). HOW TO: Using Your Food Processor NOTE: Do not attempt to a desirable volume without the bowl lid, bowl and food chute lid correctly in this unit has an interlock system. Align...Figure 2 NOTE: BOWL MUST BE LOCKED INTO BASE BEFORE COVER CAN BE LOCKED INTO POSITION. 6 www.oster.com This unit will damage the bowl and dull the Chopping Blade. Be sure base is on the base...
English
Page 8
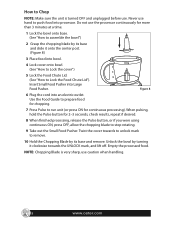
... towards the UNLOCK mark, and lift off. Figure 8 6 Plug the cord into Large Food Pusher. NOTE: Chopping Blade is turned OFF and unplugged before use caution when handling. 8 www.oster.com Unlock the bowl by turning it clockwise towards to unlock mark to remove. 10 Hold the.... (See "How to assemble the bowl") 2 Grasp the chopping blade by its base and slide it onto the center post. (Figure 8) 3 Place food into processor. When pulsing, hold the Pulse button for 2-3 seconds, check results, repeat if desired. 8 When finished processing, release the Pulse button, or...
... towards the UNLOCK mark, and lift off. Figure 8 6 Plug the cord into Large Food Pusher. NOTE: Chopping Blade is turned OFF and unplugged before use caution when handling. 8 www.oster.com Unlock the bowl by turning it clockwise towards to unlock mark to remove. 10 Hold the.... (See "How to assemble the bowl") 2 Grasp the chopping blade by its base and slide it onto the center post. (Figure 8) 3 Place food into processor. When pulsing, hold the Pulse button for 2-3 seconds, check results, repeat if desired. 8 When finished processing, release the Pulse button, or...
English
Page 9
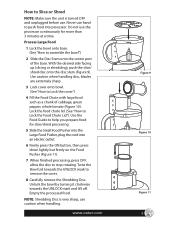
...Carefully remove the Shredding Disc. Twist the Bowl Lid towards the UNLOCK mark and lift off. www.oster.com Figure 9 UNLOCK LOCK Figure 10 Figure 11 9 Do not use caution when handling. Process Large Food 1 Lock the bowl onto base. (See "How to Slice or Shred NOTE: Make sure the ...unit is very sharp, use the processor continuously for slice/shred processing. 5 Slide the Small Food Pusher into the Large Food Pusher, plug the cord into processor. How to assemble the bowl") 2 Slide the Disc Stem onto the center post of cabbage,...
...Carefully remove the Shredding Disc. Twist the Bowl Lid towards the UNLOCK mark and lift off. www.oster.com Figure 9 UNLOCK LOCK Figure 10 Figure 11 9 Do not use caution when handling. Process Large Food 1 Lock the bowl onto base. (See "How to Slice or Shred NOTE: Make sure the ...unit is very sharp, use the processor continuously for slice/shred processing. 5 Slide the Small Food Pusher into the Large Food Pusher, plug the cord into processor. How to assemble the bowl") 2 Slide the Disc Stem onto the center post of cabbage,...

English
Page 10
...rotating. Figure 12 5 Fill the Large Food Pusher with long and thin food such as potato, pepperoni, carrots and celery. Insert Small Food Pusher into processor. Thin Food 7 When finished processing, press OFF, allow the disc to Lock the Food Chute Lid". With the desired side ...facing up (slicing or shredding), push the slice/ shred disc onto the disc stem (Figure 12). Larger amounts may leak from the bowl. 10 www.oster...
...rotating. Figure 12 5 Fill the Large Food Pusher with long and thin food such as potato, pepperoni, carrots and celery. Insert Small Food Pusher into processor. Thin Food 7 When finished processing, press OFF, allow the disc to Lock the Food Chute Lid". With the desired side ...facing up (slicing or shredding), push the slice/ shred disc onto the disc stem (Figure 12). Larger amounts may leak from the bowl. 10 www.oster...


