English
Page 4
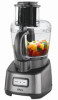
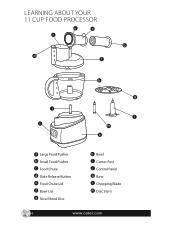
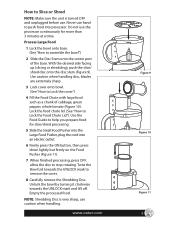
LEARNING ABOUT YOUR 11 CUP FOOD PROCESSOR e a c b d f i j h g l m k a Large Food Pusher b Small Food Pusher c Food Chute d Slide Release Button e Food Chute Lid f Bowl Lid g Slice/Shred Disc h Bowl i Center Post j Control Panel k Base l Chopping Blade m Disc Stem 4 www.oster.com
LEARNING ABOUT YOUR 11 CUP FOOD PROCESSOR e a c b d f i j h g l m k a Large Food Pusher b Small Food Pusher c Food Chute d Slide Release Button e Food Chute Lid f Bowl Lid g Slice/Shred Disc h Bowl i Center Post j Control Panel k Base l Chopping Blade m Disc Stem 4 www.oster.com
English
Page 6
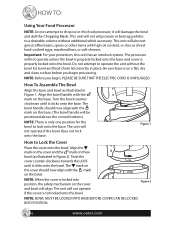
...the LOCK until it clicks onto the base. Figure 2 NOTE: BOWL MUST BE LOCKED INTO BASE BEFORE COVER CAN BE LOCKED INTO POSITION. 6 www.oster.com it clicks onto the bowl. How To Assemble The Bowl Align the base and bowl as illustrated in this unit has an interlock system. The unit will... damage the bowl and dull the Chopping Blade. UNLOCK LOCK NOTE: When the ...
...the LOCK until it clicks onto the base. Figure 2 NOTE: BOWL MUST BE LOCKED INTO BASE BEFORE COVER CAN BE LOCKED INTO POSITION. 6 www.oster.com it clicks onto the bowl. How To Assemble The Bowl Align the base and bowl as illustrated in this unit has an interlock system. The unit will... damage the bowl and dull the Chopping Blade. UNLOCK LOCK NOTE: When the ...
English
Page 8
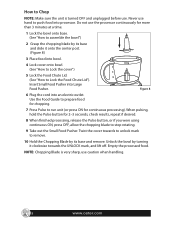
...Make sure the unit is very sharp, use caution when handling. 8 www.oster.com Never use . Unlock the bowl by its base and remove. Do not use the processor continuously for more than 3 minutes at a time. 1 Lock the bowl onto base. (See "How to stop rotating. 9 Take out the Small... 8 When finished processing, release the Pulse button, or if you were using continuous ON, press OFF, allow the chopping blade to assemble the bowl") 2 Grasp the chopping blade by turning it onto the center post. (Figure 8) 3 Place food into processor. Insert Small Food Pusher into an electric...
...Make sure the unit is very sharp, use caution when handling. 8 www.oster.com Never use . Unlock the bowl by its base and remove. Do not use the processor continuously for more than 3 minutes at a time. 1 Lock the bowl onto base. (See "How to stop rotating. 9 Take out the Small... 8 When finished processing, release the Pulse button, or if you were using continuous ON, press OFF, allow the chopping blade to assemble the bowl") 2 Grasp the chopping blade by turning it onto the center post. (Figure 8) 3 Place food into processor. Insert Small Food Pusher into an electric...
English
Page 9
...Use caution when handling disc, blades are extremely sharp. 3 Lock cover onto bowl. (See "How to assemble the bowl") 2 Slide the Disc Stem onto the center post of cabbage, green pepper, whole tomato (Figure 10). Unlock the bowl by turning it clockwise towards the UNLOCK mark to remove the cover. 8 Carefully... remove the Shredding Disc. Process Large Food 1 Lock the bowl onto base. (See "How to Lock the cover") 4 Fill the Food Chute with large food such as a chunk of the base. www.oster.com Figure 9 UNLOCK LOCK Figure 10 Figure 11 9 How to Slice or Shred ...
...Use caution when handling disc, blades are extremely sharp. 3 Lock cover onto bowl. (See "How to assemble the bowl") 2 Slide the Disc Stem onto the center post of cabbage, green pepper, whole tomato (Figure 10). Unlock the bowl by turning it clockwise towards the UNLOCK mark to remove the cover. 8 Carefully... remove the Shredding Disc. Process Large Food 1 Lock the bowl onto base. (See "How to Lock the cover") 4 Fill the Food Chute with large food such as a chunk of the base. www.oster.com Figure 9 UNLOCK LOCK Figure 10 Figure 11 9 How to Slice or Shred ...

English
Page 10
... Figure 13 NOTE: Shredding Disc is turned OFF and unplugged before locking cover onto the bowl). With the desired side facing up (slicing or shredding), push the slice/ shred disc onto the disc ... locked before use. Use caution when handling disc, blades are extremely sharp. 3 Lock cover onto bowl. (See "How to Lock the cover") 4 Lock the food chute lid. (See "How to stop rotating.... Larger amounts may leak from the bowl. 10 www.oster.com Empty the processed food. Process Long and Thin Food NOTE: Make sure the unit is very ...
... Figure 13 NOTE: Shredding Disc is turned OFF and unplugged before locking cover onto the bowl). With the desired side facing up (slicing or shredding), push the slice/ shred disc onto the disc ... locked before use. Use caution when handling disc, blades are extremely sharp. 3 Lock cover onto bowl. (See "How to Lock the cover") 4 Lock the food chute lid. (See "How to stop rotating.... Larger amounts may leak from the bowl. 10 www.oster.com Empty the processed food. Process Long and Thin Food NOTE: Make sure the unit is very ...
English
Page 11
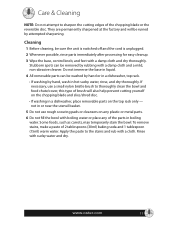
...immerse the base in hot sudsy water, rinse, and dry thoroughly. www.oster.com 11 Stubborn spots can be washed by hand or in a dishwasher, ... removable parts can be removed by attempted sharpening. Some foods, such as carrots, may temporarily stain the bowl. To remove stains, make a paste of the chopping blade or the reversible disc. They are permanently sharpened... control knob, and feet with boiling water or place any plastic or metal parts. 6 Do not fill the bowl with a damp cloth and dry thoroughly. Cleaning 1 Before cleaning, be ruined by rubbing with a damp cloth and a...
...immerse the base in hot sudsy water, rinse, and dry thoroughly. www.oster.com 11 Stubborn spots can be washed by hand or in a dishwasher, ... removable parts can be removed by attempted sharpening. Some foods, such as carrots, may temporarily stain the bowl. To remove stains, make a paste of the chopping blade or the reversible disc. They are permanently sharpened... control knob, and feet with boiling water or place any plastic or metal parts. 6 Do not fill the bowl with a damp cloth and dry thoroughly. Cleaning 1 Before cleaning, be ruined by rubbing with a damp cloth and a...
English
Page 12
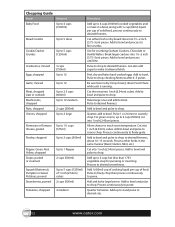
...64257;neness. Pulse to chop, checking fineness after 4-5 pulses. Process other herbs in a bowl, along with ¼ cup (60ml) liquid per cup of solid food, process continuously to desired size. 12 www.oster.com Add up to 4 and pulse to desired fineness. Break larger crackers into 1 ...inch (2.45cm) pieces. Add to bowl and pulse to chop. Add ¼ (60ml) cup of cooking liquid per cup ...
...64257;neness. Pulse to chop, checking fineness after 4-5 pulses. Process other herbs in a bowl, along with ¼ cup (60ml) liquid per cup of solid food, process continuously to desired size. 12 www.oster.com Add up to 4 and pulse to desired fineness. Break larger crackers into 1 ...inch (2.45cm) pieces. Add to bowl and pulse to chop. Add ¼ (60ml) cup of cooking liquid per cup ...
English
Page 13
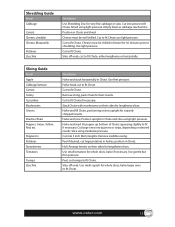
.... Cut into quarters or strips, depending on their sides for lengthwise slices. Hull. Use small tomatoes for very fine cabbage or slaw. www.oster.com 13 Empty bowl as cabbage reaches Disc. Halve and seed. Cut large ones into 3 inch (8cm) lengths. Peel, cut to fit Chute Cut to fit Chute...
.... Cut into quarters or strips, depending on their sides for lengthwise slices. Hull. Use small tomatoes for very fine cabbage or slaw. www.oster.com 13 Empty bowl as cabbage reaches Disc. Halve and seed. Cut large ones into 3 inch (8cm) lengths. Peel, cut to fit Chute Cut to fit Chute...
