

User Manual
Page 1
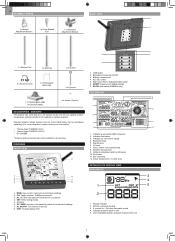
...Software updates 10 Reset ...10 Precautions ...10 Specifications ...10 About Oregon Scientific 11 EU-Declaration Of Conformity 11 FCC Statement ...11 Declaration of Conformity 11 INTRODUCTION... Center Model: WMR200 / WMR200A USER MANUAL CONTENTS Introduction...1 Packaging Contents 1 Base Station ...1 Wind Sensor / Temperature & Humidity Sensor 1 Solar Panel ...1 Rain Gauge...1 Assembly Parts ...2 Accessories - PACKAGING CONTENTS BASE STATION 1 x 6V Adapter 1 x USB Cable 4 x AA UM-3 1.5V batteries WIND SENSOR / TEMPERATURE & HUMIDITY SENSOR 1 x Wind Sensor (1 x Wind Vane Above and...
...Software updates 10 Reset ...10 Precautions ...10 Specifications ...10 About Oregon Scientific 11 EU-Declaration Of Conformity 11 FCC Statement ...11 Declaration of Conformity 11 INTRODUCTION... Center Model: WMR200 / WMR200A USER MANUAL CONTENTS Introduction...1 Packaging Contents 1 Base Station ...1 Wind Sensor / Temperature & Humidity Sensor 1 Solar Panel ...1 Rain Gauge...1 Assembly Parts ...2 Accessories - PACKAGING CONTENTS BASE STATION 1 x 6V Adapter 1 x USB Cable 4 x AA UM-3 1.5V batteries WIND SENSOR / TEMPERATURE & HUMIDITY SENSOR 1 x Wind Sensor (1 x Wind Vane Above and...
User Manual
Page 2
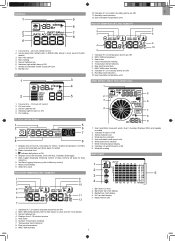
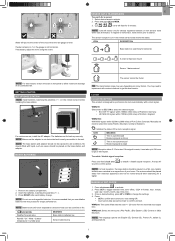
... default settings 7. Wall mount holes / Adjustable table stand 6. EU/UK slide switch (WMR200 only) LCD DISPLAY 1 2 3 USB 4 FEET M 5 6 MIN 7 1. Indicates a successful USB connection 2. Antenna 6. Battery compartment 4. UV area 7. Wind area 11. MEM: View current, maximum and minimum readings 2. Outdoor temperature and humidity ... 8. UNIT: Change display units 3 1. AC / DC socket 5. Optional wireless remote sensors such as those listed below can work with up to 10 sensors at any one time to capture outdoor temperature, relative humidity or UV readings in all ...
... default settings 7. Wall mount holes / Adjustable table stand 6. EU/UK slide switch (WMR200 only) LCD DISPLAY 1 2 3 USB 4 FEET M 5 6 MIN 7 1. Indicates a successful USB connection 2. Antenna 6. Battery compartment 4. UV area 7. Wind area 11. MEM: View current, maximum and minimum readings 2. Outdoor temperature and humidity ... 8. UNIT: Change display units 3 1. AC / DC socket 5. Optional wireless remote sensors such as those listed below can work with up to 10 sensors at any one time to capture outdoor temperature, relative humidity or UV readings in all ...
User Manual
Page 3
...Temperature trend indicators 6. UV level index 3. Radio controlled clock 3. User selectable wind speed units 6. Barometer bar chart display 3. UV bar chart display 5. Humidity trend indicators 12. Rainfall unit 1. Sensor batteries low 4. Heat index 6. Indicates HI / LO outdoor humidity alarms ...area for further details) 3. Moon phase display 8. Sensor batteries low 4. Displays Clock with seconds, Clock with day, Calendar, Data logger 5. Bar chart icon area 2. MAX / MIN humidity 3 Displays MAX wind speeds recorded 2. Rainfall bar chart display 4. Indicates...
...Temperature trend indicators 6. UV level index 3. Radio controlled clock 3. User selectable wind speed units 6. Barometer bar chart display 3. UV bar chart display 5. Humidity trend indicators 12. Rainfall unit 1. Sensor batteries low 4. Heat index 6. Indicates HI / LO outdoor humidity alarms ...area for further details) 3. Moon phase display 8. Sensor batteries low 4. Displays Clock with seconds, Clock with day, Calendar, Data logger 5. Bar chart icon area 2. MAX / MIN humidity 3 Displays MAX wind speeds recorded 2. Rainfall bar chart display 4. Indicates...
User Manual
Page 4
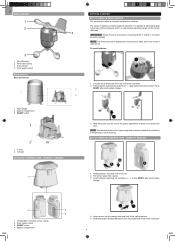
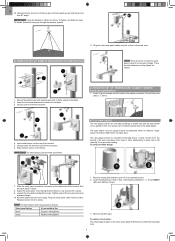
... REMOTE WIND SENSOR The wind sensor takes wind speed and direction readings. Slide wind vane onto the end of the sensor connector. 4 Pull sensor away from the wind sensor carefully. 2. Press RESET after each battery change . 1. Temperature / humidity sensor casing 2. Slide temperature and humidity sensor onto ... wirelessly within an approximate operating range of 100 meters (328 feet). 4 IMPORTANT Ensure that the wind sensor is battery and solar powered operated. Insert batteries matching the polarities (+ / -) and replace the anemometer. Funnel 2. Battery compartment 4 5...
... REMOTE WIND SENSOR The wind sensor takes wind speed and direction readings. Slide wind vane onto the end of the sensor connector. 4 Pull sensor away from the wind sensor carefully. 2. Press RESET after each battery change . 1. Temperature / humidity sensor casing 2. Slide temperature and humidity sensor onto ... wirelessly within an approximate operating range of 100 meters (328 feet). 4 IMPORTANT Ensure that the wind sensor is battery and solar powered operated. Insert batteries matching the polarities (+ / -) and replace the anemometer. Funnel 2. Battery compartment 4 5...
User Manual
Page 5
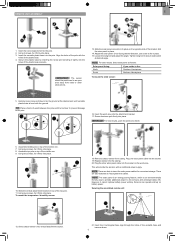
...firmly into place on the wind vane. Using two screws, fix it firmly into the socket on the opposite side of the plastic base. 4. Remove outdoor sensor from trees or other solar panel cable into place. 8. Slide outdoor sensor onto vertical attachment bracket. 21. Insert...a block of wood between the pole and the hammer to prevent damage to fix in the: Southern Hemisphere Northern Hemisphere To mount the wind sensor: 16 5. Using 2 screws, fix it cannot replace battery power entirely. Screw aluminum pole firmly into the socket. 19. ...
...firmly into place on the wind vane. Using two screws, fix it firmly into the socket on the opposite side of the plastic base. 4. Remove outdoor sensor from trees or other solar panel cable into place. 8. Slide outdoor sensor onto vertical attachment bracket. 21. Insert...a block of wood between the pole and the hammer to prevent damage to fix in the: Southern Hemisphere Northern Hemisphere To mount the wind sensor: 16 5. Using 2 screws, fix it cannot replace battery power entirely. Screw aluminum pole firmly into the socket. 19. ...
User Manual
Page 6
There are slots to insert the solar power cable for an accurate reading. Insert the horizontal attachment bracket into place. 6. Insert wind sensor into the socket on the wind vane. To set up through the fastener eyelets. 11. Remove the fibre tape. To loosen, thread the string up ...fix in an open area. To ensure a level plane: Put a few drops of water on the eye pins. ALTERNATIVE SET UP: REMOTE WIND SENSOR ON EXISTING POLE 3 1 NOTE There are also fasteners to check the horizontal level. 6 Once facing desired direction, use screw to secure solar panel...
There are slots to insert the solar power cable for an accurate reading. Insert the horizontal attachment bracket into place. 6. Insert wind sensor into the socket on the wind vane. To set up through the fastener eyelets. 11. Remove the fibre tape. To loosen, thread the string up ...fix in an open area. To ensure a level plane: Put a few drops of water on the eye pins. ALTERNATIVE SET UP: REMOTE WIND SENSOR ON EXISTING POLE 3 1 NOTE There are also fasteners to check the horizontal level. 6 Once facing desired direction, use screw to secure solar panel...
User Manual
Page 7
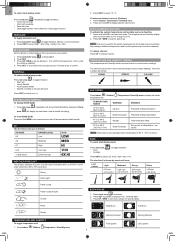
...weak, it can take up use rechargeable batteries. LOCATION Weather forecast area Rainfall / UV / Wind / Outdoor temperature / humidity area MEANING Base station batteries low Sensor batteries low The sensor cannot be exposed to wet conditions. ICON MEANING Time is synchronized Receiving signal is strong Time ..., minute, year, day / month, month, day, time zone. 3. You may vary depending on 1-4, the gauge is searching for a signal. WMR200: Slide switch to EU / UK to select time zone (Pacific, Mountain, Central or Eastern). Manually set clock to select the desired signal. ...
...weak, it can take up use rechargeable batteries. LOCATION Weather forecast area Rainfall / UV / Wind / Outdoor temperature / humidity area MEANING Base station batteries low Sensor batteries low The sensor cannot be exposed to wet conditions. ICON MEANING Time is synchronized Receiving signal is strong Time ..., minute, year, day / month, month, day, time zone. 3. You may vary depending on 1-4, the gauge is searching for a signal. WMR200: Slide switch to EU / UK to select time zone (Pacific, Mountain, Central or Eastern). Manually set clock to select the desired signal. ...
User Manual
Page 8
...1. AUTO SCANNING FUNCTION To activate the outdoor temperature and humidity auto-scan function: 1. The temperature and humidity display will display the start of icons: Lost sensor Light 0-8 mph (3-13 km/h) Moderate 9-25 mph (14-41 km/h) Strong 26-54 mph (42-87 km/h) Storm >55 mph (>88 km/h)...date. 3. with year • Data logger (please refer to Memory / Data logger section) PRESSURE To toggle barometer unit: 1. The wind level is used for each sensor. To reset SINCE DATE: Press and hold CH to set the altitude in . Press and hold MEM to activate auto-scan. TEMPERATURE ...
...1. AUTO SCANNING FUNCTION To activate the outdoor temperature and humidity auto-scan function: 1. The temperature and humidity display will display the start of icons: Lost sensor Light 0-8 mph (3-13 km/h) Moderate 9-25 mph (14-41 km/h) Strong 26-54 mph (42-87 km/h) Storm >55 mph (>88 km/h)...date. 3. with year • Data logger (please refer to Memory / Data logger section) PRESSURE To toggle barometer unit: 1. The wind level is used for each sensor. To reset SINCE DATE: Press and hold CH to set the altitude in . Press and hold MEM to activate auto-scan. TEMPERATURE ...
User Manual
Page 9
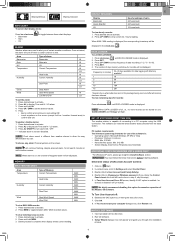
... area records: 1. HOURLY RECORDS Display Barometer Hourly Rainfall UV Hourly readings of Memory Current Temperature Heat Index Humidity Current Humidity Dew Point Wind Gust Wind Speed Wind Chill MAX MIN MAX MIN MAX MIN MAX MIN MAX MIN To view MAX / MIN records: 1. PC system requirements The minimum ...been cleared. To view remaining days for data logging with Memory available* 19 38 97 194 291 * based only on Start. 2. Click on all provided sensors in minutes 1 2 5 10 15 No. In Turn User Account On or Off screen, identify if UAC option is on (ticked) or disabled / ...
... area records: 1. HOURLY RECORDS Display Barometer Hourly Rainfall UV Hourly readings of Memory Current Temperature Heat Index Humidity Current Humidity Dew Point Wind Gust Wind Speed Wind Chill MAX MIN MAX MIN MAX MIN MAX MIN MAX MIN To view MAX / MIN records: 1. PC system requirements The minimum ...been cleared. To view remaining days for data logging with Memory available* 19 38 97 194 291 * based only on Start. 2. Click on all provided sensors in minutes 1 2 5 10 15 No. In Turn User Account On or Off screen, identify if UAC option is on (ticked) or disabled / ...
User Manual
Page 11
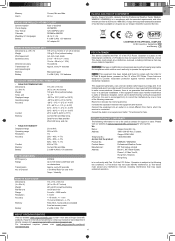
...equipment off and on request via our Oregon Scientific Customer Service. Operation is in 5 languages (E, G, F, I, S) Battery 4 x UM-3 (AA) 1.5V batteries AC adapter 6V REMOTE WIND SENSOR UNIT Dimensions (L x W x H)... Dimensions (L x W x H) Weight Temp. If this Professional Weather Center (Models: WMR200 / WMR200A) is subject to contact our Customer Care department directly, please visit: www2... hourly and accumulated from last memory reset 2 x UM-3 (AA) 1.5V ABOUT OREGON SCIENTIFIC Visit our website (www.oregonscientific.com) to Part 15 of the following two ...
...equipment off and on request via our Oregon Scientific Customer Service. Operation is in 5 languages (E, G, F, I, S) Battery 4 x UM-3 (AA) 1.5V batteries AC adapter 6V REMOTE WIND SENSOR UNIT Dimensions (L x W x H)... Dimensions (L x W x H) Weight Temp. If this Professional Weather Center (Models: WMR200 / WMR200A) is subject to contact our Customer Care department directly, please visit: www2... hourly and accumulated from last memory reset 2 x UM-3 (AA) 1.5V ABOUT OREGON SCIENTIFIC Visit our website (www.oregonscientific.com) to Part 15 of the following two ...


