
User Manual
Page 1
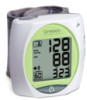
Talking Wrist Type Blood Pressure Monitor Model: BPW810 User Manual
Talking Wrist Type Blood Pressure Monitor Model: BPW810 User Manual
User Manual
Page 2
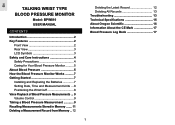
EN TALKING WRIST TYPE BLOOD PRESSURE MONITOR Model: BPW810 USER MANUAL CONTENTS Introduction 2 Key Features 2 Front View 2 Rear View 3 LCD Symbols 3 Safety and Care Instructions 4 Safety Precautions 4 Caring for Your Blood Pressure Monitor .......... 5 About ... Stored in Memory ....... 11 Deleting a Measurement Record from Memory .. 12 Deleting the Latest Record 12 Deleting All Records 13 Troubleshooting 13 Technical Specifications 15 About Oregon Scientific 16 Information About the CE Mark 17 Blood Pressure Log Book 17 1
EN TALKING WRIST TYPE BLOOD PRESSURE MONITOR Model: BPW810 USER MANUAL CONTENTS Introduction 2 Key Features 2 Front View 2 Rear View 3 LCD Symbols 3 Safety and Care Instructions 4 Safety Precautions 4 Caring for Your Blood Pressure Monitor .......... 5 About ... Stored in Memory ....... 11 Deleting a Measurement Record from Memory .. 12 Deleting the Latest Record 12 Deleting All Records 13 Troubleshooting 13 Technical Specifications 15 About Oregon Scientific 16 Information About the CE Mark 17 Blood Pressure Log Book 17 1
User Manual
Page 3
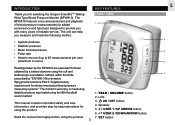
... voice announcement and playback of up to 60 measurements per user (maximum 2 users) 6 Readings taken by the BPW810 are equivalent to provide you for selecting the Oregon ScientificTM Talking Wrist Type Blood Pressure Monitor (BPW810). USER 1 / UP ARROW button 6. SET button 2 ON / OFF button 4. USER 2 / DOWN ARROW button Read the manual thoroughly before...
... voice announcement and playback of up to 60 measurements per user (maximum 2 users) 6 Readings taken by the BPW810 are equivalent to provide you for selecting the Oregon ScientificTM Talking Wrist Type Blood Pressure Monitor (BPW810). USER 1 / UP ARROW button 6. SET button 2 ON / OFF button 4. USER 2 / DOWN ARROW button Read the manual thoroughly before...
User Manual
Page 4
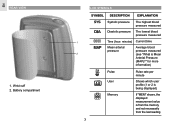
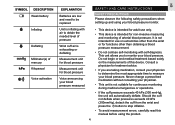
EN REAR VIEW 1. Wrist cuff 2. for more information) Pulse User Pulse rate per minute Shows which user profile (1 or 2 is being displayed) Memory If "MEM" shows, the displayed measurement value is Mean Arterial Pressure (MAP)?" Battery compartment LCD SYMBOLS SYMBOL DESCRIPTION EXPLANATION Systolic pressure The highest blood pressure measured Diastolic pressure The lowest blood pressure measured 1 Time (hour: minutes) Current time Mean arterial Average blood pressure pressure measured 2 (see "What is from the memory and not necessarily from the last reading 3
EN REAR VIEW 1. Wrist cuff 2. for more information) Pulse User Pulse rate per minute Shows which user profile (1 or 2 is being displayed) Memory If "MEM" shows, the displayed measurement value is Mean Arterial Pressure (MAP)?" Battery compartment LCD SYMBOLS SYMBOL DESCRIPTION EXPLANATION Systolic pressure The highest blood pressure measured Diastolic pressure The lowest blood pressure measured 1 Time (hour: minutes) Current time Mean arterial Average blood pressure pressure measured 2 (see "What is from the memory and not necessarily from the last reading 3
User Manual
Page 5
Unit is intended for functions other than obtaining a blood pressure measurement. • Do not confuse self-monitoring with air to stop inflation. • To avoid measurement errors, carefully read this device. Do not begin or end medical treatment based solely on extremities other than the wrist or for non-invasive measuring and monitoring of arterial blood pressure. Should the cuff not deflate when pressures exceeds 40 kPa (300mmHg), detach the cuff from the wrist and press the button to obtain the needed level of pressure Wrist cuff air is exhausting or deflating ...
Unit is intended for functions other than obtaining a blood pressure measurement. • Do not confuse self-monitoring with air to stop inflation. • To avoid measurement errors, carefully read this device. Do not begin or end medical treatment based solely on extremities other than the wrist or for non-invasive measuring and monitoring of arterial blood pressure. Should the cuff not deflate when pressures exceeds 40 kPa (300mmHg), detach the cuff from the wrist and press the button to obtain the needed level of pressure Wrist cuff air is exhausting or deflating ...
User Manual
Page 6
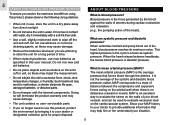
Doing so will terminate the product warranty and may cause damage. • The unit contains no distension outward or inward. When the heart relaxes between the compressive and expansive forces acting on the walls of your blood vessels, and can be used to provide additional information that forces blood through the arteries. MAP is an excellent way to evaluate the stress on the arterial wall when there is no user- What are planning to your dealer or designated collection point for a long period of time. • When replacing batteries, use new batteries as specified in ...
Doing so will terminate the product warranty and may cause damage. • The unit contains no distension outward or inward. When the heart relaxes between the compressive and expansive forces acting on the walls of your blood vessels, and can be used to provide additional information that forces blood through the arteries. MAP is an excellent way to evaluate the stress on the arterial wall when there is no user- What are planning to your dealer or designated collection point for a long period of time. • When replacing batteries, use new batteries as specified in ...
User Manual
Page 7
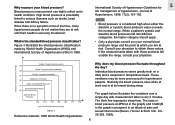
NOTE • Blood pressure is the standard blood pressure classification? Grade 3 hypertension(severe) 110 Grade 2 hypertension(moderate) 100 95 Grade 1 hypertension(mild) Subgroup: borderline 90 High-normal Blood Pressure 85 Normal Blood Pressure 80 Optimal Blood Pressure 120 130 140 150 160 170 180 sys tolic blood preesure(mmHg) Figure 3 Reference material: 1999 World Health Organization- Individual blood pressure varies greatly both on a daily and a seasonal or temperature basis. Diastolic blood pressure (mmHg) EN Why measure your physician. What is considered high...
NOTE • Blood pressure is the standard blood pressure classification? Grade 3 hypertension(severe) 110 Grade 2 hypertension(moderate) 100 95 Grade 1 hypertension(mild) Subgroup: borderline 90 High-normal Blood Pressure 85 Normal Blood Pressure 80 Optimal Blood Pressure 120 130 140 150 160 170 180 sys tolic blood preesure(mmHg) Figure 3 Reference material: 1999 World Health Organization- Individual blood pressure varies greatly both on a daily and a seasonal or temperature basis. Diastolic blood pressure (mmHg) EN Why measure your physician. What is considered high...
User Manual
Page 8
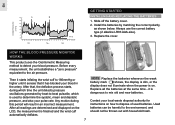
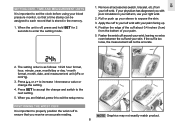
HOW THE BLOOD PRESSURE MONITOR WORKS This product uses the Oscillometric Measuring method to 180mmHg or higher until it senses that , the deflation process starts, during this period will result in the artery. Then it is dangerous to mix old and new batteries. After that it has blocked your pulse rate. Used batteries can be thrown out with household trash. 7 EN GETTING STARTED INSTALLING AND REPLACING THE BATTERIES 1. Replace the cover. NOTE Replace the batteries whenever the weak battery mark shows, the display is dim, or the display does not illuminate when the ...
HOW THE BLOOD PRESSURE MONITOR WORKS This product uses the Oscillometric Measuring method to 180mmHg or higher until it senses that , the deflation process starts, during this period will result in the artery. Then it is dangerous to mix old and new batteries. After that it has blocked your pulse rate. Used batteries can be thrown out with household trash. 7 EN GETTING STARTED INSTALLING AND REPLACING THE BATTERIES 1. Replace the cover. NOTE Replace the batteries whenever the weak battery mark shows, the display is dim, or the display does not illuminate when the ...
User Manual
Page 9
Position the edge of your skin. Fasten the wrist cuff around your wrist, leaving no extra room between the cuff and your palm. 5. Press or to exit the setup menu. When the unit is as follows: 12/24 hour format, hour, minute, year, month/day or day / month format, month, date, and measurement unit (kPa or mmHg). 3. The setting order is off, press and hold SET for 2 seconds to enter the setting mode. 1. POSITIONING THE WRIST CUFF It is too loose, the measurement will not be assigned to each record that you with your sleeve to expose the skin. 3. When you are finished, ...
Position the edge of your skin. Fasten the wrist cuff around your wrist, leaving no extra room between the cuff and your palm. 5. Press or to exit the setup menu. When the unit is as follows: 12/24 hour format, hour, minute, year, month/day or day / month format, month, date, and measurement unit (kPa or mmHg). 3. The setting order is off, press and hold SET for 2 seconds to enter the setting mode. 1. POSITIONING THE WRIST CUFF It is too loose, the measurement will not be assigned to each record that you with your sleeve to expose the skin. 3. When you are finished, ...
User Manual
Page 10
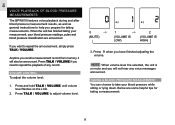
... can choose to repeat the announcement, simply press TALK / VOLUME. VOLUME CONTROL To adjust the volume level: 1. EN VOICE PLAYBACK OF BLOOD PRESSURE MEASUREMENTS The BPW810 features voice playback during and after blood pressure measurement results, as well as general instructions to help you prepare for taking a measurement: 9
... can choose to repeat the announcement, simply press TALK / VOLUME. VOLUME CONTROL To adjust the volume level: 1. EN VOICE PLAYBACK OF BLOOD PRESSURE MEASUREMENTS The BPW810 features voice playback during and after blood pressure measurement results, as well as general instructions to help you prepare for taking a measurement: 9
User Manual
Page 11
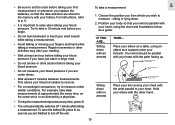
This allows your blood circulation to recover. • For a meaningful comparison, try to measure under your forearm. Sitting down with the wrist parallel to your heart. To save the battery life, press as soon as a guide. Choose the position you from which you begin. • Do not lean backward or bend your wrist inward while taking a measurement. • Avoid talking or moving your fingers and hand while taking a measurement. Sitting down . 2. Try to take a 15-minute rest before you wish to measure - Position your body so that the date and time are finished to...
This allows your blood circulation to recover. • For a meaningful comparison, try to measure under your forearm. Sitting down with the wrist parallel to your heart. To save the battery life, press as soon as a guide. Choose the position you from which you begin. • Do not lean backward or bend your wrist inward while taking a measurement. • Avoid talking or moving your fingers and hand while taking a measurement. Sitting down . 2. Try to take a 15-minute rest before you wish to measure - Position your body so that the date and time are finished to...
User Manual
Page 12
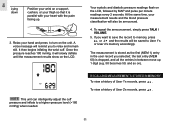
Relax your measurement results and the blood pressure classification will remind you to relax and remain still. Once the pressure reaches 180 mmHg, it is parallel with your heart with the palm facing up 1 digit (e.g. 58 becomes 59, and so on the LCD, followed by MAP and pulse per minute readings every 2 seconds. NOTE This unit can intelligently adjust the cuff pressure and inflate to User 1's or User 2's memory accordingly. Your systolic and diastolic pressure readings flash on ). To repeat the announcement, simply press TALK / VOLUME. 5. the last entry (MEM 60) is stored as the ...
Relax your measurement results and the blood pressure classification will remind you to relax and remain still. Once the pressure reaches 180 mmHg, it is parallel with your heart with the palm facing up 1 digit (e.g. 58 becomes 59, and so on the LCD, followed by MAP and pulse per minute readings every 2 seconds. NOTE This unit can intelligently adjust the cuff pressure and inflate to User 1's or User 2's memory accordingly. Your systolic and diastolic pressure readings flash on ). To repeat the announcement, simply press TALK / VOLUME. 5. the last entry (MEM 60) is stored as the ...

User Manual
Page 13
After you decide to abort the delete action instead, press to go back to the main screen. DELETING A MEASUREMENT RECORD FROM MEMORY You have the option of measurement are shown with each record. • Memory records will be recorded again. 4. This is dropped from the list. • Press the corresponding user button again ( or ) to be kept even when the batteries become exhausted and are replaced. 3. Press or to the first (1) record. All other records are pushed back one digit (e.g., 2 becomes 3, and so on), and the last record (60) is useful if measurements have confirmed ...
After you decide to abort the delete action instead, press to go back to the main screen. DELETING A MEASUREMENT RECORD FROM MEMORY You have the option of measurement are shown with each record. • Memory records will be recorded again. 4. This is dropped from the list. • Press the corresponding user button again ( or ) to be kept even when the batteries become exhausted and are replaced. 3. Press or to the first (1) record. All other records are pushed back one digit (e.g., 2 becomes 3, and so on), and the last record (60) is useful if measurements have confirmed ...
User Manual
Page 14
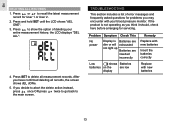
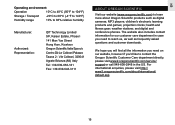
the LCD displays "DEL ALL". 4. Press or to delete all records, the screen shows dEL dONe. 5. If the product is Batteries are dim or will exhausted not light up Batteries are inserted incorrectly Low shows Batteries batteries on the are low display Remedy Replace with new batteries Insert the batteries correctly Replace with your entire measurement history; Press and hold SET until the LCD shows "dEL ONE". 3. Press SET to recall the latest measurement record for User 1 or User 2. 2. If you decide to abort the delete action instead, press once OR press twice to go ...
the LCD displays "DEL ALL". 4. Press or to delete all records, the screen shows dEL dONe. 5. If the product is Batteries are dim or will exhausted not light up Batteries are inserted incorrectly Low shows Batteries batteries on the are low display Remedy Replace with new batteries Insert the batteries correctly Replace with your entire measurement history; Press and hold SET until the LCD shows "dEL ONE". 3. Press SET to recall the latest measurement record for User 1 or User 2. 2. If you decide to abort the delete action instead, press once OR press twice to go ...

User Manual
Page 15
Relax for a moment and then measure again Movement can affect the measurement. Relax for a moment and then measure again Relax for a moment and then measure again Problem Symptom Check This Remedy Error message Err 7 or 8 shows on the display A calibration error occurred Retake the measurement. Refer to the warranty for further assistance. EN Problem Symptom Check This Error message Err shows on the display Pressure is over 37.3 kPa (280 mmHg) Deflation period was not unit set or reset after installing new batteries 14 If the problem persists, contact the retailer...
Relax for a moment and then measure again Movement can affect the measurement. Relax for a moment and then measure again Relax for a moment and then measure again Problem Symptom Check This Remedy Error message Err 7 or 8 shows on the display A calibration error occurred Retake the measurement. Refer to the warranty for further assistance. EN Problem Symptom Check This Error message Err shows on the display Pressure is over 37.3 kPa (280 mmHg) Deflation period was not unit set or reset after installing new batteries 14 If the problem persists, contact the retailer...

User Manual
Page 16
Press or to save Classification of protection against electric shock: Classification of protection against ingress of water: Classification of non-activity Internally powered equipment, type BF applied part IPX0 continuous operation EN Problem Symptom Check This Remedy No user Cannot memory find a record The memory was stored to the wrong user memory Press to view User 1's record. Press to view User 2's record Pulse Accuracy: Pressure Pulse TECHNICAL SPECIFICATIONS Application: Measuring method Application Measurement location Memory Maximum number of users Oscillometric / ...
Press or to save Classification of protection against electric shock: Classification of protection against ingress of water: Classification of non-activity Internally powered equipment, type BF applied part IPX0 continuous operation EN Problem Symptom Check This Remedy No user Cannot memory find a record The memory was stored to the wrong user memory Press to view User 1's record. Press to view User 2's record Pulse Accuracy: Pressure Pulse TECHNICAL SPECIFICATIONS Application: Measuring method Application Measurement location Memory Maximum number of users Oscillometric / ...
User Manual
Page 17
... customer care department in the US. projection clocks; For international enquiries, please visit http:// www2.oregonscientific.com/about Oregon Scientific products such as frequently asked questions and customer downloads. EN Operating environment: Operation 10°C to 40°C ...relative humidity Manufacturer: Authorized: Representative: IDT Technology Limited 9/F, Kaiser Estate, Phase I 141 Man Yue Street Hung Hom, Kowloon Oregon Scientific Italia Spa c/o Centro Dir.Le Colleoni Palazzo Taurus 2 - weather stations; children's electronic learning products and games; We hope...
... customer care department in the US. projection clocks; For international enquiries, please visit http:// www2.oregonscientific.com/about Oregon Scientific products such as frequently asked questions and customer downloads. EN Operating environment: Operation 10°C to 40°C ...relative humidity Manufacturer: Authorized: Representative: IDT Technology Limited 9/F, Kaiser Estate, Phase I 141 Man Yue Street Hung Hom, Kowloon Oregon Scientific Italia Spa c/o Centro Dir.Le Colleoni Palazzo Taurus 2 - weather stations; children's electronic learning products and games; We hope...
User Manual
Page 18
The CE mark further indicates that this device is used for industrial or commercial purposes. BLOOD PRESSURE LOG BOOK To create a log of your blood pressure history, complete the personal information section at the top, then enter the details (date, time, and measurements) for each measurement falls on the Medical Products Code, and bears the CE mark "CE0123". Malfunctioning may however occur in compliance to mark the points where each reading you take. EN INFORMATION ABOUT THE CE MARK This device complies with the "Ordinance for Operators of Medical Products", a technical ...
The CE mark further indicates that this device is used for industrial or commercial purposes. BLOOD PRESSURE LOG BOOK To create a log of your blood pressure history, complete the personal information section at the top, then enter the details (date, time, and measurements) for each measurement falls on the Medical Products Code, and bears the CE mark "CE0123". Malfunctioning may however occur in compliance to mark the points where each reading you take. EN INFORMATION ABOUT THE CE MARK This device complies with the "Ordinance for Operators of Medical Products", a technical ...