User Guide
Page 2
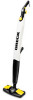
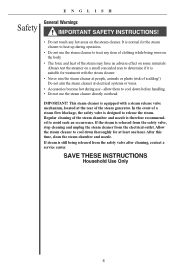
... 8 Carpet Pile Rejuvenation 8 Hard Floor Cleaning 8 Attaching an Accessory 8 Maintenance 10 After Each Use 10 Cleaning the Steam Generator 10 Unblocking the Steam Outlet 10 Cleaning the Cloth 10 Troubleshooting 11 Warranty 12 Enjoy Thank You for purchasing an Oreck Steam-It™ All Purpose Steam Wand! At Oreck, we offer different customer service options to our...
... 8 Carpet Pile Rejuvenation 8 Hard Floor Cleaning 8 Attaching an Accessory 8 Maintenance 10 After Each Use 10 Cleaning the Steam Generator 10 Unblocking the Steam Outlet 10 Cleaning the Cloth 10 Troubleshooting 11 Warranty 12 Enjoy Thank You for purchasing an Oreck Steam-It™ All Purpose Steam Wand! At Oreck, we offer different customer service options to our...
User Guide
Page 4
... to cool down thoroughly for treatment with a steam release valve mechanism, located at electrical systems or wires. • Accessories become hot during operation. • Do not use the steam cleaner to release the steam. If steam is equipped with the steam cleaner. • Never aim the steam cleaner at people, animals or plants (risk of scalding!) Do...
... to cool down thoroughly for treatment with a steam release valve mechanism, located at electrical systems or wires. • Accessories become hot during operation. • Do not use the steam cleaner to release the steam. If steam is equipped with the steam cleaner. • Never aim the steam cleaner at people, animals or plants (risk of scalding!) Do...
User Guide
Page 5
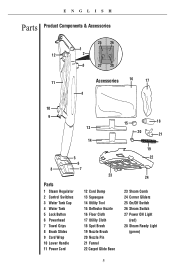
ENGLISH Parts Product Components & Accessories 25 26 1 12 2 3 27 28 11 Accessories 16 17 4 10 9 13 14 5 6 8 7 23 Parts 1 Steam Regulator 2 Control Switches 3 Water Tank Cap 4 Water Tank 5 Lock Button 6 Powerhead 7 Towel Grips 8 Brush Slides 9 Cord Wrap 10 Lower Handle 11 Power Cord 12 Cord ... Utility Cloth 18 Spot Brush 19 Nozzle Brush 20 Nozzle Pin 21 Funnel 22 Carpet Glide Base 15 18 20 21 19 22 24 23 Steam Comb 24 Corner Gliders 25 On/Off Switch 26...
ENGLISH Parts Product Components & Accessories 25 26 1 12 2 3 27 28 11 Accessories 16 17 4 10 9 13 14 5 6 8 7 23 Parts 1 Steam Regulator 2 Control Switches 3 Water Tank Cap 4 Water Tank 5 Lock Button 6 Powerhead 7 Towel Grips 8 Brush Slides 9 Cord Wrap 10 Lower Handle 11 Power Cord 12 Cord ... Utility Cloth 18 Spot Brush 19 Nozzle Brush 20 Nozzle Pin 21 Funnel 22 Carpet Glide Base 15 18 20 21 19 22 24 23 Steam Comb 24 Corner Gliders 25 On/Off Switch 26...

User Guide
Page 6
...Turn the steam switch on . 5. Replace the cap securely. 2. Insert the power plug into place. 2. Press the ON/OFF switch located on the handle to the "ON" position. Press the steam switch to switch the steam cleaner on the main body of the other cleaning accessories. Turn the steam regulator control ...to maximum and point the steam nozzle towards a cloth or sink for approximately 10 - 15 seconds, to...
...Turn the steam switch on . 5. Replace the cap securely. 2. Insert the power plug into place. 2. Press the ON/OFF switch located on the handle to the "ON" position. Press the steam switch to switch the steam cleaner on the main body of the other cleaning accessories. Turn the steam regulator control ...to maximum and point the steam nozzle towards a cloth or sink for approximately 10 - 15 seconds, to...
User Guide
Page 8
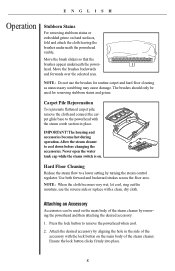
...hard surfaces, fold and attach the cloth leaving the brushes underneath the powerhead visible. Attaching an Accessory Accessories can be used on the main body of the steam cleaner by turning the steam control regulator. Ensure the lock button clicks firmly into place. 8 NOTE: Do not use the... over the selected area. Hard Floor Cleaning Reduce the steam flow to the powerhead with the steam comb section in the side of the accessory with a clean, dry cloth. The housing and accessories become hot during operation.Allow the steam cleaner to remove the powerhead when cool. 2. Carpet ...
...hard surfaces, fold and attach the cloth leaving the brushes underneath the powerhead visible. Attaching an Accessory Accessories can be used on the main body of the steam cleaner by turning the steam control regulator. Ensure the lock button clicks firmly into place. 8 NOTE: Do not use the... over the selected area. Hard Floor Cleaning Reduce the steam flow to the powerhead with the steam comb section in the side of the accessory with a clean, dry cloth. The housing and accessories become hot during operation.Allow the steam cleaner to remove the powerhead when cool. 2. Carpet ...