User Manual
Page 1
...Connecting the Projector 13 Connect to Computer/Notebook......... 13 Connect to Video Sources 14 Connect to 3D Video Devices............15 Using the 3D glasses 17 Powering On/Off the Projector..........18 Powering On the Projector 18 Powering off the projector 19 Warning Indicator 20 Adjusting the Projected ...60 RS232 Commands and Protocol Function List 62 RS232 Pin Assignments 62 RS232 Protocol Function List 63 Ceiling Mount Installation 67 Optoma Global Offices 68 Regulation & Safety Notices 70 FCC Notice 70 Declaration of Conformity for EU countries 71 Trademarks 72 1 English
...Connecting the Projector 13 Connect to Computer/Notebook......... 13 Connect to Video Sources 14 Connect to 3D Video Devices............15 Using the 3D glasses 17 Powering On/Off the Projector..........18 Powering On the Projector 18 Powering off the projector 19 Warning Indicator 20 Adjusting the Projected ...60 RS232 Commands and Protocol Function List 62 RS232 Pin Assignments 62 RS232 Protocol Function List 63 Ceiling Mount Installation 67 Optoma Global Offices 68 Regulation & Safety Notices 70 FCC Notice 70 Declaration of Conformity for EU countries 71 Trademarks 72 1 English
User Manual
Page 5
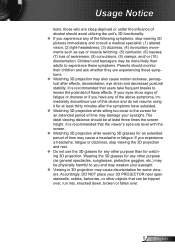
... decreased postural stability. It is recommended that the viewer's eyes are level with the screen. ™™ Watching 3D projection while wearing 3D glasses for watching 3D projection. Accordingly, DO NOT place your eyesight. If you experience a headache, fatigue or dizziness, stop viewing 3D pictures immediately ... and do not resume using it for at least three times the screen height. Wearing the 3D glasses for any of the above symptoms, immediately discontinue use the 3D glasses for any of the following symptoms, stop viewing the 3D projection and rest. ™™ Do...
... decreased postural stability. It is recommended that the viewer's eyes are level with the screen. ™™ Watching 3D projection while wearing 3D glasses for watching 3D projection. Accordingly, DO NOT place your eyesight. If you experience a headache, fatigue or dizziness, stop viewing 3D pictures immediately ... and do not resume using it for at least three times the screen height. Wearing the 3D glasses for any of the above symptoms, immediately discontinue use the 3D glasses for any of the following symptoms, stop viewing the 3D projection and rest. ™™ Do...
User Manual
Page 13
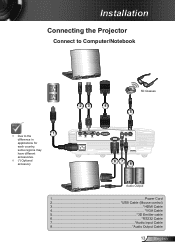
Installation Connecting the Projector Connect to Computer/Notebook 1 ™™ Due to the difference in applications for each country, some regions may have different accessories. ™™ (*) Optional accessory E62405SP R MOLEX 23 4 3D Glasses 5 molex VIDEO VGA-IN/YPbPr/ MOUSE/ SERVICE HDMI 1 HDMI 2 AUDIO1-IN (VGA) 3D SYNC Out(5V) RS-232C AUDIO OUT AUDIO2-IN (VIDEO) 67 8 Audio Output 1...Power Cord 2 USB Cable (Mouse control) 3 HDMI Cable 4 VGA Cable 5 3D Emitter cable 6 RS232 Cable 7 Audio Input Cable 8 Audio Output Cable 13 English
Installation Connecting the Projector Connect to Computer/Notebook 1 ™™ Due to the difference in applications for each country, some regions may have different accessories. ™™ (*) Optional accessory E62405SP R MOLEX 23 4 3D Glasses 5 molex VIDEO VGA-IN/YPbPr/ MOUSE/ SERVICE HDMI 1 HDMI 2 AUDIO1-IN (VGA) 3D SYNC Out(5V) RS-232C AUDIO OUT AUDIO2-IN (VIDEO) 67 8 Audio Output 1...Power Cord 2 USB Cable (Mouse control) 3 HDMI Cable 4 VGA Cable 5 3D Emitter cable 6 RS232 Cable 7 Audio Input Cable 8 Audio Output Cable 13 English
User Manual
Page 14
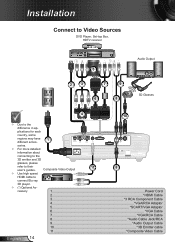
... SYNC Out(5V) RS-232C AUDIO OUT AUDIO2-IN (VIDEO) R ™™ For more detailed E62405SP information about connecting to the 3D emitter and 3D glasses, please refer to connect Blu-ray 3D player. ™™ (*) Optional Ac- Composite Video Output 11 8 ™™ Use high speed HDMI cable to their... user's guides. Installation Connect to Video Sources DVD Player, Set-top Box, HDTV receiver 5 2 3 7 9 6 8 Audio Output 3D Glasses 4 10 ™™ Due to the difference in ap-
... SYNC Out(5V) RS-232C AUDIO OUT AUDIO2-IN (VIDEO) R ™™ For more detailed E62405SP information about connecting to the 3D emitter and 3D glasses, please refer to connect Blu-ray 3D player. ™™ (*) Optional Ac- Composite Video Output 11 8 ™™ Use high speed HDMI cable to their... user's guides. Installation Connect to Video Sources DVD Player, Set-top Box, HDTV receiver 5 2 3 7 9 6 8 Audio Output 3D Glasses 4 10 ™™ Due to the difference in ap-
User Manual
Page 15
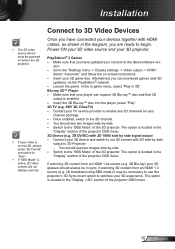
... 3D projector. yy You should see two images side-by -side. If watching 3D content from an HDMI 1.4a source (e.g. 3D Blu-ray) your 3D glasses should see two images side-by -side. Power ON your 3D video source and your 3D game disc. You should always be in 3D". yy...
... 3D projector. yy You should see two images side-by -side. If watching 3D content from an HDMI 1.4a source (e.g. 3D Blu-ray) your 3D glasses should see two images side-by -side. Power ON your 3D video source and your 3D game disc. You should always be in 3D". yy...

User Manual
Page 16
Installation 3D Broadcast 3D Blu-ray™ Disc 3D Console Games SKY+HD, cable/satellite box 3D Blu-ray™ Player PlayStation® 3 POWER SOURCE 3D Glasses Full 3D 1080p DLP® Projector English 16
Installation 3D Broadcast 3D Blu-ray™ Disc 3D Console Games SKY+HD, cable/satellite box 3D Blu-ray™ Player PlayStation® 3 POWER SOURCE 3D Glasses Full 3D 1080p DLP® Projector English 16
User Manual
Page 17
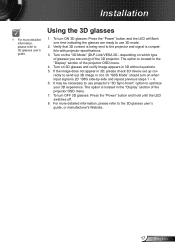
... is compatible with projector specifications. 3. The option is located in 3D without eyestrain. 5. If the image does not appear in the "Display" section of glasses you are ready to use projector's "3D Sync-Invert" option to optimize your 3D experience. Or "SBS Mode" should turn OFF 3D...may be necessary to use 3D mode. 2. To turn on the "3D Mode" (DLP-Link/VESA 3D - For more detailed information, please refer to 3D glasses user's guide. Verify that 3D content is being sent to the projector and signal is 2D 1080i side-by-side and repeat previous steps 1 ~ 4. 6. ...
... is compatible with projector specifications. 3. The option is located in 3D without eyestrain. 5. If the image does not appear in the "Display" section of glasses you are ready to use projector's "3D Sync-Invert" option to optimize your 3D experience. Or "SBS Mode" should turn OFF 3D...may be necessary to use 3D mode. 2. To turn on the "3D Mode" (DLP-Link/VESA 3D - For more detailed information, please refer to 3D glasses user's guide. Verify that 3D content is being sent to the projector and signal is 2D 1080i side-by-side and repeat previous steps 1 ~ 4. 6. ...
User Manual
Page 43
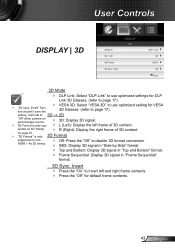
...;™ "3D Format" is only sup- `` 3D: Display 3D signal. `` L (Left): Display the left and right frame contents. `` Press the "Off" for DLP Link 3D Glasses. (refer to page 17). Link 3D AUTO Off Exit 3D Mode `` DLP-Link: Select "DLP-Link" to use optimized setting for VESA 3D... Glasses. (refer to page 17). ™™ "3D sync. Invert" function wouldn't save the `` VESA 3D: Select "VESA 3D" to use optimized settings for default frame ...
...;™ "3D Format" is only sup- `` 3D: Display 3D signal. `` L (Left): Display the left and right frame contents. `` Press the "Off" for DLP Link 3D Glasses. (refer to page 17). Link 3D AUTO Off Exit 3D Mode `` DLP-Link: Select "DLP-Link" to use optimized setting for VESA 3D... Glasses. (refer to page 17). ™™ "3D sync. Invert" function wouldn't save the `` VESA 3D: Select "VESA 3D" to use optimized settings for default frame ...

User Manual
Page 54
... wait at least 60 seconds before reconnecting power. `` Check that it is centered on the screen and below the bottom of 3D glasses is drained. `` Check if the 3D glasses is turned on. `` When the input signal is HDMI 1.3 2D (1080i side-by-side half), press "3D Format" button and switch to...
... wait at least 60 seconds before reconnecting power. `` Check that it is centered on the screen and below the bottom of 3D glasses is drained. `` Check if the 3D glasses is turned on. `` When the input signal is HDMI 1.3 2D (1080i side-by-side half), press "3D Format" button and switch to...

User Manual
Page 58
... drop the lamp module or touch the lamp bulb. Allow it is hot! The bulb may shatter and cause injury if it to wear safety glasses if changing the bulb when ceiling mounted. "Caution must be used to change the lamp as soon as possible. Warning: To reduce the risk of...
... drop the lamp module or touch the lamp bulb. Allow it is hot! The bulb may shatter and cause injury if it to wear safety glasses if changing the bulb when ceiling mounted. "Caution must be used to change the lamp as soon as possible. Warning: To reduce the risk of...

User Manual
Page 59
.... 3. Unscrew the two screws on the cover. 1 5. Unscrew the two screws on the lamp module. 3 7. Turn on the projector. ™™ Do not touch the glass area of the lamp. Allow the projector to the projector by pressing the " " button. 2. ™™ The screws on the lamp cover and the lamp...
.... 3. Unscrew the two screws on the cover. 1 5. Unscrew the two screws on the lamp module. 3 7. Turn on the projector. ™™ Do not touch the glass area of the lamp. Allow the projector to the projector by pressing the " " button. 2. ™™ The screws on the lamp cover and the lamp...
Datasheet
Page 2
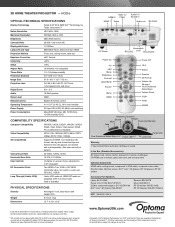
3D HOME THEATER PROJECTOR - HD25e OPTICAL/TECHNICAL SPECIFICATIONS Display Technology Single 0.65ʺ DC3 DMD DLP® Technology by Texas Instruments™ Native Resolution HD 1920 x 1080 Maximum Resolution WUXGA ...
3D HOME THEATER PROJECTOR - HD25e OPTICAL/TECHNICAL SPECIFICATIONS Display Technology Single 0.65ʺ DC3 DMD DLP® Technology by Texas Instruments™ Native Resolution HD 1920 x 1080 Maximum Resolution WUXGA ...
