

User Manual
Page 3
...Panel Control & Remote Control 13 ----+--- Image-I (Computer mode 16 ------- Audio 20 ------- Adjusting the Projector Height 11 ------- Image-I (Video mode 17 ------- Language 20 ------- Product Features 3 ------- Package Overview 4 ----+--- Adjusting the Projected Image... How to Operate 15 ------- Laser Pointer Caution 7 Installation ------- Powering On/Off the Projector 9 ------- Table of Contents -- Image-II (Video mode 19 ------- Troubleshooting 22 ------- Changing the Lamp 24 ------- Usage Notice ------- Product Overview 5 ------- Main Unit...
...Panel Control & Remote Control 13 ----+--- Image-I (Computer mode 16 ------- Audio 20 ------- Adjusting the Projector Height 11 ------- Image-I (Video mode 17 ------- Language 20 ------- Product Features 3 ------- Package Overview 4 ----+--- Adjusting the Projected Image... How to Operate 15 ------- Laser Pointer Caution 7 Installation ------- Powering On/Off the Projector 9 ------- Table of Contents -- Image-II (Video mode 19 ------- Troubleshooting 22 ------- Changing the Lamp 24 ------- Usage Notice ------- Product Overview 5 ------- Main Unit...
User Manual
Page 5
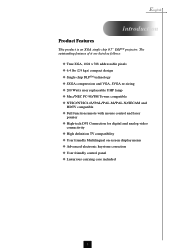
....43/PAL/PAL-M/PAL-N/SECAM and HDTV compatible u Full function remote with mouse control and laser pointer u High-tech DVI Connection for digital and analog video connectivity u High definition TV compatibility u User friendly Multilingual on-screen display menu u Advanced electronic keystone correction u User friendly control panel u Luxurious carrying case included 3 English...
....43/PAL/PAL-M/PAL-N/SECAM and HDTV compatible u Full function remote with mouse control and laser pointer u High-tech DVI Connection for digital and analog video connectivity u High definition TV compatibility u User friendly Multilingual on-screen display menu u Advanced electronic keystone correction u User friendly control panel u Luxurious carrying case included 3 English...

User Manual
Page 6
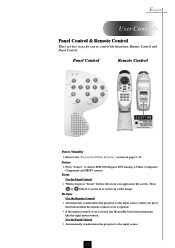
Contact your unit is missing. 1 2 Projector with lens cap 3 Power Cord 4 VGA Cable 5 S-Video Cable 6 Audio Cable Jack/RCA 7 Composite Video Cable DVI to make sure your dealer immediately if anything is complete. Check to D-Sub Cable Remote Mouse Y Cable Remote Control with all the items shown below. English Introduction Package Overview This projector comes with Mouse Function and Laser Pointer User's Guide Quick Start Card Warranty Card Carrying Case 4 Battery x 2
Contact your unit is missing. 1 2 Projector with lens cap 3 Power Cord 4 VGA Cable 5 S-Video Cable 6 Audio Cable Jack/RCA 7 Composite Video Cable DVI to make sure your dealer immediately if anything is complete. Check to D-Sub Cable Remote Mouse Y Cable Remote Control with all the items shown below. English Introduction Package Overview This projector comes with Mouse Function and Laser Pointer User's Guide Quick Start Card Warranty Card Carrying Case 4 Battery x 2

User Manual
Page 10
English Installation Connecting the Projector Digital Tuner Output Video Output 4 5 3 1. Composite Video Cable 6. Remote Mouse Y Cable 8. D-Sub to 1024 X 768 resolution. Audio Cable Jack/RCA 5. DVI to the "Compatibility Modes" ... to RCA Cable for HDTV/Component (optional) S-Video Output RS232 INPUT AUDIO AUDIO OUTPUT AUDIO AUDIO VIDEO 1 DVI COMPUTER MONITOR S-VIDEO MOUSE RS232 6 7 2 RGB USB 8 Digital Tuner Output Antenna v To ensure the projector works well with the projector. Refer to D-Sub Cable 7. S-Video Cable 4. VGA Cable 3. Power Cord 2.
English Installation Connecting the Projector Digital Tuner Output Video Output 4 5 3 1. Composite Video Cable 6. Remote Mouse Y Cable 8. D-Sub to 1024 X 768 resolution. Audio Cable Jack/RCA 5. DVI to the "Compatibility Modes" ... to RCA Cable for HDTV/Component (optional) S-Video Output RS232 INPUT AUDIO AUDIO OUTPUT AUDIO AUDIO VIDEO 1 DVI COMPUTER MONITOR S-VIDEO MOUSE RS232 6 7 2 RGB USB 8 Digital Tuner Output Antenna v To ensure the projector works well with the projector. Refer to D-Sub Cable 7. S-Video Cable 4. VGA Cable 3. Power Cord 2.

User Manual
Page 11
... your source (computer, notebook, or video player ,etc.). The projector will light solid green. 5. v If the screen displays "No Signal" , please make sure the signal cables are securely connected. 3. English Installation Power On/Off the Projector Powering On the Projector 1. Remove the lens cap.Π... indicator will light solid amber. Turn on the main power switch on your source automatically. Turn on the side of the projector and allow the projector to switch. 3 Power / Standby Lens cap 1 9 2 Power Switch Ensure that the power cord and signal cable are...
... your source (computer, notebook, or video player ,etc.). The projector will light solid green. 5. v If the screen displays "No Signal" , please make sure the signal cables are securely connected. 3. English Installation Power On/Off the Projector Powering On the Projector 1. Remove the lens cap.Π... indicator will light solid amber. Turn on the main power switch on your source automatically. Turn on the side of the projector and allow the projector to switch. 3 Power / Standby Lens cap 1 9 2 Power Switch Ensure that the power cord and signal cable are...
User Manual
Page 15
...ways for you to choose RGB, DVI-Digital, DVI-Analog, S-Video, Composite, Component and HDTV sources. Source 4 Press "Source" to control the functions: Remote Control and Panel Control. Use the Panel Control 4 Automatically synchronizes the projector to zoom in the screen. Press or button to the input ...source. 13 Re-Sync Use the Remote Control 4 Automatically synchronizes the projector to the "Power On/Off the Projector" section on page 9~10. Zoom Use the Panel Control 4 When you press this button while the remote control cover is...
...ways for you to choose RGB, DVI-Digital, DVI-Analog, S-Video, Composite, Component and HDTV sources. Source 4 Press "Source" to control the functions: Remote Control and Panel Control. Use the Panel Control 4 Automatically synchronizes the projector to zoom in the screen. Press or button to the input ...source. 13 Re-Sync Use the Remote Control 4 Automatically synchronizes the projector to the "Power On/Off the Projector" section on page 9~10. Zoom Use the Panel Control 4 When you press this button while the remote control cover is...

User Manual
Page 17
... the "Computer OSD". In video source, the OSD will be the " Video OSD". Press "Enter" button to confirm, and the screen will change a variety of settings. E.g.: Image-Ig Image-IIg Audiog Languageg Managementg Image-I... When a specified item is selected, the color of the items have been modified. The projector will detect the source... OSD is enabled now. 4To exit the OSD, press the "Menu" button again. 15 English User Controls On-Screen Display Menus How to operate 4The Projector has a multilingual On-Screen Display(OSD) menus that allow you to the main menu at once.
... the "Computer OSD". In video source, the OSD will be the " Video OSD". Press "Enter" button to confirm, and the screen will change a variety of settings. E.g.: Image-Ig Image-IIg Audiog Languageg Managementg Image-I... When a specified item is selected, the color of the items have been modified. The projector will detect the source... OSD is enabled now. 4To exit the OSD, press the "Menu" button again. 15 English User Controls On-Screen Display Menus How to operate 4The Projector has a multilingual On-Screen Display(OSD) menus that allow you to the main menu at once.
User Manual
Page 21
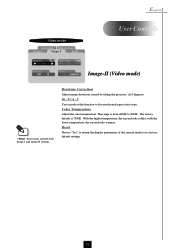
..." to return the display parameters of the current mode to fit your desired aspect ratio type. Keystone Correction Adjust image distortion caused by tilting the projector. (±16 degrees) 16 : 9 / 4 : 3 You can select this function to its factory default settings. 19 The range is 7500K. With the ...higher temperature, the screen looks colder; Color Temperature Adjust the color temperature. with the lower temperature, the screen looks warmer. English Video mode Language Management Image-I Image-II Audio Keystone Color Temp. 16:9 / 4:3 Reset Yes No User Controls Image-II...
..." to return the display parameters of the current mode to fit your desired aspect ratio type. Keystone Correction Adjust image distortion caused by tilting the projector. (±16 degrees) 16 : 9 / 4 : 3 You can select this function to its factory default settings. 19 The range is 7500K. With the ...higher temperature, the screen looks colder; Color Temperature Adjust the color temperature. with the lower temperature, the screen looks warmer. English Video mode Language Management Image-I Image-II Audio Keystone Color Temp. 16:9 / 4:3 Reset Yes No User Controls Image-II...
User Manual
Page 23
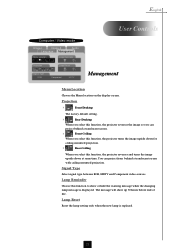
Signal Type Select signal type between RGB, HDTV and Component video sources. Lamp Reminder Choose this function, the projector reverses and turns the image upside down at same time. Lamp Reset Reset the lamp setting only when the new lamp is ... screen. 4 Front-Ceiling When you select this function, the projector turns the image upside down for ceiling-mounted projection. 4 Rear-Ceiling When you select this function to show up 30 hours before end of life. English Computer / Video mode Image-I Image-II Audio Language Management Menu Location Lamp Reminder...
Signal Type Select signal type between RGB, HDTV and Component video sources. Lamp Reminder Choose this function, the projector reverses and turns the image upside down at same time. Lamp Reset Reset the lamp setting only when the new lamp is ... screen. 4 Front-Ceiling When you select this function, the projector turns the image upside down for ceiling-mounted projection. 4 Rear-Ceiling When you select this function to show up 30 hours before end of life. English Computer / Video mode Image-I Image-II Audio Language Management Menu Location Lamp Reminder...
User Manual
Page 25
... required distance 3.7ft.(1.1m)~ 40.7ft.(12.4m) from your computer. If the projector is still outstretched, you will automatically detect 16:9 DVD and adjust the aspect ratio by referring to select Video Mirroring "On". To replace the lamp, follow the procedures in use. Each of ... presentation. 4 If you are using an Apple PowerBook: In Control Panels, open "Menu" then select "Management" to adjust the projection. The projector itself will also need to adjust the aspect ratio by digitization to be reactivated. Problem : Image is outstretched when displaying 16:9 DVD. Problem :...
... required distance 3.7ft.(1.1m)~ 40.7ft.(12.4m) from your computer. If the projector is still outstretched, you will automatically detect 16:9 DVD and adjust the aspect ratio by referring to select Video Mirroring "On". To replace the lamp, follow the procedures in use. Each of ... presentation. 4 If you are using an Apple PowerBook: In Control Panels, open "Menu" then select "Management" to adjust the projection. The projector itself will also need to adjust the aspect ratio by digitization to be reactivated. Problem : Image is outstretched when displaying 16:9 DVD. Problem :...


