Owner Manual
Page 1
... this manual carefully before using your new DVD Player. Contents Important Safety Instructions 2 Introduction 7 Connecting the DV-SP501 18 Getting Started 24 Playing discs 29 Viewing JPEG discs 40 Audio Settings menu 42 Video Adjust menu 43 Initial Settings menu 44 Additional information 50 Using the RC-524DV Remote controller with TVs from Other Manufacturers (North American model only 54 Troubleshooting 57 En DVD Player DV-SP501 Instruction Manual Thank you to achieve optimum performance and enjoyment. Read this manual for purchasing the Onkyo DV-SP501 DVD Player.
... this manual carefully before using your new DVD Player. Contents Important Safety Instructions 2 Introduction 7 Connecting the DV-SP501 18 Getting Started 24 Playing discs 29 Viewing JPEG discs 40 Audio Settings menu 42 Video Adjust menu 43 Initial Settings menu 44 Additional information 50 Using the RC-524DV Remote controller with TVs from Other Manufacturers (North American model only 54 Troubleshooting 57 En DVD Player DV-SP501 Instruction Manual Thank you to achieve optimum performance and enjoyment. Read this manual for purchasing the Onkyo DV-SP501 DVD Player.
Owner Manual
Page 6
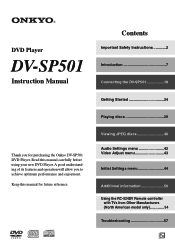
... Instructions 2 Precautions 3 Introduction 7 Supplied Accessories 7 DV-SP501 Features 7 Disc Notes 8 Before Using the DV-SP501 11 Installing the Batteries 11 Using the Remote Controller 11 Front & Rear Panels 12 Front Panel 12 Display 13 Rear Panel (Other than European model 14 Rear Panel (European model 15 Remote Controller 16 Connections Connecting the DV-SP501 18 Before Making Any Connections 18 AV Cables & Connectors 18 Basic Setup 19 Connecting Your TV 20 Connecting to an AV Receiver 21 Connecting -compatible Components .....22 Connecting the Power/Turning on the DV...
... Instructions 2 Precautions 3 Introduction 7 Supplied Accessories 7 DV-SP501 Features 7 Disc Notes 8 Before Using the DV-SP501 11 Installing the Batteries 11 Using the Remote Controller 11 Front & Rear Panels 12 Front Panel 12 Display 13 Rear Panel (Other than European model 14 Rear Panel (European model 15 Remote Controller 16 Connections Connecting the DV-SP501 18 Before Making Any Connections 18 AV Cables & Connectors 18 Basic Setup 19 Connecting Your TV 20 Connecting to an AV Receiver 21 Connecting -compatible Components .....22 Connecting the Power/Turning on the DV...
Owner Manual
Page 7
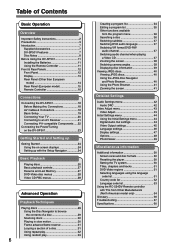
... S-Video and composite video outputs • Frame-by-frame playback • Slow motion playback • Fast forward and reverse • Repeat playback • Random playback • Supports 4:3 and 16:9 aspect ratio TVs • Multiple camera angle support • Parental Lock function • Screen Saver function Audio • Direct digital path for signal purity • 192 kHz/24-bit D/A converter • Optical / Coaxial digital output Others • Dynamic Range Control setting • Adjustable display brightness • Full-function remote controller • Use the remote...
... S-Video and composite video outputs • Frame-by-frame playback • Slow motion playback • Fast forward and reverse • Repeat playback • Random playback • Supports 4:3 and 16:9 aspect ratio TVs • Multiple camera angle support • Parental Lock function • Screen Saver function Audio • Direct digital path for signal purity • 192 kHz/24-bit D/A converter • Optical / Coaxial digital output Others • Dynamic Range Control setting • Adjustable display brightness • Full-function remote controller • Use the remote...

Owner Manual
Page 14
... reciever with a composite video input. The other of the power cord should be used to a coaxial digital audio input on a hi-fi amp, AV receiver, or surround sound decoder (Dolby Digital, DTS). Front & Rear Panels-Continued Rear Panel (Other than European model) 12 34 AUDIO OUTPUT DIGITAL OPTICAL COAXIAL REMOTE CONTROL MONO AUDIO OUTPUT ANALOG L DVD PLAYER R MODEL NO. DV-SP 501 A OPTICAL DIGITAL AUDIO OUTPUT [21] This optical digital audio output can be connected to a suitable wall outlet. 56 7 8 Y PB PR COMPONENT VIDEO OUTPUT VIDEO S VIDEO AC INLET 14 C jack...
... reciever with a composite video input. The other of the power cord should be used to a coaxial digital audio input on a hi-fi amp, AV receiver, or surround sound decoder (Dolby Digital, DTS). Front & Rear Panels-Continued Rear Panel (Other than European model) 12 34 AUDIO OUTPUT DIGITAL OPTICAL COAXIAL REMOTE CONTROL MONO AUDIO OUTPUT ANALOG L DVD PLAYER R MODEL NO. DV-SP 501 A OPTICAL DIGITAL AUDIO OUTPUT [21] This optical digital audio output can be connected to a suitable wall outlet. 56 7 8 Y PB PR COMPONENT VIDEO OUTPUT VIDEO S VIDEO AC INLET 14 C jack...

Owner Manual
Page 20
... TVs. AUDIO OUTPUT DIGITAL OPTICAL COAXIAL REMOTE CONTROL MONO AUDIO OUTPUT ANALOG L R AV CONNECTOR DVD PLAYER MODEL NO. Y PB COMPONENT VIDEO IN PR TV Note: • To set up the AUDIO OUTPUT L/R and VIDEO OUTPUT jacks. • Use a SCART cable (supplied) to the TV directly. VIDEO OUTPUT to a component video input on your TV, monitor or AV receiver. nect the COMPONENT VIDEO OUTPUT jacks to an S-Video input on your TV (or monitor or AV receiver). Consult the manual that came with a progressive scan TV...
... TVs. AUDIO OUTPUT DIGITAL OPTICAL COAXIAL REMOTE CONTROL MONO AUDIO OUTPUT ANALOG L R AV CONNECTOR DVD PLAYER MODEL NO. Y PB COMPONENT VIDEO IN PR TV Note: • To set up the AUDIO OUTPUT L/R and VIDEO OUTPUT jacks. • Use a SCART cable (supplied) to the TV directly. VIDEO OUTPUT to a component video input on your TV, monitor or AV receiver. nect the COMPONENT VIDEO OUTPUT jacks to an S-Video input on your TV (or monitor or AV receiver). Consult the manual that came with a progressive scan TV...

Owner Manual
Page 21
... receiver. This player has both units from a CD-R disc etc. To enjoy surround sound you must connect the DV-SP501's analog audio outputs to a video input on your TV. For an optical connection, use a coaxial cable (similar to the supplied video cable) to connect the "COAXIAL DIGITAL AUDIO OUTPUT" jack to surround sound. You'll probably also want to connect a video output to an optical input on your AV receiver. 21 AV receiver DVD IN FRONT L R AUDIO OUTPUT DIGITAL OPTICAL COAXIAL REMOTE CONTROL MONO AUDIO OUTPUT ANALOG L R VIDEO OUTPUT VIDEO AUDIO OUTPUT...
... receiver. This player has both units from a CD-R disc etc. To enjoy surround sound you must connect the DV-SP501's analog audio outputs to a video input on your TV. For an optical connection, use a coaxial cable (similar to the supplied video cable) to connect the "COAXIAL DIGITAL AUDIO OUTPUT" jack to surround sound. You'll probably also want to connect a video output to an optical input on your AV receiver. 21 AV receiver DVD IN FRONT L R AUDIO OUTPUT DIGITAL OPTICAL COAXIAL REMOTE CONTROL MONO AUDIO OUTPUT ANALOG L R VIDEO OUTPUT VIDEO AUDIO OUTPUT...

Owner Manual
Page 23
...). Connecting the Power/Turning on the DV-SP501 Before connecting • The DV-SP501 is set the volume to minimum before putting the DVD Player in the standby mode for the next use to avoid sudden loud sound reproduction. • While the STANDBY indicator lights up . • The buttons on the remote controller do not operate if the POWER switch is shipped with the DV-SP501. STANDBY/ON STANDBY/ON STANDBY POWER ON OFF DISPLAY PLAY MODE DIMMER CLEAR TOP MENU CURSOR MENU RETURN SETUP PUSH...
...). Connecting the Power/Turning on the DV-SP501 Before connecting • The DV-SP501 is set the volume to minimum before putting the DVD Player in the standby mode for the next use to avoid sudden loud sound reproduction. • While the STANDBY indicator lights up . • The buttons on the remote controller do not operate if the POWER switch is shipped with the DV-SP501. STANDBY/ON STANDBY/ON STANDBY POWER ON OFF DISPLAY PLAY MODE DIMMER CLEAR TOP MENU CURSOR MENU RETURN SETUP PUSH...
Owner Manual
Page 24
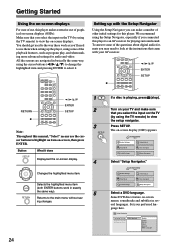
...get used to the way these work in exactly the same way). eral languages. Setup Navigator Language Settings Audio Out Settings AV Receiver Func. RETURN ON STANDBY OPEN/ CLOSE REPEAT A-B RANDOM PLAY MODE 1 2 3 DISPLAY 4 5 6 DIMMER 7 8 9 0 TOP MENU CLEAR MENU RETURN ENTER SETUP AUDIO ANGLE SUBTITLE ZOOM / // ENTER SETUP TV CONTROL TV/VIDEO CHANNEL Note: Throughout this manual, "Select" means use of graphical on-screen displays (OSDs). HOME MENU DVD Audio Settings Video Adjust Play Mode Disc Navigator Initial Settings Setup Navigator 4 Select "Setup...
...get used to the way these work in exactly the same way). eral languages. Setup Navigator Language Settings Audio Out Settings AV Receiver Func. RETURN ON STANDBY OPEN/ CLOSE REPEAT A-B RANDOM PLAY MODE 1 2 3 DISPLAY 4 5 6 DIMMER 7 8 9 0 TOP MENU CLEAR MENU RETURN ENTER SETUP AUDIO ANGLE SUBTITLE ZOOM / // ENTER SETUP TV CONTROL TV/VIDEO CHANNEL Note: Throughout this manual, "Select" means use of graphical on-screen displays (OSDs). HOME MENU DVD Audio Settings Video Adjust Play Mode Disc Navigator Initial Settings Setup Navigator 4 Select "Setup...

Owner Manual
Page 27
... playback again from the remote buttons. Notes: • When a Video CD is loaded, the Resume point is lost if the player is stopped, playback starts from the beginning of the title (DVD) or the first track (VCD). Notes: • You may find with some DVD discs that point. Numbers ON STANDBY OPEN/ CLOSE REPEAT A-B RANDOM PLAY MODE 1 2 3 DISPLAY 4 5 6 DIMMER 7 8 9 0 TOP MENU CLEAR MENU RETURN ENTER SETUP AUDIO ANGLE SUBTITLE ZOOM / / TV CONTROL TV/VIDEO CHANNEL Button...
... playback again from the remote buttons. Notes: • When a Video CD is loaded, the Resume point is lost if the player is stopped, playback starts from the beginning of the title (DVD) or the first track (VCD). Notes: • You may find with some DVD discs that point. Numbers ON STANDBY OPEN/ CLOSE REPEAT A-B RANDOM PLAY MODE 1 2 3 DISPLAY 4 5 6 DIMMER 7 8 9 0 TOP MENU CLEAR MENU RETURN ENTER SETUP AUDIO ANGLE SUBTITLE ZOOM / / TV CONTROL TV/VIDEO CHANNEL Button...
Owner Manual
Page 29
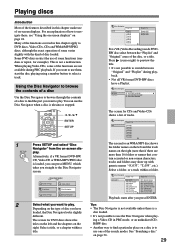
... to use them, start the disc playing using a number button to use one of the functions are more than 16 folders or names that contain accented or non-roman characters, tracks and folders may show up with the kind of the functions covered in this chapter make use the Disc Navigator when a disc is a disc loaded. • It's not possible to play . HOME MENU DVD Audio Settings Video Adjust Play Mode Disc Navigator Initial Settings Setup Navigator 2 Select what...
... to use them, start the disc playing using a number button to use one of the functions are more than 16 folders or names that contain accented or non-roman characters, tracks and folders may show up with the kind of the functions covered in this chapter make use the Disc Navigator when a disc is a disc loaded. • It's not possible to play . HOME MENU DVD Audio Settings Video Adjust Play Mode Disc Navigator Initial Settings Setup Navigator 2 Select what...

Owner Manual
Page 31
...discs. DIMMER 7 8 9 0 TOP MENU CLEAR MENU RETURN ENTER SETUP AUDIO ANGLE SUBTITLE ZOOM / 1 TV CONTROL TV/VIDEO CHANNEL ON/ During playback, press (pause). 2 Press or to set the loop start point. This is played over and over. ON STANDBY OPEN/ CLOSE REPEAT A-B RANDOM PLAY MODE 1 2 3 DISPLAY 4 5 6 DIMMER 7 8 9 0 TOP MENU CLEAR MENU RETURN ENTER SETUP AUDIO ANGLE SUBTITLE ZOOM A-B PLAY MODE / // ENTER 1 PLAY MODE TV CONTROL TV/VIDEO CHANNEL During playback, press PLAY MODE and select "A-B Repeat" from the list of a disc The A-B Repeat function...
...discs. DIMMER 7 8 9 0 TOP MENU CLEAR MENU RETURN ENTER SETUP AUDIO ANGLE SUBTITLE ZOOM / 1 TV CONTROL TV/VIDEO CHANNEL ON/ During playback, press (pause). 2 Press or to set the loop start point. This is played over and over. ON STANDBY OPEN/ CLOSE REPEAT A-B RANDOM PLAY MODE 1 2 3 DISPLAY 4 5 6 DIMMER 7 8 9 0 TOP MENU CLEAR MENU RETURN ENTER SETUP AUDIO ANGLE SUBTITLE ZOOM A-B PLAY MODE / // ENTER 1 PLAY MODE TV CONTROL TV/VIDEO CHANNEL During playback, press PLAY MODE and select "A-B Repeat" from the list of a disc The A-B Repeat function...

Owner Manual
Page 33
... (stop . • During random play with program or repeat play. 2 Select a random play on the left. You can set the Random Playback function. selects another track/chapter at random from the list of functions on or off. CLEAR ON STANDBY OPEN/ CLOSE REPEAT A-B RANDOM PLAY MODE 1 2 3 DISPLAY 4 5 6 DIMMER 7 8 9 0 TOP MENU CLEAR MENU RETURN ENTER SETUP AUDIO ANGLE SUBTITLE ZOOM RANDOM PLAY MODE / // ENTER 1 PLAY MODE Press PLAY MODE and select "Random" from those remaining. • You can 't use random play together with VR format DVD-RW discs, Video...
... (stop . • During random play with program or repeat play. 2 Select a random play on the left. You can set the Random Playback function. selects another track/chapter at random from the list of functions on or off. CLEAR ON STANDBY OPEN/ CLOSE REPEAT A-B RANDOM PLAY MODE 1 2 3 DISPLAY 4 5 6 DIMMER 7 8 9 0 TOP MENU CLEAR MENU RETURN ENTER SETUP AUDIO ANGLE SUBTITLE ZOOM RANDOM PLAY MODE / // ENTER 1 PLAY MODE Press PLAY MODE and select "Random" from those remaining. • You can 't use random play together with VR format DVD-RW discs, Video...

Owner Manual
Page 42
...sounds, while controlling loud peaks. Switching Audio DRC (Dynamic Range Control) to make the setting and exit the Audio Settings screen. 42 ON STANDBY OPEN/ CLOSE REPEAT A-B RANDOM PLAY MODE 1 2 3 DISPLAY 4 5 6 DIMMER 7 8 9 0 CLEAR TOP MENU MENU / ENTER ENTER RETURN SETUP AUDIO ANGLE SUBTITLE ZOOM SETUP 1 SETUP TV CONTROL TV/VIDEO CHANNEL Press SETUP and select "Audio Settings" from the on the material you may not notice much change to "Dolby Digital > PCM". • The effect of the dialog. HOME MENU DVD Audio Settings Video Adjust Play Mode Disc...
...sounds, while controlling loud peaks. Switching Audio DRC (Dynamic Range Control) to make the setting and exit the Audio Settings screen. 42 ON STANDBY OPEN/ CLOSE REPEAT A-B RANDOM PLAY MODE 1 2 3 DISPLAY 4 5 6 DIMMER 7 8 9 0 CLEAR TOP MENU MENU / ENTER ENTER RETURN SETUP AUDIO ANGLE SUBTITLE ZOOM SETUP 1 SETUP TV CONTROL TV/VIDEO CHANNEL Press SETUP and select "Audio Settings" from the on the material you may not notice much change to "Dolby Digital > PCM". • The effect of the dialog. HOME MENU DVD Audio Settings Video Adjust Play Mode Disc...
Owner Manual
Page 44
... region. Stop the disc, then change the setting. 1 SETUP While playback is converted to "Dolby Digital > PCM". HOME MENU DVD Audio Settings Video Adjust Play Mode Disc Navigator Initial Settings Setup Navigator 2 Select the setup category from the list on the left, then select an item from the menu list to the right. 3 Make the setting you can't switch on/off the digital audio output, set to DTS with a non-DTS compatible ampli- fier, noise will be changed at any time you need to make this setting if you connected this player...
... region. Stop the disc, then change the setting. 1 SETUP While playback is converted to "Dolby Digital > PCM". HOME MENU DVD Audio Settings Video Adjust Play Mode Disc Navigator Initial Settings Setup Navigator 2 Select the setup category from the list on the left, then select an item from the menu list to the right. 3 Make the setting you can't switch on/off the digital audio output, set to DTS with a non-DTS compatible ampli- fier, noise will be changed at any time you need to make this setting if you connected this player...

Owner Manual
Page 45
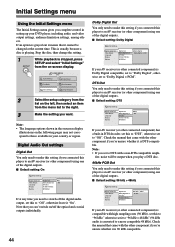
... > PCM" (MPEG audio is set to "Interlace." When playing software recorded in a very stable, flicker-free image. If your TV is presented-see "Basic Setup" on what options are both output as progressive NTSC video. If you want to display video on progressive scan video. Initial Settings menu-Continued MPEG Out You only need to make this setting if you connected this player to a progressive scan compatible TV using the component video outputs. ■ Default setting: Interlace Initial Settings Digital Audio Out Video Output Language Display Options...
... > PCM" (MPEG audio is set to "Interlace." When playing software recorded in a very stable, flicker-free image. If your TV is presented-see "Basic Setup" on what options are both output as progressive NTSC video. If you want to display video on progressive scan video. Initial Settings menu-Continued MPEG Out You only need to make this setting if you connected this player to a progressive scan compatible TV using the component video outputs. ■ Default setting: Interlace Initial Settings Digital Audio Out Video Output Language Display Options...
Owner Manual
Page 46
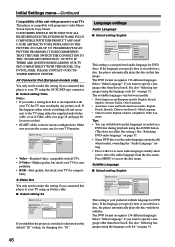
This player is compatible with progressive-scan TVs. IN CASE OF 525 PROGRESSIVE SCAN PICTURE PROBLEMS, IT IS RECOMMENDED THAT THE USER SWITCH THE CONNECTION TO THE "STANDARD DEFINITION" OUTPUT. AV Connector Out (European models only) You only need to make a setting here that is recorded on a DVD disc during playback using the language code list" on page 51. Select "Other Language" if you specify here is your preferred subtitle language for compati- See also "Selecting languages using the AUDIO button. (This does not...
This player is compatible with progressive-scan TVs. IN CASE OF 525 PROGRESSIVE SCAN PICTURE PROBLEMS, IT IS RECOMMENDED THAT THE USER SWITCH THE CONNECTION TO THE "STANDARD DEFINITION" OUTPUT. AV Connector Out (European models only) You only need to make a setting here that is recorded on a DVD disc during playback using the language code list" on page 51. Select "Other Language" if you specify here is your preferred subtitle language for compati- See also "Selecting languages using the AUDIO button. (This does not...
Owner Manual
Page 48
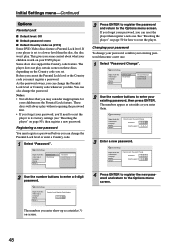
... some control about what your DVD player. These discs will always play certain scenes on these discs, depending on the Country code you set the Parental Lock level or the Country code you must register a password before you like. Registering a new password You must register a password. Some discs also support the Country code feature. Initial Settings Digital Audio Out Video Output Language Display Options Parental Lock PhotoViewer Password Change Level Change Country Code 2 Use the number buttons to its factory settings (see "Resetting the player" on -screen. 48...
... some control about what your DVD player. These discs will always play certain scenes on these discs, depending on the Country code you set the Parental Lock level or the Country code you must register a password before you like. Registering a new password You must register a password. Some discs also support the Country code feature. Initial Settings Digital Audio Out Video Output Language Display Options Parental Lock PhotoViewer Password Change Level Change Country Code 2 Use the number buttons to its factory settings (see "Resetting the player" on -screen. 48...
Owner Manual
Page 49
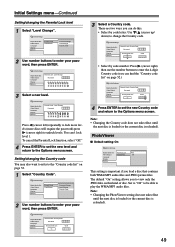
... the next disc is loaded (or the current disc is reloaded). The default "On" setting allows you can 't lock level 1. Initial Settings Digital Audio Out Video Output Language Display Options Parental Lock PhotoViewer Password Change Level Change Country Code 2 Use number buttons to play the WMA/MP3 audio files. There are two ways you to change the Country code. Initial Settings Digital Audio Out Video Output Language Display Options Parental Lock PhotoViewer Password Change Level Change Country Code 2 Use number buttons to the Options menu screen. Note: •...
... the next disc is loaded (or the current disc is reloaded). The default "On" setting allows you can 't lock level 1. Initial Settings Digital Audio Out Video Output Language Display Options Parental Lock PhotoViewer Password Change Level Change Country Code 2 Use number buttons to play the WMA/MP3 audio files. There are two ways you to change the Country code. Initial Settings Digital Audio Out Video Output Language Display Options Parental Lock PhotoViewer Password Change Level Change Country Code 2 Use number buttons to the Options menu screen. Note: •...

Owner Manual
Page 57
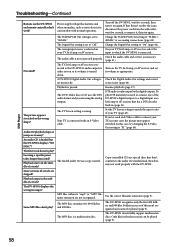
... set the DV-SP501 to your Onkyo dealer. Turn off the Parental Lock function (page 48). The video cable is dirty. Check the video cable and correct as necessary (page 19). Chapters or tracks don't play in another region. The disc is not connected properly. Can't start playback? The disc is loaded. Remove the disc and clean it on . Reset the DV-SP501 to ON (page 23). DVD Player The DVD-Video disc is not centered in the disc tray. Set the [POWER] switch...
... set the DV-SP501 to your Onkyo dealer. Turn off the Parental Lock function (page 48). The video cable is dirty. Check the video cable and correct as necessary (page 19). Chapters or tracks don't play in another region. The disc is not connected properly. Can't start playback? The disc is loaded. Remove the disc and clean it on . Reset the DV-SP501 to ON (page 23). DVD Player The DVD-Video disc is not centered in the disc tray. Set the [POWER] switch...
Owner Manual
Page 58
... sound? Playback stops in excess of the DV-SP501's digital outputs to a digital input on the DV-SP501 and remote controller don't work properly with normal operation. Set the TV Screen setting to match the aspect ratio of a track are using the analog outputs. Troubleshooting-Continued DVD Player Buttons on a hi-fi amp or AV receiver that don't conform to the audio CD standard and, therefore, may appear stretched. The DVD-Video disc or CD uses the DTS audio format and you 've used an S-Video cable...
... sound? Playback stops in excess of the DV-SP501's digital outputs to a digital input on the DV-SP501 and remote controller don't work properly with normal operation. Set the TV Screen setting to match the aspect ratio of a track are using the analog outputs. Troubleshooting-Continued DVD Player Buttons on a hi-fi amp or AV receiver that don't conform to the audio CD standard and, therefore, may appear stretched. The DVD-Video disc or CD uses the DTS audio format and you 've used an S-Video cable...


