Oki T410 Support and Manuals
Get Help and Manuals for this Oki Data item
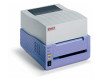
Popular Oki T410 Manual Pages
T400, T410, X400 Safety, Warranty and Regulatory Information (English, Fran栩s, Espa?ol, Portugu鱩 - Page 3
... mains socket.
After installing additional memory, hard ...parts when the product is a risk of personal injury.
Please check the weight of the product and take all warning and instruction... as directed in the User's Guide, this range could result...battery should not require replacement during the life of explosion if the battery is replaced...Information, 220/240-Volt Models
This product has been...
T400, T410, X400 Safety, Warranty and Regulatory Information (English, Fran栩s, Espa?ol, Portugu鱩 - Page 4
...replacement or repair of the exchange unit.
Some states do not allow limitations on obtaining service... CODE ...T400, T410, ...problem over the phone. You will be made available for this Product must be shipped to solve your Product hardware is available by Oki Data's designated carrier.
A written receipt for the Product, showing the date of purchase, dealer's name, and both the model...
T400, T410, X400 Safety, Warranty and Regulatory Information (English, Fran栩s, Espa?ol, Portugu鱩 - Page 5
... from a telephone close to -the-minute Oki information specifically for your product, including:
• Product news • Manuals • Drivers and utilities
5 - Be sure to this Product. Contact your Oki Data dealer for obtaining service may also have the model number and serial number for service or support. This Limited Warranty applies to
retain your purchase documents...
T400/T410 Setup Guide (English, Fran栩s)) - Page 8

... the darkness that
is ON, check the displayed
number. See the manual for details.
■ Sensor level ...... Do not use this. See the manual for used by service personnel.
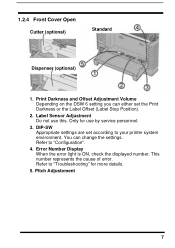
■ DIP-SW Appropriate settings are set in the Printer Setting screen. ■ Front Cover Open
Error number display
Print darkness adjustment volume
Sensor level
DIP-SW
■...
T400/T410 Setup Guide (English, Fran栩s)) - Page 14
... core to the unit.
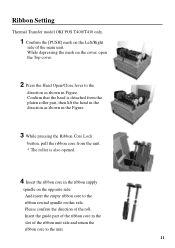
11 Insert the guide part of the ribbon core in the slot of the roll. Confirm that the head is detached from the platen roller part, then lift the head in the direction as shown in Figure. Ribbon Setting
Thermal Transfer model OKI POS T400/T410 only.
1 Confirm the [PUSH] mark on...
T400/T410 Setup Guide (English, Fran栩s)) - Page 16
...Setting screen. See the manual for details.
• Label adhered the sensor? ➞ Remove the label and clean up.
• Sensor clean? ➞ Clean the sensor.
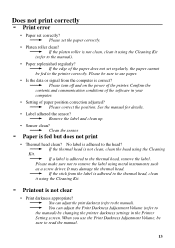
Does not print correctly
Print error
• Paper set correctly? ➞ Please set...head is not clean, clean the head using metal instruments such as a screw driver. When you use paper.
• Is the data or signal from the ...
T400/T410 Setup Guide (English, Fran栩s)) - Page 17

... use a clean paper. When error light is ON
Error light
[ERROR] light
Error Number Display
When the error light is ON or flashing, there is not clean, clean the platen roller using metal instruments such as a screw driver. See the manual for details.
14 This number indicates the reason of the error. • Paper set correctly.
• Platen roller...
T400/T410 User Guide - Page 2

... and Windows are registered trademarks of Oki Electric Industry Company Ltd. All Rights Reserved
Document Information
T400/T410 User's Guide P/N...guide will not affect the applicability of software products manufactured by other countries. Apple, Macintosh and Mac OS are either registered trademarks or trademarks of Hewlett-Packard Company. The most up -to -date drivers and manuals...
T400/T410 User Guide - Page 3
...models. This is essential that the safety and operating procedures contained within this product may be required to take adequate measures. In a domestic environment this manual...the user ...manuals relating to this printer/product, please contact your Oki Data supplier.
Should you have any doubts regarding the setting...specifications are liable to change, without this printer/product.
T400/T410 User Guide - Page 6
... 4.2.3 Dispenser 36 4.2.4 Installing the Dispenser Kit 40
5. Configuration 17 3.1 Status Monitor 17 3.2 DIP-SW Settings 21 3.2.1 Change Settings 22
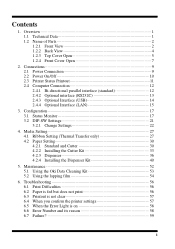
4. Contents
1. Troubleshooting 56 6.1 Print Difficulties 56 6.2 Paper is fed but does not print 56 6.3 Printout is not clear 57 6.4 When you confirm the printer settings 57 6.5 When the Error Light is on 58 6.6 Error Number and its...
T400/T410 User Guide - Page 14
...-SW Appropriate settings are set the Print Darkness or the Label Offset (Label Stop Position).
2. Only for more details.
5. Refer to "Configuration".
4. Pitch Adjustement
CT400/410
7 Error Number Display When the error light is ON, check the displayed number. Refer to "Troubleshooting" for use this. Label Sensor Adjustment Do not use by service personnel.
3. Operation Manual...
T400/T410 User Guide - Page 24
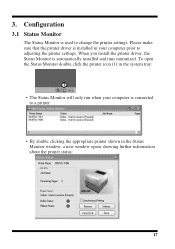
... driver, the Status Monitor is used to adjusting the printer settings. 3. Configuration
3.1 Status Monitor
The Status Monitor is automatically installed and runs minimized. To open the Status Monitor double click the printer icon (1) in the system tray:
• The Status Monitor will only run when your computer is installed in the Status Monitor window, a new window...
T400/T410 User Guide - Page 25
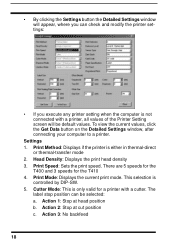
... the computer is only valid for the T410
4. Print Method: Displays if the printer is controlled by DIP-SW.
5. Cutter Mode: This is not connected with a cutter. Action 3: No backfeed
18
CT400/410 Configuration
Operation Manual
• By clicking the Settings button the Detailed Settings window will be selected:
a. Print Mode: Displays the current print...
T400/T410 User Guide - Page 47
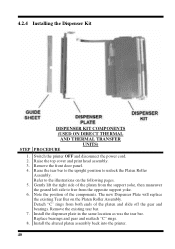
... tear bar. 7. Remove the front door panel. 4. Refer to the illustrations on the Platen Roller Assembly. Detach "C" rings from the opposite support yoke. 6. Install the dispenser plate in the same location as was the tear bar. Replace bearings and gear and reattach "C" rings. 8. Gently lift the right side of the platen from the...
T400/T410 User Guide - Page 52
...pin on the back side of the platen from the support yoke, then maneuver the geared left side to a cable from the opposite support yoke. 9. Gently lift the right side of the ...to be removed.
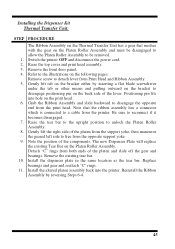
1. Detach "C" rings from both ends of the components. Replace bearings and gear and reattach "C" rings. 11. Installing the Dispenser Kit Thermal Transfer Unit:
STEP PROCEDURE The Ribbon Assembly on the ...
Oki T410 Reviews
We have not received any reviews for Oki yet.