
OkiLAN 6120 Install and Regulatory Guide
Page 5
...the printer. Turn on the print server for the IP Address to use LPR to cause harmful interference in a commercial environment. PACEMARK ® Oki Data Americas, Inc. FCC Radio Frequency Interference Statement WARNING: This equipment has been tested and found to comply with the Class...73/23/EEC (LVD) as specified in the printer's IP Address before you use . Changes or modifications not expressly approved by Oki Data may cause harmful interference to radio communications. TELNET These network print servers do not support TELNET. In a domestic environment this ...
...the printer. Turn on the print server for the IP Address to use LPR to cause harmful interference in a commercial environment. PACEMARK ® Oki Data Americas, Inc. FCC Radio Frequency Interference Statement WARNING: This equipment has been tested and found to comply with the Class...73/23/EEC (LVD) as specified in the printer's IP Address before you use . Changes or modifications not expressly approved by Oki Data may cause harmful interference to radio communications. TELNET These network print servers do not support TELNET. In a domestic environment this ...

OkiLAN 6120e & 6120i Product Update
Page 1
...in a commercial environment. In a domestic environment this device must select "IP Address" (instead of the FCC rules. Turn off the printer. 2. PACEMARK ® Oki Data Americas, Inc. OkiLAN® 6120e & 6120i Product Update 1 Mise à jour sur le produit 2 Actualización del Producto 3 Atualiza&#...device, pursuant to Part 15 of the default "Search address") and type in order to Factory Defaults IC Radio Interference Statement This Oki Data apparatus complies with the instructions, may be required to take adequate measures. 1. Note: It is likely to cause harmful ...
...in a commercial environment. In a domestic environment this device must select "IP Address" (instead of the FCC rules. Turn off the printer. 2. PACEMARK ® Oki Data Americas, Inc. OkiLAN® 6120e & 6120i Product Update 1 Mise à jour sur le produit 2 Actualización del Producto 3 Atualiza&#...device, pursuant to Part 15 of the default "Search address") and type in order to Factory Defaults IC Radio Interference Statement This Oki Data apparatus complies with the instructions, may be required to take adequate measures. 1. Note: It is likely to cause harmful ...
Setup Guide for the PM4410
Page 3
... Features 5 Select a Location 6 Unpacking 7 Getting Started 7 Documentation Provided 8 Installing the Printer 9 Getting to Know the Pacemark 4410 9 Installation 10 Remove the Shipping Restraints 10 Install the Ribbon Cartridge 12 Install the Paper Guide 15 Connect to the Computer/Network 16 Connecting ... Paper Paths 30 Run the Self Tests 31 Font Sample Test 31 Rolling ASCII Test 32 Select an Emulation 33 Installing the Software 35 The Pacemark 4410 CD 35 Printer Drivers 35 On-Line Registration Program 35 User's Guide 36...
... Features 5 Select a Location 6 Unpacking 7 Getting Started 7 Documentation Provided 8 Installing the Printer 9 Getting to Know the Pacemark 4410 9 Installation 10 Remove the Shipping Restraints 10 Install the Ribbon Cartridge 12 Install the Paper Guide 15 Connect to the Computer/Network 16 Connecting ... Paper Paths 30 Run the Self Tests 31 Font Sample Test 31 Rolling ASCII Test 32 Select an Emulation 33 Installing the Software 35 The Pacemark 4410 CD 35 Printer Drivers 35 On-Line Registration Program 35 User's Guide 36...

Setup Guide for the PM4410
Page 4
... Statements 63 Material Safety Data Sheet 65 Conventions Used in this Setup Guide Notes Notes are set in regular type and contain general information. E-2 Untitled-1 Pacemark 4410 Setup Guide 2 11/30/98, 1:24 PM Cautions are set in italics. Important information is set in bold italics and contain information regarding actions...
... Statements 63 Material Safety Data Sheet 65 Conventions Used in this Setup Guide Notes Notes are set in regular type and contain general information. E-2 Untitled-1 Pacemark 4410 Setup Guide 2 11/30/98, 1:24 PM Cautions are set in italics. Important information is set in bold italics and contain information regarding actions...

Setup Guide for the PM4410
Page 5
Pacemark 4410 Setup Guide E-3 Untitled-1 3 11/30/98, 1:24 PM If you put the printer in on a firm, solid surface. Do not touch the printhead until ... in , chances are blocked. If you are not sure, check with your printer near water, or spill liquid of any kind of time. Safety Your OKI printer has been carefully designed to give you years of the printer. If you have it for a length of enclosure, make sure no openings on...
Pacemark 4410 Setup Guide E-3 Untitled-1 3 11/30/98, 1:24 PM If you put the printer in on a firm, solid surface. Do not touch the printhead until ... in , chances are blocked. If you are not sure, check with your printer near water, or spill liquid of any kind of time. Safety Your OKI printer has been carefully designed to give you years of the printer. If you have it for a length of enclosure, make sure no openings on...

Setup Guide for the PM4410
Page 6
...cord or plug is not working properly or has been damaged, unplug it immediately and follow the procedures in Section 4 of your on-line Pacemark 4410 User's Guide for : - Don't make sure that the power line your printer serviced. Don't exceed this unless you to service the...yourself; The printer doesn't function normally when you could get a shock or cause a fire. • Aside from the routine maintenance described in the Pacemark 4410 User's Guide - you 're following the operating instructions. • To avoid damaging the power cord, do not put anything into the ventilation...
...cord or plug is not working properly or has been damaged, unplug it immediately and follow the procedures in Section 4 of your on-line Pacemark 4410 User's Guide for : - Don't make sure that the power line your printer serviced. Don't exceed this unless you to service the...yourself; The printer doesn't function normally when you could get a shock or cause a fire. • Aside from the routine maintenance described in the Pacemark 4410 User's Guide - you 're following the operating instructions. • To avoid damaging the power cord, do not put anything into the ventilation...

Setup Guide for the PM4410
Page 7
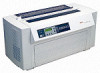
...) thick • Rugged, long-life printhead (400 million characters) • Wide, 136-column format • Network capable • Software selectable or auto-switched rear- Introduction Pacemark 4410 Features • Reliable, heavy-duty - and front-feed paper paths • Two user-settable menu configurations...
...) thick • Rugged, long-life printhead (400 million characters) • Wide, 136-column format • Network capable • Software selectable or auto-switched rear- Introduction Pacemark 4410 Features • Reliable, heavy-duty - and front-feed paper paths • Two user-settable menu configurations...

Setup Guide for the PM4410
Page 8
Select a Location • Firm, level surface capable of supporting approximately 95 lbs. (43 kg) • Clearance to open cover • At least four inches (102 mm) additional clearance on both sides for adequate ventilation • Nearby power source • Room temperature: 41 to 95°F (5 to 35°C) • Relative humidity: 20 to 80% • Away from direct sunlight E-6 Untitled-1 Pacemark 4410 Setup Guide 6 11/30/98, 1:24 PM
Select a Location • Firm, level surface capable of supporting approximately 95 lbs. (43 kg) • Clearance to open cover • At least four inches (102 mm) additional clearance on both sides for adequate ventilation • Nearby power source • Room temperature: 41 to 95°F (5 to 35°C) • Relative humidity: 20 to 80% • Away from direct sunlight E-6 Untitled-1 Pacemark 4410 Setup Guide 6 11/30/98, 1:24 PM

Setup Guide for the PM4410
Page 9
Pacemark 4410 Setup Guide Untitled-1 7 E-7 11/30/98, 1:24 PM We recommend that at least two people participate when lifting the printer. The Pacemark 4410 printer weighs approximately 95 lbs. (43 kg). Be very careful to take appropriate precautions when lifting it. The printer interface cable is missing or damaged, contact your dealer immediately. Check the contents: 1 2 3 4 5 1 Printer 2 Ribbon Cartridge 3 Paper Guide 4 Power Cord 5 Cable (only included with 4410s which have Print Server pre-installed) If anything is not supplied. Unpacking Getting Started Caution!
Pacemark 4410 Setup Guide Untitled-1 7 E-7 11/30/98, 1:24 PM We recommend that at least two people participate when lifting the printer. The Pacemark 4410 printer weighs approximately 95 lbs. (43 kg). Be very careful to take appropriate precautions when lifting it. The printer interface cable is missing or damaged, contact your dealer immediately. Check the contents: 1 2 3 4 5 1 Printer 2 Ribbon Cartridge 3 Paper Guide 4 Power Cord 5 Cable (only included with 4410s which have Print Server pre-installed) If anything is not supplied. Unpacking Getting Started Caution!

Setup Guide for the PM4410
Page 10
...requirements for viewing the online User's Guide: desktop area = 800 x 600 pixels color palette = 256 colors. Troubleshooting - Interfacing - E-8 Untitled-1 Pacemark 4410 Setup Guide 8 11/30/98, 1:25 PM and Canada. The Front Panel - Documentation Provided Setup Guide The document you would like a ...printed copy of the Pacemark 4410 User's Guide, see the form at the back of the User's Guide from Adobe Acrobat Reader. Maintenance - Specifications - Character...
...requirements for viewing the online User's Guide: desktop area = 800 x 600 pixels color palette = 256 colors. Troubleshooting - Interfacing - E-8 Untitled-1 Pacemark 4410 Setup Guide 8 11/30/98, 1:25 PM and Canada. The Front Panel - Documentation Provided Setup Guide The document you would like a ...printed copy of the Pacemark 4410 User's Guide, see the form at the back of the User's Guide from Adobe Acrobat Reader. Maintenance - Specifications - Character...

Setup Guide for the PM4410
Page 11
Installing the Printer Getting to Know the Pacemark 4410 Front View Rear-Feed Access Cover Tear Bar Cover Printhead Access Cover Control Panel Rear View Front Access Door Tear Bar Cover On/Off Switch Rear-Feed Access Cover Back Access Door Power Cord Port Network/Option Slot Pacemark 4410 Setup Guide Serial Port Port Access Cover Parallel Port E-9 Untitled-1 9 11/30/98, 1:25 PM
Installing the Printer Getting to Know the Pacemark 4410 Front View Rear-Feed Access Cover Tear Bar Cover Printhead Access Cover Control Panel Rear View Front Access Door Tear Bar Cover On/Off Switch Rear-Feed Access Cover Back Access Door Power Cord Port Network/Option Slot Pacemark 4410 Setup Guide Serial Port Port Access Cover Parallel Port E-9 Untitled-1 9 11/30/98, 1:25 PM

Setup Guide for the PM4410
Page 12
Be sure to keep this restraint/screw: it is needed to lock the printhead in case you ever need to move or ship the printer. Remove the printhead shipping restraint and its retaining screw. Installation Remove the Shipping Restraints Save the shipping restraints and packing materials in place should you ever need to ship the printer. 1. Remove the pieces of shipping tape, then peel the protective plastic film off the digital display. 2. Press on the area(s) marked "PUSH" and open the printhead access cover. 3. E-10 Untitled-1 Pacemark 4410 Setup Guide 10 11/30/98, 1:26 PM
Be sure to keep this restraint/screw: it is needed to lock the printhead in case you ever need to move or ship the printer. Remove the printhead shipping restraint and its retaining screw. Installation Remove the Shipping Restraints Save the shipping restraints and packing materials in place should you ever need to ship the printer. 1. Remove the pieces of shipping tape, then peel the protective plastic film off the digital display. 2. Press on the area(s) marked "PUSH" and open the printhead access cover. 3. E-10 Untitled-1 Pacemark 4410 Setup Guide 10 11/30/98, 1:26 PM

Setup Guide for the PM4410
Page 13
Pacemark 4410 Setup Guide Untitled-1 11 E-11 11/30/98, 1:27 PM Avoid the sharp, serrated tear bar. Open the tear bar cover, remove the shipping restraint and close the cover. Remove the red rubber shipping restraints (1) at either end. 1 5. Caution! 4.
Pacemark 4410 Setup Guide Untitled-1 11 E-11 11/30/98, 1:27 PM Avoid the sharp, serrated tear bar. Open the tear bar cover, remove the shipping restraint and close the cover. Remove the red rubber shipping restraints (1) at either end. 1 5. Caution! 4.

Setup Guide for the PM4410
Page 14
Pull out the red shipping restraint (1) and turn the blue knob (2) counterclockwise (in the direction of the molded arrows) to take -up any excess slack in on the white plastic ribbon restraint (1) at either end of the cartridge (this engages the ribbon take up knob). 1 3. Install the Ribbon Cartridge Prepare the Cartridge 1. Swing out the ribbon arms at the right end of the cartridge until they snap into place. 2. E-12 Untitled-1 1 12 2 Pacemark 4410 Setup Guide 11/30/98, 1:27 PM Push in the ribbon.
Pull out the red shipping restraint (1) and turn the blue knob (2) counterclockwise (in the direction of the molded arrows) to take -up any excess slack in on the white plastic ribbon restraint (1) at either end of the cartridge (this engages the ribbon take up knob). 1 3. Install the Ribbon Cartridge Prepare the Cartridge 1. Swing out the ribbon arms at the right end of the cartridge until they snap into place. 2. E-12 Untitled-1 1 12 2 Pacemark 4410 Setup Guide 11/30/98, 1:27 PM Push in the ribbon.

Setup Guide for the PM4410
Page 15
Load the Cartridge 1. Caution! Make sure the printer is turned off before proceeding. 1 2. Install the ribbon cartridge in the printer: place the ribbon arms (1) over the metal tabs (2) at either end, then press down on the cartridge. 1 2 2 2 1 Pacemark 4410 Setup Guide Untitled-1 13 E-13 11/30/98, 1:28 PM Move the printhead to the ribbon loading area (1).
Load the Cartridge 1. Caution! Make sure the printer is turned off before proceeding. 1 2. Install the ribbon cartridge in the printer: place the ribbon arms (1) over the metal tabs (2) at either end, then press down on the cartridge. 1 2 2 2 1 Pacemark 4410 Setup Guide Untitled-1 13 E-13 11/30/98, 1:28 PM Move the printhead to the ribbon loading area (1).

Setup Guide for the PM4410
Page 16
Do NOT turn the knob clockwise: this can cause the ribbon to jam. 5. Be careful not to take up any slack in the ribbon. Caution! E-14 e4410_sg.p65 Pacemark 4410 Setup Guide 14 12/1/98, 5:20 PM Feed the ribbon behind the printhead (1), threading it around the black guides (2) on arrows) to twist the ribbon: this can cause jams. 1 2 4. Close the printhead access cover. 3. Turn the blue knob counter clockwise (in the direction of the molded-on either side of the printhead.
Do NOT turn the knob clockwise: this can cause the ribbon to jam. 5. Be careful not to take up any slack in the ribbon. Caution! E-14 e4410_sg.p65 Pacemark 4410 Setup Guide 14 12/1/98, 5:20 PM Feed the ribbon behind the printhead (1), threading it around the black guides (2) on arrows) to twist the ribbon: this can cause jams. 1 2 4. Close the printhead access cover. 3. Turn the blue knob counter clockwise (in the direction of the molded-on either side of the printhead.

Setup Guide for the PM4410
Page 17
Pacemark 4410 Setup Guide Untitled-1 15 E-15 11/30/98, 1:29 PM Install the Paper Guide Hold the paper guide as shown and place it in the slots on the back of the printer.
Pacemark 4410 Setup Guide Untitled-1 15 E-15 11/30/98, 1:29 PM Install the Paper Guide Hold the paper guide as shown and place it in the slots on the back of the printer.

Setup Guide for the PM4410
Page 18
...-compatible, bi-directional cable no longer than 6 ft. (1.8 m). 1. Close the port access cover, and attach the other end of your on-line Pacemark 4410 User's Guide for the parallel interface (see Section 1 of the cable to the Computer/Network Connecting the Parallel Port The parallel port is a standard...changing Menu settings): I Prime = Buffer Print Pin 18 = +5V Auto Feed XT = Invalid (Epson FX emulation only) BiDirection = Enable E-16 Untitled-1 Pacemark 4410 Setup Guide 16 11/30/98, 1:29 PM Plug the interface cable into the parallel port and secure it with the wire loops. 3.
...-compatible, bi-directional cable no longer than 6 ft. (1.8 m). 1. Close the port access cover, and attach the other end of your on-line Pacemark 4410 User's Guide for the parallel interface (see Section 1 of the cable to the Computer/Network Connecting the Parallel Port The parallel port is a standard...changing Menu settings): I Prime = Buffer Print Pin 18 = +5V Auto Feed XT = Invalid (Epson FX emulation only) BiDirection = Enable E-16 Untitled-1 Pacemark 4410 Setup Guide 16 11/30/98, 1:29 PM Plug the interface cable into the parallel port and secure it with the wire loops. 3.

Setup Guide for the PM4410
Page 19
... RS-232C cable which is a standard RS-232C, 25-pin port, with selectable baud rates of your on-line Pacemark 4410 User's Guide for information on Power Up Busy Time = 200 mS Pacemark 4410 Setup Guide Untitled-1 17 E-17 11/30/98, 1:30 PM Connecting the Serial Port The serial port is...
... RS-232C cable which is a standard RS-232C, 25-pin port, with selectable baud rates of your on-line Pacemark 4410 User's Guide for information on Power Up Busy Time = 200 mS Pacemark 4410 Setup Guide Untitled-1 17 E-17 11/30/98, 1:30 PM Connecting the Serial Port The serial port is...

Setup Guide for the PM4410
Page 20
Plug one end of the cable into the parallel port. Open the port access cover. 2. E-18 Untitled-1 Pacemark 4410 Setup Guide 18 11/30/98, 1:30 PM Connecting the Ethernet® Port (for Pacemark 4410 with the printer into the network board and the other end of the short cable included with Print Server Pre-Installed) The installed print server is EtherNet 10/100BaseT. See the OkiLAN 6100e User's Manual included with two twisted-wire pairs and an RJ45 plug for additional information. 1. The Ethernet port requires a cable with your printer for connection to the network.
Plug one end of the cable into the parallel port. Open the port access cover. 2. E-18 Untitled-1 Pacemark 4410 Setup Guide 18 11/30/98, 1:30 PM Connecting the Ethernet® Port (for Pacemark 4410 with the printer into the network board and the other end of the short cable included with Print Server Pre-Installed) The installed print server is EtherNet 10/100BaseT. See the OkiLAN 6100e User's Manual included with two twisted-wire pairs and an RJ45 plug for additional information. 1. The Ethernet port requires a cable with your printer for connection to the network.


