PrintSuperVision Configuration Guide
Page 61
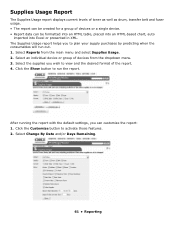
...; Report data can be created for a group of the report. 4. Supplies Usage Report The Supplies Usage report displays current levels of toner as well as drum, transfer belt and fuser usage. • The report can be formatted into an HTML table, placed into an HTML-based chart, auto imported into Excel...
...; Report data can be created for a group of the report. 4. Supplies Usage Report The Supplies Usage report displays current levels of toner as well as drum, transfer belt and fuser usage. • The report can be formatted into an HTML table, placed into an HTML-based chart, auto imported into Excel...

PrintSuperVision Configuration Guide
Page 69
... printing. Performing Day to be taken. The Near Me option cannot be customized. The information icon indicates an event has occurred, such as toner or drum replacement, cassette drawer is open or the device is running fine, there are instantly displayed or use the Search option to locate a group. 69 •...
... printing. Performing Day to be taken. The Near Me option cannot be customized. The information icon indicates an event has occurred, such as toner or drum replacement, cassette drawer is open or the device is running fine, there are instantly displayed or use the Search option to locate a group. 69 •...
Repack Procedure
Page 1
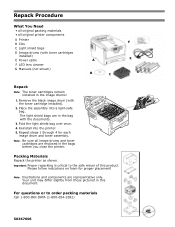
... documents. 3. Fold the light shield bag over once. 4. Note: Be sure all original printer components A Printer B CDs C Light shield bags D Image drums (with toner cartridges installed) E Power cable F LED lens cleaner G Manuals (not shown) A B C F E D Repack Note: The toner cartridges remain...into a light-safe bag. Important: Proper repacking is critical to order packing materials Call 1-800-OKI-DATA (1-800-654-3282) 58367606 Please follow indications on foam for each image drum and toner assembly. Place the assembly into the printer. 5. The light shield bags are in...
... documents. 3. Fold the light shield bag over once. 4. Note: Be sure all original printer components A Printer B CDs C Light shield bags D Image drums (with toner cartridges installed) E Power cable F LED lens cleaner G Manuals (not shown) A B C F E D Repack Note: The toner cartridges remain...into a light-safe bag. Important: Proper repacking is critical to order packing materials Call 1-800-OKI-DATA (1-800-654-3282) 58367606 Please follow indications on foam for each image drum and toner assembly. Place the assembly into the printer. 5. The light shield bags are in...
Belt Instructions
Page 1
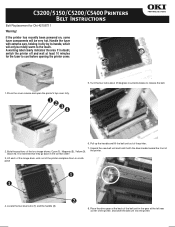
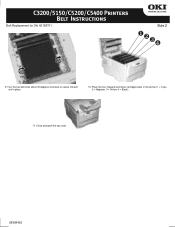
... drive gear at the back of the belt unit in the gear at least 10 minutes for Oki 42158711 Warning! It is essential that they go back in a safe place 4. Lift each of the image drum units out of the printer, and lower the belt unit into the printer. Handle the fuser... with extreme care, holding it with the blue handle toward the front of the printer. 7. Note the positions of the four image drums: Cyan (1), Magenta (2), Yellow (3), the printer. If the printer has recently been powered on, some fuser components will only be very hot. Turn the two locks...
... drive gear at the back of the belt unit in the gear at least 10 minutes for Oki 42158711 Warning! It is essential that they go back in a safe place 4. Lift each of the image drum units out of the printer, and lower the belt unit into the printer. Handle the fuser... with extreme care, holding it with the blue handle toward the front of the printer. 7. Note the positions of the four image drums: Cyan (1), Magenta (2), Yellow (3), the printer. If the printer has recently been powered on, some fuser components will only be very hot. Turn the two locks...
Belt Instructions
Page 2
Turn the two belt locks about 45 degrees clockwise to secure the belt unit in the printer (1 = Cyan, 2 = Magenta, 3 = Yellow, 4 = Black): 11. Place the four image drums/toner cartridges back in place. 10. Close and latch the top cover. 58368402 C3200/5150/C5200/C5400 Printers Belt Instructions Belt Replacement for Oki 42158701 Side 2 9.
Turn the two belt locks about 45 degrees clockwise to secure the belt unit in the printer (1 = Cyan, 2 = Magenta, 3 = Yellow, 4 = Black): 11. Place the four image drums/toner cartridges back in place. 10. Close and latch the top cover. 58368402 C3200/5150/C5200/C5400 Printers Belt Instructions Belt Replacement for Oki 42158701 Side 2 9.
Guide: Handy Reference C5150/C5200 Series (American English)
Page 4
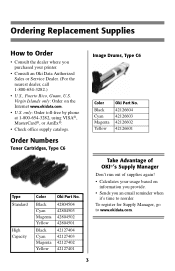
...Cartridges, Type C6 Image Drums, Type C6 Color Black Cyan Magenta Yellow Oki Part No. 42126604 42126603 42126602 42126601 Type Standard High Capacity Color Black Cyan Magenta Yellow Black Cyan Magenta Yellow Oki Part No. 42804504 42804503 42804502 42804501 42127404 42127403 42127402 42127401 Take Advantage of OKI®'s Supply Manager Don...'t run out of supplies again! • Calculates your printer. • Consult an Oki Data Authorized Sales or Service Dealer. (For the nearest dealer, call 1-800-654-3282.) • U.S., Puerto Rico, Guam, U.S. Virgin Islands ...
...Cartridges, Type C6 Image Drums, Type C6 Color Black Cyan Magenta Yellow Oki Part No. 42126604 42126603 42126602 42126601 Type Standard High Capacity Color Black Cyan Magenta Yellow Black Cyan Magenta Yellow Oki Part No. 42804504 42804503 42804502 42804501 42127404 42127403 42127402 42127401 Take Advantage of OKI®'s Supply Manager Don...'t run out of supplies again! • Calculates your printer. • Consult an Oki Data Authorized Sales or Service Dealer. (For the nearest dealer, call 1-800-654-3282.) • U.S., Puerto Rico, Guam, U.S. Virgin Islands ...

Guide: Handy Reference C5150/C5200 Series (American English)
Page 27
Caution! The fuser (behind cyan [C] toner) may be hot. 26 Clearing Media Jams (cont.) Jam 381 OPEN TOP COVER 381: PAPER JAM 1 3 Remove the image drums/ toner cartridges: Caution! To avoid damage to the drums: • Be sure to set the drums on a flat surface. 2 • Do not touch the shiny green area on the bottom of the drums. CMY K • Do not expose the drums to light for more than 5 minutes.
Caution! The fuser (behind cyan [C] toner) may be hot. 26 Clearing Media Jams (cont.) Jam 381 OPEN TOP COVER 381: PAPER JAM 1 3 Remove the image drums/ toner cartridges: Caution! To avoid damage to the drums: • Be sure to set the drums on a flat surface. 2 • Do not touch the shiny green area on the bottom of the drums. CMY K • Do not expose the drums to light for more than 5 minutes.

Guide: Handy Reference C5150/C5200 Series (American English)
Page 38
Push the lock lever toward the back of the display to indicate that color XXXX (e.g, BLACK) image drum needs to continue printing. XXXX DRUM NEAR LIFE Appears on the second line of the printer as far as separate groups of pages instead of the more information). 37 What to ... time). • Install additional memory in the printer (see your on-line User's Guide. What to Do Replace the XXXX image drum. (See the instructions supplied with the new image drum.) XXX TONER LOW Appears on the second line of the display to indicate that the lever for more common error messages...
Push the lock lever toward the back of the display to indicate that color XXXX (e.g, BLACK) image drum needs to continue printing. XXXX DRUM NEAR LIFE Appears on the second line of the printer as far as separate groups of pages instead of the more information). 37 What to ... time). • Install additional memory in the printer (see your on-line User's Guide. What to Do Replace the XXXX image drum. (See the instructions supplied with the new image drum.) XXX TONER LOW Appears on the second line of the display to indicate that the lever for more common error messages...

User's Guide
Page 3
... 25 How To Make Changes in The Menus 25 Summary of Menu Defaults 28 Printer Menus 32 Replacing Consumables 46 Toner Cartridge Replacement 47 Image Drum Replacement 55 Belt Unit Replacement 64 Fuser Replacement 70 Clearing Paper Jams 75 Troubleshooting 96 LCD messages 96 Problem solving 101 Options 110 RAM Memory...
... 25 How To Make Changes in The Menus 25 Summary of Menu Defaults 28 Printer Menus 32 Replacing Consumables 46 Toner Cartridge Replacement 47 Image Drum Replacement 55 Belt Unit Replacement 64 Fuser Replacement 70 Clearing Paper Jams 75 Troubleshooting 96 LCD messages 96 Problem solving 101 Options 110 RAM Memory...

User's Guide
Page 11
... lb. US Bond (90 g/m²) • Xerox® 4024, 20 lb.US Bond (75 g/m²) • Oki® 52206101 Bright White Proofing Paper, 32 lb. However, this will seriously affect the life of the image drum and give poor print quality. US Bond (120 g/m2) Recommendations • Check http://my.okidata.com...
... lb. US Bond (90 g/m²) • Xerox® 4024, 20 lb.US Bond (75 g/m²) • Oki® 52206101 Bright White Proofing Paper, 32 lb. However, this will seriously affect the life of the image drum and give poor print quality. US Bond (120 g/m2) Recommendations • Check http://my.okidata.com...

User's Guide
Page 30
... HUB LINK SETTING MEMORY MENU† SYS ADJUST MENU† RECEIVE BUF SIZE FLASH INITIALIZE X ADJUST Y ADJUST DUPLEX X ADJUST DUPLEX Y ADJUST MAINTENANCE MENU USAGE MENU DRUM CLEANING MENU RESET SAVE MENU POWER SAVE PAPER BLACK SET PAPER COLOR SET TRNSPR BLACK SET TRANSPR COLOR SET TOTAL PAGE COUNT TRAY1 PAGE COUNT...
... HUB LINK SETTING MEMORY MENU† SYS ADJUST MENU† RECEIVE BUF SIZE FLASH INITIALIZE X ADJUST Y ADJUST DUPLEX X ADJUST DUPLEX Y ADJUST MAINTENANCE MENU USAGE MENU DRUM CLEANING MENU RESET SAVE MENU POWER SAVE PAPER BLACK SET PAPER COLOR SET TRNSPR BLACK SET TRANSPR COLOR SET TOTAL PAGE COUNT TRAY1 PAGE COUNT...

User's Guide
Page 31
Menu Defaults (continued) Note: Menus/Items with a dagger (†) only appear when the appropriate option (e.g., Duplex Unit, Second Paper Tray, etc.) is installed. Menu Item MPT PAGE COUNT COLOR PAGE COUNT MONO PAGE COUNT K DRUM LIFE C DRUM LIFE M DRUM LIFE Y DRUM LIFE BELT LIFE FUSER LIFE K TONER C TONER M TONER Y TONER Default Setting nnnn nnnn nnnn REMAINING nn% REMAINING nn% REMAINING nn% REMAINING nn% REMAINING nn% REMAINING nn% REMAINING nn% REMAINING nn% REMAINING nn% REMAINING nn% Printer Menu • 31
Menu Defaults (continued) Note: Menus/Items with a dagger (†) only appear when the appropriate option (e.g., Duplex Unit, Second Paper Tray, etc.) is installed. Menu Item MPT PAGE COUNT COLOR PAGE COUNT MONO PAGE COUNT K DRUM LIFE C DRUM LIFE M DRUM LIFE Y DRUM LIFE BELT LIFE FUSER LIFE K TONER C TONER M TONER Y TONER Default Setting nnnn nnnn nnnn REMAINING nn% REMAINING nn% REMAINING nn% REMAINING nn% REMAINING nn% REMAINING nn% REMAINING nn% REMAINING nn% REMAINING nn% REMAINING nn% Printer Menu • 31

User's Guide
Page 37
...Item Settings Explanation DENSITY CONTROL AUTO MANUAL AUTO = image density is automatically adjusted: • at power on • when a new image drum or toner cartridge is installed • at power on this is done at intervals of 1 timing in Performs fine adjustment of image increments of... 100, 300 and 500 drum counts Auto adjustment takes up . C REG FINE ADJUST M REG FINE ADJUST Y REG FINE ADJUST -3 to + 3 in relation to the black image Default...
...Item Settings Explanation DENSITY CONTROL AUTO MANUAL AUTO = image density is automatically adjusted: • at power on • when a new image drum or toner cartridge is installed • at power on this is done at intervals of 1 timing in Performs fine adjustment of image increments of... 100, 300 and 500 drum counts Auto adjustment takes up . C REG FINE ADJUST M REG FINE ADJUST Y REG FINE ADJUST -3 to + 3 in relation to the black image Default...
User's Guide
Page 43
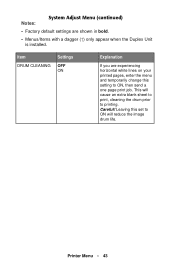
This will reduce the image drum life. Notes: System Adjust Menu (continued) • Factory default settings are experiencing horizontal white lines on your printed pages, enter the menu and temporarily change this set to ON will cause an extra blank sheet to print, cleaning the drum prior to ON, then send a one page print job. Printer Menu • 43 Leaving this setting to printing. Careful! Item DRUM CLEANING Settings OFF ON Explanation If you are shown in bold. • Menus/Items with a dagger (†) only appear when the Duplex Unit is installed.
This will reduce the image drum life. Notes: System Adjust Menu (continued) • Factory default settings are experiencing horizontal white lines on your printed pages, enter the menu and temporarily change this set to ON will cause an extra blank sheet to print, cleaning the drum prior to ON, then send a one page print job. Printer Menu • 43 Leaving this setting to printing. Careful! Item DRUM CLEANING Settings OFF ON Explanation If you are shown in bold. • Menus/Items with a dagger (†) only appear when the Duplex Unit is installed.

User's Guide
Page 45
... on page 111) is installed. Item TOTAL PAGE COUNT TRAY1 PAGE COUNT TRAY2 PAGE COUNT MPT PAGE COUNT COLOR PAGE COUNT MONO PAGE COUNT K DRUM LIFE C DRUM LIFE M DRUM LIFE Y DRUM LIFE BELT LIFE FUSER LIFE K TONER C TONER M TONER Y TONER Explanation The total number of pages fed from optional Tray 2. The total number of...
... on page 111) is installed. Item TOTAL PAGE COUNT TRAY1 PAGE COUNT TRAY2 PAGE COUNT MPT PAGE COUNT COLOR PAGE COUNT MONO PAGE COUNT K DRUM LIFE C DRUM LIFE M DRUM LIFE Y DRUM LIFE BELT LIFE FUSER LIFE K TONER C TONER M TONER Y TONER Explanation The total number of pages fed from optional Tray 2. The total number of...
User's Guide
Page 46
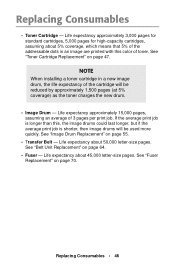
..."Toner Cartridge Replacement" on page 70. See "Fuser Replacement" on page 47. If the average print job is shorter, then image drums will be used more quickly. Replacing Consumables • 46 Life expectancy about 50,000 letter-size pages. Life expectancy approximately 15,000 ... cartridges, 5,000 pages for high-capacity cartridges, assuming about 5% coverage, which means that 5% of the addressable dots in a new image drum, the life expectancy of 3 pages per print job. See "Belt Unit Replacement" on page 55. • Transfer Belt - Replacing Consumables • Toner...
..."Toner Cartridge Replacement" on page 70. See "Fuser Replacement" on page 47. If the average print job is shorter, then image drums will be used more quickly. Replacing Consumables • 46 Life expectancy about 50,000 letter-size pages. Life expectancy approximately 15,000 ... cartridges, 5,000 pages for high-capacity cartridges, assuming about 5% coverage, which means that 5% of the addressable dots in a new image drum, the life expectancy of 3 pages per print job. See "Belt Unit Replacement" on page 55. • Transfer Belt - Replacing Consumables • Toner...

User's Guide
Page 52
If you do, it firmly against the spring on the drum unit. Replacing Consumables • 52 Do not touch the toner release lever until the toner cartridge is installed in the image drum. Holding the cartridge by its top center with the colored release lever to the right, insert the left end of the cartridge into the top of the image drum, pushing it will open the toner release slot and spill toner. 7. CAUTION!
If you do, it firmly against the spring on the drum unit. Replacing Consumables • 52 Do not touch the toner release lever until the toner cartridge is installed in the image drum. Holding the cartridge by its top center with the colored release lever to the right, insert the left end of the cartridge into the top of the image drum, pushing it will open the toner release slot and spill toner. 7. CAUTION!

User's Guide
Page 53
Lower the right end of the cartridge into the image drum unit, pressing it firmly down on the toner cartridge to open the toner release lever until the toner cartridge is properly seated in the image drum, then press back on the lever again. Important! Replacing Consumables • 53 To avoid toner spillage, do NOT open the toner slot and lock it does not, STOP! 8. If it in the image drum. The lever should move easily. and push down in place, then push the colored lock lever back to be sure that it is firmly seated in place.
Lower the right end of the cartridge into the image drum unit, pressing it firmly down on the toner cartridge to open the toner release lever until the toner cartridge is properly seated in the image drum, then press back on the lever again. Important! Replacing Consumables • 53 To avoid toner spillage, do NOT open the toner slot and lock it does not, STOP! 8. If it in the image drum. The lever should move easily. and push down in place, then push the colored lock lever back to be sure that it is firmly seated in place.

User's Guide
Page 55
You will put the image drum and toner cartridge on your working surface to protect it. Replacing Consumables • 55 Image Drum Replacement REPLACE IMAGE DRUM nnn: ZZZZ DRUM LIFE * nnn: ZZZZ = 350: YELLOW 351: MAGENTA 352: CYAN 353: BLACK Drum Color Black Cyan Magenta Yellow Oki Order # 42126604 42126603 42126602 42126601 1. Place two sheets of paper on the paper while replacing them.
You will put the image drum and toner cartridge on your working surface to protect it. Replacing Consumables • 55 Image Drum Replacement REPLACE IMAGE DRUM nnn: ZZZZ DRUM LIFE * nnn: ZZZZ = 350: YELLOW 351: MAGENTA 352: CYAN 353: BLACK Drum Color Black Cyan Magenta Yellow Oki Order # 42126604 42126603 42126602 42126601 1. Place two sheets of paper on the paper while replacing them.

User's Guide
Page 57
Lift the image drum, complete with its toner cartridge, out of the printer and put it down on one of the sheets of the four image drums: Cyan (1), Magenta (2), Yellow (3), Black (4): 4. Note the positions of paper. Replacing Consumables • 57 3.
Lift the image drum, complete with its toner cartridge, out of the printer and put it down on one of the sheets of the four image drums: Cyan (1), Magenta (2), Yellow (3), Black (4): 4. Note the positions of paper. Replacing Consumables • 57 3.


