
OkiLAN 8100 SoftNIC User's Guide
Page 5
Installation 65 Uninstallation 65 Printing utility 66 OKI LPR 66 System Requirement 66 To install the OKI LPR utility 67 Uninstallation 68 Microsoft Windows 69 Overview 69 Installation of TCP/IP Protocol 70 Windows 95/98/Me 71 Windows NT 4.0 71 Windows 2000 72 Windows XP 72 Network printer IP address configuration. .... 82 NetBEUI Protocol 83 Network Printer Settings 83 Windows 95/98/Me 83 Windows NT 4.0 84 Windows 2000 85 Windows XP 85 Printer driver configuration 86 Novell NetWare 88 Overview 88 Supported Versions and Modes 88 Remote Printer Mode 88 TABLE OF CONTENTS 3
Installation 65 Uninstallation 65 Printing utility 66 OKI LPR 66 System Requirement 66 To install the OKI LPR utility 67 Uninstallation 68 Microsoft Windows 69 Overview 69 Installation of TCP/IP Protocol 70 Windows 95/98/Me 71 Windows NT 4.0 71 Windows 2000 72 Windows XP 72 Network printer IP address configuration. .... 82 NetBEUI Protocol 83 Network Printer Settings 83 Windows 95/98/Me 83 Windows NT 4.0 84 Windows 2000 85 Windows XP 85 Printer driver configuration 86 Novell NetWare 88 Overview 88 Supported Versions and Modes 88 Remote Printer Mode 88 TABLE OF CONTENTS 3
OkiLAN 8100 SoftNIC User's Guide
Page 69
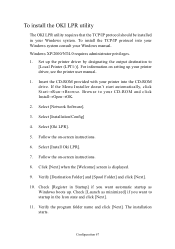
... want automatic startup as minimized] if you want to startup in your Windows system. Set up the printer driver by designating the output destination to your printer driver, see the printer user manual. 1. If the Menu Installer doesn't start automatically, click Start→Run→...TCP/IP protocol into your Windows system consult your printer into the CD-ROM drive. Windows XP/2000/NT4.0 requires administrator privileges. 1. Verify the program folder name and click [Next]. Select [Install Oki LPR]. 7. Verify [Destination Folder] and [Spool Folder] and click [Next]. 10. ...
... want automatic startup as minimized] if you want to startup in your Windows system. Set up the printer driver by designating the output destination to your printer driver, see the printer user manual. 1. If the Menu Installer doesn't start automatically, click Start→Run→...TCP/IP protocol into your Windows system consult your printer into the CD-ROM drive. Windows XP/2000/NT4.0 requires administrator privileges. 1. Verify the program folder name and click [Next]. Select [Install Oki LPR]. 7. Verify [Destination Folder] and [Spool Folder] and click [Next]. 10. ...
OkiLAN 8100 SoftNIC User's Guide
Page 82
With Windows XP, there are four options for printing using TCP/IP. > Oki LPR > Microsoft LPR > Port 9100 > IPP In order to be installed on page 75. Microsoft LPR To install this computer], clear the [Automatically detect and ... TCP/IP Printer Port Wizard] appears. Click [Next]. 7. [Welcome to this port, the following needs to use Microsoft LPR, it must first be carried out: 1. 8. OKI LPR Please follow the procedure described in the Windows 95/98/Me section on your system. Microsoft Windows 80 Select [Create a New Port] and [Type...
With Windows XP, there are four options for printing using TCP/IP. > Oki LPR > Microsoft LPR > Port 9100 > IPP In order to be installed on page 75. Microsoft LPR To install this computer], clear the [Automatically detect and ... TCP/IP Printer Port Wizard] appears. Click [Next]. 7. [Welcome to this port, the following needs to use Microsoft LPR, it must first be carried out: 1. 8. OKI LPR Please follow the procedure described in the Windows 95/98/Me section on your system. Microsoft Windows 80 Select [Create a New Port] and [Type...

OkiLAN 8100 SoftNIC User's Guide
Page 88
... and click OK. 8. Open the Valueadd\msft\net\netbeui folder, click the Netnbf.inf file and then click [Open]. Set up the printer driver as follows: Computer Name: Workgroup: Comment: OL07DB85 PrintServer EthernetBoard OKILAN 1. In the [Start] menu, select [Settings] then [Printers]. 3. Check...if the Workgroup name is selected and click [OK]. 9. Select [Have Disk] and insert your Windows XP CD-ROM. Select [Network] and click [Browse]. 6. Printer driver configuration In the following example, the printer has been configured as the default local printer. 2. Double-...
... and click OK. 8. Open the Valueadd\msft\net\netbeui folder, click the Netnbf.inf file and then click [Open]. Set up the printer driver as follows: Computer Name: Workgroup: Comment: OL07DB85 PrintServer EthernetBoard OKILAN 1. In the [Start] menu, select [Settings] then [Printers]. 3. Check...if the Workgroup name is selected and click [OK]. 9. Select [Have Disk] and insert your Windows XP CD-ROM. Select [Network] and click [Browse]. 6. Printer driver configuration In the following example, the printer has been configured as the default local printer. 2. Double-...
Installation Instructions for Duplex Unit, 42158411
Page 1
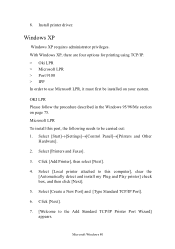
...on the display. 2. Click Start →Settings →Printers [Printers and Faxes for XP]. Windows Postscript Emulation Driver C5400n 1. Right click the Postscript emulation printer icon. Click Properties. © 2005 Oki Data Americas, Inc. 3. Change the Duplex Unit setting to Duplex. 4. Click OK ...® PCL Driver C5400, C5400n 1. The Printers (Printers and Faxes) dialog box opens. 2. Click Start →Settings →Printers [Printers and Faxes for XP]. Select LaserWriter 8. 3. Click Configure. 5. Click Apply Changes. Press ENTER. 3. "DUPLEX installed" should appear. ...
...on the display. 2. Click Start →Settings →Printers [Printers and Faxes for XP]. Windows Postscript Emulation Driver C5400n 1. Right click the Postscript emulation printer icon. Click Properties. © 2005 Oki Data Americas, Inc. 3. Change the Duplex Unit setting to Duplex. 4. Click OK ...® PCL Driver C5400, C5400n 1. The Printers (Printers and Faxes) dialog box opens. 2. Click Start →Settings →Printers [Printers and Faxes for XP]. Select LaserWriter 8. 3. Click Configure. 5. Click Apply Changes. Press ENTER. 3. "DUPLEX installed" should appear. ...

User's Guide
Page 4
Using the Printer Driver 125 Windows 98/Me/XP/NT 4.0 125 Windows 2000 140 Utility Programs 154 Overview 154 Color Swatch Utility 154 PrintSuperVision Utility: Model C5200n Only 158 Network Printer Status Utility: Model C5200n Only 159 LPR Utility 162 Contents • 4
Using the Printer Driver 125 Windows 98/Me/XP/NT 4.0 125 Windows 2000 140 Utility Programs 154 Overview 154 Color Swatch Utility 154 PrintSuperVision Utility: Model C5200n Only 158 Network Printer Status Utility: Model C5200n Only 159 LPR Utility 162 Contents • 4

User's Guide
Page 115
... doing a lot of black-only printing, you print color documents. Click Start →Settings →Printers [Printers and Faxes in Windows XP]. 2. Windows 2000/XP: select Properties, then click Printing Preferences. c. Windows 98/Me: select Properties, then click Printer Properties. Windows: Black Printing • ..., the printer will print black using all four toner colors. To Select Black Printing for a Particular Job: Click Grayscale on the driver's Color tab as you print the job: To Select Black Printing as the default, you must select either Auto Color or Manual Color...
... doing a lot of black-only printing, you print color documents. Click Start →Settings →Printers [Printers and Faxes in Windows XP]. 2. Windows 2000/XP: select Properties, then click Printing Preferences. c. Windows 98/Me: select Properties, then click Printer Properties. Windows: Black Printing • ..., the printer will print black using all four toner colors. To Select Black Printing for a Particular Job: Click Grayscale on the driver's Color tab as you print the job: To Select Black Printing as the default, you must select either Auto Color or Manual Color...

User's Guide
Page 125
...items as those in the operator panel menus, and you print documents from within the document print dialog box. Windows: Using the Printer Driver • 125 The other Windows operating systems may appear slightly different, but the principles are found in the operator panel menus. Where... (see page 139) NOTE Most applications allow the printer properties to be accessed from Windows, the settings in the Windows printer driver will override those items in the operator panel menus. Windows 98/Me/XP/NT 4.0 NOTE The illustrations in this section show the Windows Me Operating System.
...items as those in the operator panel menus, and you print documents from within the document print dialog box. Windows: Using the Printer Driver • 125 The other Windows operating systems may appear slightly different, but the principles are found in the operator panel menus. Where... (see page 139) NOTE Most applications allow the printer properties to be accessed from Windows, the settings in the Windows printer driver will override those items in the operator panel menus. Windows 98/Me/XP/NT 4.0 NOTE The illustrations in this section show the Windows Me Operating System.

User's Guide
Page 126
... list. b. To set additional parameters, click Options (2), then make your application and select File →Print. 2. Windows: Using the Printer Driver • 126 Windows 98/Me/NT4.0: click Properties. On the Setup tab, under Finishing Mode (1), select the required number of pages per ...sheet in your selections and click OK. 4. Windows XP: click Preferences. 3. Windows XP: click Print. In the Print dialog box, select your printer, then: a. N-Up Printing (Printing Multiple Pages on One Sheet) 98...
... list. b. To set additional parameters, click Options (2), then make your application and select File →Print. 2. Windows: Using the Printer Driver • 126 Windows 98/Me/NT4.0: click Properties. On the Setup tab, under Finishing Mode (1), select the required number of pages per ...sheet in your selections and click OK. 4. Windows XP: click Preferences. 3. Windows XP: click Print. In the Print dialog box, select your printer, then: a. N-Up Printing (Printing Multiple Pages on One Sheet) 98...

User's Guide
Page 127
NOTE Up to 47¼'' (1.2 m) long. Printing Custom Page Sizes 98 / Me / XP / NT 4.0 Custom page sizes can be printed from 8¼'' to 8½'' (210 to 215.9 mm) wide by up to 32 custom page sizes can be ... sure the rear exit path is open: 2. Open the file in the tray of your application and select File →Print. Windows: Using the Printer Driver • 127 Tray 1 and Tray 2 Custom Size Range • minimum 3.94'' x 5.83'' [100 x 148 mm] • maximum 8½'' x 14'' [215.9 x 355.6 mm]. Banners must be...
NOTE Up to 47¼'' (1.2 m) long. Printing Custom Page Sizes 98 / Me / XP / NT 4.0 Custom page sizes can be printed from 8¼'' to 8½'' (210 to 215.9 mm) wide by up to 32 custom page sizes can be ... sure the rear exit path is open: 2. Open the file in the tray of your application and select File →Print. Windows: Using the Printer Driver • 127 Tray 1 and Tray 2 Custom Size Range • minimum 3.94'' x 5.83'' [100 x 148 mm] • maximum 8½'' x 14'' [215.9 x 355.6 mm]. Banners must be...

User's Guide
Page 128
... You may see "Creating and Saving Custom Page Sizes" on page 129). Select the tray you do, click OK and the driver will be using in the dialog box which appears, then click OK. Windows XP: click Preferences. 5. If you will automatically make the needed changes to correct for the conflict. 6. Windows... XP: click Print. In the Print dialog box, select your printer, then: a. Windows 98/Me/NT4.0: click OK. 4. b. On the Setup tab, under Media, select User ...
... You may see "Creating and Saving Custom Page Sizes" on page 129). Select the tray you do, click OK and the driver will be using in the dialog box which appears, then click OK. Windows XP: click Preferences. 5. If you will automatically make the needed changes to correct for the conflict. 6. Windows... XP: click Print. In the Print dialog box, select your printer, then: a. Windows 98/Me/NT4.0: click OK. 4. b. On the Setup tab, under Media, select User ...

User's Guide
Page 129
... 4.0 1. Click Start →Settings →Printers [Printers and Faxes for XP]. 2. Windows NT 4.0: select Document Defaults. 3. Click Custom Size. 5. Windows XP: select Properties, then click Printing Preference. c. For each size, enter a name, width and height, then click Add. 6. Right click the printer icon, then: a. When done, ...: select Properties, then click the Printer Properties tab. On the Setup tab, click Paper Feed Options. 4. Click OK three more times. b. Windows: Using the Printer Driver • 129
... 4.0 1. Click Start →Settings →Printers [Printers and Faxes for XP]. 2. Windows NT 4.0: select Document Defaults. 3. Click Custom Size. 5. Windows XP: select Properties, then click Printing Preference. c. For each size, enter a name, width and height, then click Add. 6. Right click the printer icon, then: a. When done, ...: select Properties, then click the Printer Properties tab. On the Setup tab, click Paper Feed Options. 4. Click OK three more times. b. Windows: Using the Printer Driver • 129

User's Guide
Page 130
... icon, then: a Windows 98/Me: select Properties, then click the Printer Properties tab. Windows: Using the Printer Driver • 130 Open the file in your printer, then: a. Windows XP: click Preferences. In the Print dialog box, select your application and select File →Print. 2. Changing the Resolution... for A Print Job 98 / Me / XP / NT 4.0 NOTE These instructions explain how to change the settings as you wish to change the settings to apply to all jobs (default ...
... icon, then: a Windows 98/Me: select Properties, then click the Printer Properties tab. Windows: Using the Printer Driver • 130 Open the file in your printer, then: a. Windows XP: click Preferences. In the Print dialog box, select your application and select File →Print. 2. Changing the Resolution... for A Print Job 98 / Me / XP / NT 4.0 NOTE These instructions explain how to change the settings as you wish to change the settings to apply to all jobs (default ...

User's Guide
Page 131
Click OK 6. Windows 98/Me/NT4.0: click OK. Windows: Using the Printer Driver • 131 Windows XP: click Print. Select Toner Saving if appropriate. 5. 3. On the Job Options tab, select the required printing resolution under Quality: • Fine = high resolution, slower speed: choose this one for optimum results when printing graphics. • Normal = medium resolution, medium speed: the default. • Fast = low resolution, fast speed: choose this one for drafts or documents without graphics. 4.
Click OK 6. Windows 98/Me/NT4.0: click OK. Windows: Using the Printer Driver • 131 Windows XP: click Print. Select Toner Saving if appropriate. 5. 3. On the Job Options tab, select the required printing resolution under Quality: • Fine = high resolution, slower speed: choose this one for optimum results when printing graphics. • Normal = medium resolution, medium speed: the default. • Fast = low resolution, fast speed: choose this one for drafts or documents without graphics. 4.

User's Guide
Page 132
... Properties, then click Printing Preference. c Windows NT 4.0: select Document Defaults. • Follow steps 3, etc., below. Windows 98/Me/NT4.0: click Properties. Windows XP: click Preferences Windows: Using the Printer Driver • 132 US Bond (75 to 105 g/m²). • Paper must be installed in your printer, then: a. NOTE These instructions explain how...
... Properties, then click Printing Preference. c Windows NT 4.0: select Document Defaults. • Follow steps 3, etc., below. Windows 98/Me/NT4.0: click Properties. Windows XP: click Preferences Windows: Using the Printer Driver • 132 US Bond (75 to 105 g/m²). • Paper must be installed in your printer, then: a. NOTE These instructions explain how...

User's Guide
Page 133
Click OK. 5. 3. Windows: Using the Printer Driver • 133 Windows XP: click Print. On the Setup tab, under 2-Sided Printing, select Long Edge or Short Edge. 4. Windows 98/Me/NT4.0: click OK.
Click OK. 5. 3. Windows: Using the Printer Driver • 133 Windows XP: click Print. On the Setup tab, under 2-Sided Printing, select Long Edge or Short Edge. 4. Windows 98/Me/NT4.0: click OK.

User's Guide
Page 134
In the Print dialog box, select your application and select File →Print. 2. Windows: Using the Printer Driver • 134 Windows XP: click Preferences. Windows 98/Me/NT4.0: click Properties. b. Printing Booklets 98 / Me / XP / NT 4.0 NOTES • You must have the duplex unit installed and enabled in order to print booklets. • Not...
In the Print dialog box, select your application and select File →Print. 2. Windows: Using the Printer Driver • 134 Windows XP: click Preferences. Windows 98/Me/NT4.0: click Properties. b. Printing Booklets 98 / Me / XP / NT 4.0 NOTES • You must have the duplex unit installed and enabled in order to print booklets. • Not...

User's Guide
Page 135
Click Options, enter your settings, and click OK. 5. Windows: Using the Printer Driver • 135 3. On the Setup tab, under Finishing Mode, select Booklet in the drop-down list. 4. Click OK. 6. Windows 98/Me/NT4.0: click OK. Windows XP: click Print.
Click Options, enter your settings, and click OK. 5. Windows: Using the Printer Driver • 135 3. On the Setup tab, under Finishing Mode, select Booklet in the drop-down list. 4. Click OK. 6. Windows 98/Me/NT4.0: click OK. Windows XP: click Print.

User's Guide
Page 136
b. Windows XP: click Preferences. 3. Select a name from the Watermark list or click New to set up a new watermark. In the Print dialog box, select your application and select File →Print. 2. Open the file in your printer, then: a. Windows: Using the Printer Driver • 136 On the Job Options tab, click Watermark. 4. Windows 98/Me/NT4.0: click Properties. Printing Watermarks 98 / Me / XP / NT 4.0 1.
b. Windows XP: click Preferences. 3. Select a name from the Watermark list or click New to set up a new watermark. In the Print dialog box, select your application and select File →Print. 2. Open the file in your printer, then: a. Windows: Using the Printer Driver • 136 On the Job Options tab, click Watermark. 4. Windows 98/Me/NT4.0: click Properties. Printing Watermarks 98 / Me / XP / NT 4.0 1.

User's Guide
Page 137
Windows: Using the Printer Driver • 137 NOTE To create a new watermark or edit an existing watermark: • Click the New or Edit button. • Enter the text for the watermark and select the font, size, angle, etc., to print the watermark only on the first page of the document, select First Page only. 6. Click OK twice. 7. If you wish to be used. • Click OK. Windows XP: click Print. Windows 98/Me/NT4.0: click OK. The new watermark appears in the Watermark list. 5.
Windows: Using the Printer Driver • 137 NOTE To create a new watermark or edit an existing watermark: • Click the New or Edit button. • Enter the text for the watermark and select the font, size, angle, etc., to print the watermark only on the first page of the document, select First Page only. 6. Click OK twice. 7. If you wish to be used. • Click OK. Windows XP: click Print. Windows 98/Me/NT4.0: click OK. The new watermark appears in the Watermark list. 5.


