
PrintSuperVision Configuration Guide
Page 56
Select the Picture radio button if you wish to be reminded of both supplies and maintenance items (such as fusers and transfer belts). 5. Click Tools from the main menu and Calendar from the supplies report and Show maintenance items if you wish to be replaced. Click the Show ...
Select the Picture radio button if you wish to be reminded of both supplies and maintenance items (such as fusers and transfer belts). 5. Click Tools from the main menu and Calendar from the supplies report and Show maintenance items if you wish to be replaced. Click the Show ...
PrintSuperVision Configuration Guide
Page 61
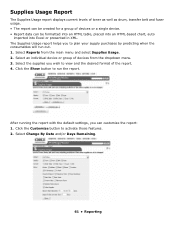
... predicting when the consumables will run the report. Supplies Usage Report The Supplies Usage report displays current levels of toner as well as drum, transfer belt and fuser usage. • The report can be formatted into an HTML table, placed into an HTML-based chart, auto imported into Excel or presented...
... predicting when the consumables will run the report. Supplies Usage Report The Supplies Usage report displays current levels of toner as well as drum, transfer belt and fuser usage. • The report can be formatted into an HTML table, placed into an HTML-based chart, auto imported into Excel or presented...
Belt Instructions
Page 1
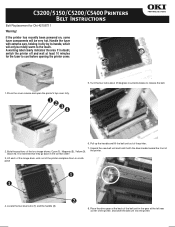
... indicates the area. Unpack the new belt unit and hold it with extreme care, holding it only by its handle, which will be mildly warm to the touch. Note the positions of the printer and place them in the gear at least 10 minutes for Oki 42158711 Warning! Locate the two blue... locks (1) and the handle (2). 8. Place the drive gear at the back of 2. Handle the fuser with the blue handle toward the front of the belt unit in a safe place 4. If in the correct order! 3. Turn...
... indicates the area. Unpack the new belt unit and hold it with extreme care, holding it only by its handle, which will be mildly warm to the touch. Note the positions of the printer and place them in the gear at least 10 minutes for Oki 42158711 Warning! Locate the two blue... locks (1) and the handle (2). 8. Place the drive gear at the back of 2. Handle the fuser with the blue handle toward the front of the belt unit in a safe place 4. If in the correct order! 3. Turn...
Belt Instructions
Page 2
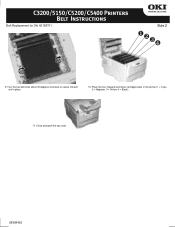
Turn the two belt locks about 45 degrees clockwise to secure the belt unit in the printer (1 = Cyan, 2 = Magenta, 3 = Yellow, 4 = Black): 11. Close and latch the top cover. 58368402 Place the four image drums/toner cartridges back in place. 10. C3200/5150/C5200/C5400 Printers Belt Instructions Belt Replacement for Oki 42158701 Side 2 9.
Turn the two belt locks about 45 degrees clockwise to secure the belt unit in the printer (1 = Cyan, 2 = Magenta, 3 = Yellow, 4 = Black): 11. Close and latch the top cover. 58368402 Place the four image drums/toner cartridges back in place. 10. C3200/5150/C5200/C5400 Printers Belt Instructions Belt Replacement for Oki 42158701 Side 2 9.

User's Guide
Page 3
... Make Changes in The Menus 25 Summary of Menu Defaults 28 Printer Menus 32 Replacing Consumables 46 Toner Cartridge Replacement 47 Image Drum Replacement 55 Belt Unit Replacement 64 Fuser Replacement 70 Clearing Paper Jams 75 Troubleshooting 96 LCD messages 96 Problem solving 101 Options 110 RAM Memory 110 Second Paper...
... Make Changes in The Menus 25 Summary of Menu Defaults 28 Printer Menus 32 Replacing Consumables 46 Toner Cartridge Replacement 47 Image Drum Replacement 55 Belt Unit Replacement 64 Fuser Replacement 70 Clearing Paper Jams 75 Troubleshooting 96 LCD messages 96 Problem solving 101 Options 110 RAM Memory 110 Second Paper...

User's Guide
Page 31
Menu Defaults (continued) Note: Menus/Items with a dagger (†) only appear when the appropriate option (e.g., Duplex Unit, Second Paper Tray, etc.) is installed. Menu Item MPT PAGE COUNT COLOR PAGE COUNT MONO PAGE COUNT K DRUM LIFE C DRUM LIFE M DRUM LIFE Y DRUM LIFE BELT LIFE FUSER LIFE K TONER C TONER M TONER Y TONER Default Setting nnnn nnnn nnnn REMAINING nn% REMAINING nn% REMAINING nn% REMAINING nn% REMAINING nn% REMAINING nn% REMAINING nn% REMAINING nn% REMAINING nn% REMAINING nn% Printer Menu • 31
Menu Defaults (continued) Note: Menus/Items with a dagger (†) only appear when the appropriate option (e.g., Duplex Unit, Second Paper Tray, etc.) is installed. Menu Item MPT PAGE COUNT COLOR PAGE COUNT MONO PAGE COUNT K DRUM LIFE C DRUM LIFE M DRUM LIFE Y DRUM LIFE BELT LIFE FUSER LIFE K TONER C TONER M TONER Y TONER Default Setting nnnn nnnn nnnn REMAINING nn% REMAINING nn% REMAINING nn% REMAINING nn% REMAINING nn% REMAINING nn% REMAINING nn% REMAINING nn% REMAINING nn% REMAINING nn% Printer Menu • 31

User's Guide
Page 45
... PAGE COUNT TRAY1 PAGE COUNT TRAY2 PAGE COUNT MPT PAGE COUNT COLOR PAGE COUNT MONO PAGE COUNT K DRUM LIFE C DRUM LIFE M DRUM LIFE Y DRUM LIFE BELT LIFE FUSER LIFE K TONER C TONER M TONER Y TONER Explanation The total number of pages printed in color. The total number of pages printed. Usage Menu This...
... PAGE COUNT TRAY1 PAGE COUNT TRAY2 PAGE COUNT MPT PAGE COUNT COLOR PAGE COUNT MONO PAGE COUNT K DRUM LIFE C DRUM LIFE M DRUM LIFE Y DRUM LIFE BELT LIFE FUSER LIFE K TONER C TONER M TONER Y TONER Explanation The total number of pages printed in color. The total number of pages printed. Usage Menu This...
User's Guide
Page 46
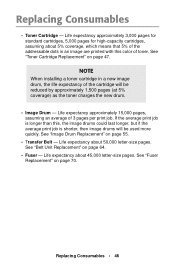
... the cartridge will be reduced by approximately 1,500 pages (at 5% coverage) as the toner charges the new drum. • Image Drum - See "Belt Unit Replacement" on page 55. • Transfer Belt - See "Image Drum Replacement" on page 64. • Fuser - NOTE When installing a toner cartridge in an image are printed with this...
... the cartridge will be reduced by approximately 1,500 pages (at 5% coverage) as the toner charges the new drum. • Image Drum - See "Belt Unit Replacement" on page 55. • Transfer Belt - See "Image Drum Replacement" on page 64. • Fuser - NOTE When installing a toner cartridge in an image are printed with this...

User's Guide
Page 64
If the printer has been powered on, the fuser is clearly labelled. This area is hot. WARNING! Do not touch it. Press the cover release and open the top cover fully. Replacing Consumables • 64 Belt Unit Replacement Oki 42158711 REPLACE BELT 355: BELT LIFE The belt unit is located under the four image drums. This unit requires replacement approximately every 50,000 pages. 1.
If the printer has been powered on, the fuser is clearly labelled. This area is hot. WARNING! Do not touch it. Press the cover release and open the top cover fully. Replacing Consumables • 64 Belt Unit Replacement Oki 42158711 REPLACE BELT 355: BELT LIFE The belt unit is located under the four image drums. This unit requires replacement approximately every 50,000 pages. 1.

User's Guide
Page 66
4. Replacing Consumables • 66 Turn the two locks about 45° counterclockwise to release the belt. Locate the two blue locks (1) and the handle (2). 5.
4. Replacing Consumables • 66 Turn the two locks about 45° counterclockwise to release the belt. Locate the two blue locks (1) and the handle (2). 5.

User's Guide
Page 67
Replacing Consumables • 67 Place the drive gear at the back of the belt unit in the gear at the left rear corner of the printer. 8. 6. Unpack the new belt unit and hold it with the blue handle toward the front of the printer, and lower the belt unit into the printer. Pull up the handle and lift the belt unit out of the printer. 7.
Replacing Consumables • 67 Place the drive gear at the back of the belt unit in the gear at the left rear corner of the printer. 8. 6. Unpack the new belt unit and hold it with the blue handle toward the front of the printer, and lower the belt unit into the printer. Pull up the handle and lift the belt unit out of the printer. 7.

User's Guide
Page 68
Place the four image drums/toner cartridges back in place. 10. 9. Turn the two belt locks about 45° clockwise to secure the belt unit in the printer (1 = Cyan, 2 = Magenta, 3 = Yellow, 4 = Black): Replacing Consumables • 68
Place the four image drums/toner cartridges back in place. 10. 9. Turn the two belt locks about 45° clockwise to secure the belt unit in the printer (1 = Cyan, 2 = Magenta, 3 = Yellow, 4 = Black): Replacing Consumables • 68

User's Guide
Page 82
Remove any sharp or abrasive objects to separate sheets from the belt. Clearing Paper Jams • 82 CAUTION! Do not use any sheets of paper on the belt unit. This may damage the belt surface. 4.
Remove any sharp or abrasive objects to separate sheets from the belt. Clearing Paper Jams • 82 CAUTION! Do not use any sheets of paper on the belt unit. This may damage the belt surface. 4.

User's Guide
Page 97
Check to be sure that the fuser unit is properly seated in the printer and that the belt unit latches are pushed all the way toward the back of the printer: CHECK MP TRAY 390: PAPER :JAM Paper has jammed Clear the jam: ... Do Open the top cover and lift out the black (K) and Yellow (Y) image drums, placing them on page 94. Tray. Troubleshooting • 97 Message CHECK BELT 330: BELT MISSING Meaning The belt unit is not properly installed.
Check to be sure that the fuser unit is properly seated in the printer and that the belt unit latches are pushed all the way toward the back of the printer: CHECK MP TRAY 390: PAPER :JAM Paper has jammed Clear the jam: ... Do Open the top cover and lift out the black (K) and Yellow (Y) image drums, placing them on page 94. Tray. Troubleshooting • 97 Message CHECK BELT 330: BELT MISSING Meaning The belt unit is not properly installed.

User's Guide
Page 99
Appears on the Make sure you have a second line of the replacement unit on the second line of the display to indicate that consumable xxx (e.g., belt, fuser, toner, image drum) is nearing end of life and should be replaced. Replace the indicated toner: 410: Y = Yellow 411 M = Magenta 412: C ...involving the network. The printer has received invalid data. Press ON-LINE. Reprocess and resend the print job. Replace the indicated component: YYYY = Fuser, Belt, C Drum, Y Drum, M Drum, K Drum. Message OPEN DUPLEX COVER nnn: PAPER JAM OPEN FRONT COVER nnn: PAPER JAM OPEN TOP COVER ...
Appears on the Make sure you have a second line of the replacement unit on the second line of the display to indicate that consumable xxx (e.g., belt, fuser, toner, image drum) is nearing end of life and should be replaced. Replace the indicated toner: 410: Y = Yellow 411 M = Magenta 412: C ...involving the network. The printer has received invalid data. Press ON-LINE. Reprocess and resend the print job. Replace the indicated component: YYYY = Fuser, Belt, C Drum, Y Drum, M Drum, K Drum. Message OPEN DUPLEX COVER nnn: PAPER JAM OPEN FRONT COVER nnn: PAPER JAM OPEN TOP COVER ...

User's Guide
Page 100
.... Note: If you see a series of the display to indicate that consumable xxx (e.g., belt, fuser, image drum) will need to be sure to write these down the message including the error number "nnn," then call your authorized Oki Data Service Dealer for service. An error has occurred which requires service. If this...
.... Note: If you see a series of the display to indicate that consumable xxx (e.g., belt, fuser, image drum) will need to be sure to write these down the message including the error number "nnn," then call your authorized Oki Data Service Dealer for service. An error has occurred which requires service. If this...

User's Guide
Page 114
... Toner life Standard cartridge: 3,000 pages at 5% coverage High-capacity cartridge: 5,000 pages at 5% coverage Image drum life 15,000 pages at 3 pages per job Belt life 50,000 letter-size pages Fuser life 45,000 letter-size pages Specifications • 114
... Toner life Standard cartridge: 3,000 pages at 5% coverage High-capacity cartridge: 5,000 pages at 5% coverage Image drum life 15,000 pages at 3 pages per job Belt life 50,000 letter-size pages Fuser life 45,000 letter-size pages Specifications • 114

User's Guide
Page 3
... Make Changes in The Menus 25 Summary of Menu Defaults 28 Printer Menus 32 Replacing Consumables 46 Toner Cartridge Replacement 47 Image Drum Replacement 55 Belt Unit Replacement 64 Fuser Replacement 70 Clearing Paper Jams 75 Troubleshooting 96 LCD messages 96 Problem solving 101 Options 110 RAM Memory 110 Second Paper...
... Make Changes in The Menus 25 Summary of Menu Defaults 28 Printer Menus 32 Replacing Consumables 46 Toner Cartridge Replacement 47 Image Drum Replacement 55 Belt Unit Replacement 64 Fuser Replacement 70 Clearing Paper Jams 75 Troubleshooting 96 LCD messages 96 Problem solving 101 Options 110 RAM Memory 110 Second Paper...

User's Guide
Page 31
Menu Item MPT PAGE COUNT COLOR PAGE COUNT MONO PAGE COUNT K DRUM LIFE C DRUM LIFE M DRUM LIFE Y DRUM LIFE BELT LIFE FUSER LIFE K TONER C TONER M TONER Y TONER Default Setting nnnn nnnn nnnn REMAINING nn% REMAINING nn% REMAINING nn% REMAINING nn% REMAINING nn% REMAINING nn% REMAINING nn% REMAINING nn% REMAINING nn% REMAINING nn% Printer Menu • 31 Menu Defaults (continued) Note: Menus/Items with a dagger (†) only appear when the appropriate option (e.g., Duplex Unit, Second Paper Tray, etc.) is installed.
Menu Item MPT PAGE COUNT COLOR PAGE COUNT MONO PAGE COUNT K DRUM LIFE C DRUM LIFE M DRUM LIFE Y DRUM LIFE BELT LIFE FUSER LIFE K TONER C TONER M TONER Y TONER Default Setting nnnn nnnn nnnn REMAINING nn% REMAINING nn% REMAINING nn% REMAINING nn% REMAINING nn% REMAINING nn% REMAINING nn% REMAINING nn% REMAINING nn% REMAINING nn% Printer Menu • 31 Menu Defaults (continued) Note: Menus/Items with a dagger (†) only appear when the appropriate option (e.g., Duplex Unit, Second Paper Tray, etc.) is installed.

User's Guide
Page 45
... PAGE COUNT TRAY1 PAGE COUNT TRAY2 PAGE COUNT MPT PAGE COUNT COLOR PAGE COUNT MONO PAGE COUNT K DRUM LIFE C DRUM LIFE M DRUM LIFE Y DRUM LIFE BELT LIFE FUSER LIFE K TONER C TONER M TONER Y TONER Explanation The total number of pages printed in color. The total number of pages fed from optional Tray...
... PAGE COUNT TRAY1 PAGE COUNT TRAY2 PAGE COUNT MPT PAGE COUNT COLOR PAGE COUNT MONO PAGE COUNT K DRUM LIFE C DRUM LIFE M DRUM LIFE Y DRUM LIFE BELT LIFE FUSER LIFE K TONER C TONER M TONER Y TONER Explanation The total number of pages printed in color. The total number of pages fed from optional Tray...


