B410/B420/B430 Setup Guide (e,f,s,p)
Page 3
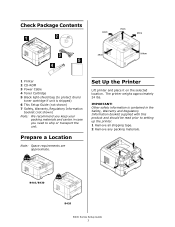
Check Package Contents 1 Printer 2 CD-ROM 3 Power Cable 4 Toner Cartridge 5 Black light-shield bag (to protect drum/ toner cartridge if unit is contained in case you need to setting up the printer. 1 Remove all shipping tape. 2 Remove any packing materials. IMPORTANT! Set ...
Check Package Contents 1 Printer 2 CD-ROM 3 Power Cable 4 Toner Cartridge 5 Black light-shield bag (to protect drum/ toner cartridge if unit is contained in case you need to setting up the printer. 1 Remove all shipping tape. 2 Remove any packing materials. IMPORTANT! Set ...

B410/B420/B430 Setup Guide (e,f,s,p)
Page 4
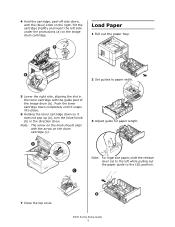
..., slowly peel off the tape. Note: Do not expose cartridge to distribute toner. 3 Holding the cartridge in the printer. 2 Lift the drum cartridge from printer. Lift out and discard shipping restraint (b). 2 Shake the cartridge several times vertically and horizontally to light for more than 5 minutes.... Note: Do not touch shiny green surface at bottom of drum cartridge. 3 Lift tape, then pull out protective paper as shown below (a). B400 Series Setup Guide 4 Install Toner Cartridge 1 Unpack the toner ...
..., slowly peel off the tape. Note: Do not expose cartridge to distribute toner. 3 Holding the cartridge in the printer. 2 Lift the drum cartridge from printer. Lift out and discard shipping restraint (b). 2 Shake the cartridge several times vertically and horizontally to light for more than 5 minutes.... Note: Do not touch shiny green surface at bottom of drum cartridge. 3 Lift tape, then pull out protective paper as shown below (a). B400 Series Setup Guide 4 Install Toner Cartridge 1 Unpack the toner ...
B410/B420/B430 Setup Guide (e,f,s,p)
Page 5
..., peel-off side down so it does not pop up (a), turn the (blue) knob (b) in the toner cartridge with the arrow on the drum cartridge (c). 3 Adjust guide for paper length. a B400 Series Setup Guide 5 Tilt the cartridge slightly and insert the left while pulling out the paper guide ...to the LGL position. b a 2 Set guides to the left side under the protrusions (a) on the image drum cartridge. c 7 Close the top cover. Push the toner cartridge down completely until it snaps into place. 6 Holding the toner cartridge down , with the (...
..., peel-off side down so it does not pop up (a), turn the (blue) knob (b) in the toner cartridge with the arrow on the drum cartridge (c). 3 Adjust guide for paper length. a B400 Series Setup Guide 5 Tilt the cartridge slightly and insert the left while pulling out the paper guide ...to the LGL position. b a 2 Set guides to the left side under the protrusions (a) on the image drum cartridge. c 7 Close the top cover. Push the toner cartridge down completely until it snaps into place. 6 Holding the toner cartridge down , with the (...
B410//B420/B430 User Guide (English)
Page 4
... order details 61 Toner cartridge life 61 When to replace the toner cartridge 61 Replacing the toner cartridge 61 Image drum life 65 When to replace the image drum 65 Replacing the image drum 65 Generating a cleaning page 67 B410d and B410dn 67 B420dn, B430dn 67 Cleaning the LED array 69 Troubleshooting 70...
... order details 61 Toner cartridge life 61 When to replace the toner cartridge 61 Replacing the toner cartridge 61 Image drum life 65 When to replace the image drum 65 Replacing the image drum 65 Generating a cleaning page 67 B410d and B410dn 67 B420dn, B430dn 67 Cleaning the LED array 69 Troubleshooting 70...
B410//B420/B430 User Guide (English)
Page 9
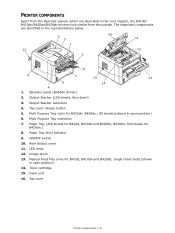
... indicator 9. Rear Output cover 11. Manual Feed Tray (only for B420dn.) 8. Top cover Printer components > 9 Output Stacker (150 sheets, face down) 3. Output Stacker extension 4. Image drum 13. Toner cartridge 15. Paper Tray (250 sheets for B410d, B410dn and B420dn, B430dn; 530 sheets for B410d, B410dn and B420dn; Fuser unit 16. The...
... indicator 9. Rear Output cover 11. Manual Feed Tray (only for B420dn.) 8. Top cover Printer components > 9 Output Stacker (150 sheets, face down) 3. Output Stacker extension 4. Image drum 13. Toner cartridge 15. Paper Tray (250 sheets for B410d, B410dn and B420dn, B430dn; 530 sheets for B410d, B410dn and B420dn; Fuser unit 16. The...
B410//B420/B430 User Guide (English)
Page 12
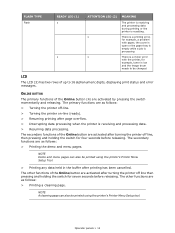
.... FLASH TYPE Flash READY LED (1) x x ATTENTION LED (2) x x MEANING The printer is receiving and processing data during printing or the printer is low and the image drum needs to 16 alphanumeric digits, displaying print status and error messages. LCD The LCD (3) has two rows of the Online button are as follows: > Turning...
.... FLASH TYPE Flash READY LED (1) x x ATTENTION LED (2) x x MEANING The printer is receiving and processing data during printing or the printer is low and the image drum needs to 16 alphanumeric digits, displaying print status and error messages. LCD The LCD (3) has two rows of the Online button are as follows: > Turning...
B410//B420/B430 User Guide (English)
Page 19
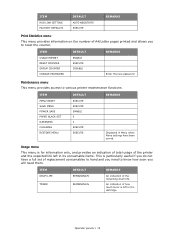
... Statistics menu This menu provides information on the number of A4/Letter pages printed and allows you to various printer maintenance functions. ITEM DRUM LIFE TONER DEFAULT REMAINING% REMAINING% REMARKS An indication of the printer and the expected life left in the cartridge. Usage menu This...need them. An indication of how much toner is for information only, and provides an indication of total usage of the remaining drum life. ITEM USAGE REPORT RESET COUNTER GROUP COUNTER CHANGE PASSWORD DEFAULT ENABLE EXECUTE DISABLE REMARKS Enter the new password Maintenance menu This menu...
... Statistics menu This menu provides information on the number of A4/Letter pages printed and allows you to various printer maintenance functions. ITEM DRUM LIFE TONER DEFAULT REMAINING% REMAINING% REMARKS An indication of the printer and the expected life left in the cartridge. Usage menu This...need them. An indication of how much toner is for information only, and provides an indication of total usage of the remaining drum life. ITEM USAGE REPORT RESET COUNTER GROUP COUNTER CHANGE PASSWORD DEFAULT ENABLE EXECUTE DISABLE REMARKS Enter the new password Maintenance menu This menu...
B410//B420/B430 User Guide (English)
Page 27
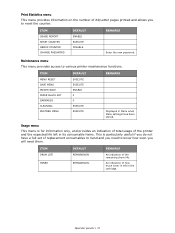
Maintenance menu This menu provides access to various printer maintenance functions. ITEM DRUM LIFE TONER DEFAULT REMAINING% REMAINING% REMARKS An indication of the remaining drum life. Usage menu This menu is for information only, and provides an indication of total usage of the printer and the expected life left in ...
Maintenance menu This menu provides access to various printer maintenance functions. ITEM DRUM LIFE TONER DEFAULT REMAINING% REMAINING% REMARKS An indication of the remaining drum life. Usage menu This menu is for information only, and provides an indication of total usage of the printer and the expected life left in ...
B410//B420/B430 User Guide (English)
Page 29
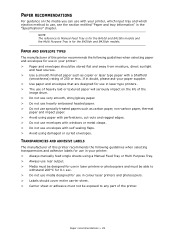
... for use in your printer: > Always manually feed single sheets using damaged or curled envelopes. PAPER RECOMMENDATIONS For guidance on the life of the image drum. > Do not use very smooth, shiny/glossy paper. > Do not use heavily embossed headed paper. > Do not use specially treated papers such as carbon paper...
... for use in your printer: > Always manually feed single sheets using damaged or curled envelopes. PAPER RECOMMENDATIONS For guidance on the life of the image drum. > Do not use very smooth, shiny/glossy paper. > Do not use heavily embossed headed paper. > Do not use specially treated papers such as carbon paper...
B410//B420/B430 User Guide (English)
Page 61
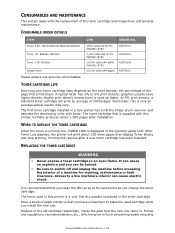
...at the same time as you install the new one came in the operator panel LCD. graphics usually have somewhere to fill the image drum reservoir and saturate the developing roller with toner. Higher print density means toner is displayed in . WHEN TO REPLACE THE TONER CARTRIDGE ...and stop printing. A typical letter has 3% to switch off and unplug the machine before accessing the interior of the toner cartridge and image drum and general maintenance. The first toner cartridge installed in force concerning waste recycling. After Toner Low displays, the printer will print about 1,500 ...
...at the same time as you install the new one came in the operator panel LCD. graphics usually have somewhere to fill the image drum reservoir and saturate the developing roller with toner. Higher print density means toner is displayed in . WHEN TO REPLACE THE TONER CARTRIDGE ...and stop printing. A typical letter has 3% to switch off and unplug the machine before accessing the interior of the toner cartridge and image drum and general maintenance. The first toner cartridge installed in force concerning waste recycling. After Toner Low displays, the printer will print about 1,500 ...

B410//B420/B430 User Guide (English)
Page 63
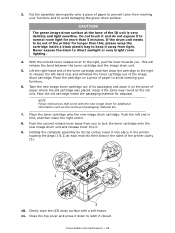
... (7). 5 7 6 Consumables and maintenance > 63 Then lower the right end of the cartridge down into the printer over the image drum unit from which the old cartridge was removed. 10. Remove the wrapping material and peel off the adhesive tape from end to end several times ...to the right (5), lower it against the shiny pins in the drum unit. Holding the cartridge by its top center with the colored lever to loosen and distribute the toner evenly inside the cartridge. 3 4 8. Insert the left...
... (7). 5 7 6 Consumables and maintenance > 63 Then lower the right end of the cartridge down into the printer over the image drum unit from which the old cartridge was removed. 10. Remove the wrapping material and peel off the adhesive tape from end to end several times ...to the right (5), lower it against the shiny pins in the drum unit. Holding the cartridge by its top center with the colored lever to loosen and distribute the toner evenly inside the cartridge. 3 4 8. Insert the left...

B410//B420/B430 User Guide (English)
Page 64
Gently wipe the LED array surface (9) with a soft tissue. 9 13. Push the lever all the way forward until the pointers on the cartridge to latch it is firmly seated, push the colored lever towards the rear of the printer (8). Close the top cover and press it down on the drum and the toner are aligned (8a). This will lock the cartridge into place and release toner into the image drum unit. 8 8a 12. 11. Consumables and maintenance > 64 Pressing gently down to ensure that it closed.
Gently wipe the LED array surface (9) with a soft tissue. 9 13. Push the lever all the way forward until the pointers on the cartridge to latch it is firmly seated, push the colored lever towards the rear of the printer (8). Close the top cover and press it down on the drum and the toner are aligned (8a). This will lock the cartridge into place and release toner into the image drum unit. 8 8a 12. 11. Consumables and maintenance > 64 Pressing gently down to ensure that it closed.

B410//B420/B430 User Guide (English)
Page 65
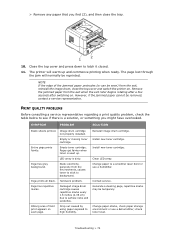
...and clean the LED array at the same time as you can be hot. WHEN TO REPLACE THE IMAGE DRUM When the drum reaches 90% of its top centre, remove the used image drum and toner cartridge, out of the printer. WARNING! Access to deteriorate. This area is displayed in the ...touch. 2. Press the cover release and open flame. This number is recommended that you change the image drum. > The B430dn model has been illustrated below. Holding it by its life, a CHANGE DRUM message is clearly labelled. The principles are printed each time and the environmental conditions and the paper type ...
...and clean the LED array at the same time as you can be hot. WHEN TO REPLACE THE IMAGE DRUM When the drum reaches 90% of its top centre, remove the used image drum and toner cartridge, out of the printer. WARNING! Access to deteriorate. This area is displayed in the ...touch. 2. Press the cover release and open flame. This number is recommended that you change the image drum. > The B430dn model has been illustrated below. Holding it by its life, a CHANGE DRUM message is clearly labelled. The principles are printed each time and the environmental conditions and the paper type ...
B410//B420/B430 User Guide (English)
Page 66
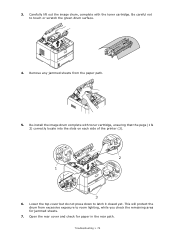
... of paper where the old cartridge was placed. Place the cartridge on the piece of paper to prevent toner from light. Take the new image drum cartridge out of its top center, lower it into place in the printer locating the pegs (1 & 2) at the base of packaging material etc. 7. NOTE Follow... instructions that come with a soft tissue. 11. If the drum unit needs to be out of the printer cavity (3). 2 1 3 10. This will release the bond between the toner cartridge and the image...
... of paper where the old cartridge was placed. Place the cartridge on the piece of paper to prevent toner from light. Take the new image drum cartridge out of its top center, lower it into place in the printer locating the pegs (1 & 2) at the base of packaging material etc. 7. NOTE Follow... instructions that come with a soft tissue. 11. If the drum unit needs to be out of the printer cavity (3). 2 1 3 10. This will release the bond between the toner cartridge and the image...
B410//B420/B430 User Guide (English)
Page 67
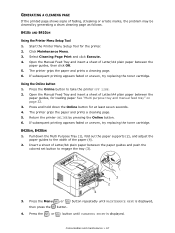
... the colored set button to take the printer OFF LINE. 2. Press the Online button to engage the tray (3). 13 2 4 3. Return the printer ONLINE by generating a drum cleaning page as follows. Pull down the Online button for the printer. 2. Press the Menu or button repeatedly until CLEANING PRINT is displayed, then press...
... the colored set button to take the printer OFF LINE. 2. Press the Online button to engage the tray (3). 13 2 4 3. Return the printer ONLINE by generating a drum cleaning page as follows. Pull down the Online button for the printer. 2. Press the Menu or button repeatedly until CLEANING PRINT is displayed, then press...

B410//B420/B430 User Guide (English)
Page 71
...fuser area will be hot. Never touch the surface of any paper from the printer (1). 2. After successful removal of the green drum inside the image drum unit. INPUT JAM NOTE The B430dn model has been illustrated below. Remove any misfed sheets as given above. 2. Replace the ...paper tray. Do not touch it. WARNING! CAUTION! Troubleshooting > 71 Never expose the image drum unit to light for all models of the printer (2). 2 1 4. Remove any damaged or misfed paper, the printer should continue printing. Never expose...
...fuser area will be hot. Never touch the surface of any paper from the printer (1). 2. After successful removal of the green drum inside the image drum unit. INPUT JAM NOTE The B430dn model has been illustrated below. Remove any misfed sheets as given above. 2. Replace the ...paper tray. Do not touch it. WARNING! CAUTION! Troubleshooting > 71 Never expose the image drum unit to light for all models of the printer (2). 2 1 4. Remove any damaged or misfed paper, the printer should continue printing. Never expose...
B410//B420/B430 User Guide (English)
Page 72
... jammed sheets from excessive exposure to room lighting, while you check the remaining area for paper in the rear path. Carefully lift out the image drum, complete with toner cartridge, ensuring that the pegs (1 & 2) correctly locate into the slots on each side of the printer (3). 2 1 3 6. Lower the top cover but do... not press down to touch or scratch the green drum surface. 4. 3. Be careful not to latch it closed yet. Open the rear cover and check for jammed sheets. 7.
... jammed sheets from excessive exposure to room lighting, while you check the remaining area for paper in the rear path. Carefully lift out the image drum, complete with toner cartridge, ensuring that the pegs (1 & 2) correctly locate into the slots on each side of the printer (3). 2 1 3 6. Lower the top cover but do... not press down to touch or scratch the green drum surface. 4. 3. Be careful not to latch it closed yet. Open the rear cover and check for jammed sheets. 7.
B410//B420/B430 User Guide (English)
Page 74
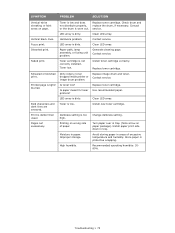
... the tray. 1 2 10. Entire page prints faintly. Empty toner cartridge. Page prints all black. Damaged image drum cartridge causes repetitive marks every 1.6 inches (4.06 cm) due to high humidity. Drop out caused by using paper exposed to surface nicks and...from dry environments, causes toner to stick to latch it closed. 11. Oblong area of the jammed paper protrudes (or can be reprinted. Reinstall image drum cartridge. check toner level. Clean LED array. Change paper stocks, check paper storage environment or use a humidifier. > Remove any paper that you ...
... the tray. 1 2 10. Entire page prints faintly. Empty toner cartridge. Page prints all black. Damaged image drum cartridge causes repetitive marks every 1.6 inches (4.06 cm) due to high humidity. Drop out caused by using paper exposed to surface nicks and...from dry environments, causes toner to stick to latch it closed. 11. Oblong area of the jammed paper protrudes (or can be reprinted. Reinstall image drum cartridge. check toner level. Clean LED array. Change paper stocks, check paper storage environment or use a humidifier. > Remove any paper that you ...
B410//B420/B430 User Guide (English)
Page 75
... humidity. Troubleshooting > 75 Replace toner cartridge. Clean LED array. Fuzzy print. Generate cleaning page. Toner low. Replace image drum and toner. Install new toner cartridge. Printing on wrong side of excessive temperature and humidity. Moisture in tray. Avoid storing ... tray. (Note arrow on page. SYMPTOM PROBLEM SOLUTION Vertical white streaking or faint areas on paper package). Check drum and replace the drum, if necessary. Contact service. Vertical black lines. Clean LED array. Distorted print. Contact service. Replace toner cartridge...
... humidity. Troubleshooting > 75 Replace toner cartridge. Clean LED array. Fuzzy print. Generate cleaning page. Toner low. Replace image drum and toner. Install new toner cartridge. Printing on wrong side of excessive temperature and humidity. Moisture in tray. Avoid storing ... tray. (Note arrow on page. SYMPTOM PROBLEM SOLUTION Vertical white streaking or faint areas on paper package). Check drum and replace the drum, if necessary. Contact service. Vertical black lines. Clean LED array. Distorted print. Contact service. Replace toner cartridge...
B410//B420/B430 User Guide (English)
Page 80
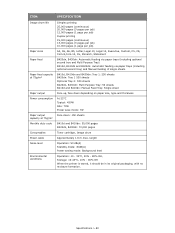
...: 10-43°C, 10% - 90% RH When the printer is stored, it should be in its original packaging, with no moisture formation. ITEM SPECIFICATION Image drum life Paper sizes Paper feed Paper feed capacity at 75g/m² Paper output Power consumption Paper output capacity at 75g/m² Monthly duty cycle Consumables...: 450W Idle: 70W Power save mode: 7W Face down: 150 sheets B410d and B410dn: 50,000 pages B420dn, B430dn: 70,000 pages Toner cartridge, Image drum Approximately 1.8 m max. Specifications > 80
...: 10-43°C, 10% - 90% RH When the printer is stored, it should be in its original packaging, with no moisture formation. ITEM SPECIFICATION Image drum life Paper sizes Paper feed Paper feed capacity at 75g/m² Paper output Power consumption Paper output capacity at 75g/m² Monthly duty cycle Consumables...: 450W Idle: 70W Power save mode: 7W Face down: 150 sheets B410d and B410dn: 50,000 pages B420dn, B430dn: 70,000 pages Toner cartridge, Image drum Approximately 1.8 m max. Specifications > 80


