
English Manual
Page 1
As a manufacturer, we are missing parts, we will provide immediate assistance, free of charge. Model No. 831.159770 Serial No. The serial number is found in the space above. Save this ...-825-2588 Mon.-Fri., 6 a.m.-6 p.m. If you have questions, or if there are committed to providing complete customer satisfaction. USER'S MANUAL Visit our website at www.nordictrack.com new products, prizes, fitness tips, and much more!
As a manufacturer, we are missing parts, we will provide immediate assistance, free of charge. Model No. 831.159770 Serial No. The serial number is found in the space above. Save this ...-825-2588 Mon.-Fri., 6 a.m.-6 p.m. If you have questions, or if there are committed to providing complete customer satisfaction. USER'S MANUAL Visit our website at www.nordictrack.com new products, prizes, fitness tips, and much more!
English Manual
Page 2
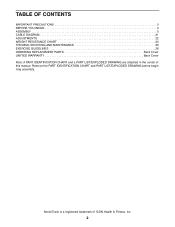
TABLE OF CONTENTS IMPORTANT PRECAUTIONS 3 BEFORE YOU BEGIN 4 ASSEMBLY 5 CABLE DIAGRAM 21 ADJUSTMENTS 22 WEIGHT RESISTANCE CHART 24 TROUBLE-SHOOTING AND MAINTENANCE 25 EXERCISE GUIDELINES 26 ORDERING REPLACEMENT PARTS Back Cover LIMITED WARRANTY Back Cover Note: A PART IDENTIFICATION CHART and a PART LIST/EXPLODED DRAWING are attached in the center of ICON Health & Fitness, Inc. 2 NordicTrack is a registered trademark of this manual. Remove the PART IDENTIFICATION CHART and PART LIST/EXPLODED DRAWING before beginning assembly.
TABLE OF CONTENTS IMPORTANT PRECAUTIONS 3 BEFORE YOU BEGIN 4 ASSEMBLY 5 CABLE DIAGRAM 21 ADJUSTMENTS 22 WEIGHT RESISTANCE CHART 24 TROUBLE-SHOOTING AND MAINTENANCE 25 EXERCISE GUIDELINES 26 ORDERING REPLACEMENT PARTS Back Cover LIMITED WARRANTY Back Cover Note: A PART IDENTIFICATION CHART and a PART LIST/EXPLODED DRAWING are attached in the center of ICON Health & Fitness, Inc. 2 NordicTrack is a registered trademark of this manual. Remove the PART IDENTIFICATION CHART and PART LIST/EXPLODED DRAWING before beginning assembly.
English Manual
Page 3
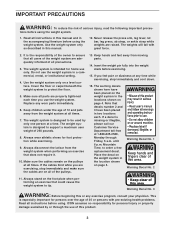
... exercise that does not require it. 10. Replace any exercise program, consult your physician. Always disconnect the lat bar from moving parts. 14. Keep hands and feet away from the weight system when performing an exercise that could cause the weight system to order ... system are on the weight system in this manual. 12. until 6 p.m. Warning Decal No. 3 WARNING: Before beginning this or any worn parts immediately. 6. The weight system is especially important for foot protection while exercising. 9. IMPORTANT PRECAUTIONS WARNING: To reduce the risk of this area....
... exercise that does not require it. 10. Replace any exercise program, consult your physician. Always disconnect the lat bar from moving parts. 14. Keep hands and feet away from the weight system when performing an exercise that could cause the weight system to order ... system are on the weight system in this manual. 12. until 6 p.m. Warning Decal No. 3 WARNING: Before beginning this or any worn parts immediately. 6. The weight system is especially important for foot protection while exercising. 9. IMPORTANT PRECAUTIONS WARNING: To reduce the risk of this area....
English Manual
Page 4
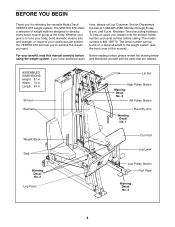
...To help you for selecting the versatile NordicTrack® VERTEX 670 weight system. The serial number can ...3 Leg Press Curl Pad Leg Lever Low Pulley Station Foot Plate Warning Decal No. 2 4 The VERTEX 670 offers a selection of weight stations designed to achieve the results you want. tions, please call our...parts that are labeled. The model number is to the weight system (see the front cover of this manual carefully before calling. until 6 p.m. Length: 64 in. BEFORE YOU BEGIN Thank you to develop every major muscle group of the body. For your cardiovascular system, the VERTEX 670...
...To help you for selecting the versatile NordicTrack® VERTEX 670 weight system. The serial number can ...3 Leg Press Curl Pad Leg Lever Low Pulley Station Foot Plate Warning Decal No. 2 4 The VERTEX 670 offers a selection of weight stations designed to achieve the results you want. tions, please call our...parts that are labeled. The model number is to the weight system (see the front cover of this manual carefully before calling. until 6 p.m. Length: 64 in. BEFORE YOU BEGIN Thank you to develop every major muscle group of the body. For your cardiovascular system, the VERTEX 670...
English Manual
Page 5
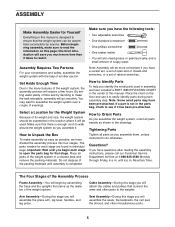
..., or a set of the weight system, the assembly process will assemble the seats, the backrests, the curl pad, the shroud, and other parts to the weights. ASSEMBLY Make Assembly Easier for Yourself Everything in this manual is designed to ensure that the weight system can be assembled successfully... system over a couple of the weight system. Important: Wait until assembly is completed. Place the chart on this page; Note: Some small parts may want to Unpack the Box To make assembly as easy as possible, we have questions after reading the assembly instructions, please call our Customer...
..., or a set of the weight system, the assembly process will assemble the seats, the backrests, the curl pad, the shroud, and other parts to the weights. ASSEMBLY Make Assembly Easier for Yourself Everything in this manual is designed to ensure that the weight system can be assembled successfully... system over a couple of the weight system. Important: Wait until assembly is completed. Place the chart on this page; Note: Some small parts may want to Unpack the Box To make assembly as easy as possible, we have questions after reading the assembly instructions, please call our Customer...

English Manual
Page 6
... Upright (3) with the two indicated 3/8" x 3 3/4" Carriage Bolts (52) and two 3/8" Nylon Locknuts (50). Press a 2" x 3" Inner Cap (24) into the Base; it . 24 3 33 Open the parts bag labeled "FRAME ASSEMBLY." Frame Assembly 1 1. Press a 2" x 3" Inner Cap and a 2" Square Inner Cap (33) into the indicated holes in the indicated locations. Insert three 3/8" x 3 3/4" Carriage...
... Upright (3) with the two indicated 3/8" x 3 3/4" Carriage Bolts (52) and two 3/8" Nylon Locknuts (50). Press a 2" x 3" Inner Cap (24) into the Base; it . 24 3 33 Open the parts bag labeled "FRAME ASSEMBLY." Frame Assembly 1 1. Press a 2" x 3" Inner Cap and a 2" Square Inner Cap (33) into the indicated holes in the indicated locations. Insert three 3/8" x 3 3/4" Carriage...

English Manual
Page 7
... 3/8" Washers (55), and a 3/8" Nylon Jamnut (63). 23 55 63 42 19 5 42 4. See the inset drawing. Make sure the Weights are oriented correctly; Open the parts bag labeled "Weight Inserts." Press two Weight Inserts (77) into the Weights (26). 4 23 16 36 47 55 54 77 26 26 Pin Grooves Large...
... 3/8" Washers (55), and a 3/8" Nylon Jamnut (63). 23 55 63 42 19 5 42 4. See the inset drawing. Make sure the Weights are oriented correctly; Open the parts bag labeled "Weight Inserts." Press two Weight Inserts (77) into the Weights (26). 4 23 16 36 47 55 54 77 26 26 Pin Grooves Large...

English Manual
Page 9
... the Leg Press Plate (85) to the Leg Press Base (84) with two 3/8" x 3 1/4" Bolts (87), eight 3/8" Washers (55), and two 3/8" Nylon Jamnuts (63). Open the parts bags labeled "ARM ASSEMBLY." Attach the two Leg Press Attachments (100) to the Sliding Seat Frame (74) with two 3/8" x 3 1/4" Bolts (87) and two 3/8" Nylon Jamnuts...
... the Leg Press Plate (85) to the Leg Press Base (84) with two 3/8" x 3 1/4" Bolts (87), eight 3/8" Washers (55), and two 3/8" Nylon Jamnuts (63). Open the parts bags labeled "ARM ASSEMBLY." Attach the two Leg Press Attachments (100) to the Sliding Seat Frame (74) with two 3/8" x 3 1/4" Bolts (87) and two 3/8" Nylon Jamnuts...
English Manual
Page 11
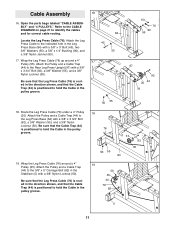
... (92), a 3/8" Washer (55), and a 3/8" Nylon Locknut (50). Attach the Leg Press Cable to the Rear Leg Press Upright (97) with a 3/8" Nylon Locknut (50). Open the parts bags labeled "CABLE ASSEMBLY" and "4 PULLEYS." Wrap the Leg Press Cable (76) around a 4" Pulley (35). Cable Assembly 16.
... (92), a 3/8" Washer (55), and a 3/8" Nylon Locknut (50). Attach the Leg Press Cable to the Rear Leg Press Upright (97) with a 3/8" Nylon Locknut (50). Open the parts bags labeled "CABLE ASSEMBLY" and "4 PULLEYS." Wrap the Leg Press Cable (76) around a 4" Pulley (35). Cable Assembly 16.
English Manual
Page 17
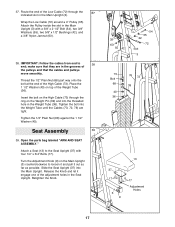
Place the 1 1/2" Washer (40) on the Weight Pin (39) and into the threaded hole in the Weight Tube (36). Open the parts bag labeled "ARM AND SEAT ASSEMBLY." Turn the Adjustment Knob (9) on the Main Upright (3) counterclockwise to the Seat Upright (37) with a 3/8" x 2 1/2" Bolt (54), two 3/8" Washers (...: Follow the cables from end to 38 end; Wrap the Low Cable (72) around a 4" Pulley (35). Seat Assembly 39 39. Thread the 1/2" Plain Nut (68) part way onto the bolt at the end of the Low Cable (72) through the ring on top of the pulleys and that the cables and...
Place the 1 1/2" Washer (40) on the Weight Pin (39) and into the threaded hole in the Weight Tube (36). Open the parts bag labeled "ARM AND SEAT ASSEMBLY." Turn the Adjustment Knob (9) on the Main Upright (3) counterclockwise to the Seat Upright (37) with a 3/8" x 2 1/2" Bolt (54), two 3/8" Washers (...: Follow the cables from end to 38 end; Wrap the Low Cable (72) around a 4" Pulley (35). Seat Assembly 39 39. Thread the 1/2" Plain Nut (68) part way onto the bolt at the end of the Low Cable (72) through the ring on top of the pulleys and that the cables and...
English Manual
Page 20
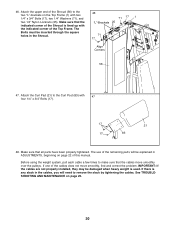
... is any slack in the cables, you will be inserted through the square holes in ADJUSTMENTS, beginning on page 25. 20 Make sure that all parts have been properly tightened. Attach the upper end of the Shroud (56) to the Curl Post (83) with the indicated corner of the remaining...
... is any slack in the cables, you will be inserted through the square holes in ADJUSTMENTS, beginning on page 25. 20 Make sure that all parts have been properly tightened. Attach the upper end of the Shroud (56) to the Curl Post (83) with the indicated corner of the remaining...
English Manual
Page 22
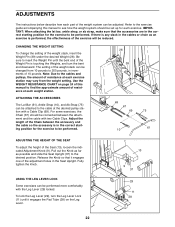
... the accessories are in the Seat Upright. To lock the Leg Lever (29), turn the bent end downward. ADJUSTMENTS The instructions below describe how each part of the weight system can be performed more comfortably with the Leg Lever (29) locked. ATTACHING THE ACCESSORIES The Lat Bar (61), Ankle Strap (10...
... the accessories are in the Seat Upright. To lock the Leg Lever (29), turn the bent end downward. ADJUSTMENTS The instructions below describe how each part of the weight system can be performed more comfortably with the Leg Lever (29) locked. ATTACHING THE ACCESSORIES The Lat Bar (61), Ankle Strap (10...
English Manual
Page 25
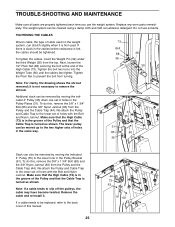
TROUBLE-SHOOTING AND MAINTENANCE Make sure all parts are properly tightened each time you use solvents. TIGHTENING THE CABLES Woven cable, the type of holes in the same way. 73 44 35 31 ... use the weight system. Re-attach the Pulley and Cable Trap to be cleaned using a damp cloth and mild non-abrasive detergent. Replace any worn parts immediately. it . If a cable needs to the lower set of the High Cable (73). Tighten the bolt two turns into the Weight Tube (36) until...
TROUBLE-SHOOTING AND MAINTENANCE Make sure all parts are properly tightened each time you use solvents. TIGHTENING THE CABLES Woven cable, the type of holes in the same way. 73 44 35 31 ... use the weight system. Re-attach the Pulley and Cable Trap to be cleaned using a damp cloth and mild non-abrasive detergent. Replace any worn parts immediately. it . If a cable needs to the lower set of the High Cable (73). Tighten the bolt two turns into the Weight Tube (36) until...
English Manual
Page 26
... stop immediately and begin cooling down. Begin with it during the first few months of 8 repetitions for a maximum of weight. It is an essential part of repetitions or sets per- If you , stick with 3 sets of your muscles, push them to 30 minutes, resting for each week to give... balance and variety to regenerate. Find out what is important. This requires moving only the appropriate parts of the muscles. Refer to the muscle chart on Monday, Wednesday, and Friday. • Plan 20 to 30 minutes of your exercise program....
... stop immediately and begin cooling down. Begin with it during the first few months of 8 repetitions for a maximum of weight. It is an essential part of repetitions or sets per- If you , stick with 3 sets of your muscles, push them to 30 minutes, resting for each week to give... balance and variety to regenerate. Find out what is important. This requires moving only the appropriate parts of the muscles. Refer to the muscle chart on Monday, Wednesday, and Friday. • Plan 20 to 30 minutes of your exercise program....
English Manual
Page 27
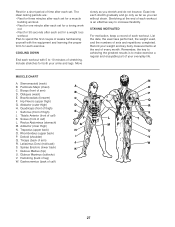
... weight used, and the numbers of calf) K. Remember, the key to achieving the greatest results is an effective way to make exercise a regular and enjoyable part of your everyday life. Obliques (waist) E. Tibialis Anterior (front of sets and repetitions completed. Deltoid (shoulder) I . Latissimus Dorsi (mid back) J S. Sternomastoid (neck) B. Quadriceps (front of...
... weight used, and the numbers of calf) K. Remember, the key to achieving the greatest results is an effective way to make exercise a regular and enjoyable part of your everyday life. Obliques (waist) E. Tibialis Anterior (front of sets and repetitions completed. Deltoid (shoulder) I . Latissimus Dorsi (mid back) J S. Sternomastoid (neck) B. Quadriceps (front of...
English Manual
Page 28
... the product. The KEY NUMBER and DESCRIPTION of the part(s) (see the front cover of merchantability or fitness for one year after discovery of your Product. LIMITED WARRANTY WHAT IS COVERED-The entire NordicTrack® VERTEX 670 weight system ("Product") is limited in material and workmanship... authorized service provider, or, at our option, we will replace the Product. securely pack your part to be prepared to you . on the outside of the product (NordicTrack® VERTEX 670 weight system) 3. Accordingly, the above limitation may not apply to change, modify or extend the...
... the product. The KEY NUMBER and DESCRIPTION of the part(s) (see the front cover of merchantability or fitness for one year after discovery of your Product. LIMITED WARRANTY WHAT IS COVERED-The entire NordicTrack® VERTEX 670 weight system ("Product") is limited in material and workmanship... authorized service provider, or, at our option, we will replace the Product. securely pack your part to be prepared to you . on the outside of the product (NordicTrack® VERTEX 670 weight system) 3. Accordingly, the above limitation may not apply to change, modify or extend the...
English Manual
Page 29
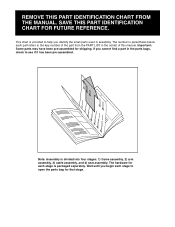
..., check to help you begin each stage to the key number of the part from the PART LIST in parenthesis below each part refers to open the parts bag for each stage is packaged separately. Wait until you identify the small parts used in assembly. This chart is provided to see if it has been... stages: 1) frame assembly, 2) arm assembly, 3) cable assembly, and 4) seat assembly. The number in the center of this manual. The hardware for that stage. Important: Some parts may have been pre-assembled for shipping.
..., check to help you begin each stage to the key number of the part from the PART LIST in parenthesis below each part refers to open the parts bag for each stage is packaged separately. Wait until you identify the small parts used in assembly. This chart is provided to see if it has been... stages: 1) frame assembly, 2) arm assembly, 3) cable assembly, and 4) seat assembly. The number in the center of this manual. The hardware for that stage. Important: Some parts may have been pre-assembled for shipping.
English Manual
Page 33
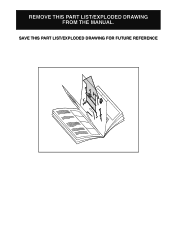
REMOVE THIS PART LIST/EXPLODED DRAWING FROM THE MANUAL. SAVE THIS PART LIST/EXPLODED DRAWING FOR FUTURE REFERENCE 81
REMOVE THIS PART LIST/EXPLODED DRAWING FROM THE MANUAL. SAVE THIS PART LIST/EXPLODED DRAWING FOR FUTURE REFERENCE 81
English Manual
Page 34
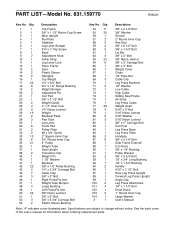
... Press Upright Forward Leg Press Upright Angle Cap Leg Press Attachment 1/4" x 1 1/2" Bolt Chart Decal 1" Round Inner Cap Large Washer User's Manual Note: "#" indicates a non-illustrated part. Qty. 1 1 2 1 3 1 4 1 5 1 6 1 7 1 8 1 9 2 10 1 11 1 12 1 13 2 14 2 15 2 16 1 17 22 18 8 19 2 20 2 21 1 22 1 23 2 24...Left Press/Fly Arm 3/8" Nylon Locknut 3/8" x 9" Bolt 3/8" x 3 3/4" Carriage Bolt Plastic Sleeve Bushing Key No. PART LIST-Model No. 831.159770 R0402A Key No. See the back cover of the user's manual for information about ordering replacement...
... Press Upright Forward Leg Press Upright Angle Cap Leg Press Attachment 1/4" x 1 1/2" Bolt Chart Decal 1" Round Inner Cap Large Washer User's Manual Note: "#" indicates a non-illustrated part. Qty. 1 1 2 1 3 1 4 1 5 1 6 1 7 1 8 1 9 2 10 1 11 1 12 1 13 2 14 2 15 2 16 1 17 22 18 8 19 2 20 2 21 1 22 1 23 2 24...Left Press/Fly Arm 3/8" Nylon Locknut 3/8" x 9" Bolt 3/8" x 3 3/4" Carriage Bolt Plastic Sleeve Bushing Key No. PART LIST-Model No. 831.159770 R0402A Key No. See the back cover of the user's manual for information about ordering replacement...


