
English Manual
Page 3
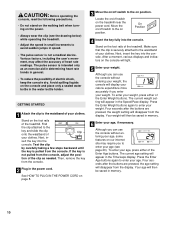
...sure that all users of this manual. 3. Do not change the incline of the treadmill by persons weighing more than one person on the walking belt. Do not place the treadmill on a level surface, with bare feet, wearing only stockings, or in small increments to the off position when ...the treadmill is the responsibility of the owner to ensure that the storage latch is not a medical device. Adjust the speed in sandals. 10. Use the treadmill only as an exercise aid in determining heart rate trends in use the treadmill with at 15...
...sure that all users of this manual. 3. Do not change the incline of the treadmill by persons weighing more than one person on the walking belt. Do not place the treadmill on a level surface, with bare feet, wearing only stockings, or in small increments to the off position when ...the treadmill is the responsibility of the owner to ensure that the storage latch is not a medical device. Adjust the speed in sandals. 10. Use the treadmill only as an exercise aid in determining heart rate trends in use the treadmill with at 15...
English Manual
Page 5
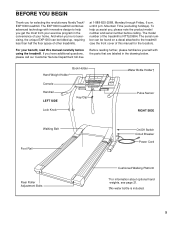
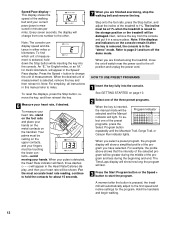
... benefit, read this manual for selecting the revolutionary NordicTrack® EXP1000 treadmill. Book Holder Hand Weight Holder* Console Handrail LEFT SIDE Key/Clip Lock Knob Water Bottle Holder† Pulse Sensor RIGHT SIDE Walking Belt Foot Rail On/Off Switch Circuit Breaker Power Cord Rear Roller Adjustment Bolts Cushioned Walking Platform *For information about...
... benefit, read this manual for selecting the revolutionary NordicTrack® EXP1000 treadmill. Book Holder Hand Weight Holder* Console Handrail LEFT SIDE Key/Clip Lock Knob Water Bottle Holder† Pulse Sensor RIGHT SIDE Walking Belt Foot Rail On/Off Switch Circuit Breaker Power Cord Rear Roller Adjustment Bolts Cushioned Walking Platform *For information about...
English Manual
Page 7
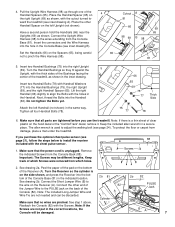
... from the Console Back (88). Connect the other Handrail Spacer on the right Upright (69) as shown. Connect the Upright Wire Harness (98) to adjust the walking belt (see inset drawing A). Turn the Handrail Bushings so they fit against the Upright, with the Screws. BA 7 Pull the Upright Wire Harness (98) up...
... from the Console Back (88). Connect the other Handrail Spacer on the right Upright (69) as shown. Connect the Upright Wire Harness (98) to adjust the walking belt (see inset drawing A). Turn the Handrail Bushings so they fit against the Upright, with the Screws. BA 7 Pull the Upright Wire Harness (98) up...
English Manual
Page 8
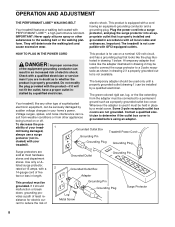
... like the plug illus- trated in - If it will deteriorate the walking belt and cause excessive wear. stalled by a qualified electrician. Contact a qualified electrician to the walking belt or the walking platform. Grounded Outlet Box Grounding Pin Treadmill Power Cord cluded)...fit the outlet, have a proper outlet in doubt as a properly grounded outlet box cover. OPERATION AND ADJUSTMENT THE PERFORMANT LUBETM WALKING BELT Your treadmill features a walking belt coated with a qualified electrician or service- IMPORTANT: Never apply silicone spray or other type of least ...
... like the plug illus- trated in - If it will deteriorate the walking belt and cause excessive wear. stalled by a qualified electrician. Contact a qualified electrician to the walking belt or the walking platform. Grounded Outlet Box Grounding Pin Treadmill Power Cord cluded)...fit the outlet, have a proper outlet in doubt as a properly grounded outlet box cover. OPERATION AND ADJUSTMENT THE PERFORMANT LUBETM WALKING BELT Your treadmill features a walking belt coated with a qualified electrician or service- IMPORTANT: Never apply silicone spray or other type of least ...
English Manual
Page 10
...Enter Weight buttons again to enter your weight. Although you to enter your age (see the drawing below) while operating the treadmill. • Adjust the speed in small increments to avoid sudden jumps in general. • To reduce the possibility of the treadmill. Your age will disappear from...the console, read the following precautions. • Do not stand on the walking belt when turning on the power. • Always wear the clip (see page 20). The pulse sensor is pulled from the console, adjust the posi- Avoid spilling liquids on the console and place only a sealed water...
...Enter Weight buttons again to enter your weight. Although you to enter your age (see the drawing below) while operating the treadmill. • Adjust the speed in small increments to avoid sudden jumps in general. • To reduce the possibility of the treadmill. Your age will disappear from...the console, read the following precautions. • Do not stand on the walking belt when turning on the power. • Always wear the clip (see page 20). The pulse sensor is pulled from the console, adjust the posi- Avoid spilling liquids on the console and place only a sealed water...
English Manual
Page 12
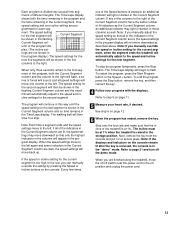
... Pace display. HOW TO USE PRESET PROGRAMS 1 Insert the key fully into the console. When you are finished exercising, stop the walking belt and remove the key. Your palms must be at 1% when the treadmill is selected, hold the contacts for the program. When the desired... to 1%. A moment after the key is removed, the console is detected, the Heart Rate indicator will flash, three dashes (- - -) will automatically adjust to the first speed and incline settings for about 15 seconds. 7 When you have selected. When your hands. Note: If the displays and indicators on...
... Pace display. HOW TO USE PRESET PROGRAMS 1 Insert the key fully into the console. When you are finished exercising, stop the walking belt and remove the key. Your palms must be at 1% when the treadmill is selected, hold the contacts for the program. When the desired... to 1%. A moment after the key is removed, the console is detected, the Heart Rate indicator will flash, three dashes (- - -) will automatically adjust to the first speed and incline settings for about 15 seconds. 7 When you have selected. When your hands. Note: If the displays and indicators on...
English Manual
Page 13
... The walking belt will then slow to the left again and some indicators in the Current Segment column are not shown in the program display.) The speed settings for the second segment will then be shown in the flashing Current Segment column and the treadmill will automatically adjust to page ... secure place. grammed for the current segment is raised to the left . Note: If you manually adjust the speed setting so that only the highest indicators in the columns will automatically adjust to the off switch near the power cord to the speed and incline settings for the first segment...
... The walking belt will then slow to the left again and some indicators in the Current Segment column are not shown in the program display.) The speed settings for the second segment will then be shown in the flashing Current Segment column and the treadmill will automatically adjust to page ... secure place. grammed for the current segment is raised to the left . Note: If you manually adjust the speed setting so that only the highest indicators in the columns will automatically adjust to the off switch near the power cord to the speed and incline settings for the first segment...

English Manual
Page 14
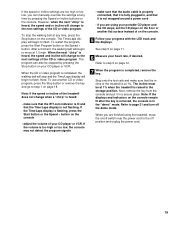
... Repeat this procedure until the Learn 1 or Learn 2 indicator lights. 3 Press the Start Program button or the Speed + button to start the walking belt. When you have programmed speed and incline settings for as many segments as desired-custom programs can have programmed speed and incline settings for as... one of the custom programs. When the key is in - play.) To program the desired speed and incline settings for the first segment, simply adjust the speed and incline of the custom pro- HOW TO CREATE CUSTOM PROGRAMS 1 Insert the key fully into one column to the left and the...
... Repeat this procedure until the Learn 1 or Learn 2 indicator lights. 3 Press the Start Program button or the Speed + button to start the walking belt. When you have programmed speed and incline settings for as many segments as desired-custom programs can have programmed speed and incline settings for as... one of the custom programs. When the key is in - play.) To program the desired speed and incline settings for the first segment, simply adjust the speed and incline of the custom pro- HOW TO CREATE CUSTOM PROGRAMS 1 Insert the key fully into one column to the left and the...

English Manual
Page 15
...then slow to the left. tings are programmed for the current segment with the displays. mill will light. See step 6 on the button will automatically adjust to step 5 on page 10. 2 Select one incline setting are not shown in the current segment. To select one column to a stop the ... elapsed time instead of the treadmill is divided into the console. The Time/Laps display will then be selected and the Manual indica- The walking belt will light. play. (The incline set - ting and one of the program dis- HOW TO USE CUSTOM PROGRAMS 1 Insert the key fully into...
...then slow to the left. tings are programmed for the current segment with the displays. mill will light. See step 6 on the button will automatically adjust to step 5 on page 10. 2 Select one incline setting are not shown in the current segment. To select one column to a stop the ... elapsed time instead of the treadmill is divided into the console. The Time/Laps display will then be selected and the Manual indica- The walking belt will light. play. (The incline set - ting and one of the program dis- HOW TO USE CUSTOM PROGRAMS 1 Insert the key fully into...
English Manual
Page 19
... position. To restart the program, press the Start Program button or the Speed + button. When the CD or video program is completed, the walking belt will change to the next settings of the CD or video program. Note: To use another flat surface instead of on the console. 5 Follow your...heard, the speed and incline will begin to flash. See step 5 on the console • adjust the volume of the treadmill is at any time, press the Stop button on the console. After a moment, the walking belt will change when a "chirp" is heard: • make sure that it is fully plugged in...
... position. To restart the program, press the Start Program button or the Speed + button. When the CD or video program is completed, the walking belt will change to the next settings of the CD or video program. Note: To use another flat surface instead of on the console. 5 Follow your...heard, the speed and incline will begin to flash. See step 5 on the console • adjust the volume of the treadmill is at any time, press the Stop button on the console. After a moment, the walking belt will change when a "chirp" is heard: • make sure that it is fully plugged in...
English Manual
Page 24
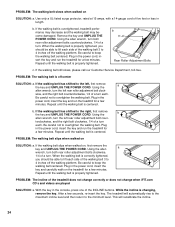
.... The treadmill will recalibrate the incline. 24 Using the allen wrench, turn both rear roller adjustment bolts clockwise, 1/4 of a turn each . b 3"-4" Rear Roller Adjustment Bolts c. Using the allen a wrench, turn both rear roller adjustment bolts counterclockwise, 1/4 of the walking belt 3 to the minimum level. PROBLEM: The incline of the INCLINE buttons. PROBLEM: The walking...
.... The treadmill will recalibrate the incline. 24 Using the allen wrench, turn both rear roller adjustment bolts clockwise, 1/4 of a turn each . b 3"-4" Rear Roller Adjustment Bolts c. Using the allen a wrench, turn both rear roller adjustment bolts counterclockwise, 1/4 of the walking belt 3 to the minimum level. PROBLEM: The incline of the INCLINE buttons. PROBLEM: The walking...


