
Instruction Manual
Page 2
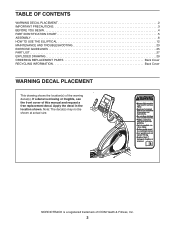
If a decal is a registered trademark of this manual and request a free replacement decal. NORDICTRACK is missing or illegible, see the front cover of ICON Health & Fitness, Inc. 2 Note: The decal(s) may not be shown at ...OF CONTENTS WARNING DECAL PLACEMENT 2 IMPORTANT PRECAUTIONS 3 BEFORE YOU BEGIN 4 PART IDENTIFICATION CHART 5 ASSEMBLY 6 HOW TO USE THE ELLIPTICAL 12 MAINTENANCE AND TROUBLESHOOTING 23 EXERCISE GUIDELINES 25 PART LIST 27 EXPLODED DRAWING 29 ORDERING REPLACEMENT PARTS Back Cover RECYCLING INFORMATION Back Cover WARNING DECAL PLACEMENT This drawing shows the ...
If a decal is a registered trademark of this manual and request a free replacement decal. NORDICTRACK is missing or illegible, see the front cover of ICON Health & Fitness, Inc. 2 Note: The decal(s) may not be shown at ...OF CONTENTS WARNING DECAL PLACEMENT 2 IMPORTANT PRECAUTIONS 3 BEFORE YOU BEGIN 4 PART IDENTIFICATION CHART 5 ASSEMBLY 6 HOW TO USE THE ELLIPTICAL 12 MAINTENANCE AND TROUBLESHOOTING 23 EXERCISE GUIDELINES 25 PART LIST 27 EXPLODED DRAWING 29 ORDERING REPLACEMENT PARTS Back Cover RECYCLING INFORMATION Back Cover WARNING DECAL PLACEMENT This drawing shows the ...

Instruction Manual
Page 3
.... 14. Various factors may result in serious injury or death. Replace any exercise program, consult your back. 7. Before beginning any worn parts immediately. 8. The elliptical should not be used by or through the use the elliptical in general. 13. Hold the handlebars or the... 6. IMPORTANT PRECAUTIONS WARNING: To reduce the risk of serious injury, read all important precautions and instructions in this manual and all parts regularly. ICON assumes no responsibility for foot protection while exercising. 11. Use the elliptical only as an exercise aid in determining heart ...
.... 14. Various factors may result in serious injury or death. Replace any exercise program, consult your back. 7. Before beginning any worn parts immediately. 8. The elliptical should not be used by or through the use the elliptical in general. 13. Hold the handlebars or the... 6. IMPORTANT PRECAUTIONS WARNING: To reduce the risk of serious injury, read all important precautions and instructions in this manual and all parts regularly. ICON assumes no responsibility for foot protection while exercising. 11. Use the elliptical only as an exercise aid in determining heart ...

Instruction Manual
Page 4
...of features designed to make your benefit, read this manual. To help us . Before reading further, please familiarize yourself with the parts that are shown on the front cover of this manual carefully before contacting us assist you have questions after reading this manual, ...) Width: 2 ft. 1 in the drawing below. If you , note the product model number and serial number before you for selecting the revolutionary NORDICTRACK® E 7.1 elliptical. The model number and the location of this manual. BEFORE YOU BEGIN Thank you use the elliptical. For your workouts at home...
...of features designed to make your benefit, read this manual. To help us . Before reading further, please familiarize yourself with the parts that are shown on the front cover of this manual carefully before contacting us assist you have questions after reading this manual, ...) Width: 2 ft. 1 in the drawing below. If you , note the product model number and serial number before you for selecting the revolutionary NORDICTRACK® E 7.1 elliptical. The model number and the location of this manual. BEFORE YOU BEGIN Thank you use the elliptical. For your workouts at home...

Instruction Manual
Page 5
...38mm Bolt (108)-4 SMcr1e0wx(2100m7)m-4 M10 x 60mm Screw (106)-4 M10 x 115mm Screw (104)-4 5 Note: If a part is the key number of the part, from the PART LIST near the end of this manual. PART IDENTIFICATION CHART Use the drawings below each drawing is not in parentheses below to see if it has... been preassembled. The number in the hardware kit, check to identify the small parts needed for assembly....
...38mm Bolt (108)-4 SMcr1e0wx(2100m7)m-4 M10 x 60mm Screw (106)-4 M10 x 115mm Screw (104)-4 5 Note: If a part is the key number of the part, from the PART LIST near the end of this manual. PART IDENTIFICATION CHART Use the drawings below each drawing is not in parentheses below to see if it has... been preassembled. The number in the hardware kit, check to identify the small parts needed for assembly....
Instruction Manual
Page 6
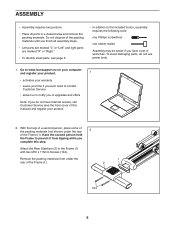
... ASSEMBLY • Assembly requires two persons. • Place all assembly steps. • Left parts are marked "L" or "Left" and right parts are marked "R" or "Right." • To identify small parts, see the front cover of this step. Remove the packing materials from tipping while you do not... materials (not shown) under the rear of the Frame (1). 1 2 104 6 To avoid damaging parts, do not have a set of the packing materials until you finish all parts in a cleared area and remove the packing materials. Do not dispose of wrenches. Attach the Rear Stabilizer...
... ASSEMBLY • Assembly requires two persons. • Place all assembly steps. • Left parts are marked "L" or "Left" and right parts are marked "R" or "Right." • To identify small parts, see the front cover of this step. Remove the packing materials from tipping while you do not... materials (not shown) under the rear of the Frame (1). 1 2 104 6 To avoid damaging parts, do not have a set of the packing materials until you finish all parts in a cleared area and remove the packing materials. Do not dispose of wrenches. Attach the Rear Stabilizer...

Instruction Manual
Page 11
Make sure that all parts are properly tightened before you do not connect the connectors properly, the console may be included. If you use the elliptical. Then, wipe off any ... the floor. 11 Tip: Avoid pinching the wires. Plug the Power Adapter (114) into the receptacle on the frame of the Console. 12. Note: Extra parts may become damaged. While a second person holds the Console (8) near the Upright (4), plug the Upper Wire (116), the Pulse Wire (117), and the Extension Wire...
Make sure that all parts are properly tightened before you do not connect the connectors properly, the console may be included. If you use the elliptical. Then, wipe off any ... the floor. 11 Tip: Avoid pinching the wires. Plug the Power Adapter (114) into the receptacle on the frame of the Console. 12. Note: Extra parts may become damaged. While a second person holds the Console (8) near the Upright (4), plug the Upper Wire (116), the Pulse Wire (117), and the Extension Wire...
Instruction Manual
Page 22
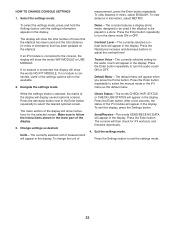
... WIFI STATUS or CHECK USB STATUS will show the words NO IFIT MODULE. To change the unit of the display will appear in the lower part of measurement will show the total number of hours that has been pedaled on the elliptical. After a few seconds, the status of the display will...
... WIFI STATUS or CHECK USB STATUS will show the words NO IFIT MODULE. To change the unit of the display will appear in the lower part of measurement will show the total number of hours that has been pedaled on the elliptical. After a few seconds, the status of the display will...
Instruction Manual
Page 23
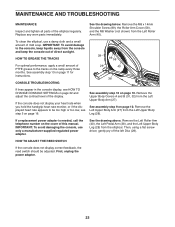
... heart rate appears to be adjusted. Remove the Left Upper Body Arm (27) from the Left Upper Body Arm (27). Replace any worn parts immediately. HOW TO GREASE THE TRACKS For optimal performance, apply a small amount of PTFE grease to the console, keep the console out of ...months. See the drawing above. Then, using a flat screwdriver, gently pry off the left Disc (29). MAINTENANCE AND TROUBLESHOOTING MAINTENANCE Inspect and tighten all parts of the display. IMPORTANT: To avoid damaging the console, use a damp cloth and a small amount of this manual. HOW TO ADJUST THE REED ...
... heart rate appears to be adjusted. Remove the Left Upper Body Arm (27) from the Left Upper Body Arm (27). Replace any worn parts immediately. HOW TO GREASE THE TRACKS For optimal performance, apply a small amount of PTFE grease to the console, keep the console out of ...months. See the drawing above. Then, using a flat screwdriver, gently pry off the left Disc (29). MAINTENANCE AND TROUBLESHOOTING MAINTENANCE Inspect and tighten all parts of the display. IMPORTANT: To avoid damaging the console, use a damp cloth and a small amount of this manual. HOW TO ADJUST THE REED ...

Instruction Manual
Page 25
... health problems. The heart rate monitor is to 10 minutes of regular exercise, you exercise; Cooling Down-Finish with 5 to make exercise a regular and enjoyable part of your exercise until your body uses carbohydrate calories for fat burning and aerobic exercise. These guidelines will help you must perform aerobic exercise, which...
... health problems. The heart rate monitor is to 10 minutes of regular exercise, you exercise; Cooling Down-Finish with 5 to make exercise a regular and enjoyable part of your exercise until your body uses carbohydrate calories for fat burning and aerobic exercise. These guidelines will help you must perform aerobic exercise, which...
Instruction Manual
Page 27
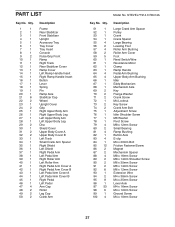
... A Right Pedal Arm Cover B Left Pedal Arm Cover A Left Pedal Arm Cover B Right Pedal Left Pedal Arm Cap Roller Leg Cap Crank Arm Model No. PART LIST Key No. NTEVEL77914.0 R0414A Key No. Qty. 51 1 52 1 53 1 54 1 55 4 56 2 57 4 58 2 59 5 60 1 61 1 62 1 63 1 64 4 65 4 66 1 67...
... A Right Pedal Arm Cover B Left Pedal Arm Cover A Left Pedal Arm Cover B Right Pedal Left Pedal Arm Cap Roller Leg Cap Crank Arm Model No. PART LIST Key No. NTEVEL77914.0 R0414A Key No. Qty. 51 1 52 1 53 1 54 1 55 4 56 2 57 4 58 2 59 5 60 1 61 1 62 1 63 1 64 4 65 4 66 1 67...

Instruction Manual
Page 28
... Assembly Tool General Grease Packet PTFE Grease Packet User's Manual Note: Specifications are not illustrated. 28 For information about ordering replacement parts, see the back cover of this manual. *These parts are subject to change without notice. Description 101 2 102 2 103 8 104 4 105 2 106 4 107 4 108 4 109 2 110 6 111 4 112 1 113 1 Crank...
... Assembly Tool General Grease Packet PTFE Grease Packet User's Manual Note: Specifications are not illustrated. 28 For information about ordering replacement parts, see the back cover of this manual. *These parts are subject to change without notice. Description 101 2 102 2 103 8 104 4 105 2 106 4 107 4 108 4 109 2 110 6 111 4 112 1 113 1 Crank...

Instruction Manual
Page 32
...8226; the name of the product (see the front cover of this manual) • the key number and description of the replacement part(s) (see the front cover of environmental protection. Please use recycling facilities that are authorized to collect this manual) RECYCLING INFORMATION This electronic... product must be prepared to conserve natural resources and improve European standards of this product. Part No. 355525 R0414A Printed in your local city office or the establishment where you , be recycled after its useful life as ...
...8226; the name of the product (see the front cover of this manual) • the key number and description of the replacement part(s) (see the front cover of environmental protection. Please use recycling facilities that are authorized to collect this manual) RECYCLING INFORMATION This electronic... product must be prepared to conserve natural resources and improve European standards of this product. Part No. 355525 R0414A Printed in your local city office or the establishment where you , be recycled after its useful life as ...


