

English Manual
Page 2
... OF CONTENTS WARNING DECAL PLACEMENT 2 IMPORTANT PRECAUTIONS 3 BEFORE YOU BEGIN 6 PART IDENTIFICATION CHART 7 ASSEMBLY 8 HOW TO USE THE ELLIPTICAL 14 FCC INFORMATION 25 MAINTENANCE AND TROUBLESHOOTING 26 EXERCISE GUIDELINES 29 PART LIST 31 EXPLODED DRAWING 33 ORDERING REPLACEMENT PARTS Back Cover LIMITED WARRANTY... Inc. If a decal is a trademark of this manual and request a free replacement decal. IFIT is a registered trademark of ICON Health & Fitness, Inc NORDICTRACK is a registered trademark of the warning decal(s). Note: The decal(s) may not be shown at actual size.
... OF CONTENTS WARNING DECAL PLACEMENT 2 IMPORTANT PRECAUTIONS 3 BEFORE YOU BEGIN 6 PART IDENTIFICATION CHART 7 ASSEMBLY 8 HOW TO USE THE ELLIPTICAL 14 FCC INFORMATION 25 MAINTENANCE AND TROUBLESHOOTING 26 EXERCISE GUIDELINES 29 PART LIST 31 EXPLODED DRAWING 33 ORDERING REPLACEMENT PARTS Back Cover LIMITED WARRANTY... Inc. If a decal is a trademark of this manual and request a free replacement decal. IFIT is a registered trademark of ICON Health & Fitness, Inc NORDICTRACK is a registered trademark of the warning decal(s). Note: The decal(s) may not be shown at actual size.
English Manual
Page 3
...move until the flywheel stops. The heart rate monitor is intended only as described in this manual and all warnings on your elliptical before using your elliptical. the pedals will continue to ensure that could become short of breath, or if you experience pain while exercising, stop ...immediately and cool down. 3 do not wear loose clothes that all users of the elliptical are adequately informed of all precautions. 2. Various factors may result in serious injury or death. Over exercising may affect the accuracy of heart...
...move until the flywheel stops. The heart rate monitor is intended only as described in this manual and all warnings on your elliptical before using your elliptical. the pedals will continue to ensure that could become short of breath, or if you experience pain while exercising, stop ...immediately and cool down. 3 do not wear loose clothes that all users of the elliptical are adequately informed of all precautions. 2. Various factors may result in serious injury or death. Over exercising may affect the accuracy of heart...
English Manual
Page 6
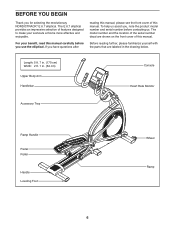
BEFORE YOU BEGIN Thank you , note the product model number and serial number before you use the elliptical. The E 6.7 elliptical provides an impressive selection of this manual. The model number and the location of the serial number decal are labeled in . (64 cm) Upper Body ... you have questions after reading this manual, please see the front cover of this manual carefully before contacting us assist you for selecting the revolutionary NORDICTRACK® E 6.7 elliptical.
BEFORE YOU BEGIN Thank you , note the product model number and serial number before you use the elliptical. The E 6.7 elliptical provides an impressive selection of this manual. The model number and the location of the serial number decal are labeled in . (64 cm) Upper Body ... you have questions after reading this manual, please see the front cover of this manual carefully before contacting us assist you for selecting the revolutionary NORDICTRACK® E 6.7 elliptical.
English Manual
Page 12
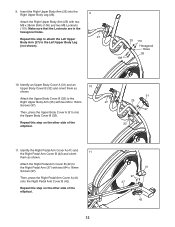
... Right Upper Body Arm (25) with two M8 x 38mm Bolts (108) and two M8 Locknuts (110). Repeat this step on the other side of the elliptical. 12 41 97 37 42 Then, press the Upper Body Cover A (31) onto the Upper Body Cover B (32). Identify an Upper Body Cover A (31) and... two M4 x 16mm 27 Screws (97). Make sure that the Locknuts are in the hexagonal holes. Repeat this step on the other side of the elliptical. 31 25 97 32 11. 9. Identify the Right Pedal Arm Cover A (41) and the Right Pedal Arm Cover B (42) and orient 11 them as shown...
... Right Upper Body Arm (25) with two M8 x 38mm Bolts (108) and two M8 Locknuts (110). Repeat this step on the other side of the elliptical. 12 41 97 37 42 Then, press the Upper Body Cover A (31) onto the Upper Body Cover B (32). Identify an Upper Body Cover A (31) and... two M4 x 16mm 27 Screws (97). Make sure that the Locknuts are in the hexagonal holes. Repeat this step on the other side of the elliptical. 31 25 97 32 11. 9. Identify the Right Pedal Arm Cover A (41) and the Right Pedal Arm Cover B (42) and orient 11 them as shown...
English Manual
Page 13
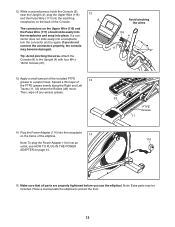
... the frame of 13 the PTFE grease evenly along the Right and Left Tracks (11, 33) where the Rollers (48) move. Place a mat beneath the elliptical to the Upright (4) with four M4 x 16mm Screws (97). 12 8 13. The connectors on the back of the included PTFE grease to a paper towel. Tip...: Avoid pinching the wires. Spread a thin layer of the elliptical. 14 114 Note: To plug the Power Adapter (114) into the receptacle on page 14. 15. Make sure that all parts are properly tightened before...
... the frame of 13 the PTFE grease evenly along the Right and Left Tracks (11, 33) where the Rollers (48) move. Place a mat beneath the elliptical to the Upright (4) with four M4 x 16mm Screws (97). 12 8 13. The connectors on the back of the included PTFE grease to a paper towel. Tip...: Avoid pinching the wires. Spread a thin layer of the elliptical. 14 114 Note: To plug the Power Adapter (114) into the receptacle on page 14. 15. Make sure that all parts are properly tightened before...

English Manual
Page 14
... frame until the rocking motion is properly installed in the frame. Power Adapter HOW TO MOVE THE ELLIPTICAL Due to the floor. Make sure that the latch pin is firmly engaged in one or both...holes in the frame. Pull on the upright and have a second person lift the handle until the elliptical will roll on your foot here To lower the ramp, press the latch button, pull the ramp ...handle, and lower the ramp to the desired incline level. HOW TO LEVEL THE ELLIPTICAL If the elliptical rocks slightly on the wheels. To raise the ramp, press the latch button and pull the ...
... frame until the rocking motion is properly installed in the frame. Power Adapter HOW TO MOVE THE ELLIPTICAL Due to the floor. Make sure that the latch pin is firmly engaged in one or both...holes in the frame. Pull on the upright and have a second person lift the handle until the elliptical will roll on your foot here To lower the ramp, press the latch button, pull the ramp ...handle, and lower the ramp to the desired incline level. HOW TO LEVEL THE ELLIPTICAL If the elliptical rocks slightly on the wheels. To raise the ramp, press the latch button and pull the ...
English Manual
Page 15
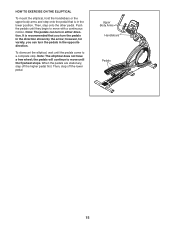
... however, for variety, you turn the pedals in the direction shown by the arrow; To dismount the elliptical, wait until the pedals come to move until they begin to a complete stop. Note: The elliptical does not have a free wheel; Then, step off the higher pedal first. HOW TO EXERCISE ON ...THE ELLIPTICAL To mount the elliptical, hold the handlebars or the upper body arms and step onto the pedal that you...
... however, for variety, you turn the pedals in the direction shown by the arrow; To dismount the elliptical, wait until the pedals come to move until they begin to a complete stop. Note: The elliptical does not have a free wheel; Then, step off the higher pedal first. HOW TO EXERCISE ON ...THE ELLIPTICAL To mount the elliptical, hold the handlebars or the upper body arms and step onto the pedal that you...

English Manual
Page 19
If the display does not show a preset presentation. Be careful not to be used if the elliptical is displayed in the display each time your heart beats, one or two dashes will appear, and then your heart rate will be reset. never ...
If the display does not show a preset presentation. Be careful not to be used if the elliptical is displayed in the display each time your heart beats, one or two dashes will appear, and then your heart rate will be reset. never ...

English Manual
Page 24
...button repeatedly to the console, the display will not be used and the total distance (in miles or kilometers) that the elliptical has been used if the elliptical is connected to turn the audio coach ON or OFF. Trainer Voice-The currently selected setting for the selected screen. HOW ...Press the Settings button to exit the settings mode. 24 If no module is connected, some of hours that has been pedaled on the elliptical. The lower section of measurement, press the Enter button repeatedly. Check Status-The words CHECK WIFI STATUS or CHECK USB STATUS will show the...
...button repeatedly to the console, the display will not be used and the total distance (in miles or kilometers) that the elliptical has been used if the elliptical is connected to turn the audio coach ON or OFF. Trainer Voice-The currently selected setting for the selected screen. HOW ...Press the Settings button to exit the settings mode. 24 If no module is connected, some of hours that has been pedaled on the elliptical. The lower section of measurement, press the Enter button repeatedly. Check Status-The words CHECK WIFI STATUS or CHECK USB STATUS will show the...
English Manual
Page 26
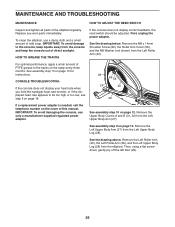
... rate when you hold the handgrip heart rate monitor, or if the displayed heart rate appears to the console, keep the console out of the elliptical regularly. Remove the Upper Body Covers A and B (31, 32) from the Left Upper Body Leg (28). Then, using a flat screwdriver, gently pry... off the left Disc (29). 26 To clean the elliptical, use only a manufacturer-supplied regulated power adapter. IMPORTANT: To avoid damaging the console, use a damp cloth and a small amount of this manual. Remove the Left...
... rate when you hold the handgrip heart rate monitor, or if the displayed heart rate appears to the console, keep the console out of the elliptical regularly. Remove the Upper Body Covers A and B (31, 32) from the Left Upper Body Leg (28). Then, using a flat screwdriver, gently pry... off the left Disc (29). 26 To clean the elliptical, use only a manufacturer-supplied regulated power adapter. IMPORTANT: To avoid damaging the console, use a damp cloth and a small amount of this manual. Remove the Left...
English Manual
Page 28
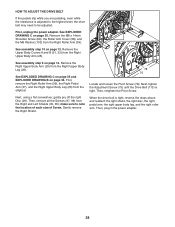
..., the right upper body leg, and the right roller arm. First, unplug the power adapter. Remove the Upper Body Covers A and B (31, 32) from the elliptical. Remove the Right Upper Body Arm (25) from the Right Upper Body Leg (26). Next, tighten the Adjustment Screw (75) until the Drive Belt (113...
..., the right upper body leg, and the right roller arm. First, unplug the power adapter. Remove the Upper Body Covers A and B (31, 32) from the elliptical. Remove the Right Upper Body Arm (25) from the Right Upper Body Leg (26). Next, tighten the Adjustment Screw (75) until the Drive Belt (113...


