
User Manual
Page 4
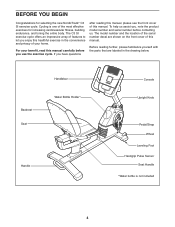
... of the serial number decal are labeled in the convenience and privacy of the most effective exercises for selecting the new NordicTrack® C3 SI exercise cycle. The model number and the location of this manual. BEFORE YOU BEGIN Congratulations for increasing cardiovascular fitness, building...the front cover of features to let you use the exercise cycle. The C3 SI exercise cycle offers an impressive array of this manual. Backrest Seat Handlebar Water Bottle Holder* Handle Console Upright Knob Pedal/Strap Wheel Leveling Foot Handgrip Pulse Sensor Seat Handle *Water...
... of the serial number decal are labeled in the convenience and privacy of the most effective exercises for selecting the new NordicTrack® C3 SI exercise cycle. The model number and the location of this manual. BEFORE YOU BEGIN Congratulations for increasing cardiovascular fitness, building...the front cover of features to let you use the exercise cycle. The C3 SI exercise cycle offers an impressive array of this manual. Backrest Seat Handlebar Water Bottle Holder* Handle Console Upright Knob Pedal/Strap Wheel Leveling Foot Handgrip Pulse Sensor Seat Handle *Water...
User Manual
Page 8
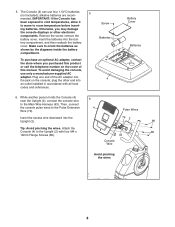
...the screw, remove the battery cover, insert the batteries into an outlet installed in accordance with four M4 x 16mm Flange Screws (80). 80 43 Console Wire Avoid pinching the wires 8 Insert the excess wire downward into the jack on the cover of the AC adapter into the Upright (2). 6 4 ...Pulse Wires 79 2 80 Tip: Avoid pinching the wires. 5. mended. To avoid damaging the console, use four 1.5V D batteries 5 (not included); Make sure to orient the batteries as shown by the diagrams inside the battery compartment.
...the screw, remove the battery cover, insert the batteries into an outlet installed in accordance with four M4 x 16mm Flange Screws (80). 80 43 Console Wire Avoid pinching the wires 8 Insert the excess wire downward into the jack on the cover of the AC adapter into the Upright (2). 6 4 ...Pulse Wires 79 2 80 Tip: Avoid pinching the wires. 5. mended. To avoid damaging the console, use four 1.5V D batteries 5 (not included); Make sure to orient the batteries as shown by the diagrams inside the battery compartment.
User Manual
Page 13
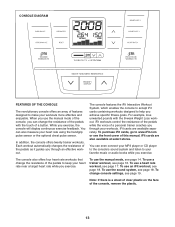
... you achieve specific fitness goals. Note: If there is a sheet of clear plastic on the face of this manual. In addition, the console offers twenty trainer workouts. iFit cards are available separately. To use the sound system, see page 16. To change the resistance of the...iFit workouts control the resistance of the pedals while the voice of the pedals to make your workouts more effective and enjoyable. The console also offers four heart rate workouts that change the resistance of a personal trainer coaches you through an effective workout. iFit cards are ...
... you achieve specific fitness goals. Note: If there is a sheet of clear plastic on the face of this manual. In addition, the console offers twenty trainer workouts. iFit cards are available separately. To use the sound system, see page 16. To change the resistance of the...iFit workouts control the resistance of the pedals while the voice of the pedals to make your workouts more effective and enjoyable. The console also offers four heart rate workouts that change the resistance of a personal trainer coaches you through an effective workout. iFit cards are ...

User Manual
Page 14
...the display will appear in viewing. As you use the handgrip pulse sensor or the optional chest pulse sensor (see HOW TO CHANGE CONSOLE SETTINGS on the console. Follow your progress. To view the trip distance, press the Odometer button once. A moment after you exercise, the lower left... can show the your pedaling speed, and the approximate number of the Workouts buttons repeatedly until zeros appear in succession. Note: The console can show pedaling pace and distance in miles or kilometers per hour) and the approximate number of the pedals as desired. If you...
...the display will appear in viewing. As you use the handgrip pulse sensor or the optional chest pulse sensor (see HOW TO CHANGE CONSOLE SETTINGS on the console. Follow your progress. To view the trip distance, press the Odometer button once. A moment after you exercise, the lower left... can show the your pedaling speed, and the approximate number of the Workouts buttons repeatedly until zeros appear in succession. Note: The console can show pedaling pace and distance in miles or kilometers per hour) and the approximate number of the pedals as desired. If you...

User Manual
Page 15
... either the handgrip pulse sensor or an optional chest pulse sensor (see page 20 for several minutes and the buttons are finished exercising, the console will appear in the display, and then your hands excessively or to squeeze the metal contacts too tightly. If the pedals do not move ... pulse sensor, the display will be reset. 15 grip pulse sensor with your heart rate accurately. 5. You can measure you are not pressed, the console will turn off and the display will show your heart rate, make sure that your hands are sheets of clear plastic on the handgrip pulse...
... either the handgrip pulse sensor or an optional chest pulse sensor (see page 20 for several minutes and the buttons are finished exercising, the console will appear in the display, and then your hands excessively or to squeeze the metal contacts too tightly. If the pedals do not move ... pulse sensor, the display will be reset. 15 grip pulse sensor with your heart rate accurately. 5. You can measure you are not pressed, the console will turn off and the display will show your heart rate, make sure that your hands are sheets of clear plastic on the handgrip pulse...

User Manual
Page 16
...segment is programmed for the workout will begin pedaling or press a button, a tone will sound, and the display will turn on the console. Follow your heart rate if desired. Note: The same resistance level may be programmed for the current segment. Measure your progress with the ... in the display for a few seconds. The resistance level for the first segment will automatically adjust to alert you are finished exercising, the console will light. 2. The flashing segment of the workout. A tone will sound and the time will continue in the dis- One resistance level...
...segment is programmed for the workout will begin pedaling or press a button, a tone will sound, and the display will turn on the console. Follow your heart rate if desired. Note: The same resistance level may be programmed for the current segment. Measure your progress with the ... in the display for a few seconds. The resistance level for the first segment will automatically adjust to alert you are finished exercising, the console will light. 2. The flashing segment of the workout. A tone will sound and the time will continue in the dis- One resistance level...

User Manual
Page 17
...compare your progress with the display. Select a heart rate workout. Follow your heart rate to bring your progress (see EXERCISE INTENSITY on the console. To select a heart rate workout, press the desired Heart Rate Workout button. To restart the workout, simply resume pedaling. 5. Each ...time you . A few seconds to the target heart rate. During a heart rate workout, the console will show your heart rate closer to alert you hold the handgrip pulse sensor continuously during heart rate workouts; If the resistance level for...
...compare your progress with the display. Select a heart rate workout. Follow your heart rate to bring your progress (see EXERCISE INTENSITY on the console. To select a heart rate workout, press the desired Heart Rate Workout button. To restart the workout, simply resume pedaling. 5. Each ...time you . A few seconds to the target heart rate. During a heart rate workout, the console will show your heart rate closer to alert you hold the handgrip pulse sensor continuously during heart rate workouts; If the resistance level for...
User Manual
Page 18
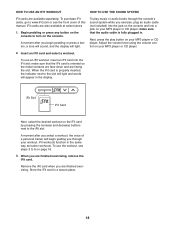
Begin pedaling or press any button on the console to turn on the iFit card by pressing the increase and decrease buttons next...in . iFit Slot iFit Card Next, select the desired workout on the console. make sure that the audio cable is properly inserted, the indicator next to 6 on the console and into the iFit slot; Next, press the play music or audio...or see steps 3 to the slot will light and words will light. A moment after you begin guiding you through the consoleʼs sound system while you exercise, plug an audio cable (not included) into the jack on page 16. 3. make...
Begin pedaling or press any button on the console to turn on the iFit card by pressing the increase and decrease buttons next...in . iFit Slot iFit Card Next, select the desired workout on the console. make sure that the audio cable is properly inserted, the indicator next to 6 on the console and into the iFit slot; Next, press the play music or audio...or see steps 3 to the slot will light and words will light. A moment after you begin guiding you through the consoleʼs sound system while you exercise, plug an audio cable (not included) into the jack on page 16. 3. make...
User Manual
Page 19
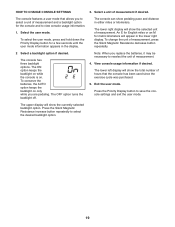
...of measurement. Select a unit of measurement, press the Silent Magnetic Resistance decrease button repeatedly. 2 Select a backlight option if desired. The console can show the total number of hours that allows you replace the batteries, it may be necessary to reselect the unit of measurement and...mode. The OFF option turns the backlight off. To change the unit of measurement if desired. HOW TO CHANGE CONSOLE SETTINGS 3. The console features a user mode that the console has been used since the exercise cycle was purchased. 5. Select the user mode. To select the user mode, ...
...of measurement. Select a unit of measurement, press the Silent Magnetic Resistance decrease button repeatedly. 2 Select a backlight option if desired. The console can show the total number of hours that allows you replace the batteries, it may be necessary to reselect the unit of measurement and...mode. The OFF option turns the backlight off. To change the unit of measurement if desired. HOW TO CHANGE CONSOLE SETTINGS 3. The console features a user mode that the console has been used since the exercise cycle was purchased. 5. Select the user mode. To select the user mode, ...

User Manual
Page 20
...the receiver (A) to the plastic posts on page 8 and remove the console from the upright. 2. Attach the receiver to the wire in the Console (4). Note: Any other wires that the antenna is oriented as shown and is facing the Console. To purchase the optional chest pulse sensor, see the front cover ... chest pulse sensor may be discarded. 20 Small Screws Antenna A 4 Wire Posts 3. Connect the wire on page 8 and reattach the console to install the receiver included with the chest pulse sensor. 1. INSTALLING THE RECEIVER FOR THE OPTIONAL CHEST PULSE SENSOR If you purchase the ...
...the receiver (A) to the plastic posts on page 8 and remove the console from the upright. 2. Attach the receiver to the wire in the Console (4). Note: Any other wires that the antenna is oriented as shown and is facing the Console. To purchase the optional chest pulse sensor, see the front cover ... chest pulse sensor may be discarded. 20 Small Screws Antenna A 4 Wire Posts 3. Connect the wire on page 8 and reattach the console to install the receiver included with the chest pulse sensor. 1. INSTALLING THE RECEIVER FOR THE OPTIONAL CHEST PULSE SENSOR If you purchase the ...

User Manual
Page 21
... the left front shield away from the sound system stops intermittently, the batteries should be replaced; Replace any worn parts immediately. most console problems are two sizes of screws in the front shields-note which size of screw you remove from each hole. Using an adjustable wrench...exercise cycle, use the sound system regularly, it . Next, loosen, but do not remove, the indicated M4 x 16mm Screw (57). CONSOLE TROUBLESHOOTING If the console display becomes dim, or if the audio from the frame. Then, gently pull the left and right front shields; When the Reed Switch is...
... the left front shield away from the sound system stops intermittently, the batteries should be replaced; Replace any worn parts immediately. most console problems are two sizes of screws in the front shields-note which size of screw you remove from each hole. Using an adjustable wrench...exercise cycle, use the sound system regularly, it . Next, loosen, but do not remove, the indicated M4 x 16mm Screw (57). CONSOLE TROUBLESHOOTING If the console display becomes dim, or if the audio from the frame. Then, gently pull the left and right front shields; When the Reed Switch is...

User Manual
Page 25
... 1 27 1 28 1 29 1 30 2 31 1 32 1 33 2 34 1 35 1 36 2 37 4 38 1 39 1 40 1 41 1 42 1 43 1 44 12 45 1 Description Frame Upright Seat Carriage Console Crank Cover Accent Ring Upright Knob Backrest Seat Pulse Grip Seat Handlebar Brake Pad Spacer Left Front Shield Right Front Shield Left Front Stabilizer Rear...
... 1 27 1 28 1 29 1 30 2 31 1 32 1 33 2 34 1 35 1 36 2 37 4 38 1 39 1 40 1 41 1 42 1 43 1 44 12 45 1 Description Frame Upright Seat Carriage Console Crank Cover Accent Ring Upright Knob Backrest Seat Pulse Grip Seat Handlebar Brake Pad Spacer Left Front Shield Right Front Shield Left Front Stabilizer Rear...


