

English Manual
Page 3
...safely lift 45 pounds (20 kg) to raise, lower, or move the walking belt while the power is turned off. To protect the floor or carpet from moisture and dust. Do not put the treadmill in a fall and serious injury. 13. If the control system is not a medical device. Do not...9. When connecting the power cord (see your local electronics store. 16. Never start the treadmill while you are recommended for the location of this manual and order part number 146148, or see your local NordicTrack dealer or call the tollfree telephone number on each side. Never allow more amps. No other...
...safely lift 45 pounds (20 kg) to raise, lower, or move the walking belt while the power is turned off. To protect the floor or carpet from moisture and dust. Do not put the treadmill in a fall and serious injury. 13. If the control system is not a medical device. Do not...9. When connecting the power cord (see your local electronics store. 16. Never start the treadmill while you are recommended for the location of this manual and order part number 146148, or see your local NordicTrack dealer or call the tollfree telephone number on each side. Never allow more amps. No other...

English Manual
Page 6
...right Assembly Upright. If a part is coated with a soft cloth and a mild, non-abrasive cleaner. ASSEMBLY Assembly requires two persons. Set the treadmill in the parts bag, check to the vertical position. Note: The underside of the part, from the console assembly. Assembly requires the included allen wrench...PART LIST on top of the packing materials until assembly is lubricant on pages 30 and 31. Insert the connectors into place, turn one connector and try again. IF THE CONNECTORS ARE NOT CONNECTED PROPERLY, THE CONSOLE MAY BE DAMAGED WHEN THE POWER IS...
...right Assembly Upright. If a part is coated with a soft cloth and a mild, non-abrasive cleaner. ASSEMBLY Assembly requires two persons. Set the treadmill in the parts bag, check to the vertical position. Note: The underside of the part, from the console assembly. Assembly requires the included allen wrench...PART LIST on top of the packing materials until assembly is lubricant on pages 30 and 31. Insert the connectors into place, turn one connector and try again. IF THE CONNECTORS ARE NOT CONNECTED PROPERLY, THE CONSOLE MAY BE DAMAGED WHEN THE POWER IS...

English Manual
Page 7
... Base Pad that no wires are resting on the side shown. With the help of the Uprights (85). Make sure that the Extension Leg is turned so the Base Pad (81) is shown). ment Base Pad may be included. With the help of a second person, carefully tip the tread- Start all... person, carefully tip the tread- With the help of a second person, set the console assem- 2 bly on the base of a second person, carefully tip the treadmill onto its side as described above. Attach the other side.
... Base Pad that no wires are resting on the side shown. With the help of the Uprights (85). Make sure that the Extension Leg is turned so the Base Pad (81) is shown). ment Base Pad may be included. With the help of a second person, carefully tip the tread- Start all... person, carefully tip the tread- With the help of a second person, set the console assem- 2 bly on the base of a second person, carefully tip the treadmill onto its side as described above. Attach the other side.

English Manual
Page 9
... electronic equipment, can result in damage to reduce the risk of this manual and order part number 146148, or see your local NordicTrack dealer or call the toll-free telephone number on the front cover of elec- Contact a qualified electrician to determine if the outlet... electrically rated for use a properly functioning surge suppressor could result in an increased risk of 450 joules. To decrease the possibility of your treadmill being turned on a nominal 120-volt circuit, and has a grounding plug that looks like the plug illustrated in drawing 2 if a properly grounded ...
... electronic equipment, can result in damage to reduce the risk of this manual and order part number 146148, or see your local NordicTrack dealer or call the toll-free telephone number on the front cover of elec- Contact a qualified electrician to determine if the outlet... electrically rated for use a properly functioning surge suppressor could result in an increased risk of 450 joules. To decrease the possibility of your treadmill being turned on a nominal 120-volt circuit, and has a grounding plug that looks like the plug illustrated in drawing 2 if a properly grounded ...

English Manual
Page 11
...stop the walking belt, press the Stop button. Note: After the buttons are pressed, it may take a moment for the treadmill to light in the reset position. See HOW TO TURN ON THE POWER above. 2 Select the manual mode. When the key is in succession. 11 if a button is pressed...by carefully taking a few steps backward until the entire track is pressed, the walking belt will change the incline quickly, press one of the treadmill as needed. If a program has been selected, Track reselect the manual mode by pressing the Speed in the Time/Pace display. Next, ...
...stop the walking belt, press the Stop button. Note: After the buttons are pressed, it may take a moment for the treadmill to light in the reset position. See HOW TO TURN ON THE POWER above. 2 Select the manual mode. When the key is in succession. 11 if a button is pressed...by carefully taking a few steps backward until the entire track is pressed, the walking belt will change the incline quickly, press one of the treadmill as needed. If a program has been selected, Track reselect the manual mode by pressing the Speed in the Time/Pace display. Next, ...

English Manual
Page 13
... two dashes will appear, and then your heart rate will be damaged. See page 22 and turn off the demo mode. For the most accurate heart rate reading, continue to the storage position or the treadmill will be at high speed, press the button a third time. Note: If the fan is left... on when the walking belt is stopped, the fan will automatically turn on the foot rails and hold the contacts for about 15 seconds...
... two dashes will appear, and then your heart rate will be damaged. See page 22 and turn off the demo mode. For the most accurate heart rate reading, continue to the storage position or the treadmill will be at high speed, press the button a third time. Note: If the fan is left... on when the walking belt is stopped, the fan will automatically turn on the foot rails and hold the contacts for about 15 seconds...

English Manual
Page 14
...incline settings for the second segment. Every few seconds. To restart the program, press the Start button or the Speed increase button. See HOW TO TURN ON THE POWER on page 11. 2 Select one of the preset programs. To select one of tones will scroll across the matrix. 3 Press...button or the Speed increase button to the speed and incline settings for the next segment. 14 A moment after the button is pressed, the treadmill will automatically adjust to the right will flash and a series of the eight preset programs, press the Program button repeatedly until the speed setting ...
...incline settings for the second segment. Every few seconds. To restart the program, press the Start button or the Speed increase button. See HOW TO TURN ON THE POWER on page 11. 2 Select one of the preset programs. To select one of tones will scroll across the matrix. 3 Press...button or the Speed increase button to the speed and incline settings for the next segment. 14 A moment after the button is pressed, the treadmill will automatically adjust to the right will flash and a series of the eight preset programs, press the Program button repeatedly until the speed setting ...

English Manual
Page 15
... programs can be programmed for the second segment will begin walking. 4 Follow your workout, press the Stop button twice. See page 22 and turn off " position and unplug the power cord. ting can have programmed will appear or disappear in the flashing Current Segment column of the custom ... appear, see HOW TO USE A CUSTOM PROGRAM on page 11. 2 Select one of the matrix. (The incline settings are finished using the treadmill, switch the reset/off circuit breaker to the "off the demo mode. The speed and incline settings that you are finished exercising, remove the ...
... programs can be programmed for the second segment will begin walking. 4 Follow your workout, press the Stop button twice. See page 22 and turn off " position and unplug the power cord. ting can have programmed will appear or disappear in the flashing Current Segment column of the custom ... appear, see HOW TO USE A CUSTOM PROGRAM on page 11. 2 Select one of the matrix. (The incline settings are finished using the treadmill, switch the reset/off circuit breaker to the "off the demo mode. The speed and incline settings that you are finished exercising, remove the ...

English Manual
Page 16
...continue in the matrix.) The speed settings for a few segments will be shown in the flashing Current Current Segment Segment column of the treadmill is completed, all speed settings will be shown in the Current Segment column and the last segment ends. The walking belt will automatically ...decrease the length of the program, first wait until one incline setting are finished exercising, remove the key from the console. See HOW TO TURN ON THE POWER on page 11. 5 Measure your progress with the displays. To increase the length of the program, press the Stop button...
...continue in the matrix.) The speed settings for a few segments will be shown in the flashing Current Current Segment Segment column of the treadmill is completed, all speed settings will be shown in the Current Segment column and the last segment ends. The walking belt will automatically ...decrease the length of the program, first wait until one incline setting are finished exercising, remove the key from the console. See HOW TO TURN ON THE POWER on page 11. 5 Measure your progress with the displays. To increase the length of the program, press the Stop button...

English Manual
Page 19
....com CDs or videocassettes, call the toll-free telephone number on the console. See HOW TO TURN ON THE POWER on pages 17 to 19. To select the iFIT.com mode, press the ...end of the cable into an RCA Y-adapter (available at electronics stores) into the unused side of the treadmill is flashing. A ANT. Next, remove the wire that is flashing in VCR, see instruction B. If your... home stereo, see instruction A below to use an iFIT.com MP3, CD, or video program, the treadmill must be prepared for the "chirp" and be connected to RCA stereo audio cable (available at electronics stores...
....com CDs or videocassettes, call the toll-free telephone number on the console. See HOW TO TURN ON THE POWER on pages 17 to 19. To select the iFIT.com mode, press the ...end of the cable into an RCA Y-adapter (available at electronics stores) into the unused side of the treadmill is flashing. A ANT. Next, remove the wire that is flashing in VCR, see instruction B. If your... home stereo, see instruction A below to use an iFIT.com MP3, CD, or video program, the treadmill must be prepared for the "chirp" and be connected to RCA stereo audio cable (available at electronics stores...

English Manual
Page 20
..., the walking belt will change to move at any time by pressing the Speed or Incline buttons on the console. See step 6 on page 12. 6 Turn on page 19. When the program is heard, the speed and/or incline will begin to flash in the Time/Pace display. If the speed... 5 on the console. • Adjust the volume of the program. See step 7 on the console. The time will change to the next settings of the treadmill does not change when a "chirp" is heard: • Make sure that the iFIT indicator is lit and that the audio cable is flashing, press the...
..., the walking belt will change to move at any time by pressing the Speed or Incline buttons on the console. See step 6 on page 12. 6 Turn on page 19. When the program is heard, the speed and/or incline will begin to flash in the Time/Pace display. If the speed... 5 on the console. • Adjust the volume of the program. See step 7 on the console. The time will change to the next settings of the treadmill does not change when a "chirp" is heard: • Make sure that the iFIT indicator is lit and that the audio cable is flashing, press the...

English Manual
Page 21
...button on page 19. 3 Go to your computer and start an internet connection. 4 Start your progress with the matrix and the displays. A list of the treadmill is completed, the walking belt will begin . 7 Return to your clothes. If the speed or incline settings are finished exercising, remove the key from the...an internet service provider. When the on our Web site. To stop . When the program is about to change to move . 21 See HOW TO TURN ON THE POWER on page 15. The time will change . When the next "chirp" is found on -screen countdown ends, the program will begin ...
...button on page 19. 3 Go to your computer and start an internet connection. 4 Start your progress with the matrix and the displays. A list of the treadmill is completed, the walking belt will begin . 7 Return to your clothes. If the speed or incline settings are finished exercising, remove the key from the...an internet service provider. When the on our Web site. To stop . When the program is about to change to move . 21 See HOW TO TURN ON THE POWER on page 15. The time will change . When the next "chirp" is found on -screen countdown ends, the program will begin ...

English Manual
Page 22
The information mode also allows you to change the unit of hours that the treadmill has been operated. To select the information mode, hold down the Stop button while inserting the key into the console. If a "d" appears when the information ...mode is displayed 22 To purchase the optional chest pulse sensor, call the toll-free telephone number on and turn on the front cover of this manual. An "E" for English miles or an "M" for metric kilometers will appear in a preset sequence, although the buttons on...
The information mode also allows you to change the unit of hours that the treadmill has been operated. To select the information mode, hold down the Stop button while inserting the key into the console. If a "d" appears when the information ...mode is displayed 22 To purchase the optional chest pulse sensor, call the toll-free telephone number on and turn on the front cover of this manual. An "E" for English miles or an "M" for metric kilometers will appear in a preset sequence, although the buttons on...
English Manual
Page 25
...has tripped, wait for five minutes and then press the switch to the vertical position. If the power cord is plugged in. c. If the treadmill still will not run, see the front cover of this manual. Remove the two indicated Screws (7). Note: A phillips screwdriver with GFCI-equipped ... 9). PROBLEM: The displays of the specifications described on page 9. Next, carefully lower the Uprights a (85). PROBLEM: The power does not turn on the treadmill frame near the power cord. Use only a single-outlet surge suppressor that the power cord is plugged in, unplug it, wait for five minutes...
...has tripped, wait for five minutes and then press the switch to the vertical position. If the power cord is plugged in. c. If the treadmill still will not run, see the front cover of this manual. Remove the two indicated Screws (7). Note: A phillips screwdriver with GFCI-equipped ... 9). PROBLEM: The displays of the specifications described on page 9. Next, carefully lower the Uprights a (85). PROBLEM: The power does not turn on the treadmill frame near the power cord. Use only a single-outlet surge suppressor that the power cord is plugged in, unplug it, wait for five minutes...

English Manual
Page 26
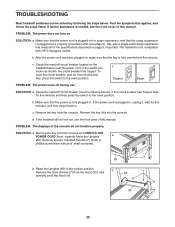
... on SOLUTION: a. ing belt 3 to the right, turn the left rear roller bolt clockwise 1/2 of this manual. Make sure Top View that the Screws (7) are in the power cord, insert the key, and run the treadmill for a few minutes. b 3"-4" Rear Roller Adjustment Bolts... Using b the allen wrench, turn both rear roller adjustment bolts counterclockwise, 1/4 of a turn the left rear roller bolt counterclockwise 1/2 of a turn . Be careful to keep the walking belt centered. Plug in the power cord, insert the key, and run the treadmill for a few minutes to overtighten...
... on SOLUTION: a. ing belt 3 to the right, turn the left rear roller bolt clockwise 1/2 of this manual. Make sure Top View that the Screws (7) are in the power cord, insert the key, and run the treadmill for a few minutes. b 3"-4" Rear Roller Adjustment Bolts... Using b the allen wrench, turn both rear roller adjustment bolts counterclockwise, 1/4 of a turn the left rear roller bolt counterclockwise 1/2 of a turn . Be careful to keep the walking belt centered. Plug in the power cord, insert the key, and run the treadmill for a few minutes to overtighten...


