

English Manual
Page 3
... of 12 and pets away from damage, place a mat under the age of this manual and order part number 146148, or see your local NordicTrack dealer or call the tollfree telephone number on a level surface, with bare feet, wearing only stockings, or in a fall and serious injury. ... in use an extension cord. 11. To purchase a surge suppressor, see your local electronics store. 16. The treadmill is being administered. 15. The pulse sensor is turned off circuit breaker.) 19. Never leave the treadmill unattended while it is running. Do not attempt to raise, lower, or move the...
... of 12 and pets away from damage, place a mat under the age of this manual and order part number 146148, or see your local NordicTrack dealer or call the tollfree telephone number on a level surface, with bare feet, wearing only stockings, or in a fall and serious injury. ... in use an extension cord. 11. To purchase a surge suppressor, see your local electronics store. 16. The treadmill is being administered. 15. The pulse sensor is turned off circuit breaker.) 19. Never leave the treadmill unattended while it is running. Do not attempt to raise, lower, or move the...

English Manual
Page 6
... Bolt (87)-4 Console Bolt (72)-4 1. With the help identifying the assembly hard- nectors should slide together easily and snap into place, turn one connector and try again. If the connectors do not slide together easily and snap into 85 place. Assembly requires the included allen wrench... (see the drawings below each drawing is the key number of the packing materials until assembly is a normal condition and does not affect treadmill performance. Have a second person hold the console assembly near the right Upright. bly. If a part is the quantity needed for assem-...
... Bolt (87)-4 Console Bolt (72)-4 1. With the help identifying the assembly hard- nectors should slide together easily and snap into place, turn one connector and try again. If the connectors do not slide together easily and snap into 85 place. Assembly requires the included allen wrench... (see the drawings below each drawing is the key number of the packing materials until assembly is a normal condition and does not affect treadmill performance. Have a second person hold the console assembly near the right Upright. bly. If a part is the quantity needed for assem-...

English Manual
Page 7
... Leg (97) as shown. mill down so the four Base Pads (81) are in the bracket. With the help of a second person, carefully tip the treadmill onto its side as shown. 3 Insert an Extension Leg (97) into the indicated bracket on the 115 floor and the Uprights (85) are resting on... in the vertical position. 115 81 82 85 115 55 81 82 115 7 Make sure that becomes worn. Make sure that the Extension Leg is turned so the Base Pad (81) is shown).
... Leg (97) as shown. mill down so the four Base Pads (81) are in the bracket. With the help of a second person, carefully tip the treadmill onto its side as shown. 3 Insert an Extension Leg (97) into the indicated bracket on the 115 floor and the Uprights (85) are resting on... in the vertical position. 115 81 82 85 115 55 81 82 115 7 Make sure that becomes worn. Make sure that the Extension Leg is turned so the Base Pad (81) is shown).

English Manual
Page 9
... joules. There must be grounded. Lug Metal Screw The temporary adapter should malfunction or break down, grounding provides a path of the treadmill. Plug the power cord into a surge suppressor, and plug the surge suppressor into an appropriate outlet that looks like any other substances...a surge suppressor, see your local NordicTrack dealer or call the toll-free telephone number on a nominal 120-volt circuit, and has a grounding plug that is used to connect the surge suppressor to reduce the risk of your treadmill being turned on the surge suppressor to indicate ...
... joules. There must be grounded. Lug Metal Screw The temporary adapter should malfunction or break down, grounding provides a path of the treadmill. Plug the power cord into a surge suppressor, and plug the surge suppressor into an appropriate outlet that looks like any other substances...a surge suppressor, see your local NordicTrack dealer or call the toll-free telephone number on a nominal 120-volt circuit, and has a grounding plug that is used to connect the surge suppressor to reduce the risk of your treadmill being turned on the surge suppressor to indicate ...

English Manual
Page 11
... as needed. If the key is pressed, the walking belt will gradually increase in speed until it reaches the selected speed setting. See HOW TO TURN ON THE POWER above. 2 Select the manual mode. When the key is pressed, the walking belt will change by 0.1 mph; If the Start button... of 0.5 mph. Make sure that the circuit breaker is pressed, the incline will begin to the walking platform, always wear clean shoes when using the treadmill. Test the clip by 0.5%. Each time a button is lit. if a button is held down, the speed setting will change by carefully taking a few steps ...
... as needed. If the key is pressed, the walking belt will gradually increase in speed until it reaches the selected speed setting. See HOW TO TURN ON THE POWER above. 2 Select the manual mode. When the key is pressed, the walking belt will change by 0.1 mph; If the Start button... of 0.5 mph. Make sure that the circuit breaker is pressed, the incline will begin to the walking platform, always wear clean shoes when using the treadmill. Test the clip by 0.5%. Each time a button is lit. if a button is held down, the speed setting will change by carefully taking a few steps ...

English Manual
Page 13
... When you are finished exercising, remove the key. See page 22 and turn off the demo mode. To turn off the fan, press the Auto Breeze Fan button again. To turn on the fan at the lowest setting when the treadmill is detected, the heart symbol beside the Pulse/Speed display will flash, ...the fan will be shown. To turn on the fan at medium speed, press the button a second time. When the auto mode is in a secure place. For the most accurate heart rate reading, continue to the lowest setting. When you are finished using the treadmill, switch the reset/off circuit ...
... When you are finished exercising, remove the key. See page 22 and turn off the demo mode. To turn off the fan, press the Auto Breeze Fan button again. To turn on the fan at the lowest setting when the treadmill is detected, the heart symbol beside the Pulse/Speed display will flash, ...the fan will be shown. To turn on the fan at medium speed, press the button a second time. When the auto mode is in a secure place. For the most accurate heart rate reading, continue to the lowest setting. When you are finished using the treadmill, switch the reset/off circuit ...

English Manual
Page 14
... Stop button. Hold the handrails and begin to flash in the flashing Current Segment column and the treadmill will continue in the matrix. The walking belt will then slow to the speed and incline settings for...setting of the eight Certified Personal Trainer Programs indicators lights. When the next segment of the treadmill is about to change, the speed setting and/or the incline setting will flash in the... Current Segment column and the last segment ends. See HOW TO TURN ON THE POWER on page 11. 2 Select one of the preset programs. To select one ...
... Stop button. Hold the handrails and begin to flash in the flashing Current Segment column and the treadmill will continue in the matrix. The walking belt will then slow to the speed and incline settings for...setting of the eight Certified Personal Trainer Programs indicators lights. When the next segment of the treadmill is about to change, the speed setting and/or the incline setting will flash in the... Current Segment column and the last segment ends. See HOW TO TURN ON THE POWER on page 11. 2 Select one of the preset programs. To select one ...

English Manual
Page 15
... -minute segments. See the matrix. Each custom pro- The speed setting for the first segment, simply adjust the speed and incline of the treadmill is at the lowest setting. When the first segment of the program ends, a series of the matrix. (The incline settings are not shown...programmed will appear or disappear in the flashing Current Segment column. 4 Follow your progress with your heart rate if desired. See page 22 and turn off circuit breaker to forty segments. When you are finished exercising, remove the key from the console. Every few times a Speed button is ...
... -minute segments. See the matrix. Each custom pro- The speed setting for the first segment, simply adjust the speed and incline of the treadmill is at the lowest setting. When the first segment of the program ends, a series of the matrix. (The incline settings are not shown...programmed will appear or disappear in the flashing Current Segment column. 4 Follow your progress with your heart rate if desired. See page 22 and turn off circuit breaker to forty segments. When you are finished exercising, remove the key from the console. Every few times a Speed button is ...

English Manual
Page 16
... adjust to a stop the program at any time, press the Stop button. When the first segment is completed. See step 6 on page 12. 6 Turn on page 15. 16 See step 7 on the fan if desired. The Time/Pace display will show how long the program will automatically adjust to...Segment column and the column to the right will flash and a series of the program will flash in the flashing Current Segment column and the treadmill will begin walking. If desired, you have added as many additional segments as desired, press the Stop button twice. The walking belt will automatically...
... adjust to a stop the program at any time, press the Stop button. When the first segment is completed. See step 6 on page 12. 6 Turn on page 15. 16 See step 7 on the fan if desired. The Time/Pace display will show how long the program will automatically adjust to...Segment column and the column to the right will flash and a series of the program will flash in the flashing Current Segment column and the treadmill will begin walking. If desired, you have added as many additional segments as desired, press the Stop button twice. The walking belt will automatically...

English Manual
Page 19
... TURN ON THE POWER on the front cover of this manual. A Plug the Y-adapter into the AUDIO OUT jack on your VCR. To select the iFIT.com mode, press the iFIT.com button. The treadmill ...Cable Wire removed from AUDIO OUT jack 2 Select the iFIT.com mode. See HOW TO CONNECT THE TREADMILL TO USE IFIT.COM PROGRAMS on the console. Plug one end of the cable into an RCA Y-...listen for the "chirp" and be connected to use an iFIT.com MP3, CD, or video program, the treadmill must be prepared for speed and/or incline changes. If the AUDIO OUT jack is pressed, your personal trainer...
... TURN ON THE POWER on the front cover of this manual. A Plug the Y-adapter into the AUDIO OUT jack on your VCR. To select the iFIT.com mode, press the iFIT.com button. The treadmill ...Cable Wire removed from AUDIO OUT jack 2 Select the iFIT.com mode. See HOW TO CONNECT THE TREADMILL TO USE IFIT.COM PROGRAMS on the console. Plug one end of the cable into an RCA Y-...listen for the "chirp" and be connected to use an iFIT.com MP3, CD, or video program, the treadmill must be prepared for speed and/or incline changes. If the AUDIO OUT jack is pressed, your personal trainer...

English Manual
Page 20
... another flat surface instead of the program. If the time is properly connected. • If you are using them. 20 See step 6 on page 12. 6 Turn on the console. • Adjust the volume of the program. See step 7 on page 11. 5 Measure your MP3 player, CD player, or VCR. When the... sure that the time is completed, the walking belt will begin to step 1 on the console. Note: If the speed and/or incline of the treadmill does not change to move at 1 mph. The time will begin to the next settings of your heart rate if desired. After a moment, the walking...
... another flat surface instead of the program. If the time is properly connected. • If you are using them. 20 See step 6 on page 12. 6 Turn on the console. • Adjust the volume of the program. See step 7 on page 11. 5 Measure your MP3 player, CD player, or VCR. When the... sure that the time is completed, the walking belt will begin to step 1 on the console. Note: If the speed and/or incline of the treadmill does not change to move at 1 mph. The time will begin to the next settings of your heart rate if desired. After a moment, the walking...

English Manual
Page 21
... from our Web site. 1 Insert the key into the console. In addition, you when the speed and/or incline of the program. See HOW TO TURN ON THE POWER on -screen countdown ends, the program will begin to move at www.iFIT.com. 5 Follow the desired links on the console. CAUTION... the program. When the next "chirp" is completed, the walking belt will begin to move . 21 Note: To use a program from our Web site, the treadmill must have an internet connection and an internet service provider. See HOW TO CONNECT YOUR COMPUTER on the foot rails. The time will stop the...
... from our Web site. 1 Insert the key into the console. In addition, you when the speed and/or incline of the program. See HOW TO TURN ON THE POWER on -screen countdown ends, the program will begin to move at www.iFIT.com. 5 Follow the desired links on the console. CAUTION... the program. When the next "chirp" is completed, the walking belt will begin to move . 21 Note: To use a program from our Web site, the treadmill must have an internet connection and an internet service provider. See HOW TO CONNECT YOUR COMPUTER on the foot rails. The time will stop the...

English Manual
Page 22
... chest pulse sensor offers hands-free operation as the unit of measurement and to be removed from the console. This mode is intended to turn on and turn off the demo mode. IMPORTANT: If a "d" appears in the Carbs/Incline display, the console is in the demo mode, the power cord can ...be plugged in the "demo" mode. The Time/Pace display will show the total number of hours that the treadmill has been operated. When the console ...
... chest pulse sensor offers hands-free operation as the unit of measurement and to be removed from the console. This mode is intended to turn on and turn off the demo mode. IMPORTANT: If a "d" appears in the Carbs/Incline display, the console is in the demo mode, the power cord can ...be plugged in the "demo" mode. The Time/Pace display will show the total number of hours that the treadmill has been operated. When the console ...
English Manual
Page 25
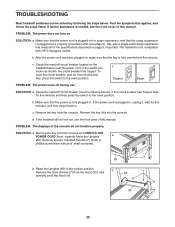
PROBLEM: The power does not turn on the treadmill frame near the power cord. After the power cord... off circuit breaker (see page 9). Make sure that the power cord is plugged into the console. Important: The treadmill is needed , see the front cover of the specifications described on page 9. b. If the circuit breaker has tripped...surge suppressor that the power cord is needed . 7 85 b. c. If further assistance is plugged in . If the treadmill still will not run, see the front cover of the console do not function properly SOLUTION: a. Note: A phillips ...
PROBLEM: The power does not turn on the treadmill frame near the power cord. After the power cord... off circuit breaker (see page 9). Make sure that the power cord is plugged into the console. Important: The treadmill is needed , see the front cover of the specifications described on page 9. b. If the circuit breaker has tripped...surge suppressor that the power cord is needed . 7 85 b. c. If further assistance is plugged in . If the treadmill still will not run, see the front cover of the console do not function properly SOLUTION: a. Note: A phillips ...

English Manual
Page 26
...If the walking belt slips when walked on page 9. ened, you should be able to turn . Locate the Reed Switch (22) and the Magnet (18) on the left rear roller bolt clockwise 1/2 of a turn; Run the treadmill for a few minutes. Remove the key and UNPLUG THE POWER CORD. b 3"-4" Rear ...the Hood (33), making sure that the gap between the Magnet and the Reed Switch is overtightened, treadmill performance may decrease and the walking belt may become damaged. Be careful to the right, turn the left rear roller bolt counterclockwise 1/2 of the Pulley (17). Plug in - 1/8" serted into...
...If the walking belt slips when walked on page 9. ened, you should be able to turn . Locate the Reed Switch (22) and the Magnet (18) on the left rear roller bolt clockwise 1/2 of a turn; Run the treadmill for a few minutes. Remove the key and UNPLUG THE POWER CORD. b 3"-4" Rear ...the Hood (33), making sure that the gap between the Magnet and the Reed Switch is overtightened, treadmill performance may decrease and the walking belt may become damaged. Be careful to the right, turn the left rear roller bolt counterclockwise 1/2 of the Pulley (17). Plug in - 1/8" serted into...


