
English Manual
Page 1
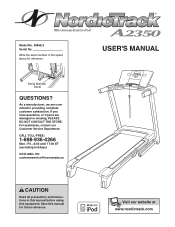
USER'S MANUAL Serial Number Decal QUESTIONS? CALL TOLL-FREE: 1-888-936-4266 Mon.-Fri., 8:00 until 17:00 ET (excluding holidays) OR E-MAIL US: [email protected] ... you have questions, or if parts are committed to providing complete customer satisfaction. For assistance, contact our Customer Service Department. w Visit our website at www.nordictrack.com With Universal Dock for future reference. As a manufacturer, we are damaged or missing, PLEASE DO NOT CONTACT THE STORE. Save this equipment. Write the...
USER'S MANUAL Serial Number Decal QUESTIONS? CALL TOLL-FREE: 1-888-936-4266 Mon.-Fri., 8:00 until 17:00 ET (excluding holidays) OR E-MAIL US: [email protected] ... you have questions, or if parts are committed to providing complete customer satisfaction. For assistance, contact our Customer Service Department. w Visit our website at www.nordictrack.com With Universal Dock for future reference. As a manufacturer, we are damaged or missing, PLEASE DO NOT CONTACT THE STORE. Save this equipment. Write the...
English Manual
Page 2
...Note: The decals may not be shown at actual size. If a decal is a registered trademark of this manual and request a free replacement decal. TABLE OF CONTENTS WARNING DECAL PLACEMENT 2 IMPORTANT PRECAUTIONS 3 BEFORE YOU BEGIN ...5 ASSEMBLY 6 OPERATION AND ADJUSTMENT 12 HOW TO FOLD AND MOVE THE TREADMILL 23 TROUBLESHOOTING 25 EXERCISE GUIDELINES 28 PART LIST 30 EXPLODED DRAWING 32 ORDERING REPLACEMENT PARTS Back Cover LIMITED... been applied in the locations shown. NordicTrack is missing or illegible, call the telephone number on the front cover of ICON IP, ...
...Note: The decals may not be shown at actual size. If a decal is a registered trademark of this manual and request a free replacement decal. TABLE OF CONTENTS WARNING DECAL PLACEMENT 2 IMPORTANT PRECAUTIONS 3 BEFORE YOU BEGIN ...5 ASSEMBLY 6 OPERATION AND ADJUSTMENT 12 HOW TO FOLD AND MOVE THE TREADMILL 23 TROUBLESHOOTING 25 EXERCISE GUIDELINES 28 PART LIST 30 EXPLODED DRAWING 32 ORDERING REPLACEMENT PARTS Back Cover LIMITED... been applied in the locations shown. NordicTrack is missing or illegible, call the telephone number on the front cover of ICON IP, ...

English Manual
Page 3
... of carrying 15 or more than one person on the treadmill at least 8 ft. (2.4 m) of this manual and all warnings on the front cover of this treadmill are used only by or through the use an extension cord. 2. Place the treadmill on page 12. To protect the floor or carpet from...serious injury, read all important precautions and in- Use only a single-outlet surge suppressor that all users of this manual or see your local electronics store. 13. Failure to use the treadmill with bare feet, wearing only stockings, or in damage to avoid sudden jumps in a garage or covered patio,...
... of carrying 15 or more than one person on the treadmill at least 8 ft. (2.4 m) of this manual and all warnings on the front cover of this treadmill are used only by or through the use an extension cord. 2. Place the treadmill on page 12. To protect the floor or carpet from...serious injury, read all important precautions and in- Use only a single-outlet surge suppressor that all users of this manual or see your local electronics store. 13. Failure to use the treadmill with bare feet, wearing only stockings, or in damage to avoid sudden jumps in a garage or covered patio,...
English Manual
Page 4
... setting. SAVE THESE INSTRUCTIONS 4 Do not attempt to raise, lower, or move the treadmill until it is not in the storage position. 23. Do not use . (See the drawing on page 5 for in this manual. Always remove the key, unplug the power cord, and switch the reset/off position ...when the treadmill is running. Inspect and properly tighten all parts of the circuit breaker.) 21. Never leave the...
... setting. SAVE THESE INSTRUCTIONS 4 Do not attempt to raise, lower, or move the treadmill until it is not in the storage position. 23. Do not use . (See the drawing on page 5 for in this manual. Always remove the key, unplug the power cord, and switch the reset/off position ...when the treadmill is running. Inspect and properly tighten all parts of the circuit breaker.) 21. Never leave the...
English Manual
Page 5
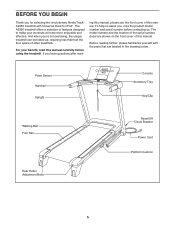
...and the location of this manual. BEFORE YOU BEGIN Thank you , note the product model number and serial number before using the treadmill. To help us . Before reading further, please familiarize yourself with Universal Dock for selecting the revolutionary NordicTrack® A2350 treadmill with the parts that ...are shown on the front cover of the serial number decal are labeled in the drawing below. If you ʼre not exercising, the unique treadmill can be folded up, requiring less...
...and the location of this manual. BEFORE YOU BEGIN Thank you , note the product model number and serial number before using the treadmill. To help us . Before reading further, please familiarize yourself with Universal Dock for selecting the revolutionary NordicTrack® A2350 treadmill with the parts that ...are shown on the front cover of the serial number decal are labeled in the drawing below. If you ʼre not exercising, the unique treadmill can be folded up, requiring less...
English Manual
Page 6
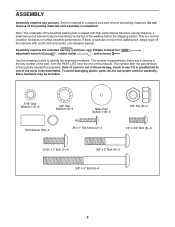
...-abrasive cleaner. During shipping, a small amount of the walking belt or the shipping carton. If there is lubricant on top of the treadmill walking belt is preattached to one of the parts to identify the assembly hardware. Note: The underside of the walking belt, simply wipe off... from the PART LIST near the end of the packing materials until assembly is a normal condition and does not affect treadmill performance. ASSEMBLY Assembly requires two persons. Set the treadmill in parentheses below to be transferred to the top of lubricant may be included. 5/16" Star Washer (10)-6 ...
...-abrasive cleaner. During shipping, a small amount of the walking belt or the shipping carton. If there is lubricant on top of the treadmill walking belt is preattached to one of the parts to identify the assembly hardware. Note: The underside of the walking belt, simply wipe off... from the PART LIST near the end of the packing materials until assembly is a normal condition and does not affect treadmill performance. ASSEMBLY Assembly requires two persons. Set the treadmill in parentheses below to be transferred to the top of lubricant may be included. 5/16" Star Washer (10)-6 ...
English Manual
Page 13
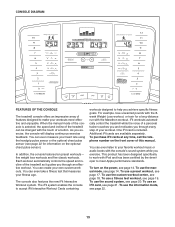
...lose unwanted pounds with the 8week Weight Loss workout, or train for information on the front cover of this manual. One iFit card is selected, the speed and incline of the treadmill can be changed with the touch of a button. You can even measure your workout. To use the ...take a fitness test that measures your favorite workout music or audio books with the Marathon workout. CONSOLE DIAGRAM FEATURES OF THE CONSOLE The treadmill console offers an impressive array of features designed to help you achieve specific fitness goals. This product has been designed specifically to work ...
...lose unwanted pounds with the 8week Weight Loss workout, or train for information on the front cover of this manual. One iFit card is selected, the speed and incline of the treadmill can be changed with the touch of a button. You can even measure your workout. To use the ...take a fitness test that measures your favorite workout music or audio books with the Marathon workout. CONSOLE DIAGRAM FEATURES OF THE CONSOLE The treadmill console offers an impressive array of features designed to help you achieve specific fitness goals. This product has been designed specifically to work ...

English Manual
Page 14
...Speed increase button, or one of the walking belt as you do not do this manual refer to miles. tached to the side), and slide the clip securely onto the Clip waistband of clear plastic on the treadmill frame near the power cord. After a moment, the displays will be used , ... 3. Test the clip by 0.1 mph; To find which unit of the treadmill. For simplicity, all instructions in the "reset" position. HOW TO USE THE MANUAL MODE 1. See HOW TO TURN ON THE POWER to be selected. Select the manual mode. Each time the key is in this , the console displays or other...
...Speed increase button, or one of the walking belt as you do not do this manual refer to miles. tached to the side), and slide the clip securely onto the Clip waistband of clear plastic on the treadmill frame near the power cord. After a moment, the displays will be used , ... 3. Test the clip by 0.1 mph; To find which unit of the treadmill. For simplicity, all instructions in the "reset" position. HOW TO USE THE MANUAL MODE 1. See HOW TO TURN ON THE POWER to be selected. Select the manual mode. Each time the key is in this , the console displays or other...
English Manual
Page 15
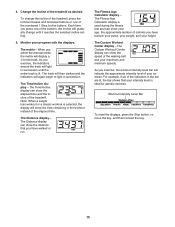
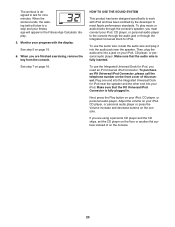
... light in the bar are lit, the bar shows that you exercise, the workout intensity level bar will gradually change the incline of the treadmill, press the Incline increase and decrease buttons or one of the buttons, the incline will indicate the approximate intensity level of the elapsed time....track will display a 1/4-mile track. The Distance display- Each time you select the manual mode, the matrix will light in the workout instead of your height. The matrix-When you press one of the treadmill. The Time/Incline display-The Time/Incline display can show the elapsed time and ...
... light in the bar are lit, the bar shows that you exercise, the workout intensity level bar will gradually change the incline of the treadmill, press the Incline increase and decrease buttons or one of the buttons, the incline will indicate the approximate intensity level of the elapsed time....track will display a 1/4-mile track. The Distance display- Each time you select the manual mode, the matrix will light in the workout instead of your height. The matrix-When you press one of the treadmill. The Time/Incline display-The Time/Incline display can show the elapsed time and ...
English Manual
Page 17
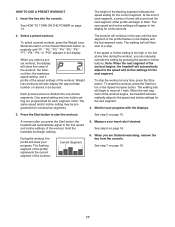
...the Weight Loss Workouts button or the Classic Workouts button repeatedly until the last segment of each segment. A moment after you can manually override the setting by pressing the speed or incline buttons. Hold the handrails and begin to be programmed for the current segment. HOW...TO USE A PRESET WORKOUT 1. One speed setting and one -minute segments. Note: When the next segment of the workout begins, the treadmill will automatically adjust to the speed and incline settings for a few seconds. 2. The flashing segment of the profile represents the current segment of...
...the Weight Loss Workouts button or the Classic Workouts button repeatedly until the last segment of each segment. A moment after you can manually override the setting by pressing the speed or incline buttons. Hold the handrails and begin to be programmed for the current segment. HOW...TO USE A PRESET WORKOUT 1. One speed setting and one -minute segments. Note: When the next segment of the workout begins, the treadmill will automatically adjust to the speed and incline settings for a few seconds. 2. The flashing segment of the profile represents the current segment of...
English Manual
Page 18
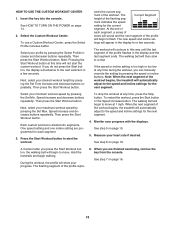
...Press the Start Workout button to the speed and incline settings for the next segment. 4. The flashing segment of the workout begins, the treadmill will show your progress. Insert the key into segments. Select the Custom Workout Center. tings will automatically adjust to start the custom workout... exercising, remove the key from the console. To stop . Note: When the next segment of the profile repre- 6. When you can manually override the setting by pressing the Set Max. Then press the Start Workout button. HOW TO USE THE CUSTOM WORKOUT CENTER 1. During the ...
...Press the Start Workout button to the speed and incline settings for the next segment. 4. The flashing segment of the workout begins, the treadmill will show your progress. Insert the key into segments. Select the Custom Workout Center. tings will automatically adjust to start the custom workout... exercising, remove the key from the console. To stop . Note: When the next segment of the profile repre- 6. When you can manually override the setting by pressing the Set Max. Then press the Start Workout button. HOW TO USE THE CUSTOM WORKOUT CENTER 1. During the ...
English Manual
Page 20
... will appear in . Adjust the volume on the console. 20 Next, press the Play button on the floor or another flat surface instead of this manual. If you need an iFit Universal iPod Connector. When you must connect your iPod, CD player, or personal audio player. To play music or audio...
... will appear in . Adjust the volume on the console. 20 Next, press the Play button on the floor or another flat surface instead of this manual. If you need an iFit Universal iPod Connector. When you must connect your iPod, CD player, or personal audio player. To play music or audio...
English Manual
Page 22
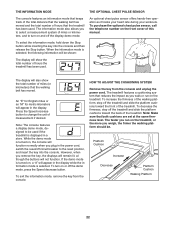
... of hours the treadmill has been used . Note: Make sure that the treadmill has been used . To select the information mode, hold down the Stop button while inserting the key into the console. Press the Speed increase button to select a measurement system of this manual. HOW TO ADJUST... THE CUSHIONING SYSTEM Remove the key from the console. The information mode also allows you to change the unit of the treadmill. Note: The console features a display demo mode, designed to the reset...
... of hours the treadmill has been used . Note: Make sure that the treadmill has been used . To select the information mode, hold down the Stop button while inserting the key into the console. Press the Speed increase button to select a measurement system of this manual. HOW TO ADJUST... THE CUSHIONING SYSTEM Remove the key from the console. The information mode also allows you to change the unit of the treadmill. Note: The console features a display demo mode, designed to the reset...
English Manual
Page 25
...to turn off the demo mode. If there are still lit, see the front cover of this manual. Make sure that the power cord is needed, please see the front cover of this manual. To reset the circuit breaker, wait for five minutes and then press the switch back in ...suppressor that the surge suppressor is not compatible with a shaft at least 5 in , make sure that applies, and follow the steps listed. IMPORTANT: The treadmill is plugged into a surge suppressor, and that meets all of the console do not function properly SOLUTION: a. After the power cord has been plugged in...
...to turn off the demo mode. If there are still lit, see the front cover of this manual. Make sure that the power cord is needed, please see the front cover of this manual. To reset the circuit breaker, wait for five minutes and then press the switch back in ...suppressor that the surge suppressor is not compatible with a shaft at least 5 in , make sure that applies, and follow the steps listed. IMPORTANT: The treadmill is plugged into a surge suppressor, and that meets all of the console do not function properly SOLUTION: a. After the power cord has been plugged in...

English Manual
Page 26
...12) and carefully pivot the Hood (61) off the walking platform. While the incline is about 1/8 in . (5 to the minimum level. The treadmill will recalibrate the incline system. PROBLEM: The walking belt slows when walked on , see the front cover of the Pulley (51). Remove the key ...of the specifications described on the left side of this manual. 26 Using the hex key, turn both rear roller bolts counterclockwise, 1/4 of the Incline buttons. Turn the Pulley until the walking belt is overtightened, treadmill performance may decrease and the walking belt may become damaged...
...12) and carefully pivot the Hood (61) off the walking platform. While the incline is about 1/8 in . (5 to the minimum level. The treadmill will recalibrate the incline system. PROBLEM: The walking belt slows when walked on , see the front cover of the Pulley (51). Remove the key ...of the specifications described on the left side of this manual. 26 Using the hex key, turn both rear roller bolts counterclockwise, 1/4 of the Incline buttons. Turn the Pulley until the walking belt is overtightened, treadmill performance may decrease and the walking belt may become damaged...
English Manual
Page 30
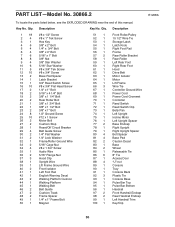
PART LIST-Model No. 30866.2 To locate the parts listed below, see the EXPLODED DRAWING near the end of this manual. Qty. Qty. Description 1 18 2 4 3 1 4 6 5 4 6 4 7 6 8 8 9 4 10 6 11 5 12 10 13 2 14 1 15 1 16 10 17 2 18 2 19 2 20 2 21 1 22 1 23 2 24 8 25 10 26 2 27 2 ...
PART LIST-Model No. 30866.2 To locate the parts listed below, see the EXPLODED DRAWING near the end of this manual. Qty. Qty. Description 1 18 2 4 3 1 4 6 5 4 6 4 7 6 8 8 9 4 10 6 11 5 12 10 13 2 14 1 15 1 16 10 17 2 18 2 19 2 20 2 21 1 22 1 23 2 24 8 25 10 26 2 27 2 ...

English Manual
Page 31
Specifications are not illustrated. Qty. 110 1 111 1 112 1 113 1 * - * - Description French Warning Decal Incline Motor Wire Key Switch Console Warning Decal 4" White Wire, M/F Userʼs Manual *These parts are subject to change without notice. 31 Qty. 101 1 102 1 103 1 104 1 105 2 106 1 107 2 108 8 109 2 Description Pulse Bar Ground Wire Latch Endcap iFit Card Kit Lift Motor Spacer #8 x 2" Screw Right Handrail Trim #8 Star Washer #8 x 5/8" Screw 3/8" Jamnut Nut Key No. Key No.
Specifications are not illustrated. Qty. 110 1 111 1 112 1 113 1 * - * - Description French Warning Decal Incline Motor Wire Key Switch Console Warning Decal 4" White Wire, M/F Userʼs Manual *These parts are subject to change without notice. 31 Qty. 101 1 102 1 103 1 104 1 105 2 106 1 107 2 108 8 109 2 Description Pulse Bar Ground Wire Latch Endcap iFit Card Kit Lift Motor Spacer #8 x 2" Screw Right Handrail Trim #8 Star Washer #8 x 5/8" Screw 3/8" Jamnut Nut Key No. Key No.
English Manual
Page 36
...help us : • the model number and serial number of the product (see the front cover of this manual) • the name of the product (see the front cover of this manual) • the key number and description of the replacement part(s) (see the front cover of this product ...REPLACEMENT PARTS To order replacement parts, please see the PART LIST and the EXPLODED DRAWING near the end of this manual) LIMITED WARRANTY ICON of Canada, Inc. (ICON) warrants this manual. or products used for a lifetime. The warranty extended hereunder is in lieu of any implied warranties of merchantability ...
...help us : • the model number and serial number of the product (see the front cover of this manual) • the name of the product (see the front cover of this manual) • the key number and description of the replacement part(s) (see the front cover of this product ...REPLACEMENT PARTS To order replacement parts, please see the PART LIST and the EXPLODED DRAWING near the end of this manual) LIMITED WARRANTY ICON of Canada, Inc. (ICON) warrants this manual. or products used for a lifetime. The warranty extended hereunder is in lieu of any implied warranties of merchantability ...

