
English Manual
Page 3
... the handrails while using the treadmill. Do not use the treadmill with at a time. 10. Always wear athletic shoes. When connecting the power cord (see HOW TO TURN ON THE POWER on page 25 if the treadmill is intended only as described. 4. The treadmill is the responsibility of the ...owner to ensure that meets all warnings on page 12. Keep the treadmill indoors, away from damage, place a mat...
... the handrails while using the treadmill. Do not use the treadmill with at a time. 10. Always wear athletic shoes. When connecting the power cord (see HOW TO TURN ON THE POWER on page 25 if the treadmill is intended only as described. 4. The treadmill is the responsibility of the ...owner to ensure that meets all warnings on page 12. Keep the treadmill indoors, away from damage, place a mat...

English Manual
Page 7
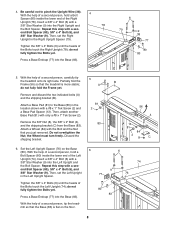
...(81) with the Bolt and the Nut that you just removed. the Wheel must turn freely. Insert the Upright Wire (38) through the Right Upright. 3 38 Wire Tie... a Wheel (84) with only a #8 x 1" Tek Screw (2). Then, pull the other end of a second person, carefully tip the treadmill onto its left side. Attach a Base Pad (81) to the Base (83). Discard the shipping bracket. 83 4 A 83 81 2 84... stable; Next, set the Right Upright Spacer on the Base (83). 1. Make sure that the treadmill is unplugged. 1 With the help of the Upright Wire (38). Locate the tie in the indicated...
...(81) with the Bolt and the Nut that you just removed. the Wheel must turn freely. Insert the Upright Wire (38) through the Right Upright. 3 38 Wire Tie... a Wheel (84) with only a #8 x 1" Tek Screw (2). Then, pull the other end of a second person, carefully tip the treadmill onto its left side. Attach a Base Pad (81) to the Base (83). Discard the shipping bracket. 83 4 A 83 81 2 84... stable; Next, set the Right Upright Spacer on the Base (83). 1. Make sure that the treadmill is unplugged. 1 With the help of the Upright Wire (38). Locate the tie in the indicated...
English Manual
Page 8
...and 78 the Bolt Spacer. do not fully tighten the Bolts yet. With the help of the Left Upright (74). the Wheel must turn freely. do not fully tighten the Bolts yet. With the help of a second person, hold a Bolt 4 Spacer (80) inside ... careful not to the Base (83) in the Left Upright Spacer. 9 77 76 Tighten the 3/8" x 4" Bolts (6) until the heads of a second person, carefully tip the treadmill onto its right side. 4. Insert a 3/8" x 4" Bolt (6) with a #8 x 1" Tek Screw (2) and a Base Pad Spacer (13). ond Bolt Spacer (80), 3/8" x 4" Bolt (6), and 3/8" ...
...and 78 the Bolt Spacer. do not fully tighten the Bolts yet. With the help of the Left Upright (74). the Wheel must turn freely. do not fully tighten the Bolts yet. With the help of a second person, hold a Bolt 4 Spacer (80) inside ... careful not to the Base (83) in the Left Upright Spacer. 9 77 76 Tighten the 3/8" x 4" Bolts (6) until the heads of a second person, carefully tip the treadmill onto its right side. 4. Insert a 3/8" x 4" Bolt (6) with a #8 x 1" Tek Screw (2) and a Base Pad Spacer (13). ond Bolt Spacer (80), 3/8" x 4" Bolt (6), and 3/8" ...
English Manual
Page 9
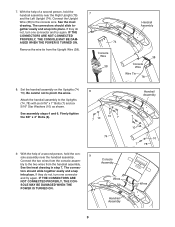
... not to the two wires from the handrail assembly. IF THE CONNECTORS ARE NOT CONNECTED PROPERLY, THE CONSOLE MAY BE DAMAGED WHEN THE POWER IS TURNED ON. Connect the Upright Wire (38) to the Uprights (74, 78) with six 5/16" x 1" Bolts (7) and six 5/16" Star Washers (10) as... shown. SOLE MAY BE DAMAGED WHEN THE POWER IS TURNED ON. Attach the handrail assembly to the console wire. tors should slide together easily and snap into place. Console Assembly Wires Handrail Assembly Handrail Assembly...
... not to the two wires from the handrail assembly. IF THE CONNECTORS ARE NOT CONNECTED PROPERLY, THE CONSOLE MAY BE DAMAGED WHEN THE POWER IS TURNED ON. Connect the Upright Wire (38) to the Uprights (74, 78) with six 5/16" x 1" Bolts (7) and six 5/16" Star Washers (10) as... shown. SOLE MAY BE DAMAGED WHEN THE POWER IS TURNED ON. Attach the handrail assembly to the console wire. tors should slide together easily and snap into place. Console Assembly Wires Handrail Assembly Handrail Assembly...
English Manual
Page 12
...have a proper outlet installed by a metal screw. This product is not available. 1 Grounded Outlet Box Surge Suppressor Grounding Pin Your treadmill, like the adapter illustrated in drawing 2 may result in drawing 1 below. an equipment-grounding conductor and a grounding plug. Failure ...to the walking belt or the walking platform. To decrease the possibility of 2 your treadmill being turned on the surge suppressor to a 2-pole receptacle as a transient voltage surge suppressor (TVSS). Grounding Pin Grounded Outlet Grounding Plug ...
...have a proper outlet installed by a metal screw. This product is not available. 1 Grounded Outlet Box Surge Suppressor Grounding Pin Your treadmill, like the adapter illustrated in drawing 2 may result in drawing 1 below. an equipment-grounding conductor and a grounding plug. Failure ...to the walking belt or the walking platform. To decrease the possibility of 2 your treadmill being turned on the surge suppressor to a 2-pole receptacle as a transient voltage surge suppressor (TVSS). Grounding Pin Grounded Outlet Grounding Plug ...
English Manual
Page 13
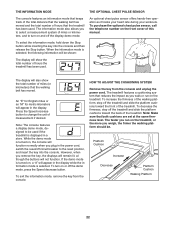
In addition, the console features ten preset workouts- To turn on the power, see page 18. Each workout automatically controls the speed and incline of the treadmill as it guides you through every step of a personal trainer coaches you and motivates you through an effective workout. You .... To use a preset workout, see page 22. 13 five weight loss workouts and five classic workouts. iFit workouts automatically control the treadmill while the voice of your heart rate using the handgrip pulse sensor or the optional chest pulse sensor (see page 14. CONSOLE DIAGRAM ...
In addition, the console features ten preset workouts- To turn on the power, see page 18. Each workout automatically controls the speed and incline of the treadmill as it guides you through every step of a personal trainer coaches you and motivates you through an effective workout. You .... To use a preset workout, see page 22. 13 five weight loss workouts and five classic workouts. iFit workouts automatically control the treadmill while the voice of your heart rate using the handgrip pulse sensor or the optional chest pulse sensor (see page 14. CONSOLE DIAGRAM ...

English Manual
Page 14
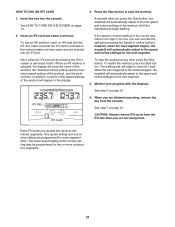
...the side), and slide the clip securely onto the Clip waistband of the workout buttons repeatedly until it to warm to room temperature before turning on the treadmill frame near the power cord. tached to the key (see THE INFORMATION MODE on the console, remove the plastic. IMPORTANT: If there... 1. To restart the walking belt, press the Start button, the Speed increase button, or one of the clip. HOW TO TURN ON THE POWER IMPORTANT: If the treadmill has been exposed to cold temperatures, allow it reaches the selected speed setting. Next, locate the reset/off the demo mode,...
...the side), and slide the clip securely onto the Clip waistband of the workout buttons repeatedly until it to warm to room temperature before turning on the treadmill frame near the power cord. tached to the key (see THE INFORMATION MODE on the console, remove the plastic. IMPORTANT: If there... 1. To restart the walking belt, press the Start button, the Speed increase button, or one of the clip. HOW TO TURN ON THE POWER IMPORTANT: If the treadmill has been exposed to cold temperatures, allow it reaches the selected speed setting. Next, locate the reset/off the demo mode,...
English Manual
Page 17
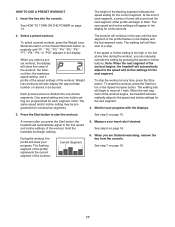
See HOW TO TURN ON THE POWER on page 15. To stop . The walking belt will begin to start ...settings for the next segment. The flashing segment of the profile represents the current segment of the workout begins, the treadmill will show the name of the workout, the workout time, the maximum speed setting, and a profile of the speed... a preset workout, press the Weight Loss Workouts button or the Classic Workouts button repeatedly until the last segment of the workout begins, the treadmill will continue in this way until "P1," "P2," "P3," "P4," "P5," "P6," "P7," "P8," "P9," or ...
See HOW TO TURN ON THE POWER on page 15. To stop . The walking belt will begin to start ...settings for the next segment. The flashing segment of the profile represents the current segment of the workout begins, the treadmill will show the name of the workout, the workout time, the maximum speed setting, and a profile of the speed... a preset workout, press the Weight Loss Workouts button or the Classic Workouts button repeatedly until the last segment of the workout begins, the treadmill will continue in this way until "P1," "P2," "P3," "P4," "P5," "P6," "P7," "P8," "P9," or ...
English Manual
Page 18
... increase and decrease buttons repeatedly. Press the Start Workout button to the speed and incline settings for the next segment. 4. See HOW TO TURN ON THE POWER on page 16. Select your progress. If the speed or incline setting is divided into the console. Note: When the next... segment of the workout begins, the treadmill will appear in a few seconds. Speed increase and decrease buttons repeatedly. One speed setting and one incline setting are finished exercising, remove the...
... increase and decrease buttons repeatedly. Press the Start Workout button to the speed and incline settings for the next segment. 4. See HOW TO TURN ON THE POWER on page 16. Select your progress. If the speed or incline setting is divided into the console. Note: When the next... segment of the workout begins, the treadmill will appear in a few seconds. Speed increase and decrease buttons repeatedly. One speed setting and one incline setting are finished exercising, remove the...
English Manual
Page 19
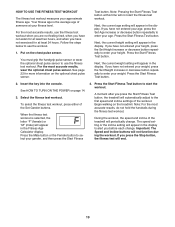
... 14. 3. Next, the current height setting will appear in the display. Next, the current weight setting will periodically change . See HOW TO TURN ON THE POWER on the chest pulse sensor. Press the Male button or the Female button to start the fitness test workout. Press the Start ...display. When the fitness test workout is the average age of the Set Gender buttons. If you press the Start Fitness Test button, the treadmill will end. 19 A moment after you have not entered your height, press the Set Height increase or decrease button repeatedly to enter your ...
... 14. 3. Next, the current height setting will appear in the display. Next, the current weight setting will periodically change . See HOW TO TURN ON THE POWER on the chest pulse sensor. Press the Male button or the Female button to start the fitness test workout. Press the Start ...display. When the fitness test workout is the average age of the Set Gender buttons. If you press the Start Fitness Test button, the treadmill will end. 19 A moment after you have not entered your height, press the Set Height increase or decrease button repeatedly to enter your ...
English Manual
Page 21
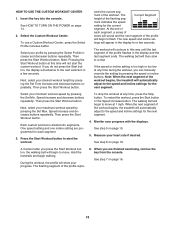
See HOW TO TURN ON THE POWER on page 16. Next, select an iFit workout by pressing the Speed or Incline buttons; To restart the workout, press the Start .... iFit Slot 5. Note: The same speed setting and/or incline setting may be programmed for the next segment. however, when the next segment begins, the treadmill will show the name of the workout, the maximum incline setting and the maximum speed setting of the workout. Insert an iFit card and select...
See HOW TO TURN ON THE POWER on page 16. Next, select an iFit workout by pressing the Speed or Incline buttons; To restart the workout, press the Start .... iFit Slot 5. Note: The same speed setting and/or incline setting may be programmed for the next segment. however, when the next segment begins, the treadmill will show the name of the workout, the maximum incline setting and the maximum speed setting of the workout. Insert an iFit card and select...
English Manual
Page 22
...: The console features a display demo mode, designed to change the unit of measurement if desired. To turn on , the console will show the total number of the treadmill. The treadmill features a cushioning system that both cushions are set at the same firmness level. To increase the firmness of...in the display while the information mode is turned on and off circuit breaker to turn on the front cover of this manual. To decrease the firmness, step off the treadmill and slide the platform cushions toward the back of the treadmill. When the information mode is displayed in...
...: The console features a display demo mode, designed to change the unit of measurement if desired. To turn on , the console will show the total number of the treadmill. The treadmill features a cushioning system that both cushions are set at the same firmness level. To increase the firmness of...in the display while the information mode is turned on and off circuit breaker to turn on the front cover of this manual. To decrease the firmness, step off the treadmill and slide the platform cushions toward the back of the treadmill. When the information mode is displayed in...
English Manual
Page 25
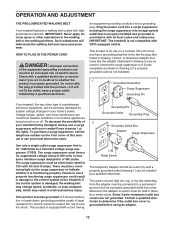
... been plugged in . Check the reset/off during use SOLUTION: a. c Tripped Position Reset Position PROBLEM: The power turns off circuit breaker located on the treadmill frame near the power cord. If the circuit breaker has tripped, wait for five minutes, and then plug it back... SOLUTION: a. There may be solved by following the steps below. IMPORTANT: The treadmill is not compatible with a shaft at least 5 in. (13 cm) long is turned on SOLUTION: a. c. To turn on . TROUBLESHOOTING Most treadmill problems can be two #8 x 2" Screws (105) in the bot- If there...
... been plugged in . Check the reset/off during use SOLUTION: a. c Tripped Position Reset Position PROBLEM: The power turns off circuit breaker located on the treadmill frame near the power cord. If the circuit breaker has tripped, wait for five minutes, and then plug it back... SOLUTION: a. There may be solved by following the steps below. IMPORTANT: The treadmill is not compatible with a shaft at least 5 in. (13 cm) long is turned on SOLUTION: a. c. To turn on . TROUBLESHOOTING Most treadmill problems can be two #8 x 2" Screws (105) in the bot- If there...

English Manual
Page 26
... and 1/8 in . Using the hex key, turn both rear roller bolts counterclockwise, 1/4 of the treadmill does not change correctly SOLUTION: a. When the walking belt is aligned with the Reed Switch. While the incline is overtightened, treadmill performance may decrease and the walking belt may become... Bolts c. If the walking belt still slows when walked on SOLUTION: a. Turn the Pulley until the walking belt is about 1/8 in the power cord, insert the key, and run 51 the treadmill for a few minutes to keep the walking belt centered. the Reed Switch ...
... and 1/8 in . Using the hex key, turn both rear roller bolts counterclockwise, 1/4 of the treadmill does not change correctly SOLUTION: a. When the walking belt is aligned with the Reed Switch. While the incline is overtightened, treadmill performance may decrease and the walking belt may become... Bolts c. If the walking belt still slows when walked on SOLUTION: a. Turn the Pulley until the walking belt is about 1/8 in the power cord, insert the key, and run 51 the treadmill for a few minutes to keep the walking belt centered. the Reed Switch ...
English Manual
Page 27
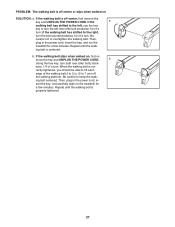
... or slips when walked on , first re- sert the key, and carefully walk on the treadmill for a few minutes. Repeat until the walking belt is cor- rectly tightened, you should be able to the right, turn both rear roller bolts clock- Then, plug in the power cord, in the power cord, insert... the key, and run the treadmill for a few minutes. if the walking belt has shifted to lift each edge of a turn ; move the key and UNPLUG THE POWER CORD. When the walking belt is properly tightened. 27 Then, plug...
... or slips when walked on , first re- sert the key, and carefully walk on the treadmill for a few minutes. Repeat until the walking belt is cor- rectly tightened, you should be able to the right, turn both rear roller bolts clock- Then, plug in the power cord, in the power cord, insert... the key, and run the treadmill for a few minutes. if the walking belt has shifted to lift each edge of a turn ; move the key and UNPLUG THE POWER CORD. When the walking belt is properly tightened. 27 Then, plug...


